Image Analysis 4.0 enables developers to build custom models leveraging the few-shot learning capabilities of Microsoft’s Florence foundation model. In this exercise, you use Vision Studio to create and train a custom object detection model capable of identifying and locating three classes of fruit (apple, banana, and orange) within an image.
Note: This lab is the second exercise belonging to the module Explore Cognitive Services for Vision. If you have not completed the first exercise, please follow these instructions to complete the items under Provision Azure Resources through to Connect your Cognitive Services Resource to Vision Studio. Then return to this exercise and start from the beginning to complete it.
Create a custom model training project
In this task, you create a new training project for a custom object detection model in Vision Studio.
-
In a web browser, navigate to Vision Studio.
-
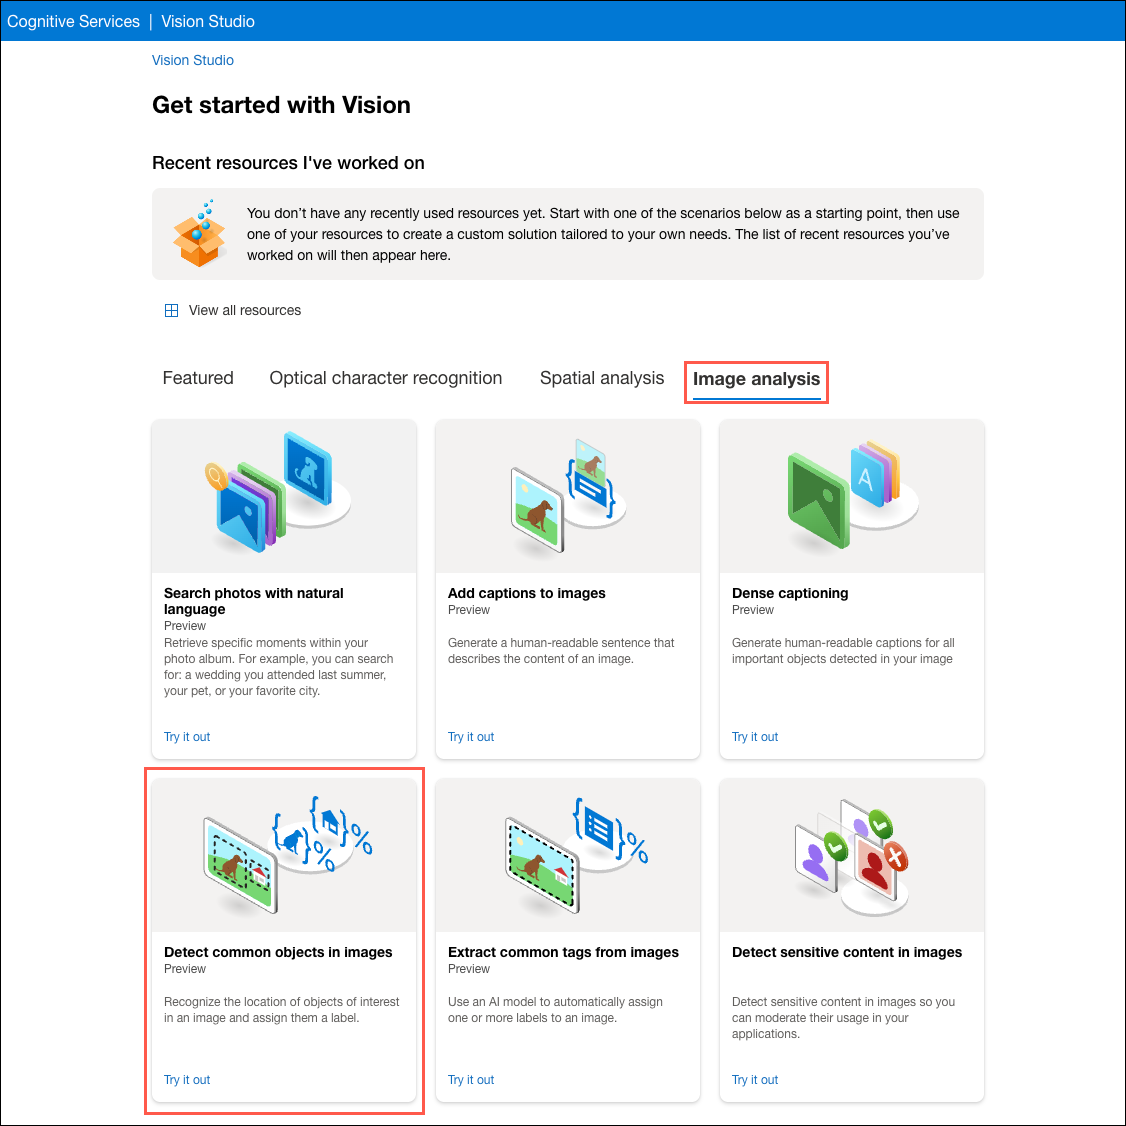
From the Vision Studio home page, select the Image analysis tab, and then select the Detect common objects in images tile.
-
Ensure the acknowledgment of resource usage box under the Try it out heading is checked and that it references the Cognitive Services account you created in the Explore Image Analysis exercise.

-
Select Train a custom model under Choose the model you want to try out.

Create datasets
The first step in training a new model is to create datasets consisting of the images that will be used to train and evaluate the custom model. In the previous exercise, you added photos to blob storage containers named training-images and evaluation-images. In this task, you will reference the images in those containers to create the datasets required to train and evaluate your custom model.
-
On the Datasets used by this project page in Vision Studio, select Add new dataset on the toolbar.

-
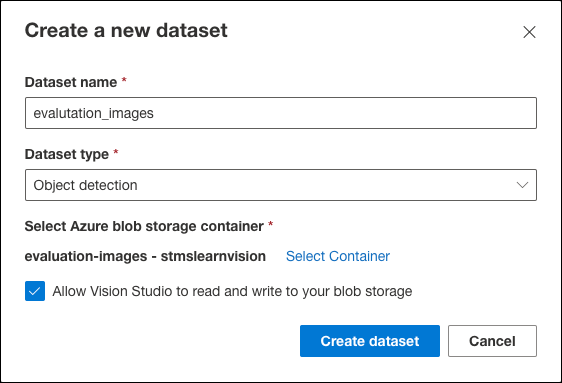
In the Create a new dataset dialog, set the following to create your evaluation dataset:
- Dataset name: Enter “evaluation_images”.
- Dataset type: Choose Object detection.
- Under Select Azure blob storage container, select Select Container and in the Please select the target Azure Blob dialog, set the following:
- Subscription: Choose your subscription for this exercise.
- Storage Account: Select the stmslearnvisionSUFFIX storage account you created for the exercises in this module.
- Blob Container: Choose the evaluation-images container.
- Select the Select container button to close the dialog.
- Check the Allow Vision Studio to read and write to your blob storage box.
-
Select Create dataset on the Create a new dataset dialog.
Note: The
evaluation_imagesdataset includes a pre-generated COCO file. This file will eliminate the time required to manually label the evaluation images from this exercise. In a real-world scenario, you must create an Azure Machine Learning data-labeling project for the evaluation images and tag your photos to generate the required COCO file. -
On the evaluation_images dataset page, select Add COCO file under the Import COCO file for labeled data header.

-
In the Import COCO file dialog, choose the Import COCO file from a Blob Container option under Import method select the
eval-labels.jsonfile from the COCO file dropdown, then select Import and add COCO file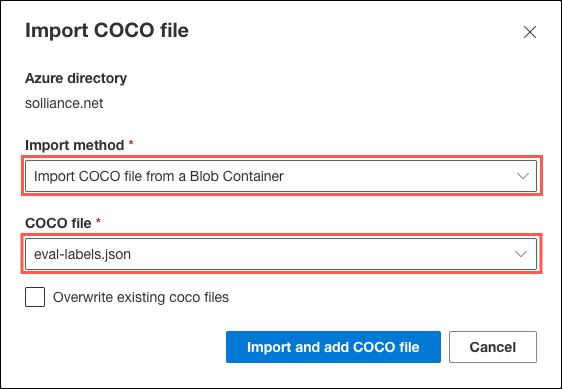
-
Next, you will create a dataset for your training images. Select Datasets in the left-hand menu to return to the datasets page, and select Add new dataset on the toolbar.

-
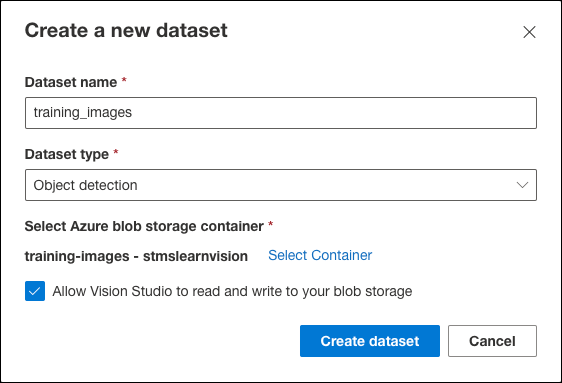
In the Create a new dataset dialog, set the following:
- Dataset name: Enter “training_images”.
- Dataset type: Choose Object detection.
- Under Select Azure blob storage container, select Select Container and in the Please select the target Azure Blob dialog, set the following:
- Subscription: Choose your subscription for this exercise.
- Storage Account: Select the stmslearnvisionSUFFIX storage account you created for the exercises in this module.
- Blob Container: Choose the training-images container.
- Select the Select container button to close the dialog.
- Check the Allow Vision Studio to read and write to your blob storage box.
-
Select Create dataset on the Create a new dataset dialog.
Note: Unlike the
evaluation_imagesdataset, you will use an Azure Machine Learning data-labeling project to label your training images and create a COCO file.
Create an Azure Machine Learning data-labeling project
COCO files are used to convey the labeling information associated with your images. The easiest way to generate a COCO file is to create an Azure Machine Learning data-labeling project. In this task, you will use Vision Studio to create an Azure Machine Learning workspace and set up a data-labeling workflow.
Note: Along with other Vision capabilities, Image Analysis 4.0 model customization is in public preview. The product team would like to hear from users about the experience. If you have comments about the Azure ML data-labeling project, you can submit feedback here.
-
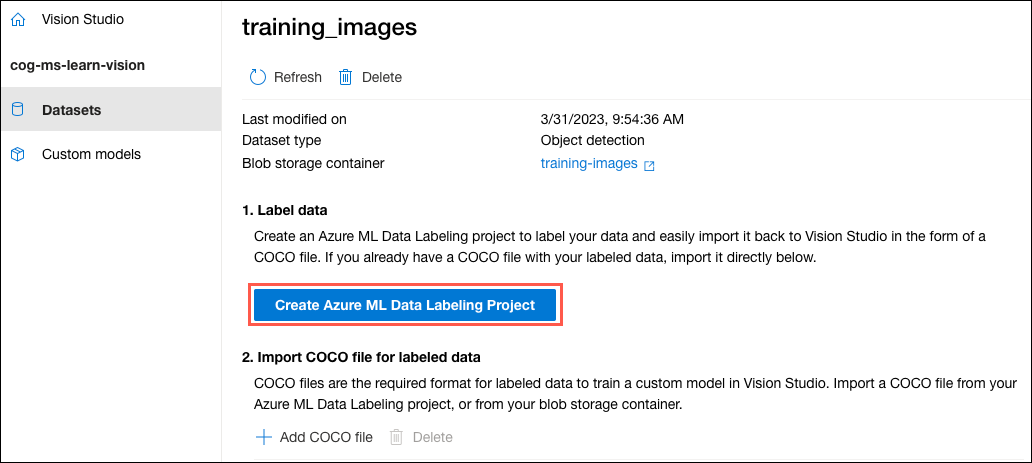
On the training_images dataset page in Vision Studio, select Create Azure ML Data Labeling Project.
-
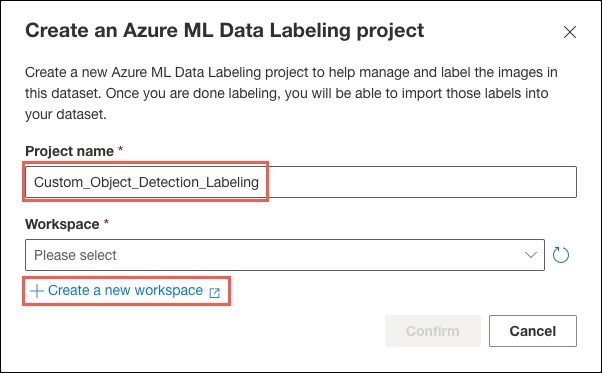
On the Create an Azure ML Data Labeling Project dialog, enter “Custom_Object_Detection_Labeling” and then select Create a new workspace.
-
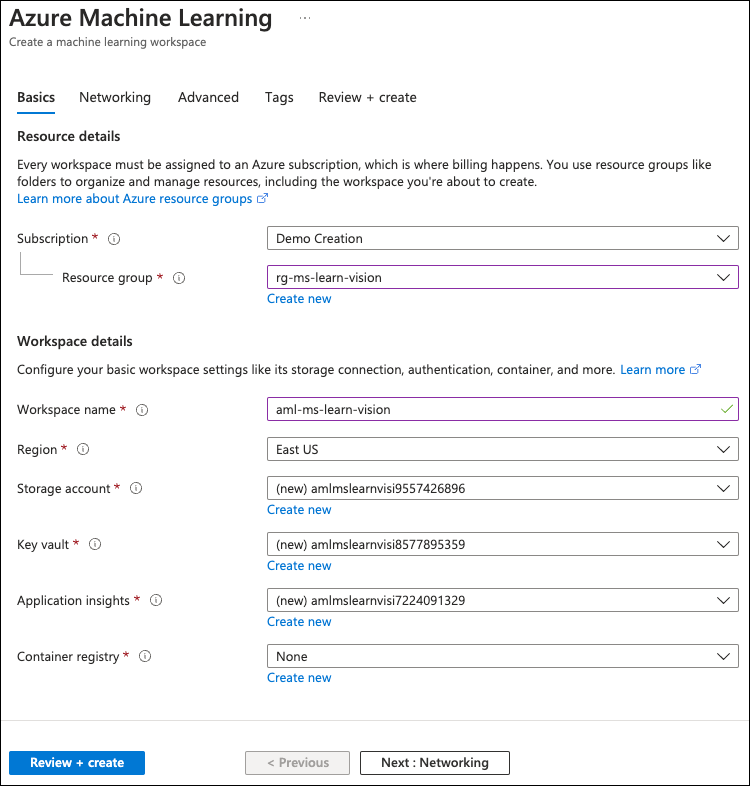
In the new Azure portal tab that opens, enter the following:
Resource details:
- Subscription: Select the subscription you are using for resources in this exercise.
- Resource group: Select the
rg-ms-learn-visionresource group you created in the previous exercise.
Workspace details:
- Workspace name: Enter a name, such as
aml-ms-learn-vision. - Region: Select East US.
- Storage account: Accept the default name for a new storage account.
- Key vault: Accept the default name for a new key vault.
- Application insights: Accept the default name for an app insights instance.
- Container registry: Leave None selected.
-
Select Review + create and then select Create on the review screen to provision your AML workspace.
-
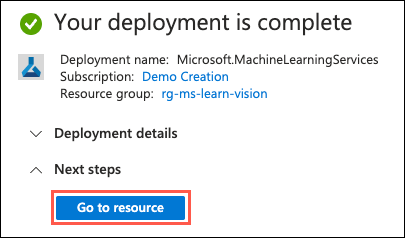
Select Go to resource when the deployment is complete.
-
Return to Vision Studio. In the Create an Azure ML Data Labeling project dialog, select the refresh button next to the Workspace dropdown, then select the new AML workspace you created.
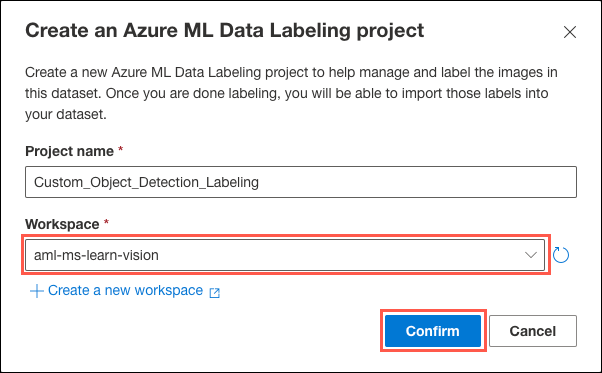
Important: If your workspace name does not appear after selecting the Refresh button next to the Workspace dropdown, wait a few minutes and try again.
-
Select Confirm on the Create an Azure ML Data Labeling Project dialog.
Label training images
Using your Azure Machine Learning data-labeling project created, you will pre-label a small subset of your images and then use the ML-assisted labeling capability of Azure Machine Learning to assign tags to the remaining photos. Image Analysis 4.0 models are especially effective at few-shot learning, enabling you to develop accurate models with less training data and reducing the work necessary to create a training dataset. ML-assisted labeling decreases the level of effort even further.
-
In Vision Studio, select the Go to Azure ML Data Labeling Project - Custom_Object_Detection_Labeling button to launch Azure Machine Learning Studio in a new browser tab.

-
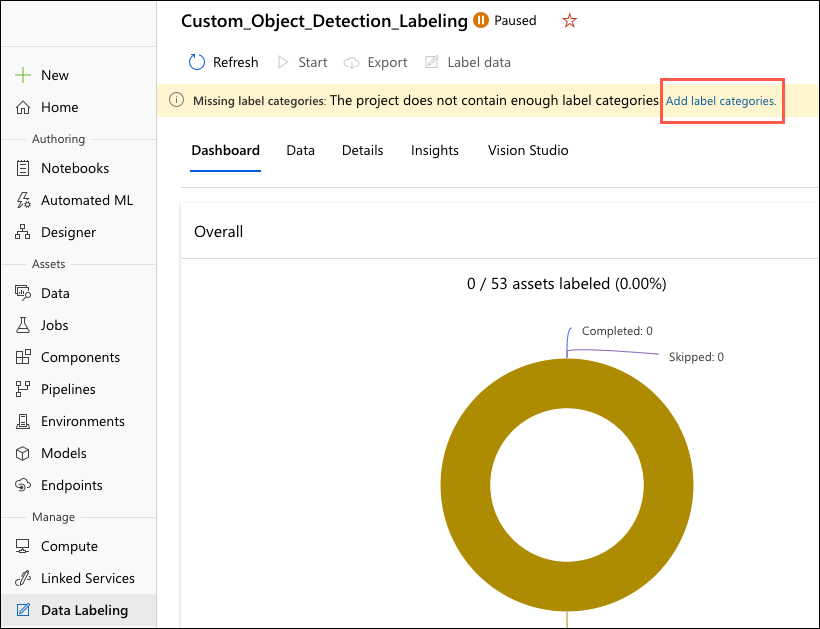
In the open Azure Machine Learning Studio tab, you must add label categories before starting the data-labeling project. Select Add label categories in the Missing label categories warning message.
-
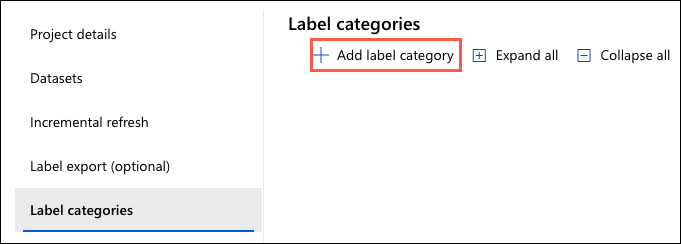
On the Label categories page, select Add label category.
-
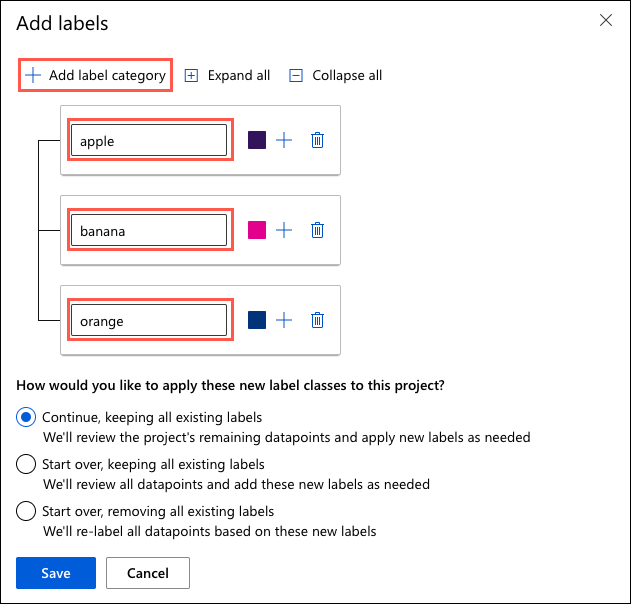
In the Add labels dialog, select Add label category and enter “apple” into the box that appears. Repeat the process two more times, adding “banana” and “orange” as additional labels.
-
Select Save on the Add labels dialog.
-
From the Label categories page in Azure Machine Learning Studio, select the ML-assisted labeling item in the left-hand menu and enable ML-assisted labeling by selecting the toggle button. Toggle the Attempt pre-labeling of manual tasks option to on. This will kick off an inference run after training a labeling model and attempt to label the remaining images in the
training_imagesdataset. Then select Save, accepting the default values for the remaining fields.
-
After adding the required labels and enabling ML-assisted labeling, select Start on the toolbar and then select Label data. You may need to select Refresh on the toolbar to enable the Label data button.

-
For this exercise, you will use ML-assisted labeling, which requires pre-labeling a subset of your images. To begin pre-labeling your pictures, first select the label you want to apply under Tags on the right-hand side of the window, then draw a bounding box around the object in the picture. It is important to select the label before you draw your bounding box. Once that is complete, select Submit for the image.
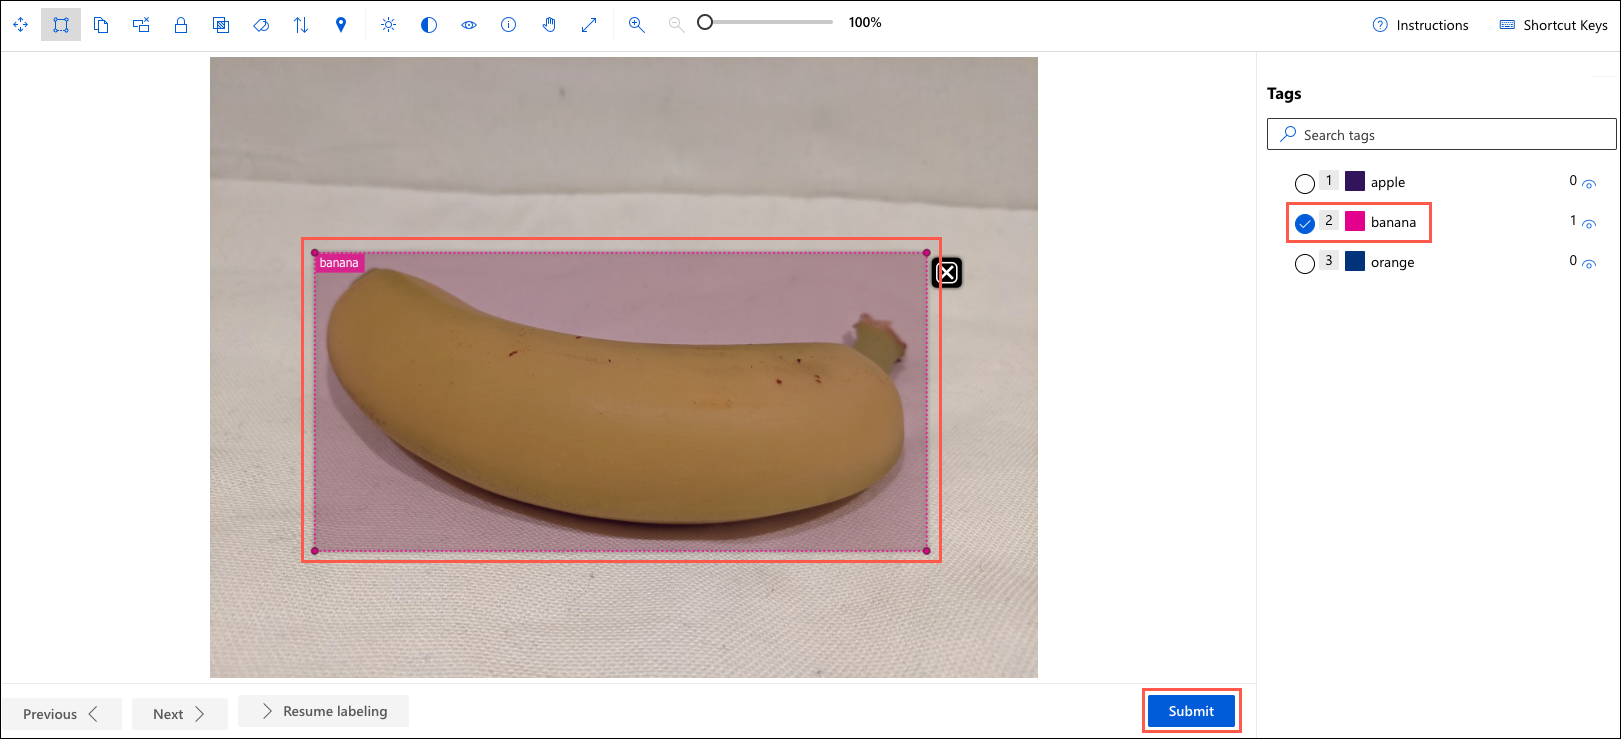
An image is just an array of pixel values to an AI application. By drawing bounding boxes around tagged objects, you define the pixel array that identifies an object within the picture. Those numeric pixel values can be used as features to train machine learning models that make predictions about the image and its contents.
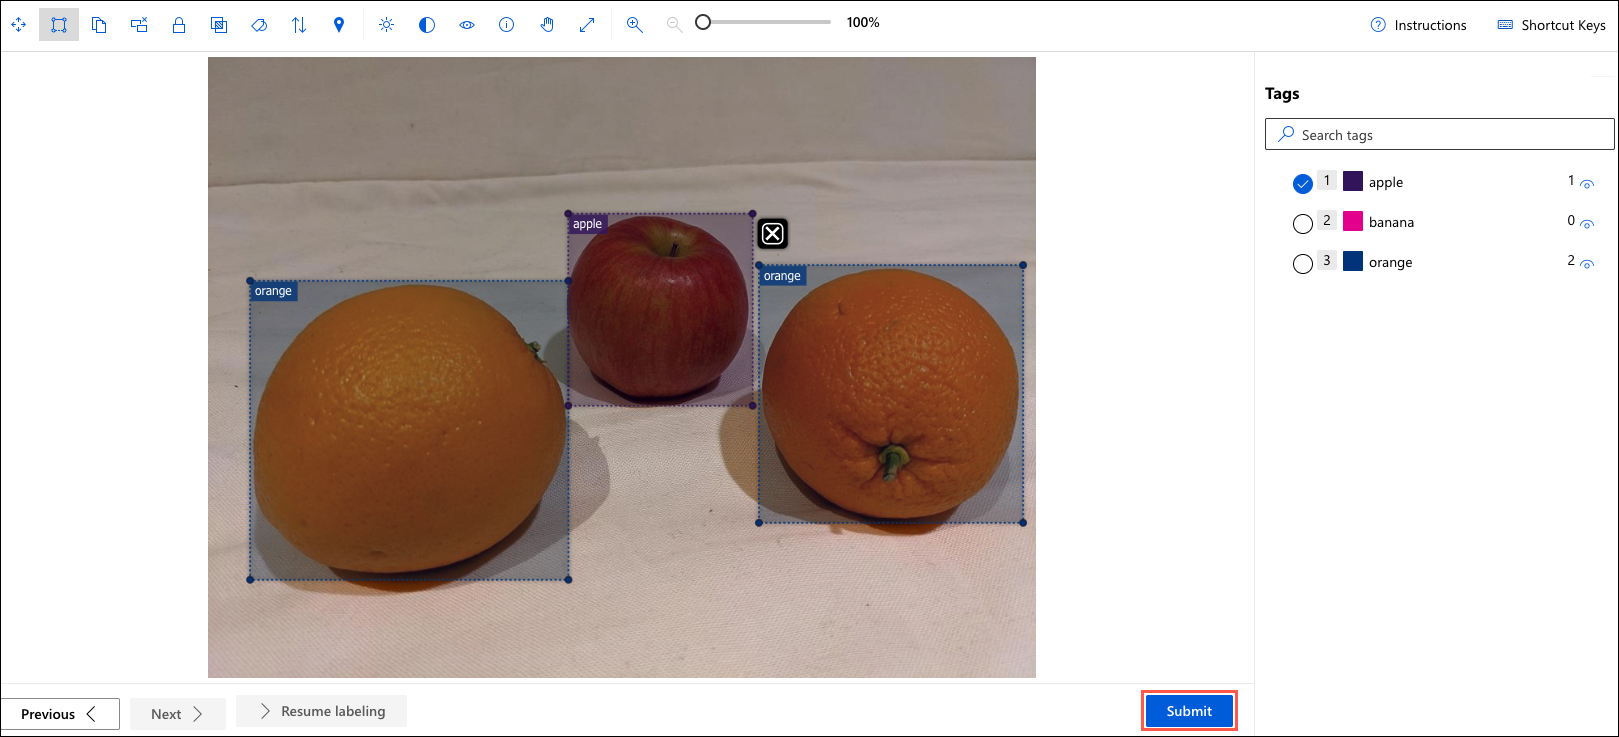
Important: If an image contains more than one object, select the label you want first and then draw a bounding box around each object on the image before choosing Submit.
-
Continue labeling images in the dataset, adding tags and bounding boxes to at least twelve photos. The required number of pre-labeled images varies by dataset, but twelve should meet this dataset’s minimum number of pre-labeled photos. There are 53 images in the
training_imagesdataset. You will see a tasks remaining value of 41/53 once you have submitted the twelfth image.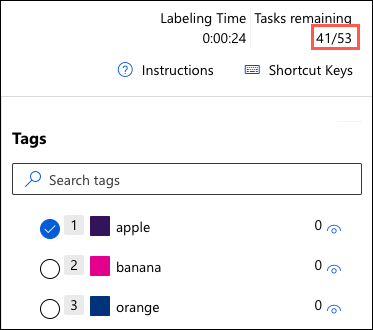
-
Select the Custom_Object_Detection_Labeling project in the breadcrumbs at the top of Azure Machine Learning Studio to return to your data-labeling project page.

-
On the page for your data-labeling project, select the Details tab, ML-assisted labeling, and then select Start in the On-demand training tile.
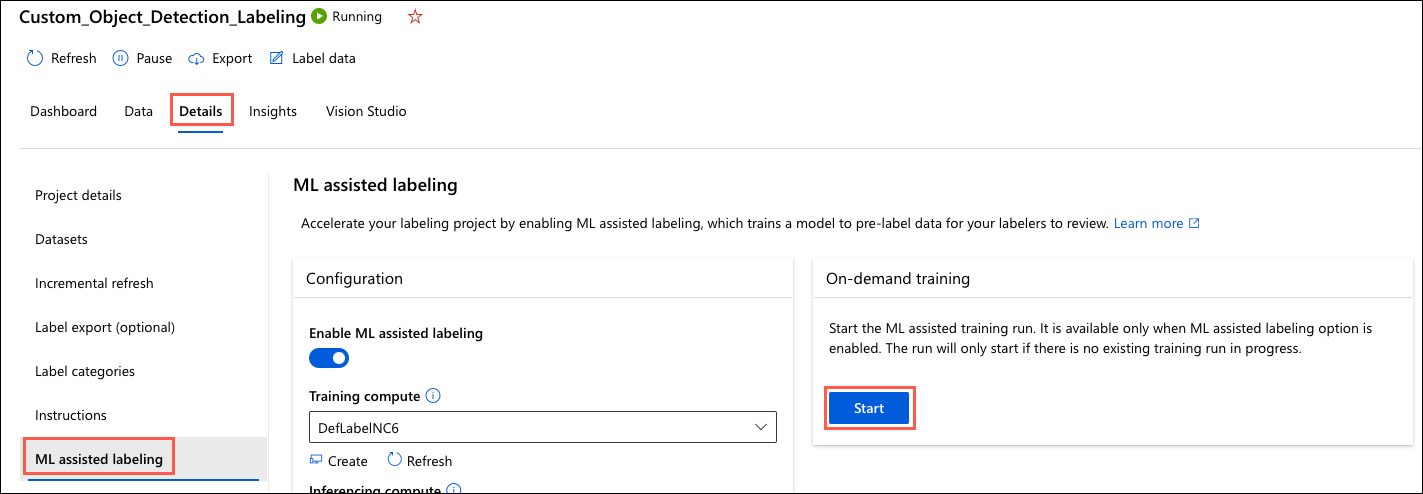
It will take about 15 minutes for the ML-assisted labeling training experiment to run. You can view the status at the bottom of the Dashboard page. Use the Refresh button on the data-labeling project’s toolbar to check for status updates.

Once the training experiment has been completed, the inference experiment will automatically begin. The inference experiment should finish within a minute or two. Select Refresh on the toolbar to check for status updates.

-
When the inference experiment finishes, select Label data from the toolbar.

-
You will now see images pre-labeled by the ML-assisted labeling service. Review each image, confirm the ML-assigned label, and adjust any bounding boxes as necessary. Select Submit for each picture after you have reviewed it.
-
If you have images not pre-labeled by the ML-assisted labeling experiment, select the appropriate tag and draw a bounding box around the object in the image to complete the labeling process of all photos in the
training_imagesdataset. -
When all your images have been labeled, select the Custom_Object_Detection_Labeling project in the breadcrumbs at the top of Azure Machine Learning Studio to return to your data-labeling project page.

-
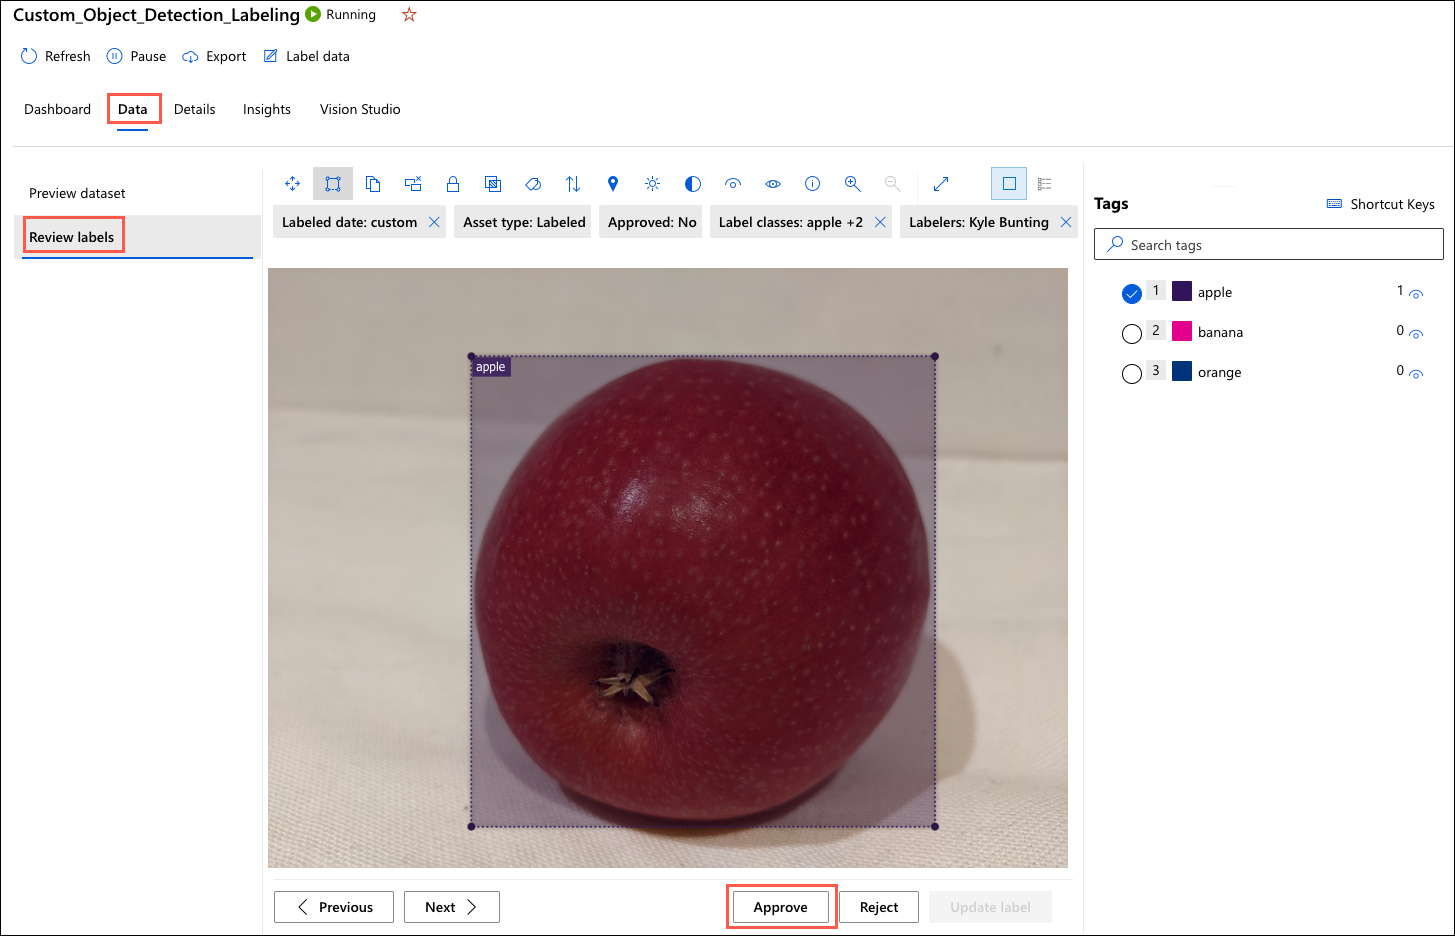
Next, you should review and approve the labels assigned to each image before generating a COCO file. The approval process allows you to check tags set by other taggers and either approve or reject them. Select the Data tab on the data-labeling project page. Then on the left-hand menu, select Review labels.
-
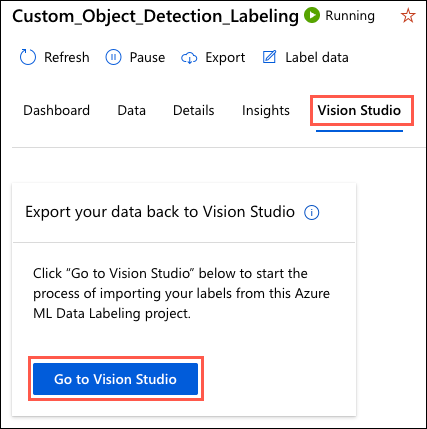
After reviewing and approving the labels assigned to each image in the training dataset, select the Vision Studio tab, and then select Go to Vision Studio.
-
In the Vision Studio browser tab, select Add COCO file under Import COCO file for labeled data.

-
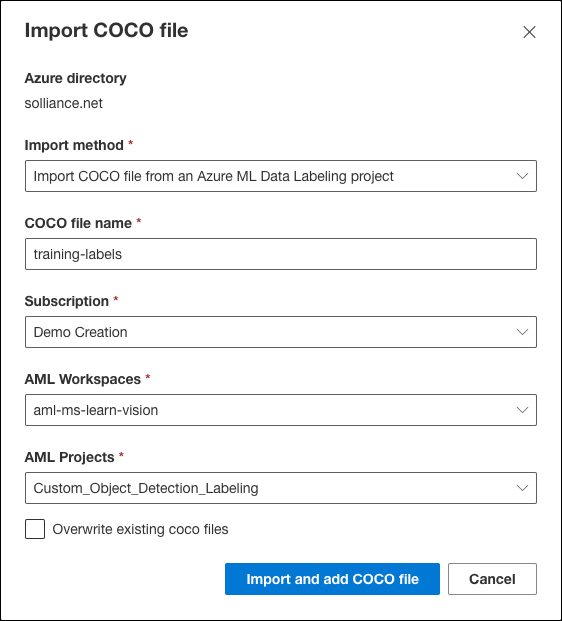
In the Import COCO file dialog:
- Import method: Select Import COCO file from an Azure ML Data Labeling project.
- COCO file name: Enter “training-labels.”
- Subscription: Choose your subscription for this exercise.
- AML Workspaces: Choose the
aml-ms-learn-visionworkspace you created for this exercise. - AML Projects: Select the
Custom_Object_Detection_Labelingproject you used to label your train images.
-
Select Import and add COCO file to import the COCO file from Azure ML and add it to the Storage Account container hosting your training images.
Train the custom object detection model
With your images labeled and the COCO annotation file imported, you can use Vision Studio to train your custom model.
-
In Vision Studio, select Custom models in the left-hand menu, then select Train a new model in the toolbar.

-
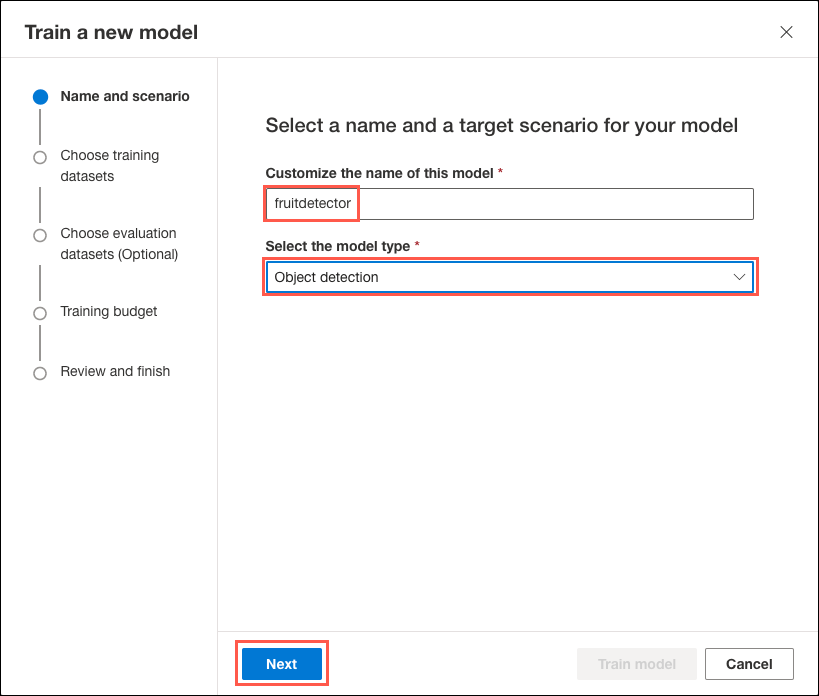
On the Name and scenario tab of the Train a new model dialog, enter “fruitdetector” into the Customize the name of this model box, select Object detection for the model type, then select Next.
-
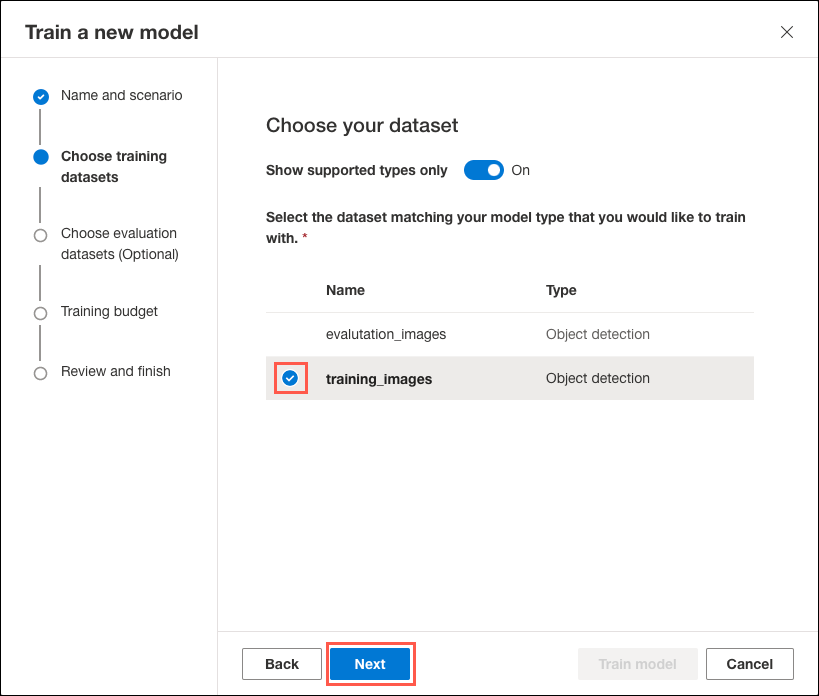
On the Choose training datasets tab, check the box next to the training_images dataset and select Next.
-
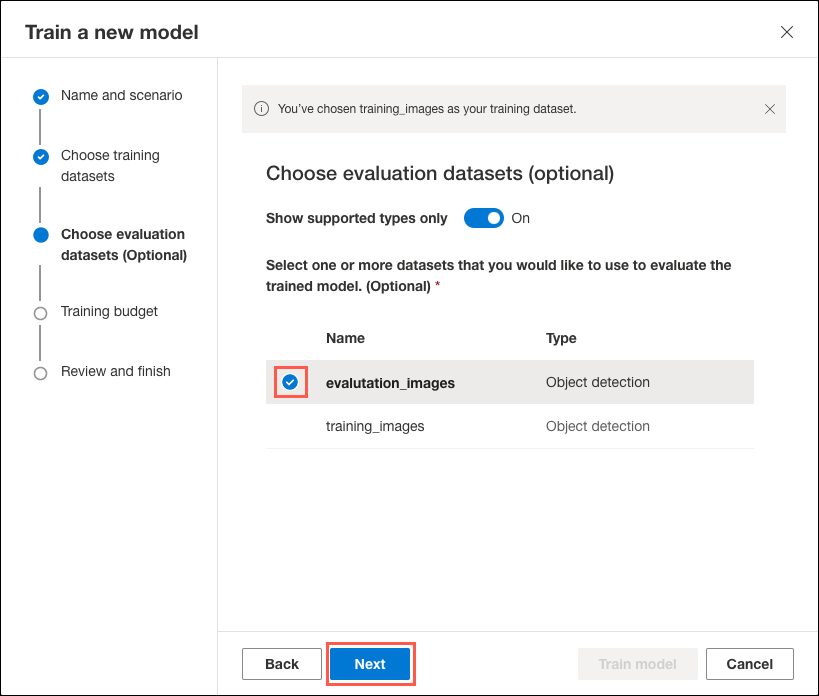
On the Choose evaluation dataset tab, check the box next to the evaluation_images dataset and select Next.
-
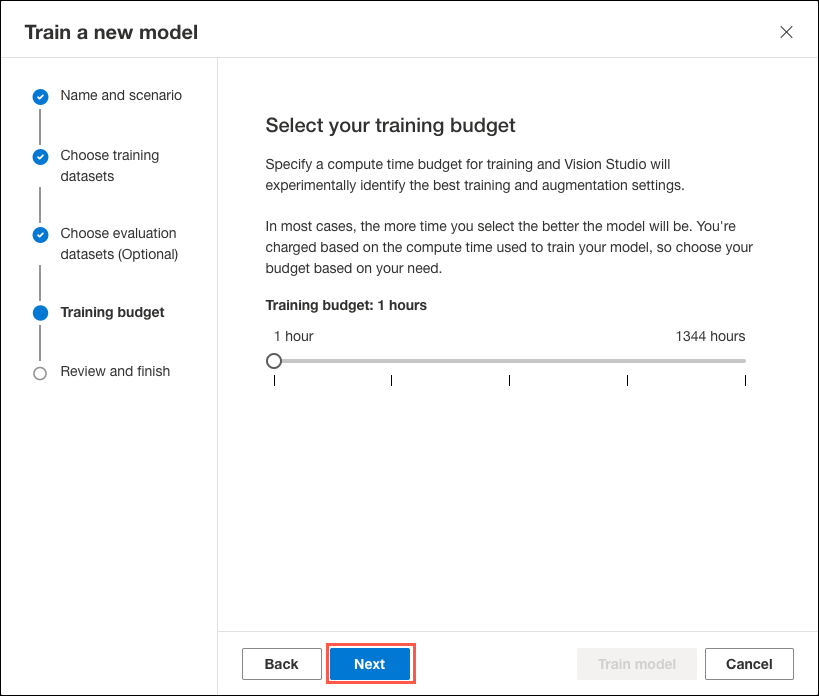
Leave the training budget set to 1 hour and select Next on the Training budget tab.
-
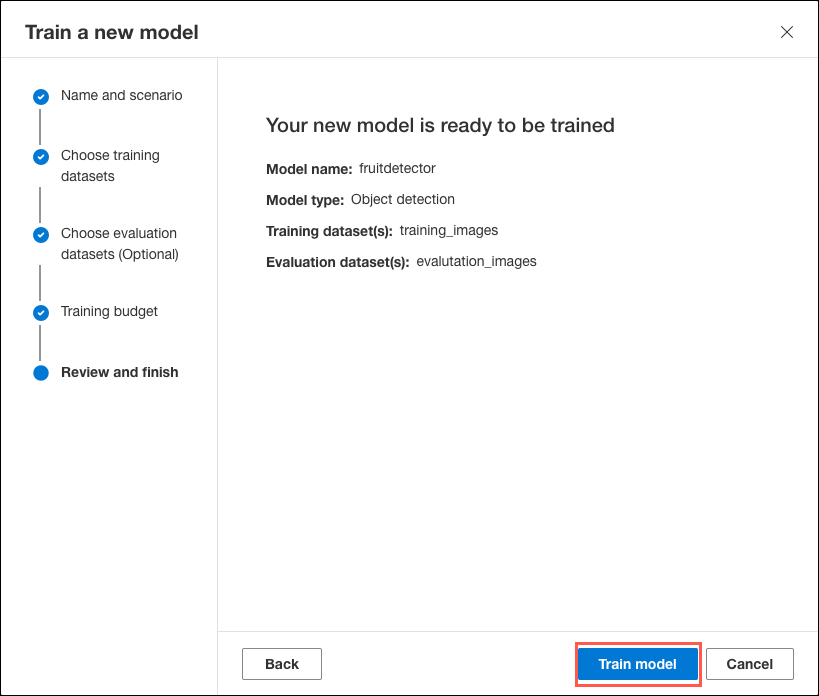
On the Review and finish tab, select Train model to start the training process.
-
The initial Status of the model training job will be Queued. Within a minute or two, you should see the status change to Training after selecting Refresh.

It can take about an hour for the training to complete. Image Analysis 4.0 models can be accurate with only a small set of training data, but they take longer to train than previous models. You can periodically select Refresh to look for an updated status. When model training has been completed, the status will change to Succeeded*.

-
Once your model training is finished, select the model on the Custom models page in Vision Studio.
-
On the
fruitdetectorpage, you can review the model’s overall performance and evaluation results.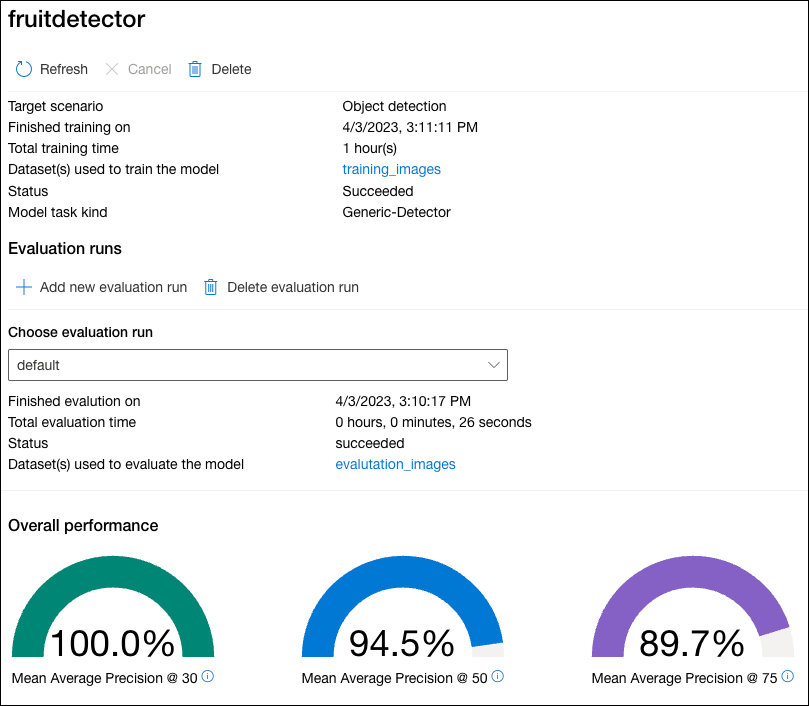
Test your custom model in Vision Studio
Once your custom model is created and trained, it belongs to your Computer Vision resource, and you can call it using the Analyze Image API. It will also be available to test from within Vision Studio.
-
Return to the Vision Studio home page, select the Image analysis tab, and then select the Detect common objects in images tile.

-
Under Choose the model you want to try out, select your custom fruitdetector model from the dropdown list.

-
Open the folder containing the images you downloaded and unzipped to your local machine and locate the folder named
test-images. -
The
test-imagesfolder contains four images: an apple, a banana, an orange, and one containing a single piece of each fruit. One at a time, drag each of the images in the folder to the Drag and drop files here box in Vision Studio, or browse to the location you downloaded the files and select them from there.
-
Observe the prediction results for each image.
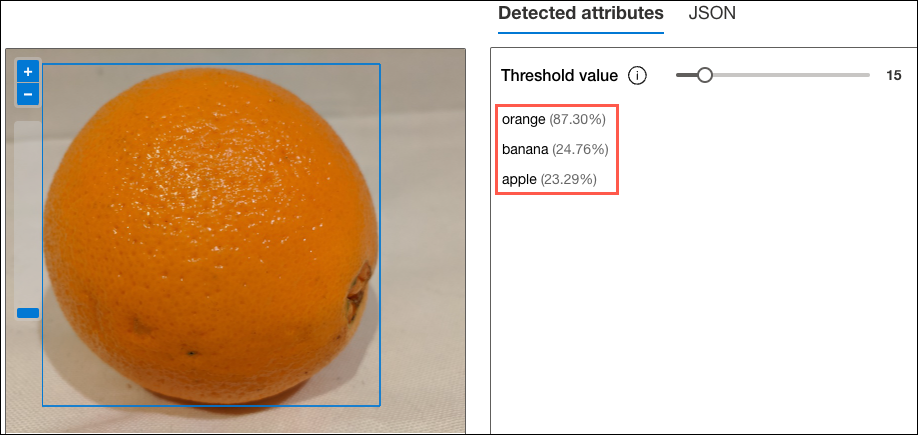
Congratulations! You have used Vision Studio to create a custom object detection model featuring the improved capabilities of Image Analysis 4.0 delivered by Microsoft’s Florence foundation model.
Clean up
You should clean up any Azure resources created during the exercises in this module to avoid being charged for unused services and resources. To delete the resources you created for this module, follow these instructions:
- Open a web browser and navigate to the Azure portal.
- In the left-hand navigation menu, select Resource Groups, and then select the
rg-ms-learn-visionresource group you created as part of the exercise in Unit 5. - In the Overview pane, select Delete resource group.
- Enter the name of the resource group you created to confirm and then select Delete.