The Image Analysis 4.0 features available in Azure Computer Vision include numerous capabilities for understanding image content and context and extracting information from images. Vision Studio allows you to try out many of the capabilities of Image Analysis 4.0 quickly and easily in a web browser. In this exercise, you will use Vision Studio to analyze images using the built-in try-it-out experiences. You will also use Visual Studio Code to make a few calls to the Image Analysis 4.0 APIs to explore features not available in Vision Studio.
Provision Azure resources
Before using Vision Studio to try out the capabilities of Image Analysis 4.0, you must prepare your Azure environment by creating a few resources required to complete the exercises in this module. You will use the Azure portal to provision and configure the following resources:
- A resource group
- An Azure Cognitive Service account
- An Azure Storage account
-
Navigate to the Azure portal in a web browser, then select Create a resource.
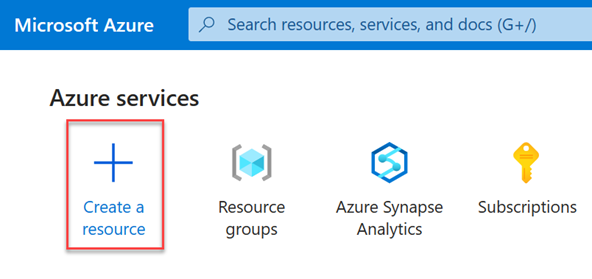
- Search for and select Resource Group in the Marketplace, then select Create. Configure the resource group with the following settings:
- Subscription: Your Azure subscription
- Resource Group: rg-ms-learn-vision
- Region: (US) East US
Select Review + Create, then select Create.
-
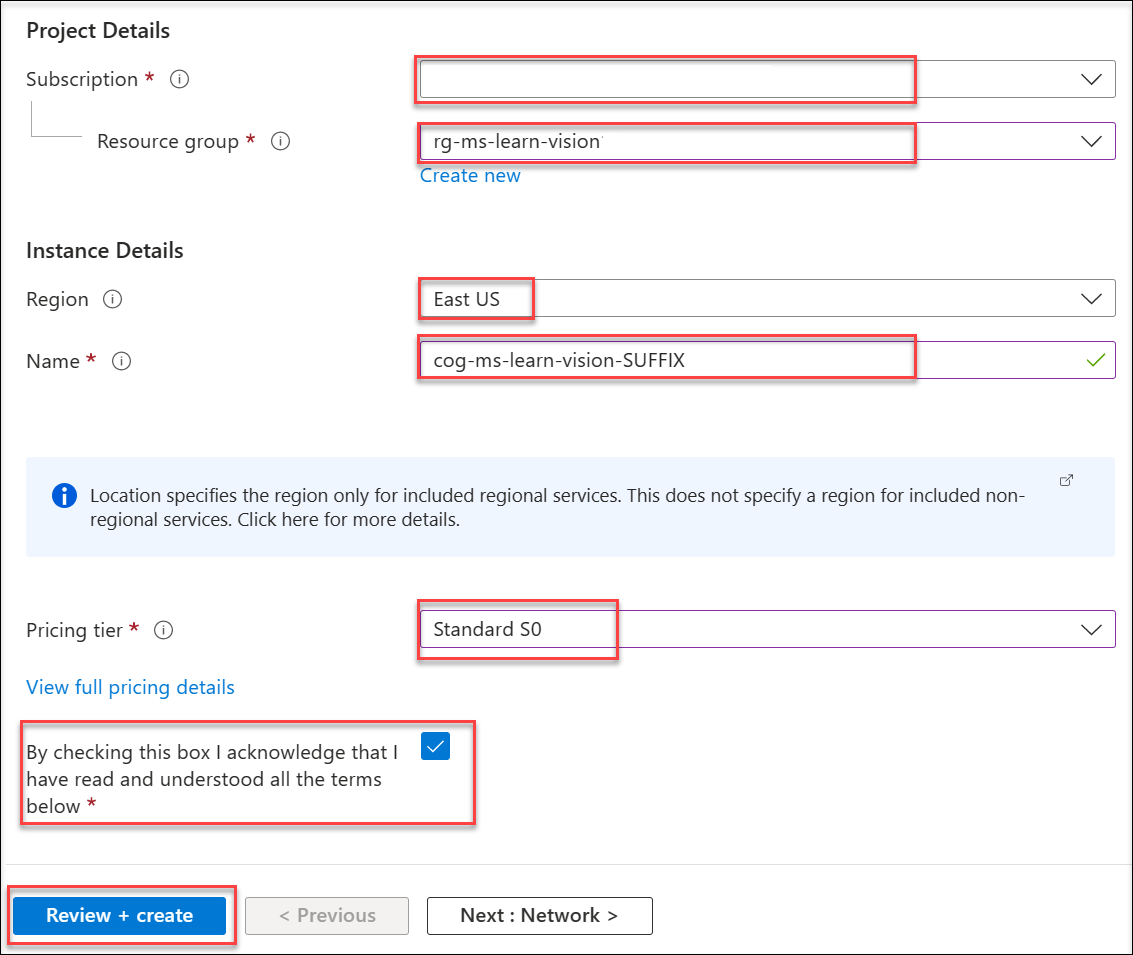
Return to the Azure portal Marketplace. Search for and select Cognitive Services, then select Create.
Configure the resource with the following settings:
- Subscription: Your Azure subscription
- Resource Group: rg-ms-learn-vision
- Region: East US
-
Name: cog-ms-learn-vision-SUFFIX
- note: replace the SUFFIX token with your initials or another value to ensure the resource name is globally unique.
- Pricing tier: S0
- Acknowledge that you have read and understood the terms by checking the box.
Select Review + Create, then select Create.
Note: Image Analysis 4.0 features are currently available in a limited number of Azure regions. Specifying
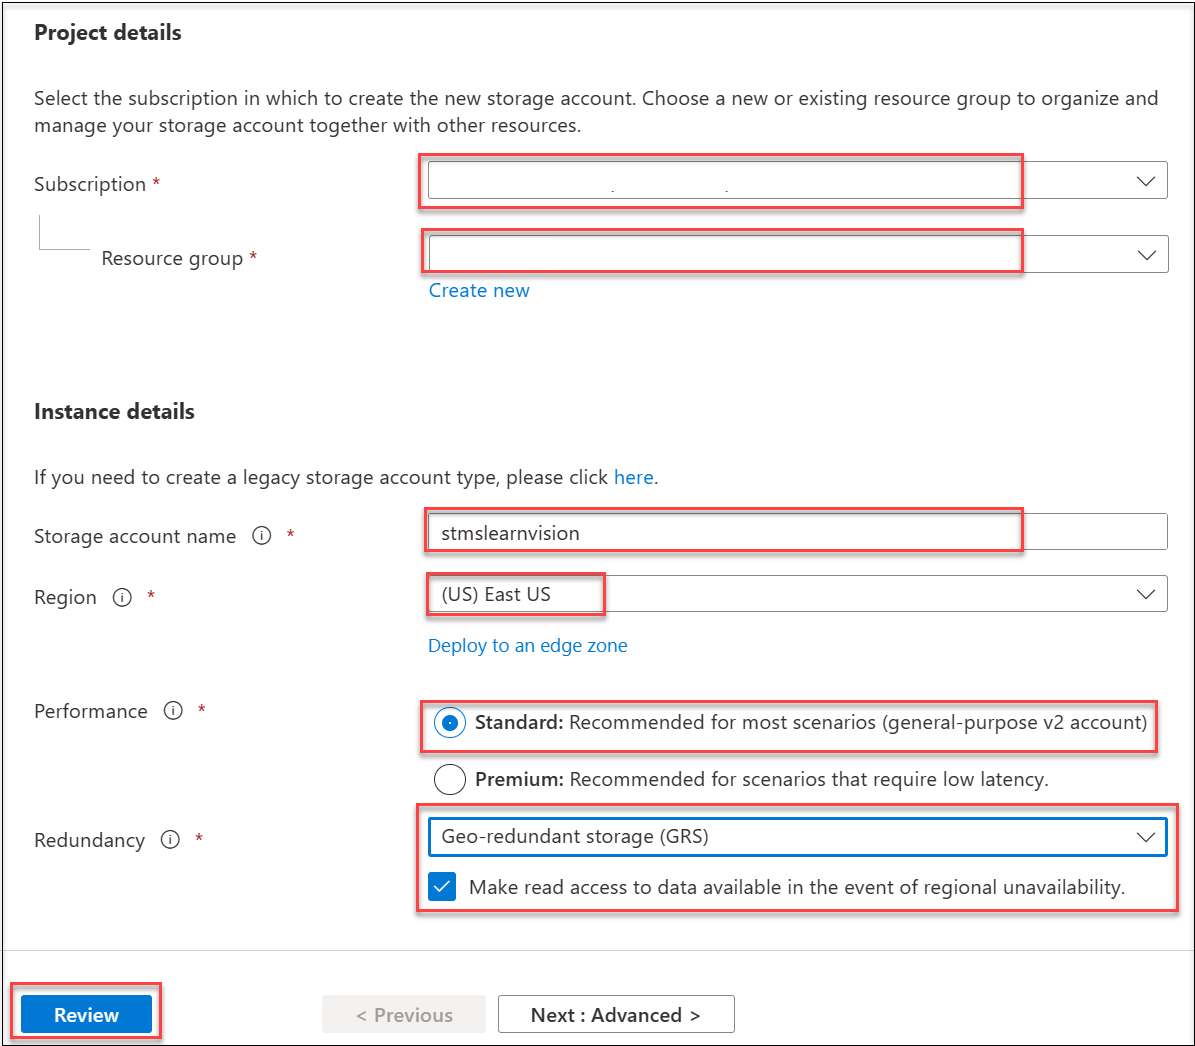
East USensures access to the 4.0 features from Vision Studio. - The last resource you need to create is an Azure Storage account for hosting some of the images you will use to try out the Image Analysis 4.0 features and create your custom object detection model in the next exercise. Return to the Azure portal Marketplace. Search for and select Storage Account, then select Create.
Configure the resource with the following settings:
- Subscription: Your Azure subscription
- Resource Group: rg-ms-learn-vision
-
Storage Account Name: stmslearnvisionSUFFIX
- note: replace the
SUFFIXtoken with your initials or another value to ensure the resource name is globally unique.
- note: replace the
- Region: East US
- Performance: Standard
- Redundancy: check the box ‘make read access to data available’
Select Review and Create.
Once the resource is deployed, select Go to Resource.
-
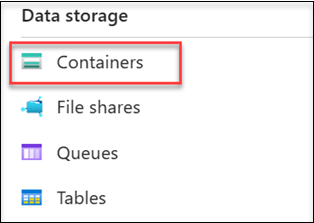
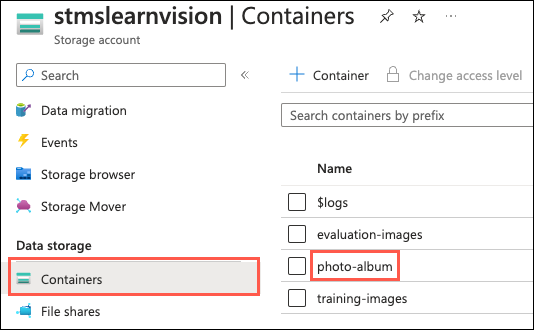
On your storage account resource page, navigate to the left-hand pane. Under Data Storage, select Containers.
-
Create a new container by selecting + Container.
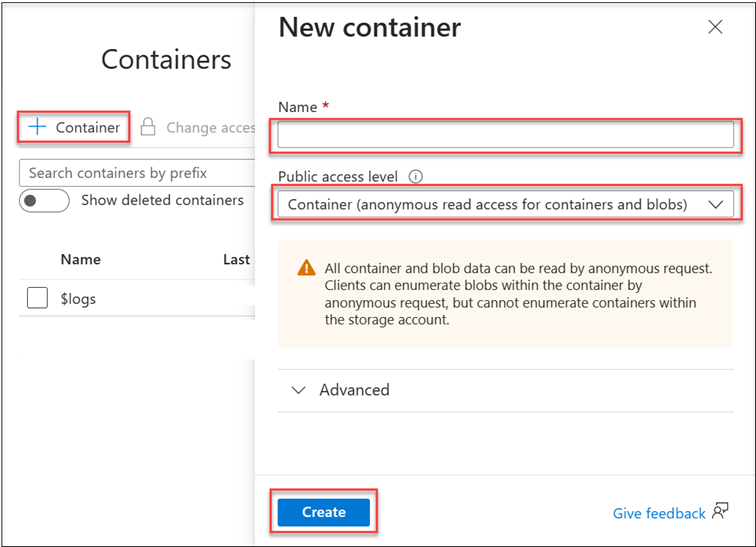
Configure the container with these settings:
- Name: photo-album
- Public access level: Container (anonymous read access for containers and blobs)
Select Create.
- Create a second container for hosting the training images you will use in the next exercise. Select + Container.
Configure the container with these settings:
- Name: training-images
- Public access level: Container (anonymous read access for containers and blobs)
Select Create.
- Repeat the above steps to create a third container for hosting the images you will use in the next exercise to evaluate your custom model. Select + Container.
Configure the container with these settings:
- Name: evaluation-images
- Public access level: Container (anonymous read access for containers and blobs)
Select Create.
Configure a CORS rule on the storage account
Before moving on to trying out the Image Analysis 4.0 features from Vision Studio, you must enable CORS on your Storage Account to allow Vision Studio to connect to it and search for images.
-
In the Azure portal browser windows, navigate to the
rg-ms-learn-visionresource group and select thestmslearnvisionSUFFIXStorage Account. -
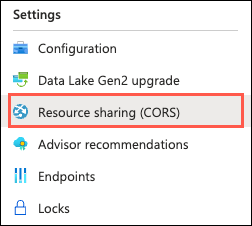
On the Storage Account page, scroll down in the left-hand navigation menu and select Resource sharing (CORS) under Settings.
-
On the Resource Sharing (CORS) page, enter the following on the Blob service tab:
- Allowed origins: Enter https://portal.vision.cognitive.azure.com.
- Allowed methods: Select the GET checkbox to allow an authenticated request from a different domain.
- Max age: Enter 9999.

-
Select Save on the Resource sharing (CORS) toolbar.
Download sample images
You will use several images for the exercises below, which you must retrieve from a local folder. In this task, you will download a zip file from a GitHub repository and unzip it to a local directory.
-
Download the zip file containing sample images from here: https://github.com/MicrosoftLearning/mslearn-cognitive-vision/blob/main/assets/images.zip?raw=true
-
Unzip the
images.zipfile to an easily accessible location on your local machine.
Update images to Azure Storage
Some of the images you download need to be added to the Azure Storage account you created above to be accessible by the try-it-out experiences. In this task, you will upload the required images to containers in blob storage.
-
In a web browser, navigate to the Azure portal and browser to the Storage Account resource in the
rg-ms-learn-visionresource group you created above, then select Containers under Data storage in the left-hand navigation menu. -
Select the ‘photo-album’ container on the Containers page.
-
On the photo-album page, select Upload from the toolbar.

-
On the Upload blob dialog, select Browse for files, navigate to the
photo-albumfolder in theimagesfolder you downloaded to your local machine, select all the files in the folder, and then select Open to add the files to the upload process.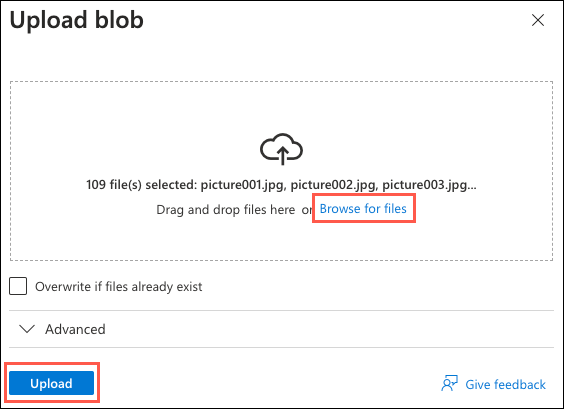
-
Select Upload to upload all files into the
photo-albumcontainer.When the upload completes, you should receive a message that 109 blobs were successfully uploaded.

-
Repeat steps 3 through 5 above, this time selecting the
training-imagescontainer and retrieving all of the images from thetraining-imagesfolder in your download location.When the upload has finished, you should receive a message that 53 blobs were successfully uploaded.
-
Repeat steps 3 through 5 above, this time selecting the
evaluation-imagescontainer and retrieving all of the files from theevaluation-imagesfolder in your download location.When the upload completes, you should see a message that 16 blobs were successfully uploaded.
Note: The
evaluation-imagesfolder also contains a JSON file namedeval-labels.json. Make sure to upload this file as well. It is the COCO file describing the labels applied to the evaluation image dataset.
Connect your Cognitive Services resource to Vision Studio
In this task, you will connect the Cognitive Services resource you provisioned above to Vision Studio so it can be used for trying out the various Image Analysis 4.0 features.
-
In a web browser, navigate to Vision Studio.
-
Sign in with your account and making sure you are using the same directory as the one where you have created the
cog-ms-learn-vision-SUFFIXCognitive Services resource. -
On the Vision Studio home page, select View all resources under the Getting started with Vision heading.

-
On the Select a resource to work with page, hover your mouse cursor over the
cog-ms-learn-vision-SUFFIXresource you created above in the list and then check the box to the left of the resource name, then select Select as default resource.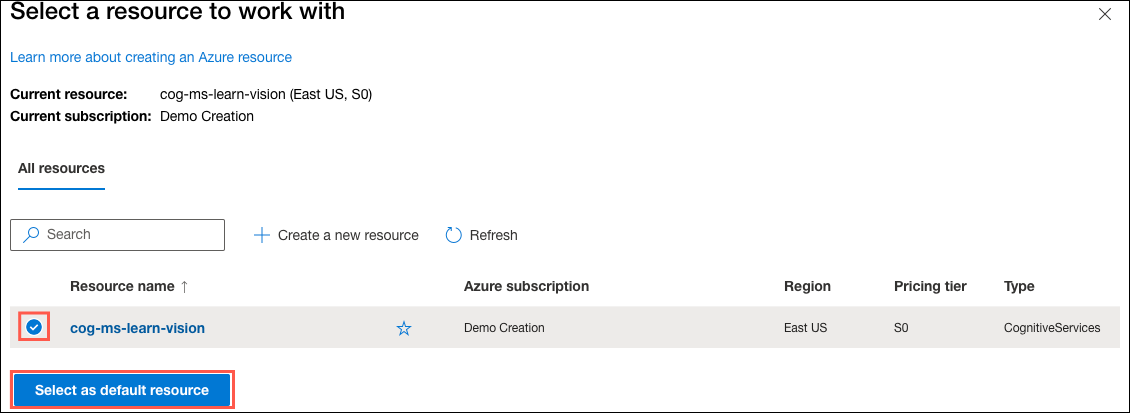
Generate captions for an image
You are ready to use Vision Studio to examine Image Analysis 4.0 capabilities. In this task, you look at the image captioning functionality of Azure Computer Vision. Image captions are available through the Caption and Dense Captions features in Image Analysis 4.0.
-
In a web browser, navigate to Vision Studio.
-
On the Getting started with Vision landing page, select the Image analysis tab and then select the Add captions to images tile.
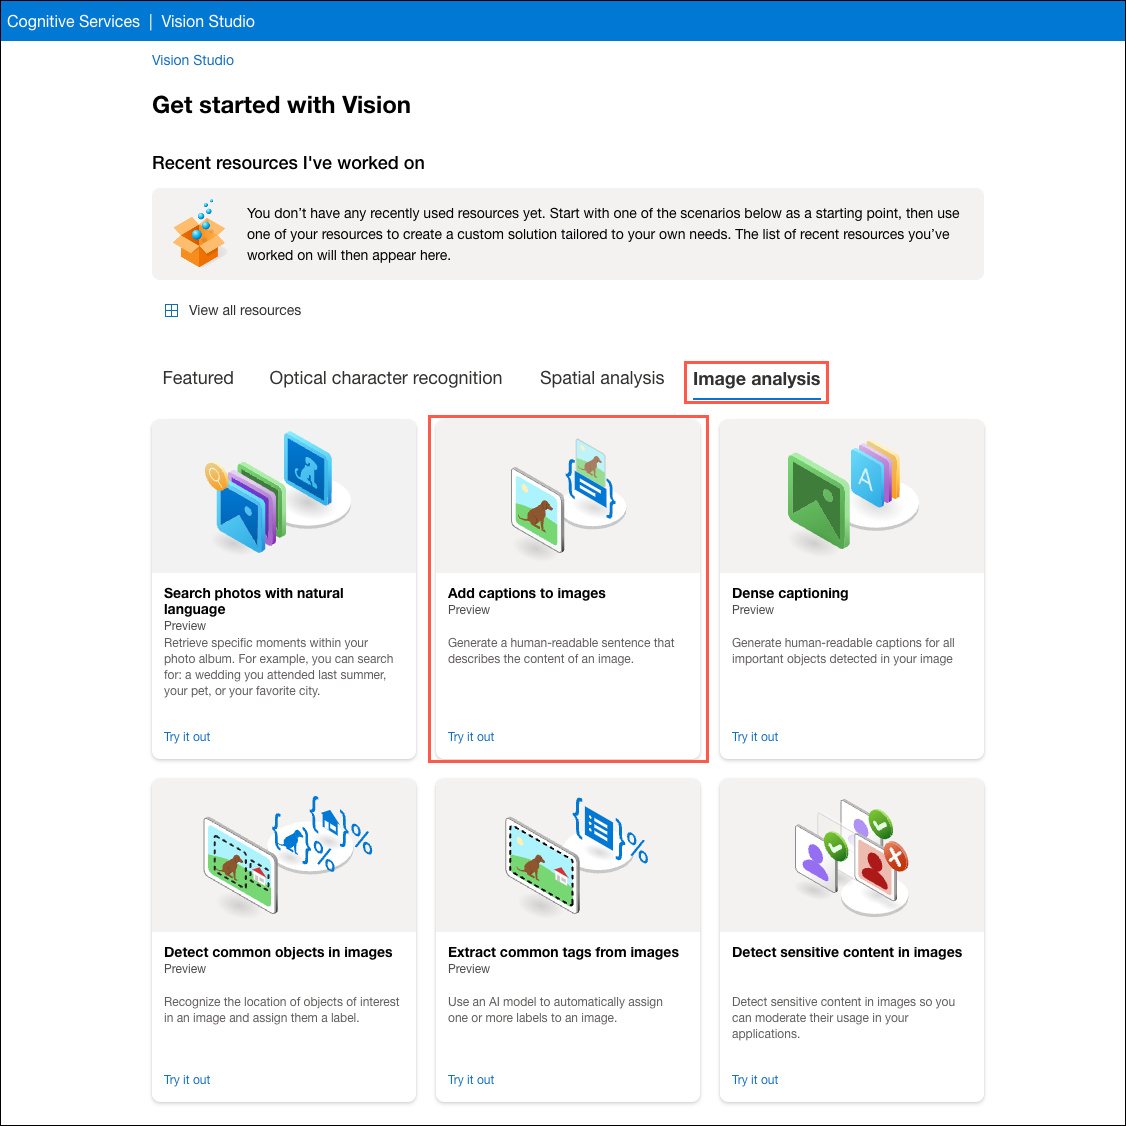
-
Under the Try It Out subheading, acknowledge the resource usage policy by reading and checking the box.
-
Open the folder containing the images you downloaded and unzipped and locate the file named
city-street.jpgwithin thetry-it-outfolder.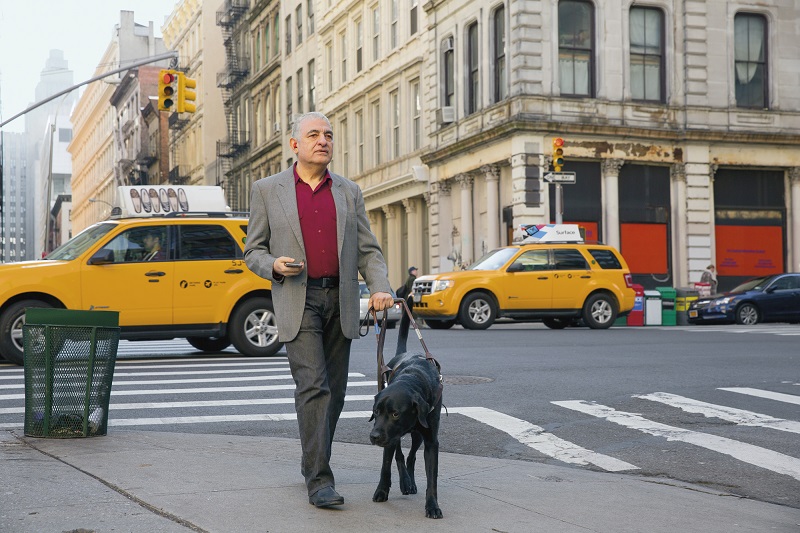
-
Drag the
city-street.jpgimage from thetry-it-outfolder into the Drag and drop files here box, or browse to the location you downloaded the file and select it.
-
Observe the generated caption text, visible in the Detected attributes panel to the right of the image.
The Caption functionality provides a single, human-readable English sentence describing the image’s content.
-
Select the JSON tab to view the full output from the API. It should look similar to the following:
 {
   "captionResult": {
     "text": "a man walking a dog on a leash on a street",
     "confidence": 0.5456792116165161
   },
   "modelVersion": "2023-02-01-preview",
   "metadata": {
     "width": 800,
     "height": 533
   }
 }
The JSON output includes the text of the generated caption, a confidence score, and metadata about the file and version of the model used to perform the image analysis.
-
Next, use the same image to perform Dense captioning. Return to the Vision Studio home page, and as you did before, select the Image analysis tab, then select the Dense captioning tile.
The Dense Captions feature of Image Analysis 4.0 differs from the Caption capability in that it provides multiple human-readable captions for an image, one describing the image’s content and others, each covering the essential objects detected in the picture. Each detected object includes a bounding box, which defines the pixel coordinates within the image associated with the object.
-
Drag the
city-street.jpgimage from thetry-it-outfolder into the Drag and drop files here box, or browse to the location you downloaded the file and select it.
-
Hover over one of the captions in the Detected attributes list and observe what happens within the image.

Move your mouse cursor over the other captions in the list, and notice how the bounding box shifts in the image to highlight the portion of the image used to generate the caption.
-
Select the JSON tab and review the structure. The JSON contains the text of each caption, a confidence score, and the coordinates of the bounding box assigned to each object for which captions were generated.
{
  "denseCaptionsResult": {
    "values": [
      {
        "text": "a man walking a dog on a leash on a street",
        "confidence": 0.5456792116165161,
        "boundingBox": {
          "x": 0,
          "y": 0,
          "w": 800,
          "h": 533
        }
      },
      ...
      {
        "text": "a yellow taxi cab on a street",
        "confidence": 0.39235755801200867,
        "boundingBox": {
          "x": 0,
          "y": 205,
          "w": 275,
          "h": 149
        }
      }
    ]
  },
  "modelVersion": "2023-02-01-preview",
  "metadata": {
    "width": 800,
    "height": 533
  }
}
Tagging images
The next feature you will try is the Extract Tags functionality of Image Analysis 4.0. Extract tags is based on thousands of recognizable objects, including living beings, scenery, and actions.
-
Return to the home page of Vision Studio, then select the Extract common tags from images tile under the Image analysis tab.
-
In the Choose the model you want to try out, leave Pretrained Vision model selected. In the Choose your language, select English or a language of your preference.
-
Open the folder containing the images you downloaded and unzipped and locate the file named
shopping.jpgwithin thetry-it-outfolder. -
Drag the
shopping.jpgfile into the Drag and drop a file here box, or select Browse for a file and retrieve theshopping.jpgfile from the location you saved it to your local computer.
-
Review the list of tags extracted from the image and the confidence score for each in the detected attributes panel.
Image Tags 
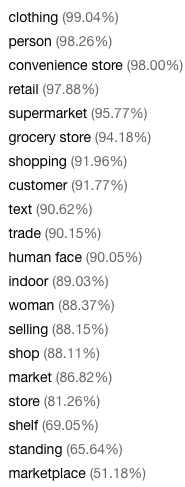
Notice in the list of tags that it includes not only objects, but actions, such as
shopping,selling, andstanding.
Object detection
In this task, you use the Object detection feature of Image Analysis. Object detection detects and extracts bounding boxes based on thousands of recognizable objects and living beings.
-
Return to the home page of Vision Studio, then select the Detect common objects in images tile under the Image analysis tab.
-
In the Choose the model you want to try out, leave Pretrained Vision model selected.
-
Open the folder containing the images you downloaded and unzipped and locate the file named
road-scene.jpgwithin thetry-it-outfolder. -
Drag the
road-scene.jpgfile into the Drag and drop a file here box, or select Browse for a file and retrieve theroad-scene.jpgfile from the location you saved it to your local computer.
-
In the Detected attributes box, observe the list of detected objects and their confidence scores.
-
Hover your mouse cursor over the objects in the Detected attributes list to highlight the object’s bounding box in the image.
-
Move the Threshold value slider until a value of 70 is displayed to the right of the slider. Observe what happens to the objects in the list.
The threshold slider specifies that only objects identified with a confidence score or probability greater than the threshold should be displayed.
OCR
In this task, you use the Read API’s Extract text capabilities to extract printed and handwritten text in supported languages from images. The optical character recognition (OCR) capability supports images and documents with mixed languages and does not require specifying the language.
-
Return to the home page of Vision Studio, then select the Extract text from images tile under the Optical character recognition tab.
-
Open the folder containing the images you downloaded and unzipped and locate the file named
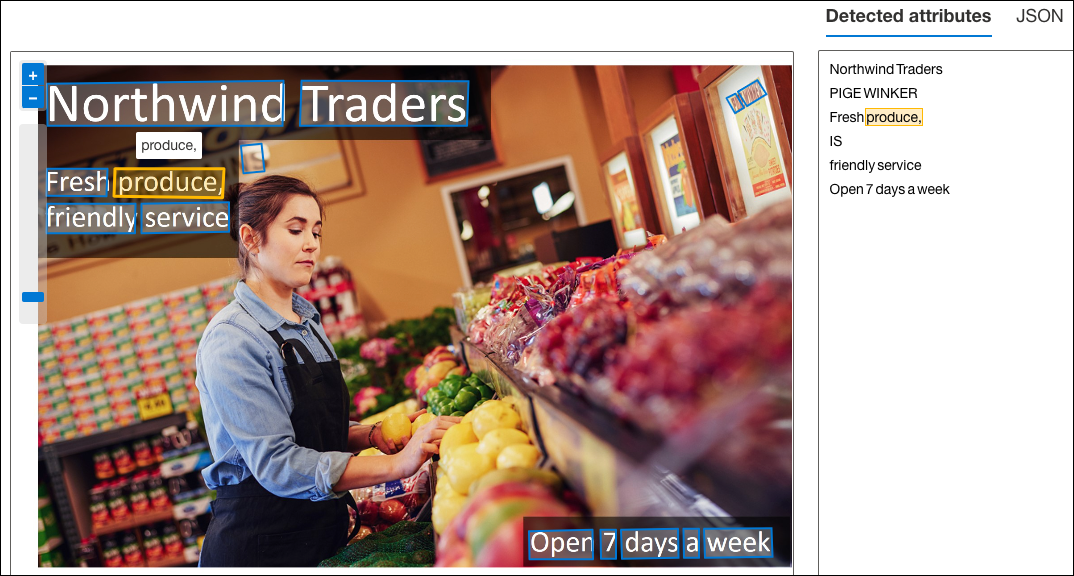
advert.jpgwithin thetry-it-outfolder. -
Drag the
advert.jpgfile into the Drag and drop a file here box, or select Browse for a file and retrieve theadvert.jpgfile from the location you saved it to your local computer.
-
A list of extracted text is displayed in the Detected attributes panel. If you hover your mouse cursor over any of the words in the Detected attributes panel, the associated text in the image will be highlighted.
-
Return to your downloaded images folder and drag the
note.jpgfile into the Drag and drop a file here box, or select Browse for a file and retrieve thenote.jpgfile from the location you saved it to your local computer.Observe the results. This image contains handwritten text, demonstrating that the OCR engine can extract printed or handwritten text. If you select the JSON tab, you will see the
styleproperty underappearancehas the name ofhandwriting, indicating the API detected the text as handwritten."appearance": { "style": { "name": "handwriting", "confidence": 1 } }
Image retrieval
In this task, you use the Image retrieval functionality of Azure Computer Vision. Image retrieval in Image Analysis 4.0 uses vectorization to match your search text more efficiently with images in a photo album in Azure Blob storage. Image retrieval enables you to search pictures for content using natural language queries.
-
Return to the home page of Vision Studio, then select the Search photos with natural language tile under the Image analysis tab.
-
Select the Try with your own images tab.
-
Select Browse for a blob storage container to search your own album.

-
In the Please select a blob storage dialog, select the
stmslearnvisionSUFFIXstorage account you provisioned above, and then select the photo-album container you created within that storage account. Check the Allow Vision Studio to read and write to your blob storage box, then select OK.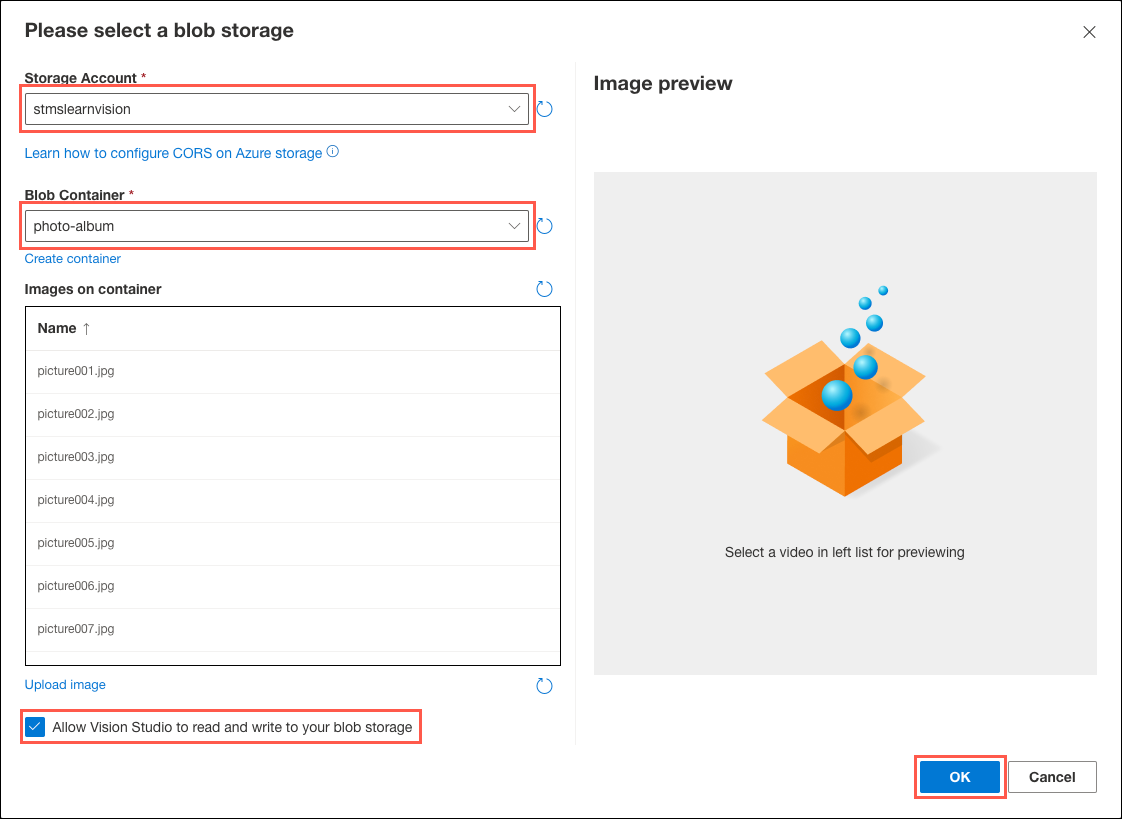
It will take a few seconds for the images from the
photo-albumcontainer to be loaded into the UI. Once the photo album has been loaded, it will appear in a tile on the screen.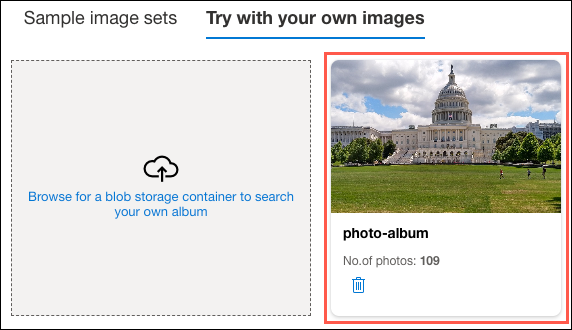
-
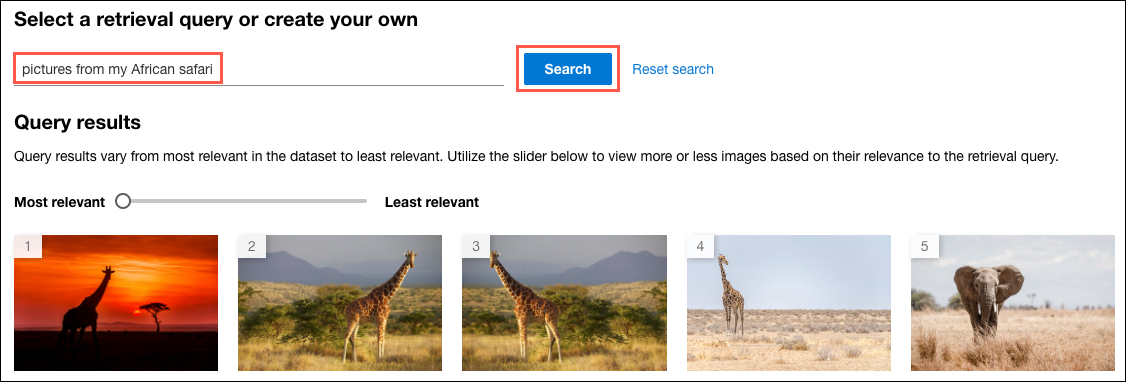
In the Enter a custom query box, enter “pictures from my African safari” and select Search.
-
To retrieve more results, move the slider from Most relevant to Least relevant.
The try-it-out experience in Vision Studio uses cosine distance to compare the vectorization of your search text to measure similarity with vectorized images. Moving the slider towards Least relevant increases the allowable similarity distance, resulting in more images appearing in the results list.
As you move the slider towards Least relevant, more images will appear in the search results. Moving the slider to Least relevant will display all pictures in the photo album.
-
Try out a few other queries, such as “elephants on the savannah” or “sunsets while mountain biking.”
Background removal
The Background removal feature of Image Analysis 4.0 is useful when extracting information and content from images with distracting or noisy backgrounds. You need to focus your analysis on the most critical visual features. Background removal is unavailable as a try-it-out experience in Vision Studio, so you will access it via the Segment API endpoint.
For this task, you will use the REST Client extension of Visual Studio Code to make calls to the endpoint.
-
Download Visual Studio Code if you don’t already have it installed, and then start Visual Studio Code.
-
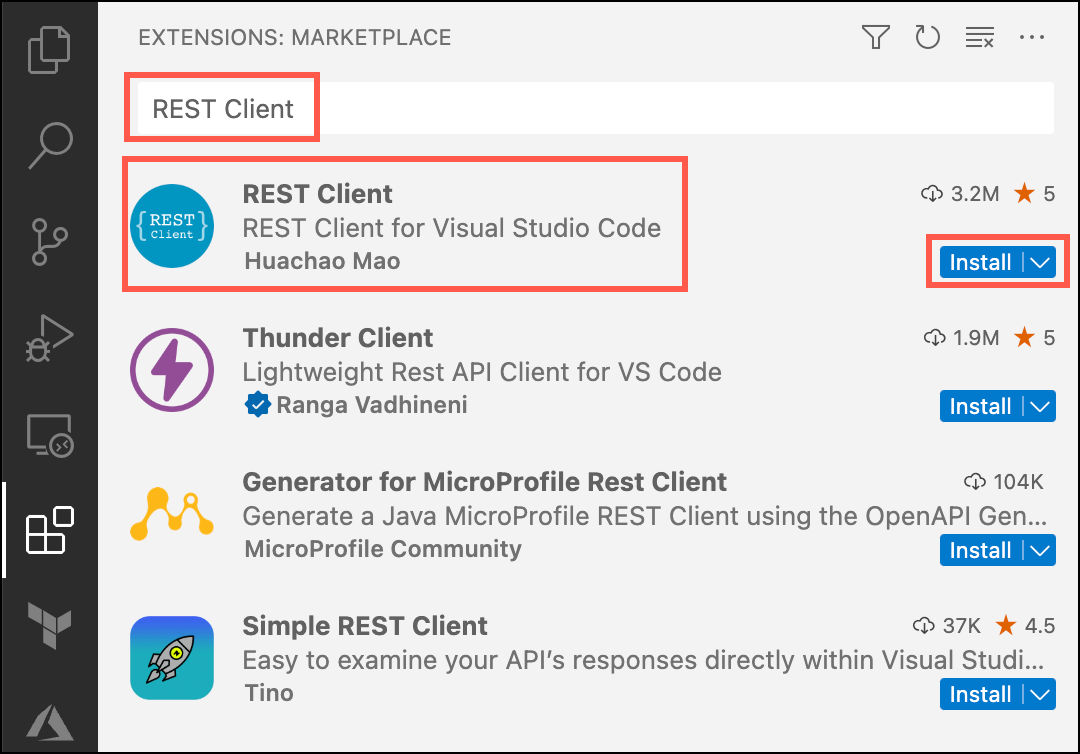
In Visual Studio Code, select the Extensions icon in the left-hand toolbar, enter “REST Client” into the Search Extensions in Marketplace box, and then select Install for the REST Client extension.
-
Download the
image-analysis.httpfile from here: https://github.com/MicrosoftLearning/mslearn-cognitive-vision/raw/main/assets/image-analysis.httpNote: If the file opens in the browser window, copy its raw text and paste it into a new file in Visual Studio Code named
image-analysis.http. Alternatively, you can right-click on the page in the browser, select Save As, and then download the file that way. This method may require manually renaming the file to remove the.txtextension. -
Open the
image-analysis.httpfile using Visual Studio Code. -
Before you can run the first command, you need to retrieve the subscription key for your Cognitive Services account from the Azure portal. In a browser window, open the Azure portal, and navigate to the
cog-ms-learn-vision-SUFFIXCognitive Service resource you created above. -
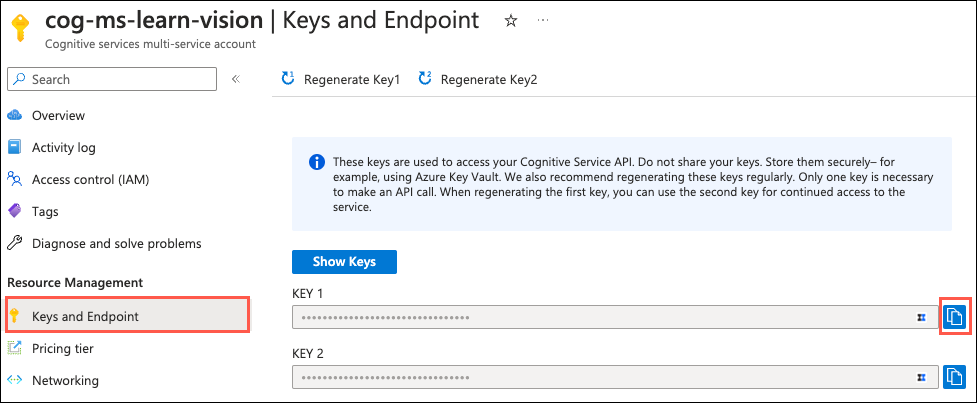
On the Cognitive Services page, select Keys and Endpoint under Resource Management from the left-hand navigation menu. Copy the KEY 1 value by selecting the Copy to clipboard icon to the right of the key value.
-
Return to the
image-analysis.httpfile in Visual Studio code and replace[INSERT YOUR COGNITIVE SERVICES SUBSCRIPTION KEY]with the KEY 1 value you copied.![[INSERT YOUR COGNITIVE SERVICES SUBSCRIPTION KEY] is highlighted after the @subscriptionKey variable.](/mslearn-cognitive-vision/media/05-vs-code-image-analysis-subscription-key.png)
With the key updated, you are now ready to send requests to the Segment API to perform the background removal steps.
To see the impact of background removal, you will use the image below:

-
Before removing the image background, you will call the Image Analysis Analyze API to generate a caption for the original image. In the
image-analysis.httpfile, select Send Request below the### Generate a caption for the original imageheader.
Note the caption returned in the Response tab that opens:
 {
   "captionResult": {
     "text": "a woman and a girl in a grocery store",
     "confidence": 0.4891723394393921
   },
   "modelVersion": "2023-02-01-preview",
   "metadata": {
     "width": 1024,
     "height": 682
   }
 }
The caption should be similar to “a woman and a girl in a grocery store.” While this caption is accurate, it does not necessarily give us any context into what the people in the photo are doing. The image captioning process evaluates all of the available information in the image to create the caption, resulting in some crucial details potentially being left out of the caption.
-
Return to the
image-analysis.httpfile and select Send Request below the### Background removalheader to submit an HTTP request to the Segment API to perform background removal on the image specified in theurlparameter in the body of the request.
-
After a few seconds, the response from the API will be returned in a new tab in Visual Studio Code. The response should look similar to the following:

-
Now, you will generate a caption for the image with the background removed. In the
image-analysis.httpfile, select Send Request below the### Generate a caption for the image with the background removedheader.
Note the caption returned in the Response tab that opens and compare it to the caption that was generated for the original image:
{
  "captionResult": {
    "text": "a woman and a girl taking a picture",
    "confidence": 0.39474931359291077
  },
  "modelVersion": "2023-02-01-preview",
  "metadata": {
    "width": 1024,
    "height": 682
  }
}
The caption should be, “a woman and a girl taking a picture.” Using the Background removal feature of Image Analysis 4.0, you can reduce the information in the photo down to the main subjects, eliminating any background noise from the picture. By removing the background, Image Analysis can identify different details as the focus, providing better context into what the photo’s subjects are doing.
Congratulations! You have successfully used Vision Studio to try out the new features of Image Analysis 4.0.