Practice Lab 7 – Trigger filters
In this lab you will filter on an update trigger.
What you will learn
- How to filter triggers
High-level lab steps
- Create an automated flow
- Add column filter
- Add query filter
Prerequisites
- Must have completed Lab 2: Data model
Detailed steps
Exercise 1 - Schema name
Task 1.1 - Column schema name
-
Navigate to the Power Apps Maker portal
https://make.powerapps.com -
Make sure you are in the Dev One environment.
-
In the left navigation pane, select Tables.
-
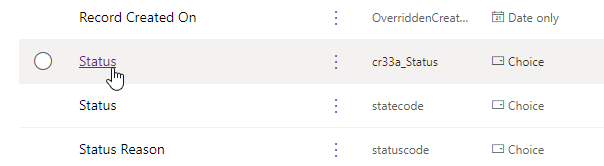
Select Opportunity.
-
Under Schema, select Columns.
-
Select the Opportunity Status column.
-
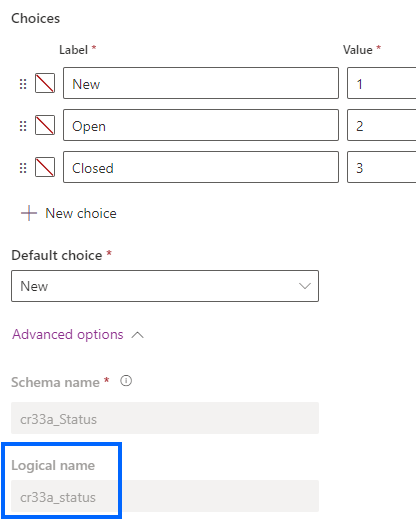
Expand Advanced options.
-
Copy the Logical name for use in the flow.
Note: The prefix for your Opportunity Status column may be different.
Exercise 2 – Create automated flow
Task 2.1 - Create the trigger
-
Navigate to the Power Automate portal
https://make.powerautomate.com -
Make sure you are in the Dev One environment.
-
Select the + Create tab from the left navigation menu.
-
Select Automated cloud flow.
-
Enter
Opportunity Closedfor Flow name. -
Enter
Dataversein search all triggers. -
Select When a row is added, modified, or deleted.
-
Select Create.
Task 2.2 - Configure the trigger
-
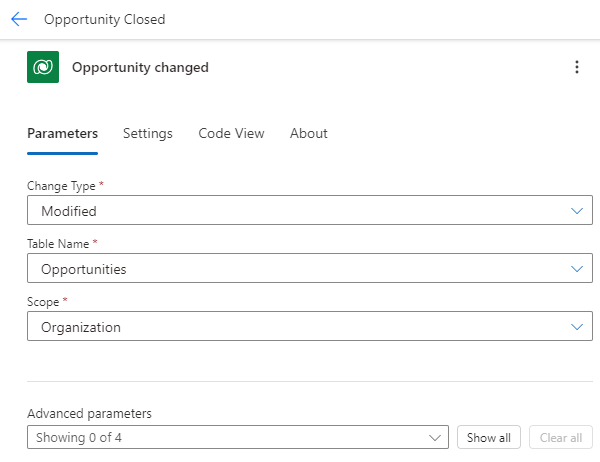
Select the When a row is added, modified, or deleted step.
- Select the When a row is added, modified, or deleted step name and enter
Opportunity changed.[!NOTE] If you encounter an issue editing the trigger name, use Copilot to rename it.
Select Copilot, and in the Copilot chat enter the following prompt:Rename the trigger to Opportunity changed. -
Select Modified for Change Type.
-
Select Opportunities for Table Name.
-
Select Organization for Scope.
Task 2.3 - Send email
-
Select the + icon under the trigger step to add an action.
-
Enter
emailin the search box. -
Select Send an email (V2) under Office 365 Outlook.
-
Select Send an email (V2) step name and enter
Notify by email -
Select To field and enter
MOD Administrator. -
Enter your tenant user id for To.
-
Select Subject field and enter
Opportunity closed -
Select Body field and select the Dynamic content icon.
-
Select Opportunity Subject from Opportunity changed.
-
Select Body field and select the Dynamic content icon and select See more.
-
Select Opportunity Status from Opportunity changed.
Task 2.4 - Column filter
-
Select the Opportunity changed trigger step.
-
Select the Select Columns field and enter the Logical name from the previous exercise, for example:
cr977_opportunitystatusNote: The prefix for your status column will be different.
Task 2.5 - Row filter
-
Select the Opportunity changed step.
-
Select the Filter Rows field and enter
cr977_opportunitystatus eq 3using the Logical name from the previous exercise.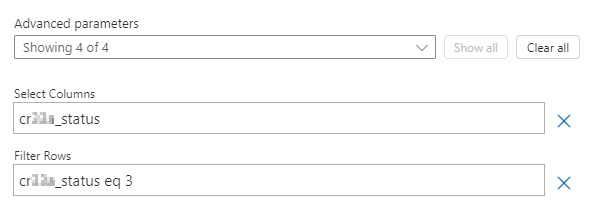
Note: The prefix for your status column will be different.
-
Select Save.
Exercise 3 – Test the automated flow
Task 3.1 - Run the automated flow manually
-
Select Test
-
Select Manually.
-
Select Test.
-
Navigate to the Power Apps Maker portal
https://make.powerapps.comin a new browser tab. -
Make sure you are in the Dev One environment.
-
In the left navigation pane, select Tables.
-
Select Opportunity.
-
Under Opportunity columns and data, choose any record and change the Opportunity status to Closed.
-
In the Power Apps Maker portal, select the App launcher in the top left of the browser window and then select Outlook.
-
Verify that an email notification was received.