Practice Lab 5 – Button flow
In this lab you will create a button flow.
What you will learn
- How to create a Power Automate instant button flow
High-level lab steps
- Create a button flow
- Use trigger tokens
- Add user input
- Test the flow
Prerequisites
- Must have completed Lab 2: Data model
Detailed steps
Exercise 1 – Create button flow
Task 1.1 - Create the trigger
-
Navigate to the Power Automate portal
https://make.powerautomate.com -
Make sure you are in the Dev One environment.
-
Select the + Create tab from the left-side menu.
-
Select Instant cloud flow.
-
Enter
Create opportunityfor Flow name. -
Select Manually trigger a flow.
-
Select Create.
Task 1.2 - Add user input
-
Select the Manually trigger a flow step.
-
Select Add an input.
-
Select Text.
-
Enter
Customer Namein Input. -
Enter
Please enter the customer namein Please enter your input. -
Select Add an input.
-
Select Text
-
Enter
Commentsin Input. -
Enter
Any commentsin Please enter your input. -
Select Add an input.
-
Select Number
-
Enter
Potential Salein Number.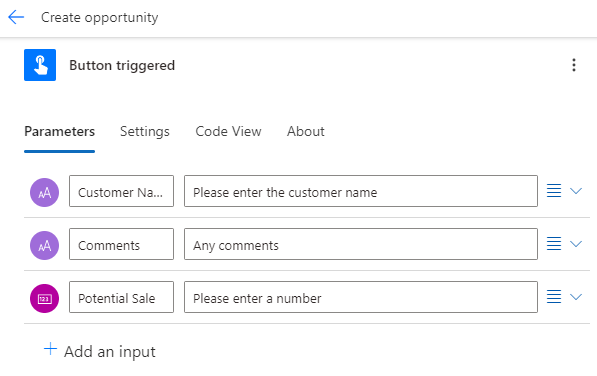
Task 1.3 - Add create opportunity action
-
Select the + icon under the trigger step to add an action.
-
Enter
add rowin the search box. -
Select Add a new row under Microsoft Dataverse.
-
Select Change connection reference.
-
Enter
Dataversefor Connection name. -
Select Sign in
-
Use your tenant credentials.
-
Select Add a new row step name and enter
New opportunity. -
Select Opportunities for Table Name.
-
Enter
/into the Customer field and select Insert dynamic content, select See more. -
Select Customer Name.
-
Select Opportunity Subject field and enter
New opportunity -
Select Owner Name field and enter
MOD Administrator -
Select Show all.
-
Enter
/into the Amount field and select Insert dynamic content. -
Select Potential Sale.
-
Enter
/into the Estimated Close Date field and select Insert expression. -
Enter the expression
utcNow()and select Add.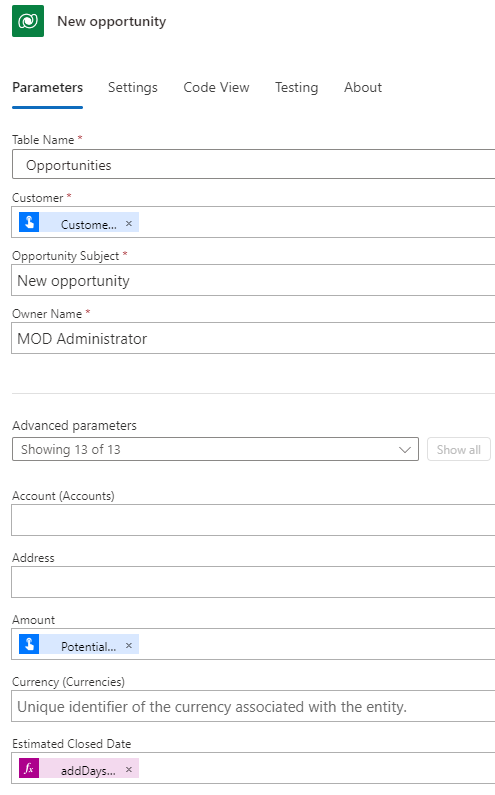
-
Select Notes field and select the Dynamic content icon and select See more.
-
Select Comments.
-
Select Save.
Exercise 2 – Test button flow
Task 2.1 - Run button flow
-
Select Test
-
Select Manually.
-
Select Test.
-
Enter the following details:
- Customer Name=
Button test - Comments=
This is a test - Potential Sale=
9999
- Customer Name=
-
Select Run flow.
-
Select Done.
-
Select the <- Back button from the top left of the command bar.
Task 2.2 - Verify opportunity record created
-
Navigate to the Power Apps Maker portal
https://make.powerapps.com -
Make sure you are in the Dev One environment.
-
In the left navigation pane, select Tables.
-
Select Opportunity.
-
Verify that a new opportunity record was created.