Practice Lab 4 – Approval flow
In this lab you will create an approval flow.
What you will learn
- How to create a Power Automate approvals cloud flow
High-level lab steps
- Create an automated cloud flow for the SharePoint list
- Create an approval
- Add condition for approval outcome
- Test the flow
Prerequisites
- Must have completed Lab 3: SharePoint
Detailed steps
Exercise 1 – Create approval flow
Task 1.1 - Create the trigger
-
Navigate to the Power Automate portal
https://make.powerautomate.com -
Make sure you are in the Dev One environment.
-
Select the + Create tab from the left navigation panel.
-
Select Automated cloud flow.
-
Enter
Task approvalfor Flow name. -
Enter
SharePointin Search all triggers. -
Select When an item is created.
-
Select Create.
Task 1.2 - Configure the trigger
-
Select the When an item is created step.
- Select the When an item is created step name and enter
New task.[!NOTE] If you encounter an issue editing the trigger name, use Copilot to rename it.
Select Copilot, and in the Copilot chat enter the following prompt:Rename the trigger to New task. -
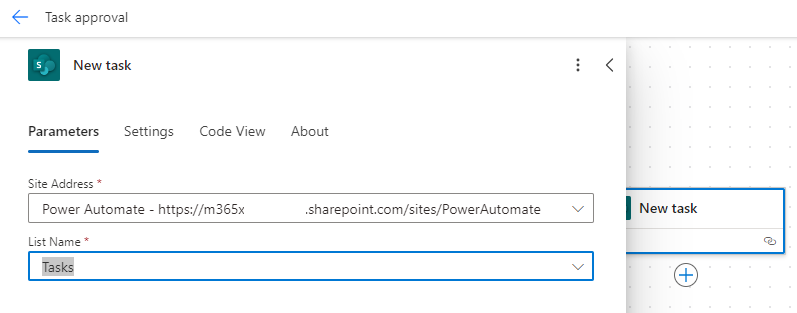
Select the Power Automate SharePoint site created in the previous lab. If the site is not listed, select Enter custom value and paste the URL of the Power Automate SharePoint site
-
Select the Tasks list.
Task 1.3 - Add approval action
-
Select the + icon under the trigger step to add an action.
-
Enter
approvalin the search box.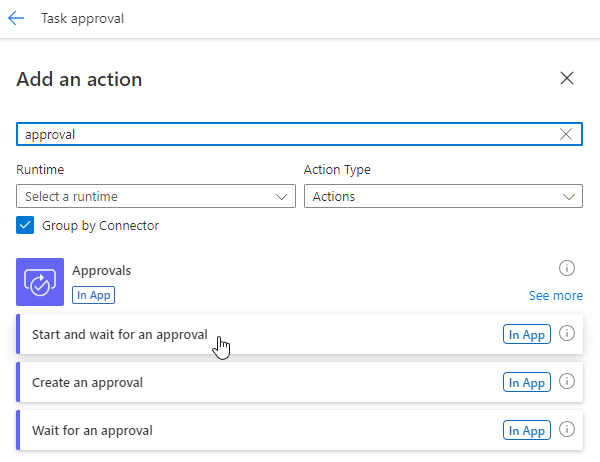
-
Select Start and wait for an approval under Standard approvals.
-
Select Create New.
-
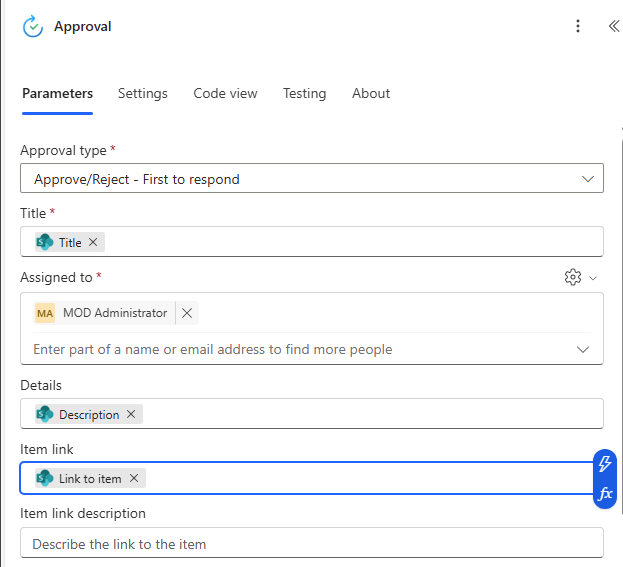
Select Approve/Reject - First to respond for Approval Type
-
Select Start and wait for an approval step name and enter
Approval -
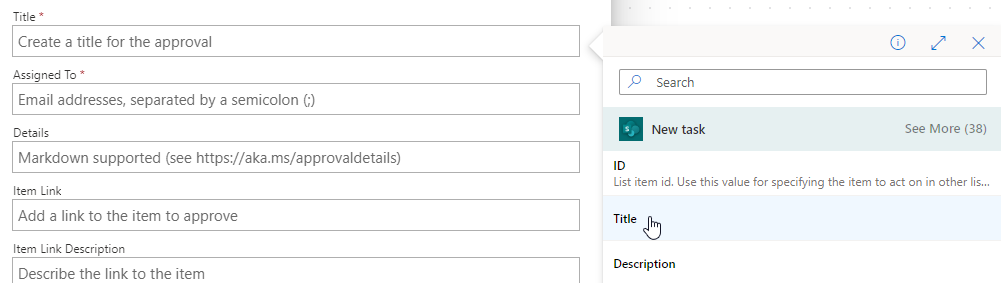
Enter
/into the Title field and select Insert dynamic content. -
Select Title under New Task.
-
Enter your tenant user id for Assigned To.
-
Enter
/into the Details field and select Insert dynamic content. -
Select Description.
-
Enter
/into the Item Link field and select Insert dynamic content. -
Select See More, and then select Link to item.
Task 1.4 - Add condition
-
Select the + icon under the approval trigger step to add an action.
-
Enter
conditionin the search box. -
Select Condition under Control.
-
Enter
/into the left Choose a value field and select Insert dynamic content.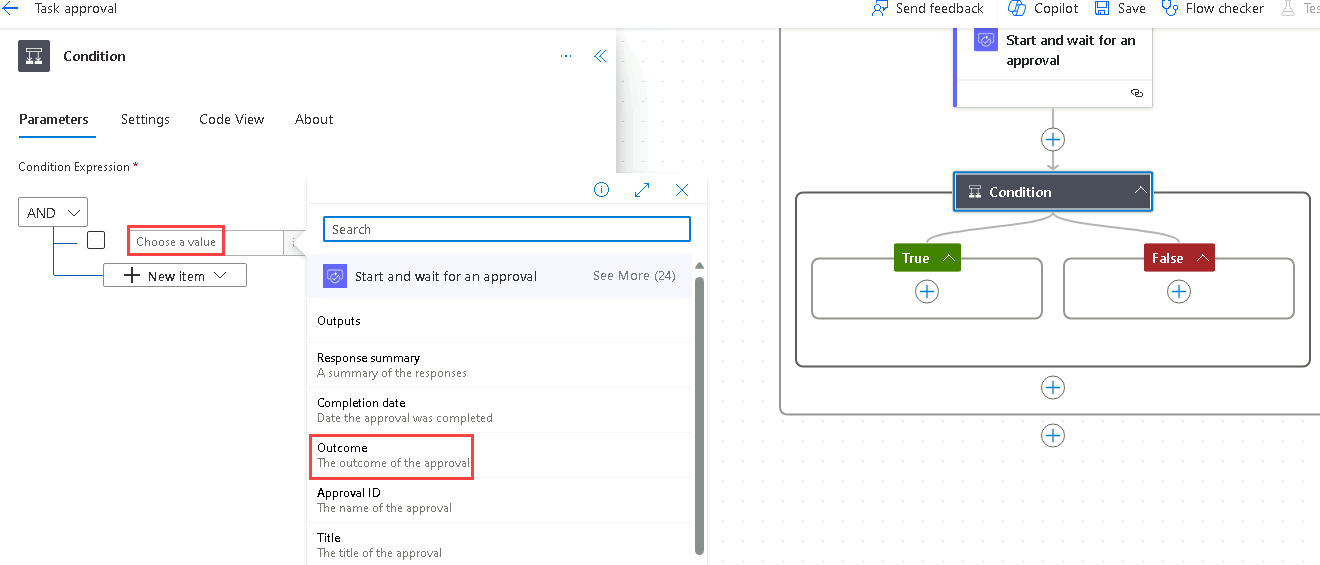
-
Select Outcome.
-
Select is equal to for Operator.
-
Select the right Choose a value field and enter
Approve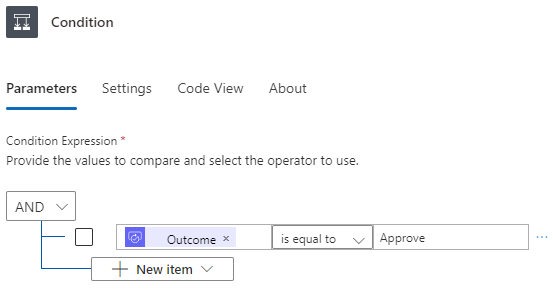
Task 1.5 - Update status actions
-
Select the + icon under True to add an action.
-
Enter
update itemin the search box. -
Select Update item under SharePoint.
-
Select Update item step name and enter
Set task to approved -
Select the Power Automate SharePoint site.
-
Select the Tasks list.
-
Enter
/into the Id field and select Insert dynamic content. -
Select ID from New task.
-
Select Show all next to Advanced parameters.
-
Enter
/into the Title field and select Insert dynamic content. -
Select Title from New task.
-
Select Approved for Approval Status Value.
-
Select the + icon under False to add an action.
-
Enter
update itemin the search box. -
Select Update item under SharePoint.
-
Select Update item 1 step name and enter
Set task to declined. -
Select the Power Automate SharePoint site.
-
Select the Tasks list.
-
Enter
/into the Id field and select Insert dynamic content. -
Select ID from New task.
-
Select Show all.
-
Enter
/into the Title field and select Insert dynamic content. -
Select Title from New task.
-
Select Declined for Approval Status Value.
-
Select Save.
-
Select the <- Back button from the top left of the command bar.
Exercise 2 – Test approval
Task 2.1 - Trigger approval flow
-
Navigate to the SharePoint site and select the Tasks list.
-
Select + Add new item and enter the following data and select Save:
- Title=
Approval test - Description=
Test - Owner Name=
MOD Administrator - Deadline=Today
- Approval Status=New
- Title=
Task 2.2 - Progress approval
-
Navigate to the Power Automate portal
https://make.powerautomate.com -
Make sure you are in the Dev One environment.
-
Select the My flows tab from the left navigation menu.
-
Select Task approval.
-
Select the date and time in the flow run history.
-
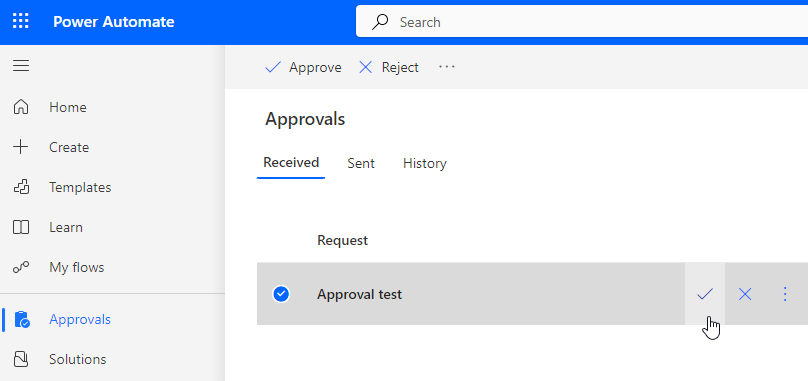
Open a new browser tab and navigate to the Power Automate portal
https://make.powerautomate.com -
Select the Approvals tab from the left navigation menu.
-
Select the Approval test, select the Tick, and select Confirm.
-
Select Done.
-
Select the My flows tab from the left navigation menu.
-
Select Task approval.
-
Select the date and time in the 28-day run history.
-
Expand the condition step.
-
Navigate to the SharePoint site and select the Tasks list.
-
Verify that the Approval status of the Approval test item is Approved.