Practice Lab 3.1 – Forms
Scenario
You are a Power Platform functional consultant and have been assigned to the Fabrikam project for the next stage of the project.
In this practice lab, you will be modifying the forms for the Fabrikam Environment model-driven apps.
There are three model-driven apps in the solution:
- Environmental Administration
- Environmental Management
- Environmental Project Delivery
You will be:
- Modifying columns on the project form
- Adding the timeline control to the project form
- Replacing the project outcomes sub-grid
- Adding the columns you created in the earlier lab to the forms
- Editing the project quick view form
- Adding a filter to the contact lookup on Program
- Adding a quick create form
- Copying a form
- Adding the table you created in the earlier lab to an app
This lab will take approximately 45 minutes to complete.
Exercise 1 – Edit Project forms
In this exercise, you will make changes to the forms for the Project table.
Task 1.1 – Modify the Project main form
In this task, you will perform the following changes to the form:
- change the label for project description
- increase the size of project description field
- add columns to the form
-
Navigate to the Power Apps Maker portal
https://make.powerapps.com -
Make sure you are in the Dev One environment.
-
Select Solutions.
-
Open the Fabrikam Environmental solution.
-
In the Objects pane on the left, expand Tables.
-
Select the Project table.
-
Under Data experiences, select Forms.
-
Select the Information form where the Form type is Main, select the Commands menu (…), and select Edit > Edit in new tab.
-
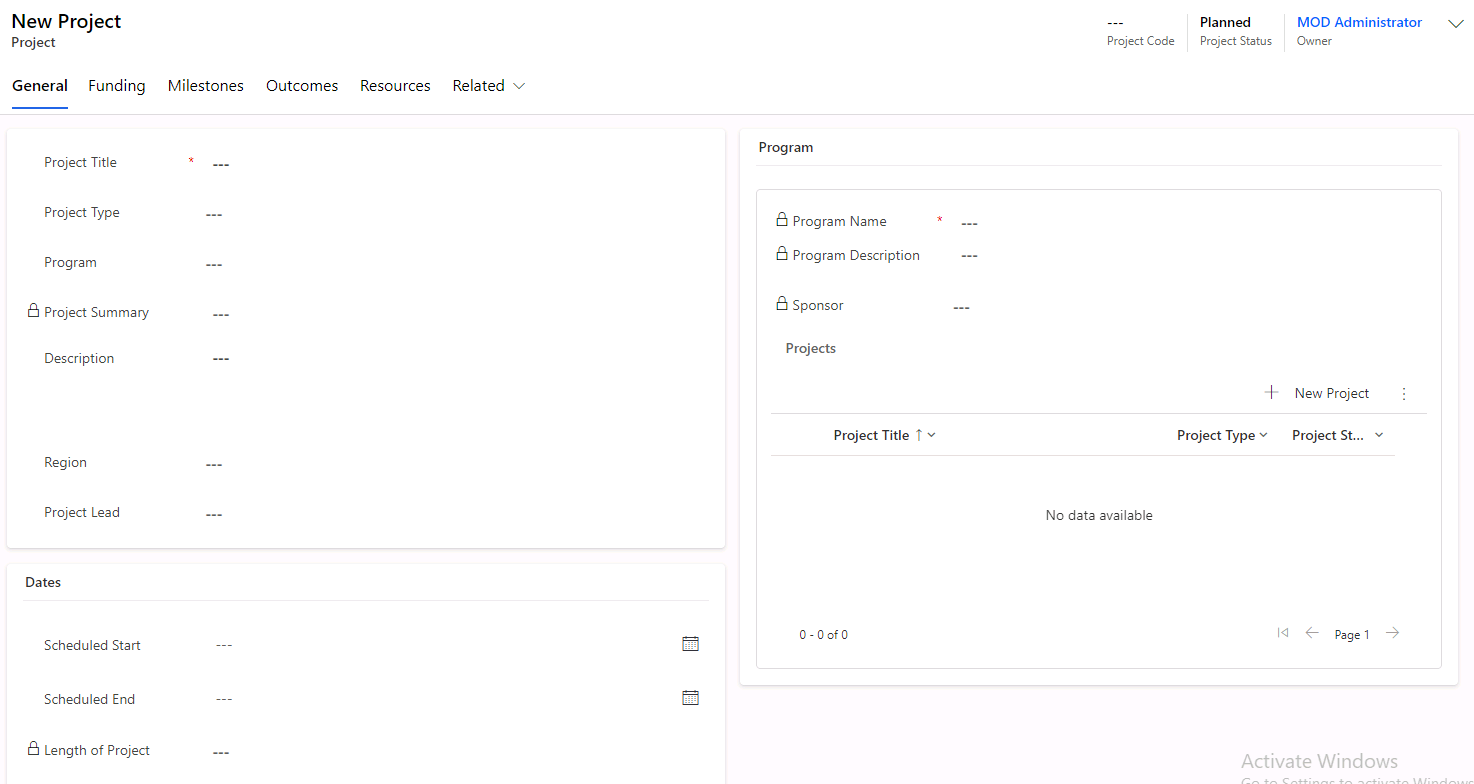
Select the Project Description field.
-
In the Properties pane on the right-hand side, change Label to
Description -
In the Properties pane on the right-hand side, increase Form field height to 4 rows.
-
Select Table columns on the left-hand side of the form designer.
-
Drag the Project Code column into the Header area.
-
Drag the Project Summary column below Program.
-
Drag the Project Lead column below Region.
-
Drag the Length of Project column below Scheduled End in the Dates section.
-
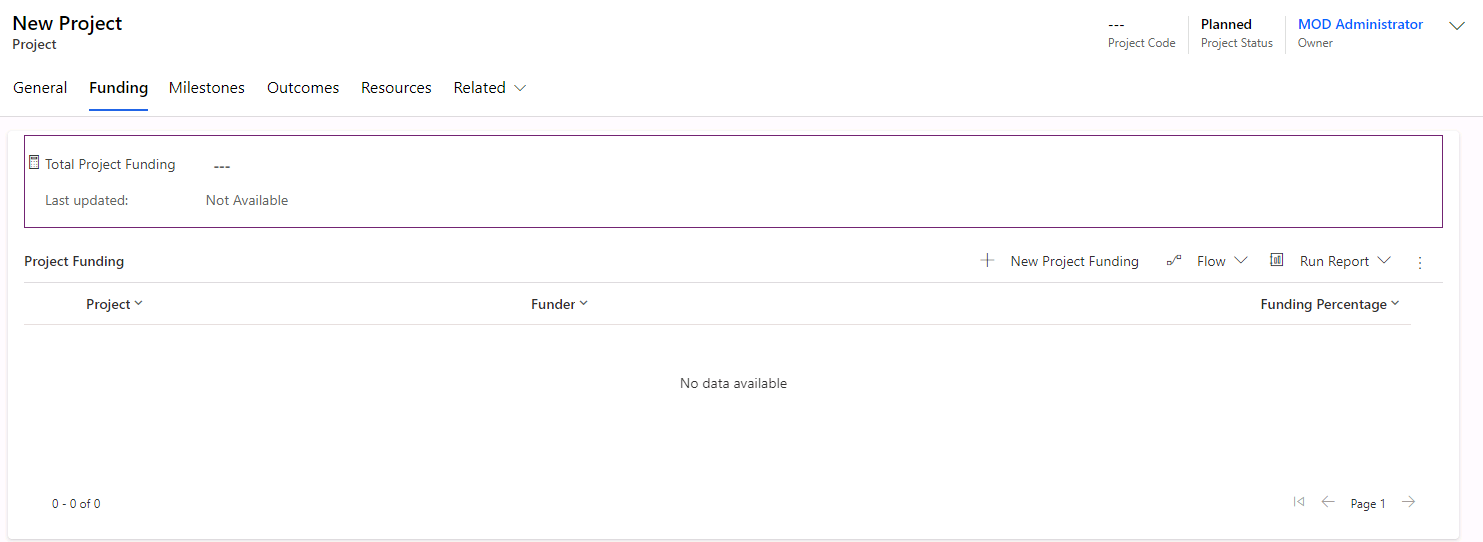
Select the Funding tab.
-
Drag the Total Project Funding column above the Project Funding sub-grid.
-
On the Save and publish drop-down menu, select Save only. Do not navigate away from this page.
Task 1.2 – Add Timeline control to main form
In this task, you will perform the following changes to the form:
- change tab properties
- insert the Timeline control
- restrict the activities available on the Timeline
-
Select Tree view on the left-hand side of the form designer.
-
Select the General tab.
-
In the Properties pane on the right-hand side, select 3 columns in the Layout drop-down.
-
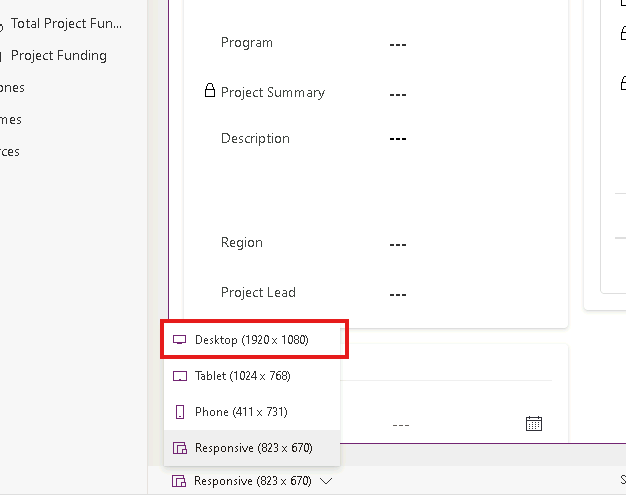
Select the Program section and drag to the new right-hand column of the General tab.
Note: If you don’t see a three column layout, change the forms view size to Desktop.
-
Select the New section in the right column and select Delete.
-
Select the New section in the middle column.
-
Select Components on the left navigation of the form designer.
-
Expand Display.
-
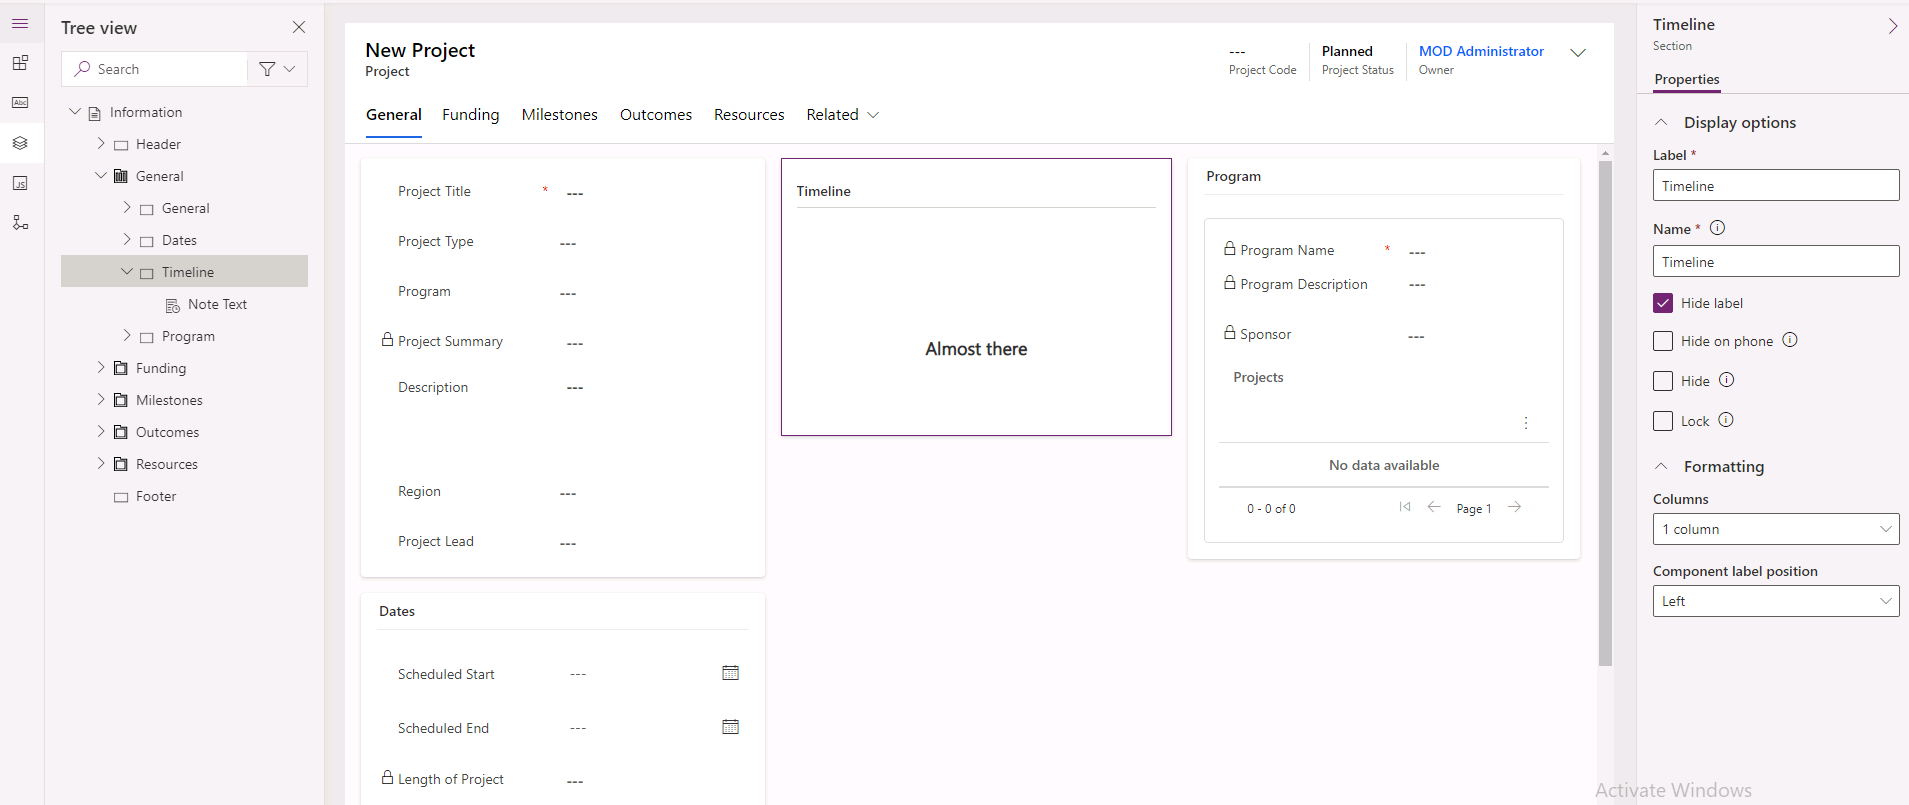
Drag the Timeline control to the middle column of the General tab.
-
Select Tree view on the left side of the form designer, expand General tab, and select the New Section section.
-
In the Properties pane on the right side, enter
Timelinefor both Label and Name. -
Check the Hide label box.
-
In the Tree view, select the Note Text control for the Timeline.
-
In the Properties pane on the right side, select Fax, verify the Enable box is unchecked, and select Cancel.
-
In the Properties pane on the right side, select Social Activity, uncheck the Enable box, and select Done.
-
In the Properties pane on the right side, select Date Created in Sort activities by drop-down.
-
On the Save and publish drop-down menu, select Save only. Do not navigate away from this page.
Task 1.3 – Outcome sub-grid on main form
In this task, you will perform the following changes to the form:
- replace the sub-grid for the many-to-many relationship between Project and Outcome with a sub-grid for the Project Outcome table
-
Select the Outcomes tab.
-
Select the Outcomes SubGrid.
-
In the properties pane on the right-hand side, select Project Outcomes (Project) in the Table drop-down.
-
On the Save and publish drop-down menu, select Save only.
-
Close the form designer.
-
Select Done.
Task 1.4 – Modify the Project quick view form
In this task, you will perform the following changes to the form:
- add a sub-grid of Outcomes to the quick view form
-
Select the Information form where the Form type is Quick View, select the Commands menu (…), and select Edit > Edit in new tab.
-
Select Table columns on the left-hand side of the form designer.
-
Drag the Region column below Owner.
-
Drag the Project Type column below Region.
-
Select the Project Status column to add it to the form below Project Type.
-
Select the Owner field.
-
In the Properties pane on the right side, check the Hide box.
-
Select Components on the left side of the form designer.
-
Select the 1-column section control to add it to the form.
-
In the properties pane on the right-hand side, enter
Outcomesfor Label and Name. -
Expand Grid in the Components pane.
-
Select Subgrid and check Show related records.
-
Select Outcomes for Table.
-
Select Outcomes SubGrid for Default view.
-
Select Done.
-
In the Properties pane on the right side, enter
Outcomesfor Label andOutcomesSGfor Name. -
Check Hide Label

-
On the Save and publish drop-down menu, select Save only.
-
Close the form designer.
-
Select Done.
Exercise 2 – Edit Program form
In this exercise, you will add filtering on a lookup field on the Program table form.
Task 2.1 – Add filtering to lookup
In this task, you will perform the following changes to the form:
- add a filter to the Contact lookup to only show Contacts that belong to the selected Account
-
Navigate to the Power Apps Maker portal https://make.powerapps.com.
-
Make sure you are in the Dev One environment.
-
Select Solutions.
-
Open the Fabrikam Environmental solution.
-
In the Objects pane on the left, click and expand Tables.
-
Select the Program table.
-
Under Data experiences, click on Forms.
-
Select the Information form where the Form type is Main, select the Commands menu (…), and select Edit > Edit in new tab.
-
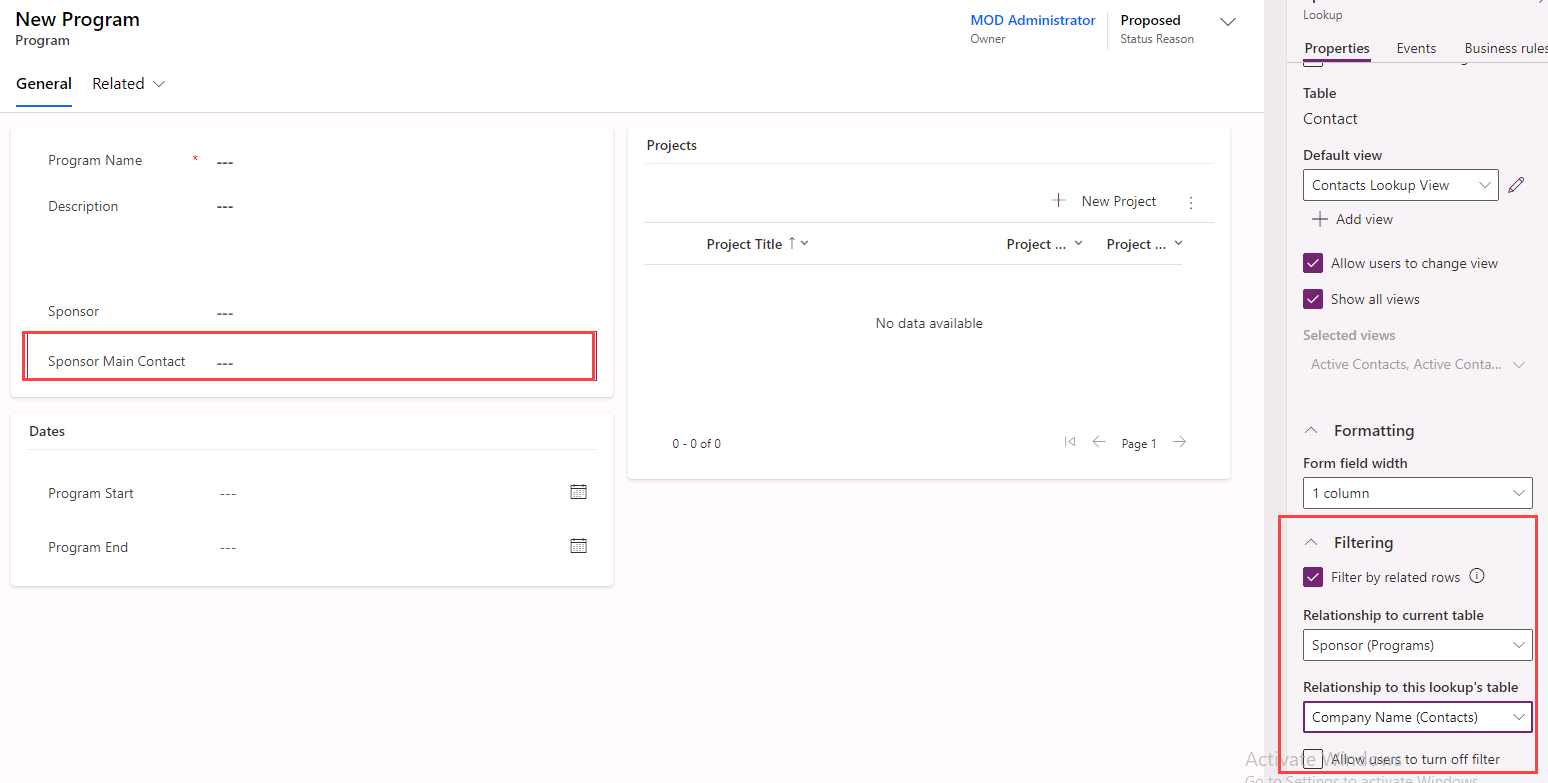
Select the Sponsor Main Contact field.
-
In the Properties pane on the right-hand side, expand Filtering.
-
Check the Filter by related rows box.
-
Select Sponsor (Programs) for Relationship to current table.
-
Select Company Name (Contacts) for Relationship to this lookup’s table.
-
On the Save and publish drop-down menu, select Save only.
-
Close the form designer.
-
Select Done.
Exercise 3 – Edit Project Funding form
In this exercise, you will add new columns to the Project Funding table main form and add the form control to allow editing of the account record.
Task 3.1 – Add columns to form
In this task, you will perform the following changes to the form:
- add columns to the form
-
Navigate to the Power Apps Maker portal https://make.powerapps.com.
-
Make sure you are in the Dev One environment.
-
Select Solutions.
-
Open the Fabrikam Environmental solution.
-
In the Objects pane on the left, expand Tables.
-
Select the Project Funding table.
-
Under Data experiences, select Forms.
-
Select the Information form where the Form type is Main, select the Commands menu (…), and select Edit > Edit in new tab.
-
Select Table columns on the left-hand side of the form designer.
-
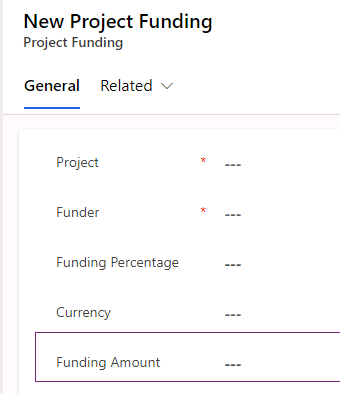
Drag the Currency column below Funding Percentage.
-
Select the Funding amount column to add to the form below Currency.
-
On the Save and publish drop-down menu, select Save only.
-
Close the form designer.
-
Select Done.
Task 3.2 – Add form control
In this task, you will perform the following changes to the form:
- add form component to embed the account form
-
Navigate to the Power Apps Maker portal https://make.powerapps.com.
-
Make sure you are in the Dev One environment.
-
Select Solutions.
-
Open the Fabrikam Environmental solution.
-
In the Objects pane on the left, expand Tables.
-
Select the Project Funding table.
-
Under Data experiences, select Forms.
-
Select the Information form where the Form type is Main, select the Commands menu (…), and select Edit > Edit in new tab.
-
Select Tree view on the left-hand side of the form designer.
-
Select the General tab.
-
In the Properties pane on the right-hand side, select 2 columns in the Layout drop-down.
-
Select Components on the left navigation of the form designer.
-
Expand Display.
-
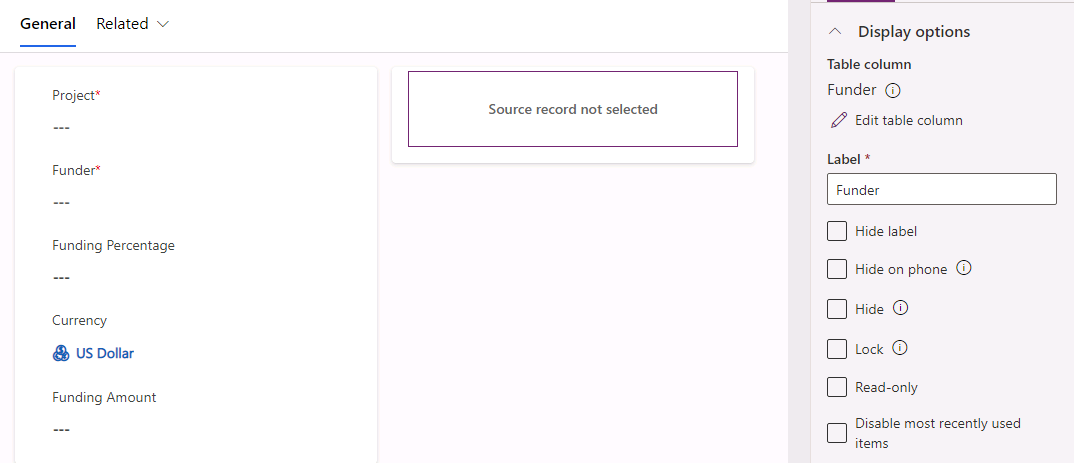
Drag the Form control to the right-hand column of the General tab.
-
Select Funder for Lookup column.
-
Select Account main form for Environmental for Related Form.
-
Select Done.
-
Select the New Section
-
Check the Hide label box.
-
On the Save and publish drop-down menu, select Save only.
-
Close the form designer.
-
Select Done.
Exercise 4 – Edit Region form
In this exercise, you will add the hierarchical relationship to the Region table form.
Task 4.1 – Add parent lookup and child sub-grid to the form
In this task, you will perform the following changes to the form:
- add parent region lookup
- add a sub-grid for child regions
-
Navigate to the Power Apps Maker portal
https://make.powerapps.com -
Make sure you are in the Dev One environment.
-
Select Solutions.
-
Open the Fabrikam Environmental solution.
-
In the Objects pane on the left, expand Tables.
-
Select the Region table.
-
Under Data experiences, select Forms.
-
Select the Information form where the Form type is Main, select the Commands menu (…), and select Edit > Edit in new tab.
-
Select Table columns on the left navigation of the form designer.
-
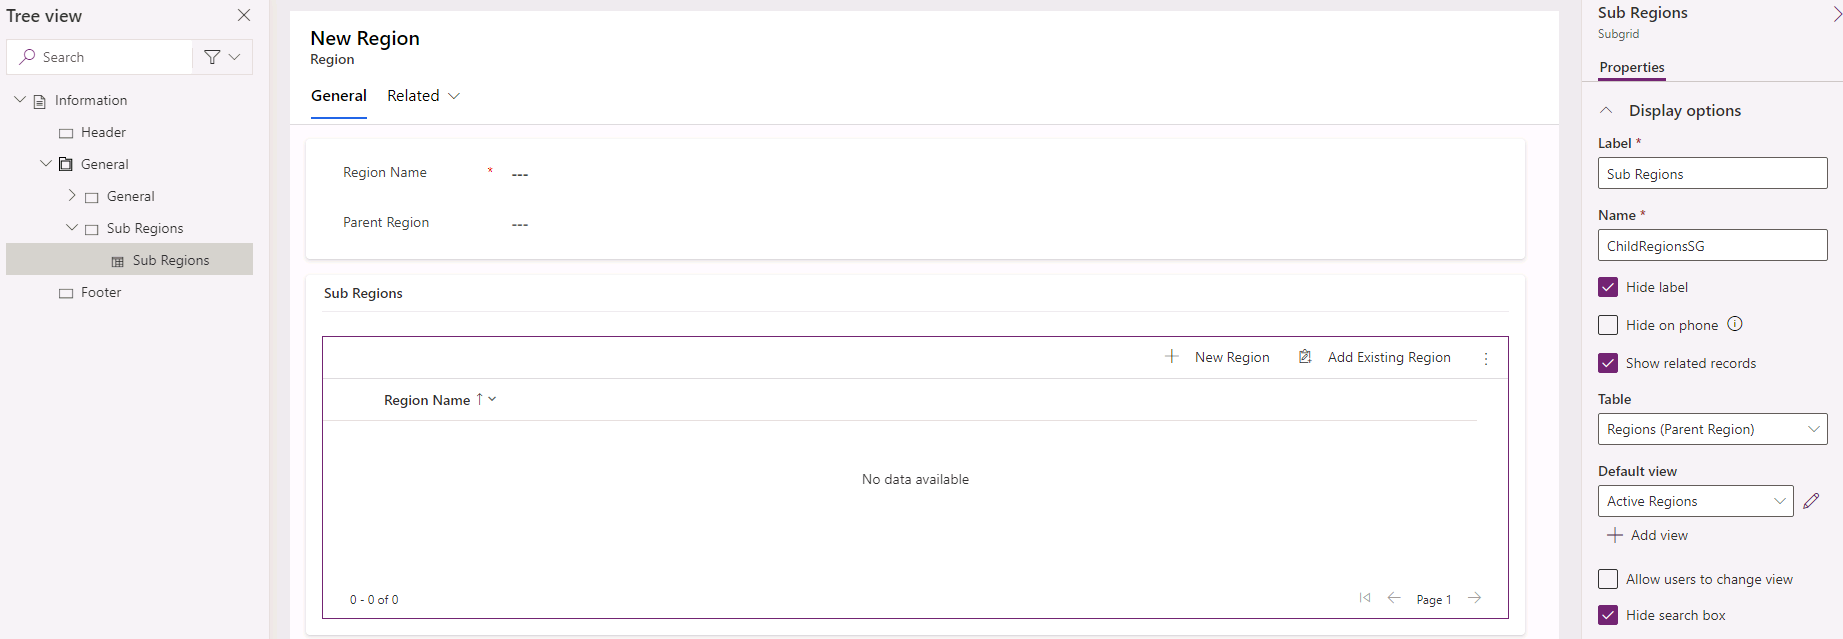
Drag the Parent Region column below Region Name.
-
Select Components on the left navigation of the form designer.
-
Select the 1-column section control to add it to the form.
-
In the Properties pane on the right side, enter
Sub Regionsfor Label andChildRegionsfor Name. -
Expand Grid in the Components pane.
-
Select Subgrid and check Show related records.
-
Select Regions (Parent Region) for Table.
-
Select Done.
-
In the Properties pane on the right side, enter
Sub Regionsfor Label andChildRegionsSGfor Name. -
Check the Hide label box.
-
On the Save and publish drop-down menu, select Save only.
-
Close the form designer.
-
Select Done.
Exercise 5 – Project Resource Quick Create form
In this exercise, you will create a Quick Create form for the Project Resource table form.
Task 5.1 – Enable Quick Create form
In this task, you will enable the Project Resource table for quick create.
-
Navigate to the Power Apps Maker portal
https://make.powerapps.com -
Make sure you are in the Dev One environment.
-
Select Solutions.
-
Open the Fabrikam Environmental solution.
-
In the Objects pane on the left, expand Tables.
-
Select the Project Resource table.
-
Under Table Properties, select Properties.
-
In the Edit table pane on the right side of the screen, expand Advanced options and scroll down.
-
Check the Leverage quick-create form if available box.
-
Select Save.
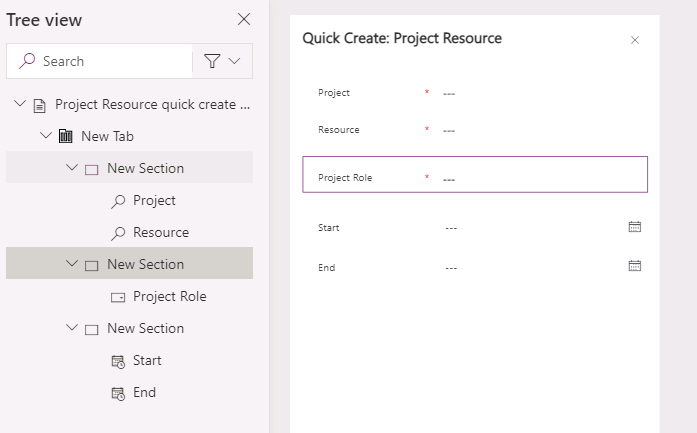
Task 5.2 – Create Quick Create form
In this task, you will create a quick create form.
-
In the Project Resource table, under Data experiences, select Forms.
-
Select + New form.
-
Select Quick create form.
-
Enter
Project Resource Quick Createfor Form name. -
Uncheck Get AI-generated column suggestions and select Create.
-
Drag the Project column to add to the form in the first section.
-
Drag the Resource column to add to the form in the first section.
-
Drag the Project Role column to add to the form in the second section.
-
Drag the Start column to add to the form in the third section.
-
Drag the End column to add to the form in the third section.
-
Select the first section, and in the properties pane click Hide label.
-
Select the second section, and in the properties pane click Hide label.
-
Select the third section, and in the properties pane click Hide label.
-
On the Save and publish drop-down menu, select Save only.
-
Select 🡠 Back.
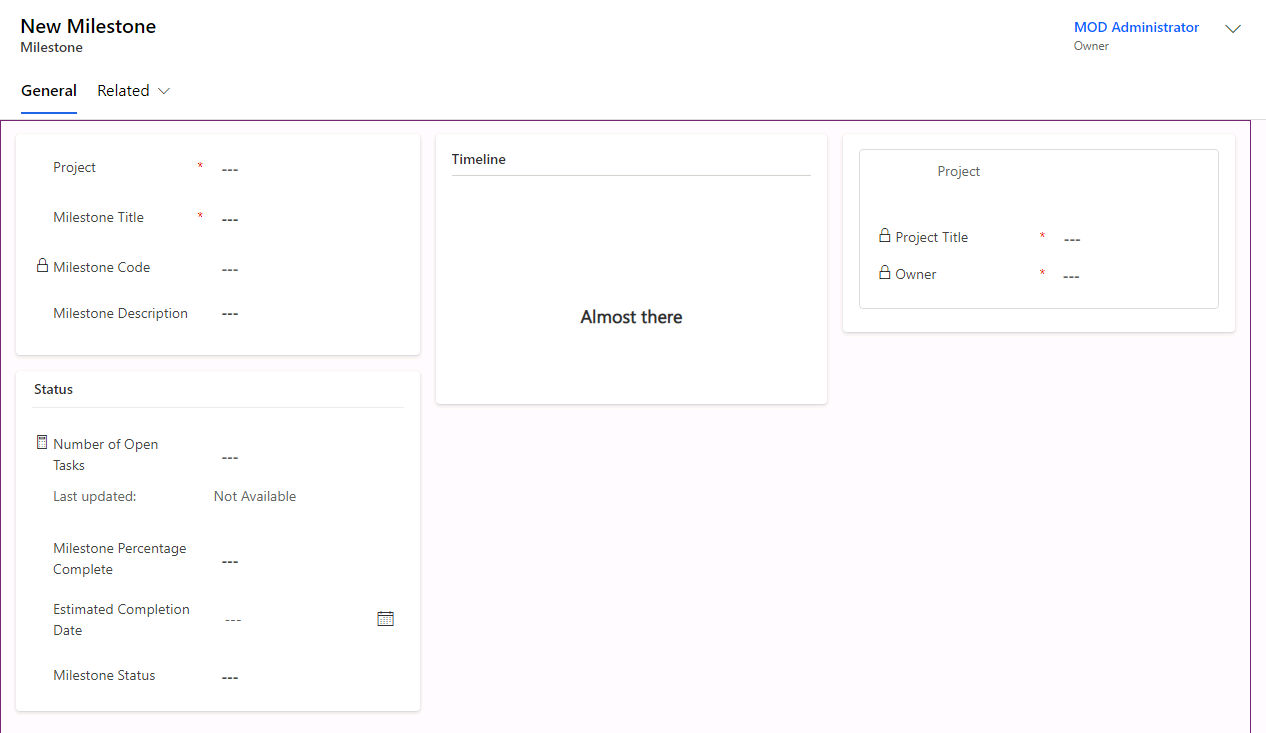
Exercise 6 – Edit Milestone form
In this exercise, you will add the status choice column to the Milestone table form.
Task 6.1 – Add columns to the form
In this task, you will perform the following changes to the form:
- add Milestone status to the form
- remove Status reason from the form
-
Navigate to the Power Apps Maker portal
https://make.powerapps.com -
Make sure you are in the Dev One environment.
-
Select Solutions.
-
Open the Fabrikam Environmental solution.
-
In the Objects pane on the left, expand Tables.
-
Select the Milestone table.
-
Under Data experiences, select Forms.
-
Select the Information form where the Form type is Main, select the Commands menu (…), and select Edit > Edit in new tab.
-
Drag the Milestone Status column below the Status Reason field.
-
Select the Status Reason field and select Delete.
-
On the Save and publish drop-down menu, select Save only.
-
Close the form designer.
-
Select Done.
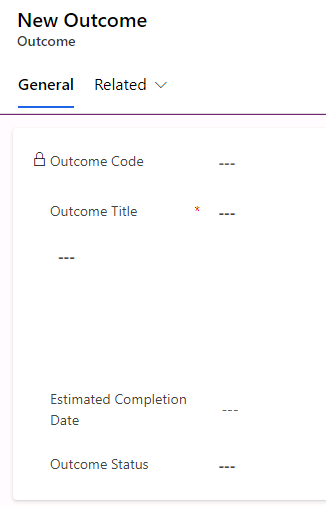
Exercise 7 – Edit Outcome form
In this exercise, you will add the status choice column to the Outcome table form.
Task 7.1 – Add columns to the form
In this task, you will perform the following changes to the Outcome form:
- add Outcome status to the form
- remove Status reason from the form
- delete the Project tab
-
Navigate to the Power Apps Maker portal
https://make.powerapps.com -
Make sure you are in the Dev One environment.
-
Select Solutions.
-
Open the Fabrikam Environmental solution.
-
In the Objects pane on the left, expand Tables.
-
Select the Outcome table.
-
Under Data experiences, select Forms.
-
Select the Information form where the Form type is Main, select the Commands menu (…), and select Edit > Edit in new tab.
-
Drag the Outcome Status column below the Status Reason field.
-
Select the Status Reason field and select Delete.
-
Select the Projects tab and select the Delete icon.
-
On the Save and publish drop-down menu, select Save only.
-
Close the form designer.
-
Select Done.
Exercise 8 – Edit Project Outcome form
In this exercise, you will configure the default form for the Project Outcome table.
Task 8.1 – Configure main form
In this task, you will perform the following changes to the Project Outcome form:
- change form layout
- add columns to the form
- hide the name on the form
- Add a quick view form
-
Navigate to the Power Apps Maker portal
https://make.powerapps.com -
Make sure you are in the Dev One environment.
-
Select Solutions.
-
Open the Fabrikam Environmental solution.
-
In the Objects pane on the left, expand Tables.
-
Select the Project Outcome table.
-
Under Data experiences, select Forms.
-
Select the Information form where the Form type is Main, select the Commands menu (…), and select Edit > Edit in new tab.
-
Drag the Owner field from the body into the Header.
-
Select Tree view on the left side of the form designer.
-
Select the General tab.
-
In the Properties pane on the right side, enter
Generalfor Name -
Under Formatting, in the Layout drop-down, select 2 columns.
-
Select the New Section section.
-
In the properties pane on the right-hand side, enter
Relatedfor Label and Name. -
Select Table columns on the left-hand side of the form designer.
-
Drag the Project column below the Title field.
-
Select the Outcome column to add to the form below Project.
-
Select the Comments column to add to the form below Outcome.
-
Select the Outcome Completed Date column to add to the form below Comments.
-
Select the Stakeholders Notified column to add to the form below Outcome completed date.
-
Select the Title field.
-
In the Properties pane on the right side, check Hide.
-
Select the Related section.
-
Select Components on the left side of the form designer, and expand Display.
-
Select the Quick view control.
-
In the Select Quick view forms pop-up, select Project for Lookup.
-
Select Information for Project.
-
Select Done.

-
Select the Related section.
-
Check Hide label.
-
On the Save and publish drop-down menu, select Save only.
-
Close the form designer.
-
Select Done.
Exercise 9 – Copy Outcome form
In this exercise, you will be copying a form and implementing security on forms.
Task 9.1 – Copy Outcome form
In this task, you will perform the following changes to the form:
- Rename the main form
- Copy the main form to allow managers to view and edit columns
- Associate security roles with the forms
- Set the form order
-
Navigate to the Power Apps Maker portal
https://make.powerapps.com -
Make sure you are in the Dev One environment.
-
Select Solutions.
-
Open the Fabrikam Environmental solution.
-
In the Objects pane on the left, expand Tables.
-
Select the Outcome table.
-
Under Data experiences, select Forms.
-
Select the Information form where the Form type is Main, select the Commands menu (…), and select Edit > Edit in new tab.
-
In the Properties pane on the right side, enter
Userfor Display Name. -
On the Save and publish drop-down menu, select Save only.
-
Select Save a copy.
-
Enter
Managerfor Display Name andForm for managersfor Description and select Save. -
Select Tree view on the left side of the form designer.
-
Select the General tab.
-
In the properties pane on the right-hand side, enter
Generalfor Name -
Under Formatting, in the Layout drop-down, select 2 columns.
-
Select the New Section section.
-
In the Properties pane on the right side, enter
Detailsfor Label and Name. -
Select Table columns on the left navigation of the form designer.
-
Drag the Goal column to the Details section.
-
Select Approver to add to the Details section.
-
Select Approver Email to add to the Details section.
-
Select Approved to add to the Details section.
-
Select Target Aim to add to the Details section.
-
Select Stakeholders identified to add to the Details section.
-
Click on Tasks created to add to the Details section.
-
Click on Tasks assigned to add to the Details section.
-
Click on Tasks completed to add to the Details section.
-
Click on Environmental impact assessment completed to add to the Details section.
-
Select the Details section.
-
Check Hide label.

-
On the Save and publish drop-down menu, select Save only.
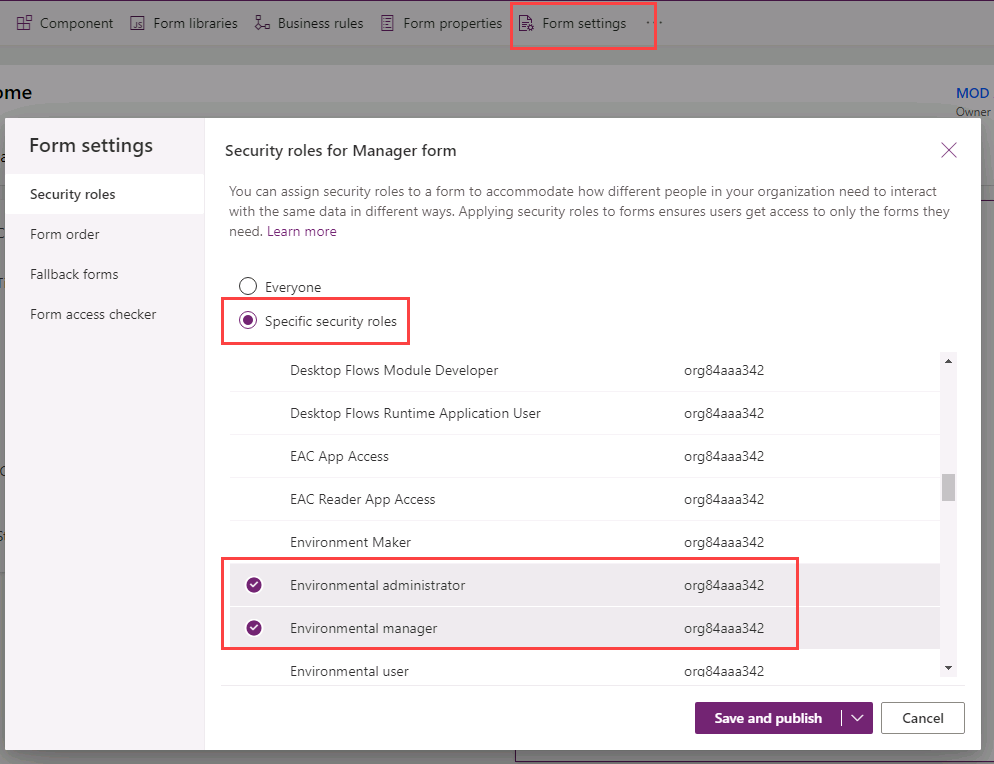
-
Select Form settings.
-
Select the Environmental manager and Environmental administrator roles as the specific security roles that should have access to this form.
-
Select the Form order tab.
-
Drag Manager above User.

-
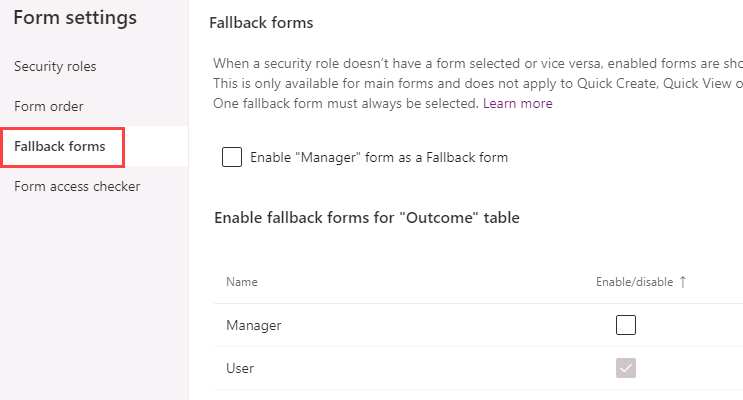
Select the Fallback forms tab.
-
Uncheck Enable Manager form as a Fallback form.
-
Select Save and publish.
-
Close the form designer.
-
Select Done.
-
Select the User form.
-
Select Form settings from the command bar.
-
Select the Specific security roles radio button.
-
Select the Environmental user role.
-
Select Save and publish.
Task 9.2 – Publish changes
-
In the Objects pane on the left, select All.
-
Select Publish all customizations.
Exercise 10 – Modify model-driven apps
In this exercise, you will be adding the tables and forms to the Fabrikam model-driven apps.
Task 10.1 – Environmental Management app
In this task, you will perform the following changes to the app:
- Add Project Outcome table
- Use the Manager form
-
Navigate to the Power Apps Maker portal
https://make.powerapps.com -
Make sure you are in the Dev One environment.
-
Select Solutions.
-
Open the Fabrikam Environmental solution.
-
In the Objects pane on the left, select Apps.
-
Select the Environmental Management app, select the Commands menu (…), and select Edit > Edit in new tab.
-
Select + New.
-
Select Dataverse table.
-
Search for and select Project Outcome.
-
Uncheck Show in navigation.
-
Select Add.
-
Select + New.
-
Select Dataverse table.
-
Search for and select Outcome.
-
Uncheck Show in navigation.
-
Select Add.
-
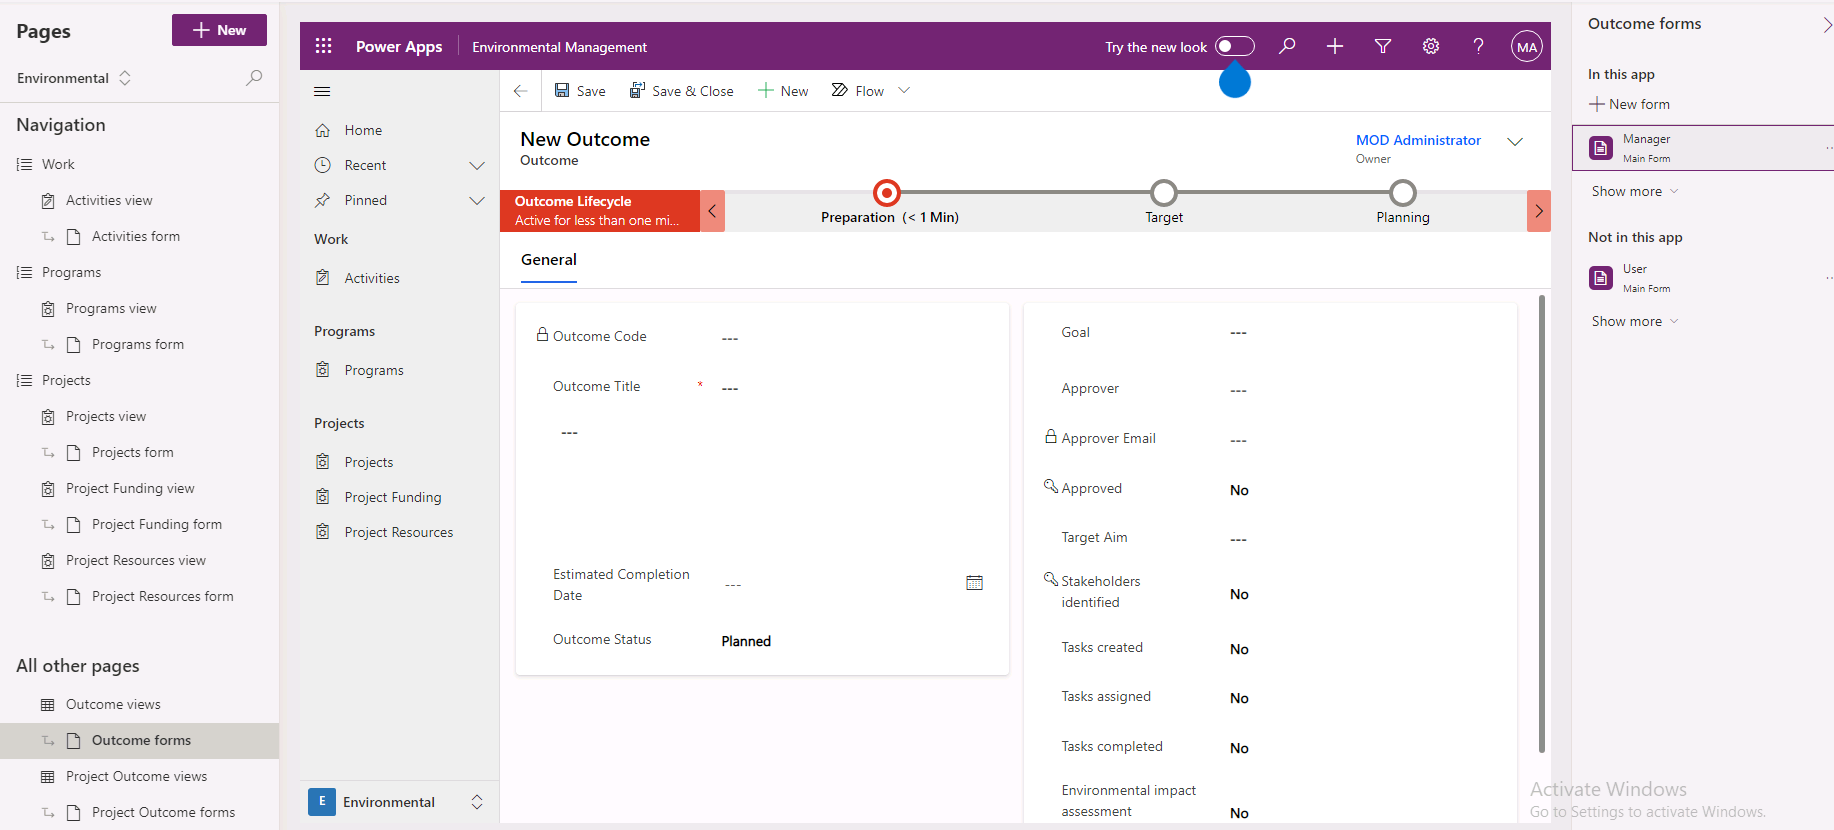
In the Pages pane on the left side, select Outcome forms under All other pages.
-
In the Outcome forms pane on the right side, select the ellipsis … for the User form and select Remove
-
Select Save and publish.
-
Select Play.
-
Navigate around and interact with the Environmental Management app before closing the app and app designer windows.
-
Close the app designer window.
-
Select Done.
Task 10.2 – Environmental Project Delivery app
In this task, you will perform the following changes to the app:
- Add Project Outcome table
- Use the User form
-
Select the Environmental Project Delivery app, select the Commands menu (…), and select Edit > Edit in new tab.
-
Select + New.
-
Select Dataverse table.
-
Search for and select Project Outcome.
-
Uncheck Show in navigation.
-
Select Add.
-
In the Pages pane on the left side, select Outcomes form.
-
In the Outcomes forms pane on the right side, select the ellipsis … menu on the Manager form and select Remove.
-
Select Save and publish.
-
Select Play.
-
Navigate around and interact with the Environmental Project Delivery app and then Close the app and app designer windows.
-
Select Done.