Lab 04: Protect devices
Lab scenario
You are Jordan Chen, Modern Endpoint Administrator at Contoso Healthcare. With devices enrolled and applications deployed, you now need to implement comprehensive security controls. You’ll integrate Microsoft Defender for Endpoint for EDR capabilities, deploy endpoint security policies (antivirus, firewall, attack surface reduction), configure BitLocker encryption with Microsoft Entra key escrow, deploy Microsoft Tunnel Gateway for secure VPN access, and implement Microsoft Cloud PKI for certificate-based authentication.
By the end of this lab, you’ll have:
- Enabled Microsoft Defender for Endpoint integration with Intune
- Onboarded Windows devices to Defender for Endpoint using EDR policies
- Deployed Microsoft Defender security baselines (tagged with the
Pharmacyscope tag) - Configured Antivirus, Firewall, and Attack Surface Reduction policies — with ASR split-assigned in Block mode to the pilot cohort and Audit mode to the broader fleet
- Created BitLocker encryption policies with Microsoft Entra recovery key escrow (tagged
Pharmacy) - Deployed Microsoft Tunnel Gateway on an Ubuntu server
- Created VPN profiles for Microsoft Tunnel connectivity
- Implemented Microsoft Cloud PKI with root and issuing CAs
- Created and deployed SCEP certificate profiles for device authentication
- Rehearsed enforcing the Conditional Access policy with What If, leaving it in Report-only
Lab Duration
Estimated Time: 110 minutes
Instructions
Before you begin
This lab requires:
- Completion of Lab 01 (devices enrolled)
- Access to the Contoso Microsoft 365 tenant (
<TenantPrefix>.onmicrosoft.com) - Microsoft 365 E5 licensing (includes Defender for Endpoint P2)
- Microsoft Intune Suite trial active (activated in Lab 01 prerequisites) — required for Cloud PKI (Exercise 5). Microsoft Tunnel (Exercise 4) is included in Intune Plan 1 and doesn’t require the Suite, but it does require the LIN-SRV1 Ubuntu server
- Global Administrator or Intune Administrator credentials
- SEA-DEV1 and SEA-DEV2 (enrolled Windows 11 devices)
- LIN-SRV1 (Ubuntu 22.04 server for Microsoft Tunnel Gateway)
[!IMPORTANT] Open the Microsoft Defender portal now. First-time Defender workspace provisioning can take several hours and took more than 4 hours in live testing. If you see Hang on! We’re preparing new spaces for your data, continue with the lab and return later.
Exercise 1: Integrate Microsoft Defender for Endpoint
Scenario
Microsoft Defender for Endpoint provides EDR (Endpoint Detection and Response), advanced threat protection, and automated investigation capabilities. You’ll enable the Intune-to-Defender connector and onboard Windows devices using an EDR configuration policy.
Task 1: Enable the Microsoft Defender for Endpoint connector
The Intune ↔ Defender for Endpoint connector is a two-portal setup: you flip the Microsoft Intune connection toggle in the Microsoft Defender portal first, and only then do the Connect Windows devices… toggles in the Intune admin center become enabled. If you skip the Defender-portal step, the Intune page shows Connection status: Unavailable and every toggle is grayed out.
Part A — Establish the connection from the Microsoft Defender portal
-
In Microsoft Edge, open a new tab and navigate to https://security.microsoft.com.
-
Sign in as **admin@
.onmicrosoft.com**. -
In the Microsoft Defender portal, select Settings.
-
Select Endpoints, and then under General, select Optional features.
-
Locate the Microsoft Intune connection toggle and set it to On.
-
Select Save preferences at the bottom of the page. The connection isn’t established until you save.
[!IMPORTANT] You need the Endpoint Security Manager role or Mobile Threat Defense Read and Modify permissions. If the toggle is unavailable or grayed out, wait for Defender provisioning, refresh the page, and try again later.
Part B — Configure the connector from the Intune admin center
-
Switch back to the Intune admin center tab (or open https://intune.microsoft.com).
-
In the Microsoft Intune admin center, select Endpoint security, and under the Setup section, select Microsoft Defender for Endpoint.
-
At the top of the page, select Refresh. Connection status should change from Unavailable to Available within a minute (it may take 1–2 minutes the first time).
-
On the **Endpoint security Microsoft Defender for Endpoint** page, configure the following:
- Endpoint Security Profile Settings:
- Allow Microsoft Defender for Endpoint to enforce Endpoint Security Configurations: On
- Compliance policy evaluation:
- Connect Windows devices version 10.0.15063 and above to Microsoft Defender for Endpoint: On
- Select Save at the top of the page. Connection status changes to Enabled.
You have successfully enabled the Microsoft Defender for Endpoint connector.
Task 2: Create an Endpoint Detection and Response policy
Endpoint Detection and Response policies onboard devices to Defender for Endpoint by deploying the required sensor and configuration.
-
In the Microsoft Intune admin center, navigate to Endpoint security → Endpoint detection and response.
-
Select + Create Policy.
- In the Create a profile pane, configure:
- Platform: Windows
- Profile: Endpoint detection and response
-
Select Create.
- On the Basics tab, enter:
- Name:
EDR - Defender Onboarding - Description:
Onboards Windows devices to Microsoft Defender for Endpoint
- Name:
-
Select Next.
- On the Configuration settings page, configure:
- Microsoft Defender for Endpoint client configuration package type: Auto from connector
- Sample Sharing: All (Default)
- [Deprecated] Telemetry Reporting Frequency: Expedite
-
Select Next.
-
On the Scope tags tab, select Next.
-
On the Assignments tab, select search by group name… to see the list of available groups.
-
Search for and select dyn-Windows-Devices.
-
Select Next.
- On the Review + create tab, select Create.
You have successfully created an EDR policy to onboard devices to Defender for Endpoint.
Task 3: Verify device onboarding in the Microsoft Defender portal
-
In Microsoft Edge, open a new tab and navigate to https://security.microsoft.com.
-
Sign in as **admin@
.onmicrosoft.com** (if not already signed in). -
In the Microsoft Defender portal, expand Assets in the left navigation and select Devices.
-
Wait 10–15 minutes for SEA-DEV1 and SEA-DEV2 to onboard to Defender for Endpoint.
[!NOTE] Device onboarding can take 10–30 minutes after the EDR policy applies. To speed it up, force a device sync in Intune.
-
After devices appear, select SEA-DEV1 from the device list.
-
Review the device details:
- Risk level: Low, Medium, High, or Secure
- Exposure level: Based on security configuration score
- Sensor health state: Active, Inactive, or Misconfigured
- Onboarding status: Onboarded
[!NOTE] Risk and exposure values can take 30–60 minutes to populate after onboarding.
You have successfully verified device onboarding to Microsoft Defender for Endpoint.
Exercise 2: Deploy endpoint security policies
Scenario
Endpoint security policies provide targeted security controls without the complexity of full configuration profiles. You’ll deploy the Microsoft Defender security baseline, antivirus policies, firewall policies, and attack surface reduction rules.
Task 1: Deploy the Microsoft Defender security baseline
Security baselines are pre-configured collections of recommended settings based on Microsoft security guidance.
-
In the Microsoft Intune admin center, navigate to Endpoint security → Security baselines.
-
Select Microsoft Defender for Endpoint Security Baseline from the list.
-
Select + Create policy.
-
In the Create a profile pane, select Create.
- On the Basics page, enter:
- Name:
Security Baseline - Defender for Endpoint - Description:
Microsoft-recommended security settings for Defender for Endpoint
- Name:
-
Select Next.
-
On the Configuration settings tab, review the default settings.
-
Scroll through the categories and note the pre-configured values. You can customize individual settings, but for this lab, accept most of the defaults.
- To prevent a conflict with a later task in this lab, expand BitLocker and configure:
- Allow Warning For Other Disk Encryption: Disabled
-
Select Next.
-
On the Scope tags tab, select + Select scope tags, select Pharmacy (created in Lab 01 Exercise 2 Task 6) and select Select. Remove the Default scope tag if present.
-
Select Next.
-
On the Assignments tab, under Included groups, select Add groups.
-
Search for and select dyn-Windows-Devices.
-
Select Select.
-
Select Next.
- On the Review + create tab, select Create.
You have successfully deployed the Microsoft Defender security baseline.
Task 2: Create an Antivirus policy
Antivirus policies configure Microsoft Defender Antivirus settings, including real-time protection, cloud protection, and scanning behavior.
-
In the Microsoft Intune admin center, navigate to Endpoint security → Antivirus.
-
Select + Create Policy.
- In the Create a profile pane, configure:
- Platform: Windows
- Profile: Microsoft Defender Antivirus
-
Select Create.
- On the Basics tab, enter:
- Name:
Antivirus - Defender Configuration - Description:
Configures real-time protection, cloud protection, and scan settings
- Name:
-
Select Next.
- On the Configuration settings page, expand Defender and configure:
- Allow Archive Scanning: Allowed
- Allow Behavior Monitoring: Allowed
- Allow Cloud Protection: Allowed
- Allow Full Scan Removable Drive Scanning: Allowed
- Allow Realtime Monitoring: Allowed
- Allow Scanning Network Files: Allowed
- Cloud Block Level: High
- Cloud Extended Timeout: 50 seconds
- Scan Parameter: Quick scan
- Schedule Scan Day: Every day
- Schedule Scan Time: 120 (minutes after midnight, which is 2:00 AM)
- Submit Samples Consent: Send all samples automatically
- Allow On Access Protection: Allowed
[!NOTE] These settings are under the Defender category. Leave every setting not listed above at its default Not configured.
-
Select Next.
-
On the Scope tags tab, select Search for scope tags…, add Pharmacy and select Next.
-
On the Assignments tab, search and select dyn-Windows-Devices.
- Select Next → Create.
[!IMPORTANT] If overlapping Defender Antivirus settings show a Conflict state in Endpoint security → All devices, the newest or higher-priority policy wins per setting.
You have successfully created an Antivirus policy.
Task 3: Create a Firewall policy
Firewall policies configure Windows Defender Firewall rules and behavior.
-
In the Microsoft Intune admin center, navigate to Endpoint security → Firewall.
-
Select + Create Policy.
- In the Create a profile pane, configure:
- Platform: Windows
- Profile: Windows Firewall
-
Select Create.
- On the Basics tab, enter:
- Name:
Firewall - Defender Configuration - Description:
Enables the firewall for all network profiles
- Name:
-
Select Next.
-
On the Configuration settings page, use the Search box to find and configure each setting below.
- Configure Domain Network Firewall:
- Enable Domain Network Firewall: True (Default)
- Enable Log Success Connections: Enable Logging Of Successful Connections
- Disable Stealth Mode: False (Default)
- Enable Log Dropped Packets: Enable Logging Of Dropped Packets
- Configure Private Network Firewall and use the same settings as the Domain profile:
- Enable Private Network Firewall: True (Default)
- Enable Log Success Connections: Enable Logging Of Successful Connections
- Disable Stealth Mode: False (Default)
- Enable Log Dropped Packets: Enable Logging Of Dropped Packets
- Configure Public Network Firewall:
- Enable Public Network Firewall: True (Default)
- Default Inbound Action for Public Profile: Block (Default)
- Disable Stealth Mode: False (Default)
- Enable Log Success Connections: Enable Logging Of Successful Connections
- Enable Log Dropped Packets: Enable Logging Of Dropped Packets
[!NOTE] Enable Log Success Connections and Enable Log Dropped Packets each return three rows when searched, one per profile.
-
Select Next.
-
On the Scope tags page, add Pharmacy and select Next.
-
On the Assignments page, assign to dyn-Windows-Devices.
- Select Next → Create.
You have successfully created a Firewall policy.
Task 4: Create an Attack Surface Reduction (ASR) policy with split pilot/audit assignment
Attack Surface Reduction rules block behaviors commonly used by malware, such as launching executables from Office documents or running obfuscated scripts. The upper-intermediate ASR rollout pattern is to enable rules in Block mode on the pilot cohort while keeping them in Audit mode for everyone else — you get real enforcement on a small group to surface false positives early, while the rest of the fleet generates Audit logs you can use to predict broad-rollout impact. You’ll do that here by creating two policies with the same rules but different modes, assigned to different groups.
Policy 1 — ASR Block mode for the pilot cohort
-
In the Microsoft Intune admin center, navigate to Endpoint security → Attack surface reduction.
-
Select + Create Policy.
- In the Create a profile pane, configure:
- Platform: Windows
- Profile: Attack Surface Reduction Rules
-
Select Create.
- On the Basics tab, enter:
- Name:
ASR - Block (Pilot) - Description:
ASR rules in Block mode for pilot cohort — real enforcement on a small group
- Name:
-
Select Next.
-
On the Configuration settings tab, configure the following ASR rules all in Block mode:
- Block all Office applications from creating child processes: Block
- Block credential stealing from the Windows local security authority subsystem: Block
- Block executable content from email client and webmail: Block
- Block execution of potentially obfuscated scripts: Block
- Block JavaScript or VBScript from launching downloaded executable content: Block
- Block Office applications from creating executable content: Block
- Block Office applications from injecting code into other processes: Block
- Block persistence through WMI event subscription: Block
- Block process creations originating from PSExec and WMI commands: Block
- Block untrusted and unsigned processes that run from USB: Block
- Block Win32 API calls from Office macros: Block
-
Select Next.
-
On the Scope tags tab, select Search for scope tags…, add Pharmacy and select Next.
-
On the Assignments tab, assign to sg-Intune-Pilot-Users (the pilot cohort from Lab 01 Exercise 1).
- Select Next → Create.
Policy 2 — ASR Audit mode for the broader fleet
-
On the **Endpoint security Attack surface reduction** page, select + Create Policy again. - In the Create a profile pane, configure:
- Platform: Windows
- Profile: Attack Surface Reduction Rules
-
Select Create.
- On the Basics tab, enter:
- Name:
ASR - Audit (Fleet) - Description:
Same ASR rules in Audit mode for the broader fleet — generates Audit logs without enforcement
- Name:
-
Select Next.
-
On the Configuration settings tab, configure the same ASR rules listed above, but set each one to Audit mode instead of Block mode. (One exception: keep
Block credential stealing from lsass.exein Block mode — it’s the lowest false-positive rate ASR rule and worth enforcing fleet-wide on day one.) -
Select Next.
-
On the Scope tags tab, leave the Default scope tag (this is fleet-wide). Select Next.
-
On the Assignments tab, search and select dyn-Windows-Devices. On that group’s row, in the Filter column, select Add assignment filter, select Exclude, and then select Next. Choose Filter - SEA-DEV1 Exclude (from Lab 02 Exercise 1 Task 3), and then select Next.
[!NOTE] SEA-DEV1 is the pilot device, so the filter keeps it from getting both the Block and Audit policies, which would show as a conflict. Use a filter rather than excluding
sg-Intune-Pilot-Users; Intune doesn’t support excluding a user group from a device-group assignment. - Select Next → Create.
You have successfully created split-assignment ASR policies for pilot Block and fleet Audit.
Exercise 3: Configure BitLocker encryption
Scenario
BitLocker encrypts the entire OS drive, protecting data at rest. You’ll configure a BitLocker policy that enables silent encryption and escrows recovery keys to Microsoft Entra ID.
Task 1: Create a BitLocker policy
-
In the Microsoft Intune admin center, navigate to Endpoint security → Disk encryption.
-
Select + Create Policy.
- In the Create a profile pane, configure:
- Platform: Windows
- Profile: BitLocker
-
Select Create.
- On the Basics tab, enter:
- Name:
BitLocker - Full Disk Encryption - Description:
Enables silent BitLocker encryption with recovery keys escrowed to Entra ID
- Name:
-
Select Next.
- On the Configuration settings tab, expand BitLocker and configure:
- Require Device Encryption: Enabled
- Allow Warning for Other Disk Encryption: Disabled
- Allow Standard User Encryption: Enabled
- Expand Fixed Data Drives and configure:
- Enforce drive encryption type on fixed data drives: Enabled
- Choose how BitLocker-protected fixed drives can be recovered: Enabled
- Save BitLocker recovery information to AD DS for fixed data drives: True
- Do not enable BitLocker until recovery information is stored to AD DS for fixed data drives: True
- Expand Operating System Drives and configure:
- Enforce drive encryption type on operating system drives: Enabled
- Choose how BitLocker-protected operating system drives can be recovered: Enabled
- Save BitLocker recovery information to AD DS for operating system drives: True
- Do not enable BitLocker until recovery information is stored in AD DS for operating system drives: True
-
Select Next.
-
On the Scope tags tab, search and select Pharmacy, then select Next. BitLocker on Pharmacy clinical workstations is a HIPAA control — keeping the policy under the
Pharmacyscope tag means the Pharmacy Helpdesk (assigned in Lab 05 Exercise 3) can see and audit it. -
On the Assignments tab, search and select dyn-Windows-Devices.
- Select Next → Create.
You have successfully created a BitLocker encryption policy.
Task 2: Monitor BitLocker encryption status
-
On SEA-DEV1, wait 10–15 minutes for the BitLocker policy to apply. You can force a sync from Intune to speed this up.
[!NOTE] BitLocker can take 1–3 hours. In this lab, encryption usually starts in 5–10 minutes.
-
On SEA-DEV1, open Terminal (Admin) (right-click Start → Terminal (Admin); Windows Terminal opens a PowerShell tab by default).
-
On the Do you want to allow this app to make changes to your device? prompt, select Yes.
-
Check BitLocker status:
manage-bde -status C: - Review the output:
- Conversion Status: Should show “Encryption in Progress” or “Fully Encrypted”
- Percentage Encrypted: Will show either 100.0% or a partial percentage
- Encryption Method: XTS-AES 128 or XTS-AES 256
- Protection Status: Protection On
- Lock Status: Unlocked
-
In the Microsoft Intune admin center, navigate to Devices → All devices → SEA-DEV1.
-
Select Recovery keys from the left navigation.
-
Verify the BitLocker recovery key for the C: drive is escrowed to Microsoft Entra ID.
[!NOTE] No BitLocker recovery key found for this device is expected at first. The key can lag 10–30 minutes after encryption starts and the device syncs.
You have successfully monitored BitLocker encryption status and verified recovery key escrow.
Task 3: Retrieve a BitLocker recovery key
[!NOTE] If no recovery key appears, skip this task and continue with Exercise 4. Return after BitLocker starts encrypting and the key appears on the Recovery keys blade.
-
In the Microsoft Intune admin center, navigate to Devices → All devices → SEA-DEV1.
-
Select Recovery keys from the left navigation.
-
Locate the recovery key for the C: drive.
-
Select Show recovery key (if prompted, confirm with MFA or re-authenticate).
-
The recovery key is displayed in the following format:
123456-789012-345678-901234-567890-123456-789012-345678
You have successfully retrieved a BitLocker recovery key from Microsoft Entra ID.
Exercise 4: Deploy Microsoft Tunnel Gateway
Scenario
Microsoft Tunnel is a VPN gateway solution that provides secure access to on-premises and cloud resources for mobile devices. You’ll deploy the Tunnel Gateway on an Ubuntu server (LIN-SRV1), register it with Intune, and author the VPN profile mobile devices would consume.
[!IMPORTANT] Exercise 4 is complete when LIN-SRV1 shows Healthy and the VPN profile is authored and assigned. The lab doesn’t include a mobile device, so live client VPN connectivity is out of scope.
Before you begin: working with LIN-SRV1
LIN-SRV1 runs Ubuntu Linux with no graphical desktop. You sign in to it once to get its IP address, and then you run every Linux command from SEA-DEV1 over an SSH connection. This lets you copy and paste commands reliably and keeps the browser and terminal on the same computer.
Some commands start with sudo, which runs the command as an administrator (like Run as administrator on Windows). When prompted, enter the labuser password. Nothing appears on screen as you type the password. That’s normal.
Task 1: Connect to LIN-SRV1 and install Docker
-
Switch to LIN-SRV1 and sign in as
labuserwith the password provided for LIN-SRV1 in the Skillable Resources panel. -
Display the server’s IP address:
hostname -IRecord the first IP address shown (for example,
192.168.1.100). You’ll use it to connect from SEA-DEV1 and again when you create the Tunnel Site in Task 2. -
Switch to SEA-DEV1, right-click Start, and select Terminal.
-
Connect to LIN-SRV1. Replace
192.168.1.100with the IP address you recorded:ssh labuser@192.168.1.100 -
When asked whether you want to continue connecting, enter
yes. Then enter thelabuserpassword. When the prompt changes tolabuser@lin-srv1:~$, you’re connected.[!NOTE] Use this SSH window for all LIN-SRV1 commands in this exercise. Paste one code block at a time, and wait for the prompt to return.
-
Update the package list. Enter the
labuserpassword when prompted:sudo apt update -
Install and start Docker, which Microsoft Tunnel uses to run its services:
sudo apt install docker.io -y
sudo systemctl start docker
You have successfully connected to LIN-SRV1 and prepared it for Microsoft Tunnel installation.
Task 2: Create the Tunnel Server configuration and Site in Intune (SEA-DEV1)
Before you install anything on LIN-SRV1, create the Intune objects the setup script expects. The setup script enrolls the server and asks which Site to join. If no Site exists yet, setup fails with: Failed to get sites: No sites exist.
Create a Server configuration first. The Site wizard requires one, and if the Server configuration dropdown is empty it means none exist yet in this tenant.
-
On SEA-DEV1, in the Microsoft Intune admin center, navigate to Tenant administration -> Microsoft Tunnel Gateway.
-
Select the Server configurations tab.
- Select + Create new and configure:
- Name:
Contoso Tunnel Server Config - IP address range:
169.254.0.0/16 - Server port:
443 - DNS servers: Required. Enter
192.168.1.1 - Leave other settings at default for this lab.
- Name:
-
Select Next until you reach the Review + create tab, and then select Create.
-
Select the Sites tab.
-
Select Create to create a new Tunnel site.
- On the Create a site page, under the Basics tab, enter:
- Name:
Contoso HQ Tunnel - Description:
Microsoft Tunnel Gateway for mobile device VPN access
- Name:
-
Select Next.
- On the Settings tab, configure:
- Public IP address or FQDN: Enter the IP address you recorded in Task 1.
- Server configuration: Select
Contoso Tunnel Server Config.
[!NOTE] Use the same endpoint value you recorded in Task 1 to avoid a SAN mismatch. In this hosted lab, LIN-SRV1 doesn’t expose learner-controlled public inbound access.
- Select Next until you reach the Review + create tab, and then select Create.
You have successfully created the Tunnel Server configuration and Site in Intune.
Task 3: Install Microsoft Tunnel on LIN-SRV1
With the Server configuration and Site in place, install the Tunnel Gateway on the Ubuntu server. The setup script enrolls the server, joins it to the Site, and imports the TLS certificate you stage.
-
Return to the SSH window on SEA-DEV1.
-
Download the Microsoft Tunnel installation script:
wget https://aka.ms/microsofttunneldownload -O mstunnel-setup chmod +x mstunnel-setup -
Create the folders for the TLS certificate. Enter the
labuserpassword if prompted:sudo mkdir -p /etc/mstunnel/certs /etc/mstunnel/private -
Create a lab-only, self-signed TLS certificate and key for the server:
FQDN=$(hostname -f)
IP=$(hostname -I | awk '{print $1}')
sudo openssl req -x509 -newkey rsa:2048 -sha256 -nodes -days 365 \
   -keyout /etc/mstunnel/private/site.key \
   -out /etc/mstunnel/certs/site.crt \
   -subj "/CN=${FQDN}" \
   -addext "subjectAltName=DNS:${FQDN},IP:${IP}"

sudo chmod 600 /etc/mstunnel/private/site.key
sudo chmod 644 /etc/mstunnel/certs/site.crt
sudo ls -l /etc/mstunnel/certs/site.crt /etc/mstunnel/private/site.key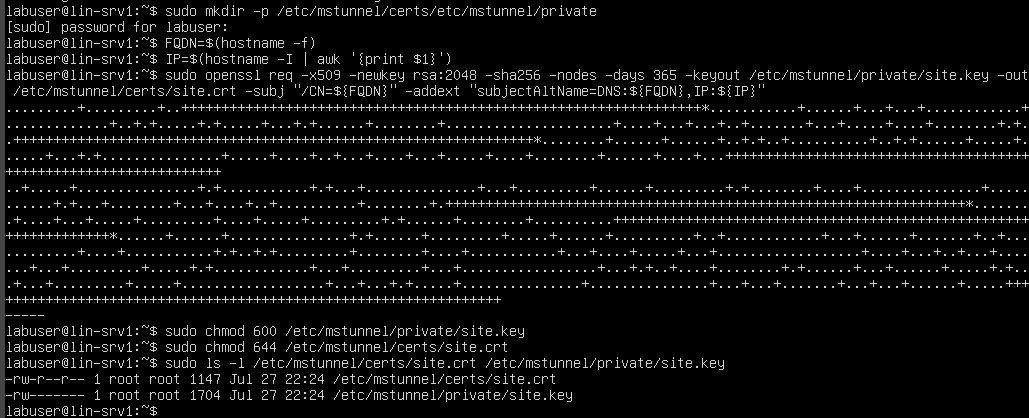
-
Run the installation script:
sudo ./mstunnel-setup - Follow the installation prompts:
- License terms: Press Space to scroll through the license. When the end shows (q to exit), press
q, and then enteryesto accept. -
Admin Tasks: When asked to continue with the TLS certificate, enter
yes. The certificate files are already in place from the previous step.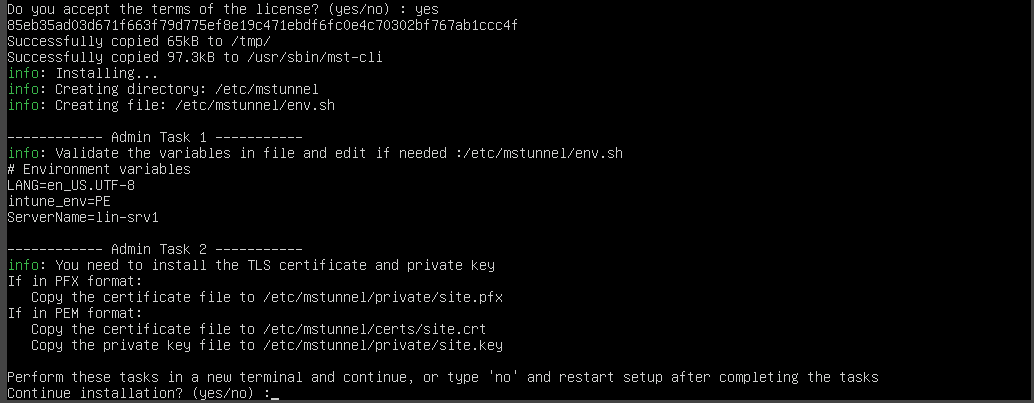
-
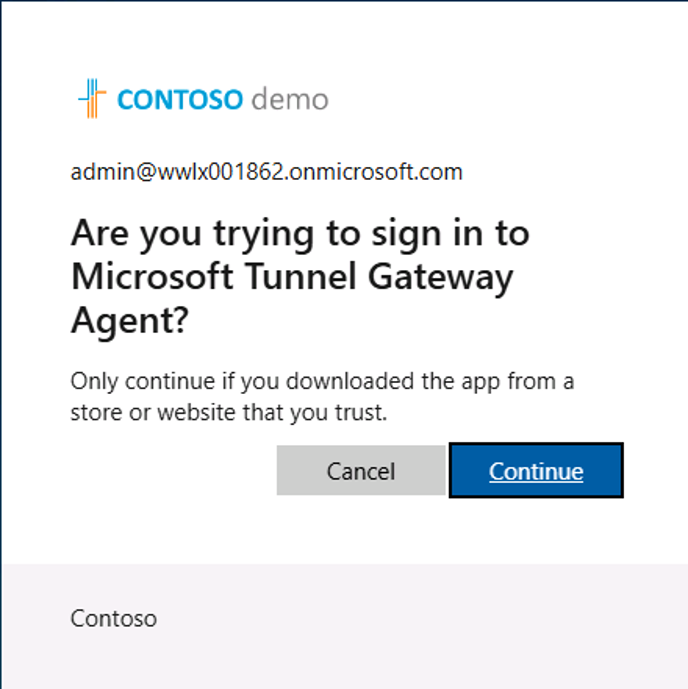
Device sign-in: Setup displays a web address and a code. Copy the code, open a new Microsoft Edge tab, and go to the web address shown. Enter the code, select the admin account, and select Continue to sign in to Microsoft Tunnel Gateway Agent.
- License terms: Press Space to scroll through the license. When the end shows (q to exit), press
-
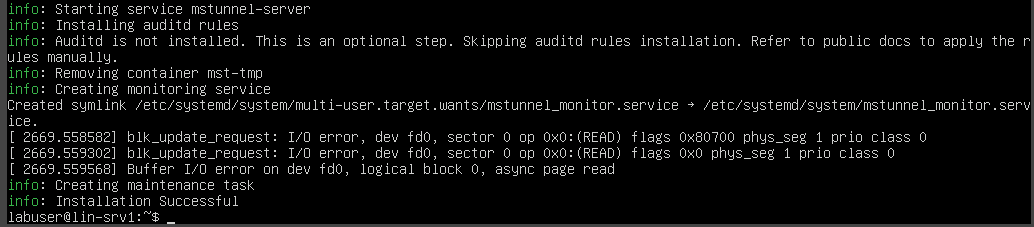
Return to the SSH window and wait until setup shows Installation Successful. This typically takes 5–10 minutes.
-
Verify that the Tunnel server and agent are running:
sudo mst-cli server status
sudo mst-cli agent status
Both should show State: running and Health: healthy.
You have successfully installed Microsoft Tunnel Gateway on LIN-SRV1.
Task 4: Verify the Tunnel Gateway server status in Intune
-
On SEA-DEV1, in the Microsoft Intune admin center, navigate to Tenant administration -> Microsoft Tunnel Gateway.
-
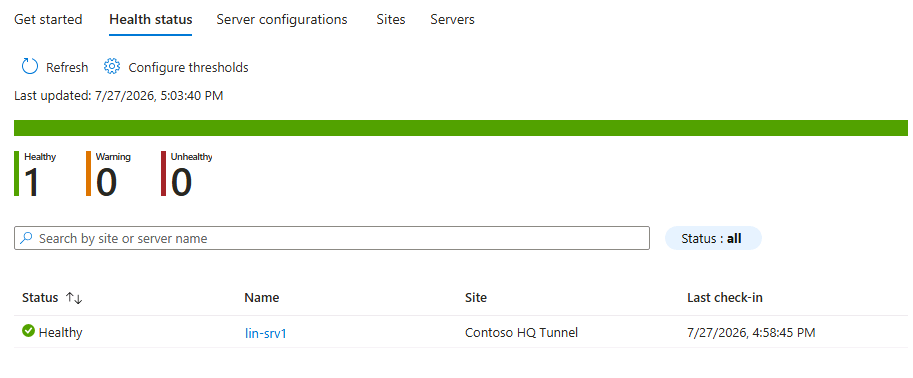
Select the Health status tab. You may need to wait 2-5 minutes for LIN-SRV1 to sync after setup completes.
-
Verify LIN-SRV1 appears in the Servers list with status Healthy.
-
The first check-in after setup can show Unhealthy while the server container is still starting. Wait about 5 minutes, and then select Refresh. If the status is still Unhealthy, run these commands in the SSH window:
sudo mst-cli server status
sudo mst-cli agent status
sudo journalctl -u mstunnel_monitor -n 200 --no-pager
sudo journalctl -t ocserv -n 200 --no-pager
You have successfully registered the Microsoft Tunnel Gateway in Intune.
Task 5: Create a VPN profile for Microsoft Tunnel
-
In the Microsoft Intune admin center, navigate to Devices → Manage Devices > Configuration.
-
Select + Create → + New policy.
- In the Create a profile pane, configure:
- Platform: iOS/iPadOS
- Profile type: Templates → VPN
-
Select Create.
- On the Basics tab, enter:
- Name:
VPN - Microsoft Tunnel for iOS/iPadOS - Description:
VPN profile for secure access via Microsoft Tunnel Gateway for iOS/iPadOS devices
- Name:
-
Select Next.
-
On the Configuration settings tab, you must choose a Connection type before any other fields appear.
From the Connection type dropdown, scroll down past the third-party clients (Cisco, F5, Palo Alto, IKEv2, and so on) and select Microsoft Tunnel.
- After you select Microsoft Tunnel, expand Base VPN. This section holds the only settings you need for the lab:
- Connection name:
Contoso VPN(this is the name users see on the device). - Microsoft Tunnel site: Select Select a site, then choose
Contoso HQ Tunnel— the site you created in Task 2. Select OK.
- Connection name:
- Leave the remaining sections at their defaults — none are required for this lab:
- Per-app VPN: Leave Not configured, and leave Safari URLs, Associated Domains, and Excluded Domains blank.
- On-Demand VPN Rules: Don’t add any rules, and leave Block users from disabling automatic VPN at Not configured.
- Proxy: Leave Use proxy server off and the Automatic configuration script, Address, and Port number fields blank.
- Custom settings: Leave empty.
-
Select Next.
-
On the Scope tags tab, select Next.
-
On the Assignments tab, under Included groups, select Add all users.
- Select Next → Create.
You have successfully created a VPN profile for Microsoft Tunnel.
Exercise 5: Implement Microsoft Cloud PKI
Scenario
Microsoft Cloud PKI (part of the Intune Suite and Microsoft 365 E5) provides a cloud-hosted certificate authority for issuing certificates to devices and users. You’ll create a root CA, an issuing CA anchored to it, and a SCEP certificate profile for device authentication (e.g., for Wi-Fi, VPN, or S/MIME encryption). With the Suite trial active (from Lab 01 prerequisites) or an E5 license, this exercise is fully hands-on.
Task 1: Create a root Certificate Authority
The root CA is the trust anchor for your Cloud PKI hierarchy. You must create at least one root CA before you can create an issuing CA.
-
In the Microsoft Intune admin center, navigate to Tenant administration → Cloud PKI.
-
Select + Create from the top toolbar.
[!NOTE] + Create opens the wizard directly. Choose CA type on the Configuration settings tab.
- On the Basics tab, enter:
- Name:
Contoso Root CA - Description:
Microsoft Cloud PKI root CA for Contoso Healthcare
- Name:
-
Select Next to continue to Configuration settings.
- On the Configuration settings tab, configure:
- CA type: Root CA
- Validity period: 25 years (allowed values: 5, 10, 15, 20, or 25)
-
Under Extended Key Usages, choose how the CA can be used. For this lab, leave Client Auth (1.3.6.1.5.5.7.3.2) and Server Authentication (1.3.6.1.5.5.7.3.1) selected (the common defaults for SCEP-issued device certificates).
[!IMPORTANT] Define on the root CA every EKU you need on the issuing CA. Don’t use Any Purpose (2.5.29.37.0).
- Under Subject attributes, enter:
- Common name (CN):
Contoso Root Certificate Authority - Organization (O):
Contoso Healthcare - Country (C): United States of America (the) (Intune enforces a two-character limit per PKI standards)
- Common name (CN):
-
Under Encryption, set Key size and algorithm to RSA-4096 and SHA-512 (the strongest available; this is the upper bound that downstream issuing CAs and SCEP profiles can use).
-
Select Next to continue to Scope tags.
-
On the Scope tags tab, leave the Default scope tag (Cloud PKI infrastructure is typically tenant-wide). Select Next.
-
On the Review + create tab, review the summary. CA properties can’t be edited after creation — if anything’s wrong, select Back now.
-
Select Create.
- Wait for the root CA to provision (typically 2–3 minutes). Select Refresh on the Cloud PKI list to see it appear with Status: Active and Type: Root.
You have successfully created a cloud-hosted root Certificate Authority.
Task 2: Create an issuing Certificate Authority
Issuing CAs are subordinate to a root CA and they’re what your devices actually request certificates from (via the SCEP service Cloud PKI provides automatically).
-
On the Cloud PKI page, select + Create again.
- On the Basics tab, enter:
- Name:
Contoso Issuing CA - Description:
Microsoft Cloud PKI issuing CA anchored to Contoso Root CA
- Name:
-
Select Next.
- On the Configuration settings tab, configure:
- CA type: Issuing CA
- Root CA source: Intune (use a root CA you created in this tenant)
- Root CA: Select Contoso Root CA (the root you created in Task 1)
- Validity period: 10 years (allowed: 2, 4, 6, 8, or 10 — must be less than or equal to the root CA’s remaining lifetime)
-
Under Extended Key Usages, the picker is constrained to EKUs you defined on the root in Task 1. Confirm Client Auth and Server Auth are selected.
- Under Subject attributes, enter:
- Common name (CN):
Contoso Issuing Certificate Authority - Organization (O):
Contoso Healthcare - Country (C): United States of America (the)
- Common name (CN):
-
Under Encryption, note that Key size and algorithm is read-only and inherited from the root CA — it displays RSA-4096 and SHA-512 and can’t be changed on the issuing CA.
-
Select Next → Scope tags (leave Default) → Next → Review + create.
-
On the Scope tags tab, select Next.
- On the Review + create tab, select Create. Provisioning takes 2–3 minutes while the root CA signs the issuing CA’s certificate.
You have successfully created an issuing Certificate Authority.
Task 3: Download the root and issuing CA certificates
-
On the Cloud PKI page, select Contoso Root CA from the list.
-
Under Properties, select Download certificate and save the file as
ContosoRootCA.cer. -
Return to the Cloud PKI page and select Contoso Issuing CA.
-
Under Properties, record the value for SCEP URI, you will use this in Task 5.
-
Under Properties, select Download certificate and save the file as
ContosoIssuingCA.cer.
You have successfully downloaded the root and issuing CA certificates.
Task 4: Create a trusted certificate profile
Trusted certificate profiles deploy root and intermediate CA certificates to devices.
-
In the Microsoft Intune admin center, navigate to Devices → Configuration.
-
Select + Create → + New policy.
- In the Create a profile pane, configure:
- Platform: Windows 10 and later
- Profile type: Templates → Trusted certificate
-
Select Create.
- On the Basics tab, enter:
- Name:
Trusted Cert - Contoso Root CA - Description:
Deploys the Contoso Root CA certificate to the Trusted Root store
- Name:
-
Select Next.
- On the Configuration settings tab, configure:
- Certificate file: Browse and select
ContosoRootCA.cer - Destination store: Computer certificate store - Root
- Certificate file: Browse and select
-
Select Next.
-
On the Scope tags tab, select Next.
-
On the Assignments tab, under Included groups, select Add groups and then search and select dyn-Windows-Devices.
-
Select Next.
-
On the Applicability rules tab, select Next.
-
On the Review + create tab, select Create.
- Repeat steps 1–13 to create a second trusted certificate profile for the issuing CA:
- Name:
Trusted Cert - Contoso Issuing CA - Certificate file:
ContosoIssuingCA.cer - Destination store: Computer certificate store - Intermediate
- Name:
You have successfully created trusted certificate profiles to deploy the CA chain.
Task 5: Create a SCEP certificate profile
SCEP (Simple Certificate Enrollment Protocol) profiles allow devices to request certificates from the Cloud PKI issuing CA.
-
In the Microsoft Intune admin center, navigate to Devices → Configuration.
-
Select + Create → + New policy.
- In the Create a profile pane, configure:
- Platform: Windows 10 and later
- Profile type: Templates → SCEP certificate
-
Select Create.
- On the Basics tab, enter:
- Name:
SCEP - Device Authentication - Description:
Issues device authentication certificates from Cloud PKI
- Name:
-
Select Next.
- On the Configuration settings tab, configure:
- Certificate type: Device
- Subject name format: CN=
- Subject alternative name: DNS =
.contoso.com - Certificate validity period: 1 year
- Key storage provider (KSP): Enroll to Trusted Platform Module (TPM) KSP if present, otherwise Software KSP
- Key usage: Digital signature, Key encipherment
- Key size (bits): 2048
- Hash algorithm: SHA-2
- Root Certificate: Select + Root Certificate and then select Trusted Cert - Contoso Root CA
- Extended key usage: Enter
Client Authenticationfor Name and select Client Authentication (1.3.6.1.5.5.7.3.2) for Predefined values. - Renewal threshold (%): 20
- SCEP Server URLs: Paste the SCEP URI you recorded in Task 3.
-
Select Next.
-
On the Scope tags tab, select Next.
-
On the Assignments tab, under Included groups, select Add groups and then search and select dyn-Windows-Devices.
-
On the Applicability Rules tab, select Next.
- On the Review + create tab, select Create.
You have successfully created a SCEP certificate profile for device authentication.
Task 6: Verify certificate enrollment on SEA-DEV1
-
On SEA-DEV1, wait 10–15 minutes for the SCEP profile to apply and the certificate to be issued. You can sync the device to speed this up.
-
Open Terminal (Admin) (Windows Terminal opens a PowerShell tab by default) and run:
Get-ChildItem -Path Cert:\LocalMachine\My | Where-Object { $_.Issuer -like "*Contoso Issuing*" } | Format-List Subject, Issuer, DnsNameList, EnhancedKeyUsageList, NotAfter - Verify a certificate issued by Contoso Issuing Certificate Authority is present with:
- Issuer: CN=Contoso Issuing Certificate Authority
- DnsNameList:
SEA-DEV1.contoso.com(from the SAN; the Subject CN may appear as the device name or a GUID depending on the subject name format) - EnhancedKeyUsageList: Client Authentication (1.3.6.1.5.5.7.3.2)
-
Open Microsoft Management Console by entering
mmc.exein PowerShell. -
Add the Certificates snap-in (File → Add/Remove Snap-in… → Certificates → Add → Computer account → Local computer (the computer this console is running on) → Finish → OK).
-
Navigate to Certificates (Local Computer) → Personal → Certificates.
- Verify the device authentication certificate is present and valid.
You have successfully verified certificate enrollment using Microsoft Cloud PKI.
Exercise 6: Monitor security posture and compliance
Scenario
You’ll use the Microsoft Defender portal and Intune admin center to monitor device security posture, compliance with policies, and threat detections.
Task 1: Review the Microsoft Defender Secure Score
-
In Microsoft Edge, navigate to https://security.microsoft.com.
-
Sign in as **admin@
.onmicrosoft.com**. -
In the Microsoft Defender portal, expand Exposure management and select Secure Score from the left navigation.
- Review the Secure Score dashboard:
- Overall score: On the Overview tab, the percentage of achieved vs. maximum possible points
- Recommended actions: On the Recommended actions tab, security configurations you can take to increase the score
- History: On the History tab, the score trend chart plus a dated activity log of each point change (Date/Time, Activity, Resulting points, Category, Attributed to)
- Score over time: On the Metrics & trends tab, the trend chart showing security posture changes
- Select an improvement action (e.g., “Encrypt all BitLocker-supported drives”) to view details and remediation guidance.
You have successfully reviewed the Microsoft Defender Secure Score.
Task 2: Review threat detections and alerts
-
In the Microsoft Defender portal, expand Investigation & response, select Incidents & alerts, and then select Alerts.
- Review the list of security alerts (if any):
- Severity: High, Medium, Low, Informational
- Alert title: Description of the detected threat
- Affected devices: Devices where the threat was detected
- Status: New, In progress, Resolved
- Select an alert to view detailed investigation information:
- Alert story: Timeline of events leading to the alert
- Evidence: Files, processes, or network connections involved
- Recommended actions: Steps to remediate the threat
[!NOTE] A new lab environment might show no alerts. That’s expected.
You have successfully reviewed threat detections and alerts in the Microsoft Defender portal.
Task 3: Rehearse enforcing the Conditional Access policy
In Lab 02 Exercise 2 Task 4 you created the Conditional Access policy CA - Require compliant device (Pharmacy pilot) in Report-only mode. In Lab 02 Exercise 6 Task 4 you inspected its impact via Sign-in logs. Before switching a policy like this to On in production, you verify its scope and rehearse it with What If. You’ll do that rehearsal now, but leave the policy in Report-only so later labs aren’t blocked by a noncompliant lab device.
-
Open a new browser tab to https://entra.microsoft.com and sign in as **admin@
.onmicrosoft.com**. -
Navigate to Entra ID → Conditional Access → Policies.
-
Select
CA - Require compliant device (Pharmacy pilot). - On the Policy details pane, select View or Edit and confirm:
- Users or agents include
sg-Intune-Pilot-Users - Users or agents exclude
admin@<TenantPrefix>.onmicrosoft.com(or whichever Global Admin you use) - Target resources: All resources (formerly “All cloud apps”)
- Grant: Require device to be marked as compliant
- Users or agents include
- Run a What If analysis:
-
From the **Conditional Access Policies** page, select What If from the top toolbar. - Under Identity, set Select identity type to Users, select Edit user, and choose a pilot-cohort user (e.g., Megan Bowen).
- Under Target resource, set Select target type to Cloud apps, then under Cloud apps select Select cloud app and choose the app to test (e.g., Office 365 Configure).
- For Device platform, select Windows
- For Client app select Mobile apps and desktop clients - Modern authentication
- Select What If.
-
-
Review the results. The bottom panel shows Policies that would apply and Policies that won’t apply. Confirm
CA - Require compliant device (Pharmacy pilot)appears under Policies that will apply with the grant controls Require compliant device.[!NOTE] If a non-pilot user appears under Policies that will apply, the assignment scope is wrong. Fix it before any production rollout.
-
Leave Enable policy set to Report-only.
[!IMPORTANT] In production, the next step is to set Enable policy to On. Don’t do that in this lab: the lab devices aren’t fully compliant, so enforcing the policy can block Megan and Joni from signing in during Labs 05 and 06.
You have successfully rehearsed enforcing the Conditional Access policy.
Lab Summary
Congratulations! You’ve completed Lab 04: Protect devices.
In this lab, you accomplished the following:
Exercise 1: Integrate Microsoft Defender for Endpoint
- Enabled the Intune-to-Defender connector
- Created an EDR policy to onboard devices to Defender for Endpoint
- Verified device onboarding in the Microsoft Defender portal
Exercise 2: Deploy endpoint security policies
- Deployed the Microsoft Defender security baseline (tagged
Pharmacy) - Created Antivirus and Firewall policies (Antivirus tagged
Pharmacy) - Created split-assignment ASR policies: Block mode on the pilot cohort, Audit mode on the broader fleet
- Observed endpoint security policy precedence and conflict surfacing
Exercise 3: Configure BitLocker encryption
- Created a BitLocker policy for silent encryption (tagged
Pharmacy) - Configured recovery key escrow to Microsoft Entra ID
- Verified encryption status and retrieved recovery keys
Exercise 4: Deploy Microsoft Tunnel Gateway
- Installed Microsoft Tunnel Gateway on an Ubuntu server
- Registered the Tunnel Gateway in Intune
- Created a VPN profile for mobile device secure access
Exercise 5: Implement Microsoft Cloud PKI
- Created a root Certificate Authority and issuing CA in Cloud PKI
- Deployed trusted certificate profiles to establish the CA chain
- Created a SCEP certificate profile for device authentication
- Verified certificate enrollment on managed devices
Exercise 6: Monitor security posture and compliance
- Reviewed the Microsoft Defender Secure Score and improvement actions
- Reviewed threat detections and alerts in the Microsoft Defender portal
- Rehearsed enforcing the
CA - Require compliant device (Pharmacy pilot)policy with What If, leaving it in Report-only
Key Takeaways:
- Microsoft Defender for Endpoint provides EDR, threat protection, and automated investigation for enrolled devices
- Endpoint security policies provide targeted controls for antivirus, firewall, and exploit mitigation; overlapping settings across baselines and standalone policies resolve via priority, with unresolvable conflicts surfaced in the portal
- Security baselines implement Microsoft-recommended settings in a single policy
- The canonical ASR rollout is Block on pilot, Audit on fleet — enforce on a small group while predicting broader impact via Audit logs
- BitLocker with Entra ID key escrow protects data at rest and enables IT recovery
- Microsoft Tunnel provides secure VPN access for mobile devices without traditional VPN infrastructure
- Microsoft Cloud PKI eliminates the need for on-premises PKI infrastructure while providing certificate-based authentication
- The Microsoft Defender portal consolidates security monitoring, scoring, and incident response
- Moving a Conditional Access policy from Report-only to On is deliberate: verify the break-glass exclusion, rehearse with What If, then switch
Next Steps: In Lab 05, you’ll automate endpoint management using Microsoft Graph PowerShell, deploy remediations, configure RBAC with scope tags, and use reporting and monitoring tools.
END OF LAB