Build a data pipeline in Azure Synapse Analytics
In this lab, we’re going to load data into a dedicated SQL Pool using the built-in Synapse Analytics Pipeline located within Azure Synapse Analytics Explorer. This lab will consist of a basic copy, transform, and sink action within Azure Synapse Analytics.
This lab will take approximately 45 minutes to complete.
Before you start
You’ll need an Azure subscription in which you have administrative-level access.
Provision an Azure Synapse Analytics workspace
You’ll need an Azure Synapse Analytics workspace with access to data lake storage. You can use the built-in serverless SQL pool to query files in the data lake.
In this exercise, you’ll use a combination of a PowerShell script and an ARM template to provision an Azure Synapse Analytics workspace.
- Sign into the Azure portal at
https://portal.azure.com. -
Use the [>_] button to the right of the search bar at the top of the page to create a new Cloud Shell in the Azure portal, selecting a PowerShell environment and creating storage if prompted. The Cloud Shell provides a command line interface in a pane at the bottom of the Azure portal, as shown here:
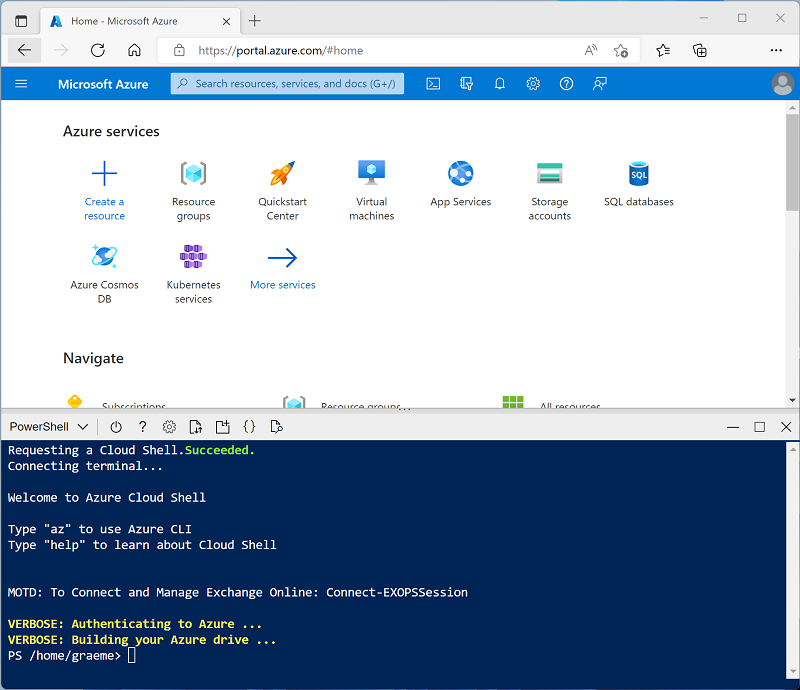
Note: If you have previously created a cloud shell that uses a Bash environment, use the the drop-down menu at the top left of the cloud shell pane to change it to PowerShell.
-
Note that Cloud Shell can be resized by dragging the separator bar at the top of the pane, or by using the—, ◻, and X icons at the top right of the pane to minimize, maximize, and close the pane. For more information about using the Azure Cloud Shell, see the Azure Cloud Shell documentation.
-
In the PowerShell pane, enter the following commands to clone this repository:
rm -r dp-000 -f git clone https://github.com/MicrosoftLearning/mslearn-synapse dp-000 -
After the repository has been cloned, enter the following commands to change to the folder for this lab, and run the setup.ps1 script it contains:
cd dp-000/Allfiles/Labs/16 ./setup.ps1 - If prompted, choose which subscription you want to use (this will only happen if you have access to multiple Azure subscriptions).
-
When prompted, enter a suitable password to be set for your Azure Synapse SQL pool.
Note: Be sure to remember this password!
- Wait for the script to complete - this typically takes around 10 minutes, but in some cases may take longer. While you’re waiting, review the Apache Spark Pool Configurations article in the Azure Synapse Analytics documentation.
View and Navigate Synapse Workspace
- After the script has completed, in the Azure portal, go to the dp000-xxxxxxx resource group that it created, and select your Synapse workspace.
- In the Overview page for your Synapse Workspace, in the Open Synapse Studio card, select Open to open Synapse Studio in a new browser tab; signing in if prompted.
- On the left side of Synapse Studio, use the ›› icon to expand the menu - this reveals the different pages within Synapse Studio that you’ll use to manage resources and perform data analytics tasks.
- On the Data page, view the Linked tab and verify that your workspace includes a link to your Azure Data Lake Storage Gen2 storage account, which should have a name similar to synapsexxxxxxx (Primary - datalakexxxxxxx).
- Expand your storage account and verify that it contains a file system container named files (primary).
- Select the files container, and note that it contains folders named data and synapse. The synapse folder is used by Azure Synapse, and the data folder contains the data files you’re going to query. Open the sales folder and the orders folder it contains, and observe the files contained within it. Right-click any of the files and select Preview to see the data it contains. Note if the files contain a header row, so you can determine whether to select the option to display column headers.
- Prior to running the next steps, In Synapse Studio, select the Data page and expand the SQL database.
- Expand the sqlxxxxxxx (SQL)
- Expand Tables and select DimCustomer.
- Select the ellipse located on the right of the table name.
- Select New SQL script, then select Select TOP 100 rows which will execute automatically with a TOP 100 query of the table resulting in 0 Rows.
Start the dedicated SQL pool
- Open the synapsexxxxxxx Synapse workspace, and on its Overview page, in the Open Synapse Studio card, select Open to open Synapse Studio in a new browser tab; signing in if prompted.
- On the left side of Synapse Studio, use the ›› icon to expand the menu - this reveals the different pages within Synapse Studio.
- On the Manage page, on the SQL pools tab, select the row for the sqlxxxxxxx dedicated SQL pool and use its ▷ icon to start it; confirming that you want to resume it when prompted.
- Wait for the SQL pool to resume. This can take a few minutes. You can use the ↻ Refresh button to check its status periodically. The status will show as Online when it’s ready.
Build a copy pipeline
- In Synapse Studio, on the Home page, select Ingest to open the Copy Data tool
- In the Copy Data tool, on the Properties step, ensure that Built-in copy task and Run once now are selected, and select Next >.
- On the Source step, in the Dataset substep, select the following settings:
- Source type: Azure Data lake Storage Gen2
- Connection: Select synapsexxxxxxx-WorkspaceDefaultStorage being sure to replace the ‘xxxxxx’ with your suffix.
- Integration Runtime: AutoResolveIntegrationRuntime Autoselected
- File or Folder: Select Browse and then select files, then select data, and finally select StageCustomer.csv. One you’ve this selected, press the OK button at the bottom of the pane. Then ensure the following settings are selected, and then select Next >:
- Binary copy: Unselected
- Recursively: Selected
- Enable partition discovery: Unselected
- Max concurrent connections: Leave blank
- Filter by last modified: Leave both UTC times blank
- On the Source step, in the Configuration substep, select Preview data to see a preview of the product data your pipeline will ingest, then close the preview.
- After previewing the data, on the File format settings page, ensure the following settings are selected, and then select Next >:
- File format: DelimitedText
- Column delimiter: Comma (,)
- Row delimiter: Line feed (\n)
- First row as header: Selected
- Compression type: None
- On the Destination step, in the Dataset substep, select the following settings:
- Destination type: Azure Synapse dedicated SQL pool
- Connection: your sqlxxxxxx instance
- Source: StageCustomers
- Target: Select Existing Table
- -Select-: dbo.StageCustomer
- After selecting the Target, on the Destination/Destination data store step, select Next >:
- On the Column mapping, ensure the following settings:
- Source: Checked
- Column Mappings: Review and look for any warnings, you should see a truncation warning on NameStyle, which can be ignored.
- On the Settings step, enter the following settings and then select Next >:
- Task name: Copy StageCustomer
- Task description Copy StageCustomer data from Data Lake
- Fault tolerance: Leave blank
- Enable logging: Unselected
- Enable staging: Unselected
- Copy method: Bulk Insert
- Bulk insert table lock: No
- On the Review and finish step, on the Review substep, read the summary and then select Next >.
- On the Deployment step, wait for the pipeline to be deployed and then select Finish.
- In Synapse Studio, select the Monitor page, and in the Pipeline runs tab, wait for the Copy DimCustomers pipeline to complete with a status of Succeeded (you can use the ↻ Refresh button on the Pipeline runs page to refresh the status).
- View the Integrate page, and verify that it now contains a pipeline named Copy StageCustomer.
Verify the Data Table Exists
- In Synapse Studio, select the Data page and expand the SQL database, then expand the sqlxxxxxxx (SQL)
- Expand Tables and select DimCustomer, then select the ellipse, select New SQL script, then select Select TOP 100 rows
- Press the Run button on the top left of the query pane.
-
You should see an empty result set as shown below.

Build a Transformation Pipeline in Azure
Unlike Azure Data Factory, which requires a separate service to be installed in order to build Orchestration pipelines, Synapse Analytics has pipeline orchestration built in. Let’s build a transformation pipeline using Azure Synapse Analytics Pipeline.
- From Synapse studio, on the Home page, select the Integrate icon to open the Integrate Pipeline tool
- Select the (+) symbol and select Pipeline which loads the familiar Orchestration tool if you’ve used Azure Data Factory (ADF) before.
- Under the Activities tab, select the Move & transform option and then drag Data flow onto the canvas.
- On the far right of the Activities tab, turn the Dataflow debug slider to the right.
- In the Turn on data flow debug tab, select Ok.
-
Under the Settings tab of the Data flow select the + New to create a new Dataflow as shown below:

- In the properties of the Dataflow1 name, it CustomerTransform.
- select the shaded Add Source option on the canvas.
- Selecting the DataFlow on the canvas, in the Source settings tab, name the Output stream name to CustomersDB.
- Further down to the Dataset, Select + New to create a new Dataset choosing Azure Data Lake Storage Gen2
-
select continue

-
Select DelimitedText.

- Select Continue
- Name your dataset CustomersText. In the Linked service drop-down, choose your Synapsexxxxxx-WorspaceDefaultStorage instance.
- In the File Path browse to Files, data, and select dimCustomer.csv
- Ensure the checkbox First Row as Header is selected.
- Select OK on the Set Properties tab
-
In the Dataset line named CustomersText on the Source settings panel, select Open. Your screen should look similar to below:

-
If not selected above, select First row as header and then select preview data in the line of the File path. your results should look similar to below:

- Close the preview window and return to the CustomerTransform tab, if, you didn’t do so earlier, move the Data flow debug switch to on and then select OK accepting the default values in the Turn on data flow debug.
-
On the CustomersDB select Projection and then select the Import projection to populate the schema if it’s not already populated.

-
Select the + on the bottom right-hand side of the CustomersDB Data source and select Filter.

- In the Filter settings, select Filter on and select on the text Enter filter…, select Open expression builder
- In the Output Stream name enter OldestCustomers, next in the filter on type the following code:
toInteger(left(DateFirstPurchase, 4)) <= 2011
-
Select the + symbol on the bottom-right of the OldestCustomers Filter component and select Aggregate option on the canvas.

- In Output stream name type AggregateOldestCustomers
- In the Group by tab select GeographyKey and then select the Aggregates tab
-
In the Aggregates tab under Column enter TotalCountByRegion and in the *Expression enter the following expression:
count(CustomerKey) -
Select on the Data preview tab and select Refresh.

-
In the same manner as before, select the + symbol at the bottom-right of the AggregateOldestCustomers aggregate component and select Sink option on the canvas.

- Name the Output stream name OldestCustomersSink and then select + New on the Dataset line.
- Select Azure Data Lake Storage Gen2 and then select the Continue button.
- Select the DelimitedText format and select the Continue button.
- On the Set properties, replace DelimitedText1 in the Name field with CustomerAggregates.
- Select the appropriate WorkspaceDefaultStorage created in earlier steps.
- In the File path row, select the browse button and navigate to Files/Data then select Ok.
- Leave the final cell File name blank as it will automatically populate the results.
- Select the First row as header and then press the OK button.

Debug and monitor the Data Flow
We can debug the pipeline before we publish it. In this step, you’re going to trigger a debug run of the data flow pipeline. While data preview doesn’t write data, a debug run will write data to your sink destination. This was made possible by selecting the Data flow debug option earlier in the lab.
- Select the Pipeline 1 tab on the canvas. Select Debug to start a debug run.

-
Select on the refresh icon to view the status of the pipeline in debug mode.

-
Once the package has been debugged, it’s time to Publish using the Publish all button above the Pipeline 1 tab and development canvas

- Select the Data tab in Synapse Studio and then select the Linked tab.
- Expand Integration Datasets you’ll see the two datasets created during this lab, CustomerAggregates and CustomersText.
- Navigating to the Develop tab in Synapse Studio, under the Data flows you’ll find the CustomerTransformation data flow package, which we just ran.
- Navigating to the Integrate tab in Synapse Studio, under Pipelines you’ll find the Pipeline 1 which is the top level of the pipeline we created.
Delete Azure resources
If you’ve finished exploring Azure Synapse Analytics, you should delete the resources you’ve created to avoid unnecessary Azure costs.
- Close the Synapse Studio browser tab and return to the Azure portal.
- On the Azure portal, on the Home page, select Resource groups.
- Select the dp000-xxxxxxx resource group for your Synapse Analytics workspace (not the managed resource group), and verify that it contains the Synapse workspace, storage account, and Spark pool for your workspace.
- At the top of the Overview page for your resource group, select Delete resource group.
-
Enter the dp000-xxxxxxx resource group name to confirm you want to delete it, and select Delete.
After a few minutes, your Azure Synapse workspace resource group and the managed workspace resource group associated with it will be deleted.