Use Microsoft Purview with Azure Synapse Analytics
Microsoft Purview enables you to catalog data assets across your data estate and track the flow of data as it is transferred from one data source to another - a key element of a comprehensive data governance solution.
This lab will take approximately 40 minutes to complete.
Before you start
You’ll need an Azure subscription in which you have administrative-level access.
Provision Azure resources
In this exercise, you’ll use Microsoft Purview to track assets and data lineage in an Azure Synapse Analytics workspace. You’ll start by using a script to provision these resources in your Azure subscription.
- Sign into the Azure portal at
https://portal.azure.com. -
Use the [>_] button to the right of the search bar at the top of the page to create a new Cloud Shell in the Azure portal, selecting a PowerShell environment and creating storage if prompted. The cloud shell provides a command line interface in a pane at the bottom of the Azure portal, as shown here:
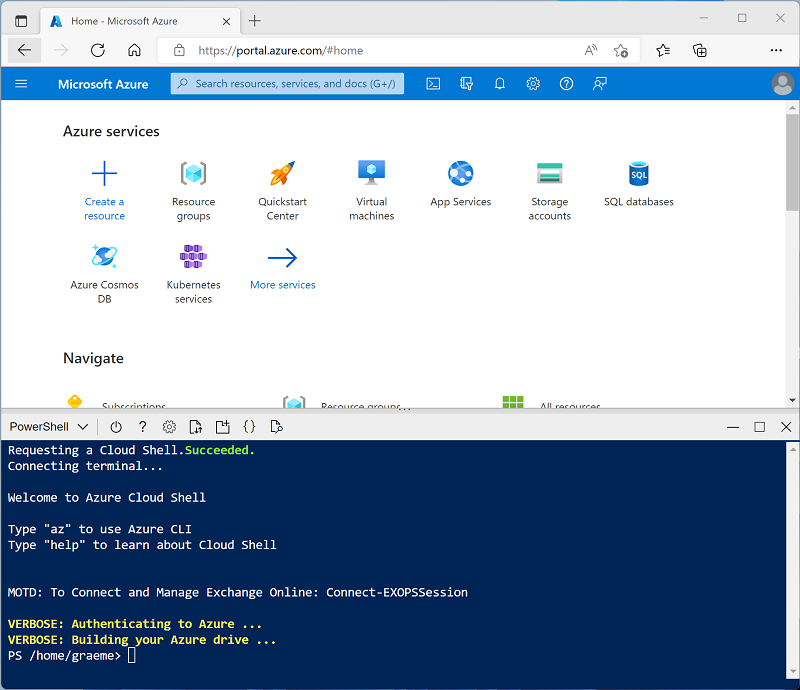
Note: If you have previously created a cloud shell that uses a Bash environment, use the the drop-down menu at the top left of the cloud shell pane to change it to PowerShell.
-
Note that you can resize the cloud shell by dragging the separator bar at the top of the pane, or by using the —, ◻, and X icons at the top right of the pane to minimize, maximize, and close the pane. For more information about using the Azure Cloud Shell, see the Azure Cloud Shell documentation.
-
In the PowerShell pane, enter the following commands to clone this repo:
rm -r dp-000 -f git clone https://github.com/MicrosoftLearning/mslearn-synapse dp-000 -
After the repo has been cloned, enter the following commands to change to the folder for this lab and run the setup.ps1 script it contains:
cd dp-000/Allfiles/Labs/10 ./setup.ps1 - If prompted, choose which subscription you want to use (this will only happen if you have access to multiple Azure subscriptions).
-
When prompted, enter a suitable password for your Azure SQL Database.
Note: Be sure to remember this password!
- Wait for the script to complete - this typically takes around 15 minutes, but in some cases may take longer. While you are waiting, review the What’s available in the Microsoft Purview governance portal? article in the Microsoft Purview documentation.
Tip: If, after running the setup script you decide not to complete the lab, be sure to delete the dp000-xxxxxxx resource group that was created in your Azure subscription to avoid unnecessary Azure costs.
Catalog Azure Synapse Analytics data assets in Microsoft Purview
With Microsoft Purview, you can catalog data assets across your data estate - including data sources in an Azure Synapse Workspace. The workspace you deployed using a script includes a data lake (in an Azure Data Lake Storage Gen2 account), a serverless database, and a data warehouse in a dedicated SQL pool.
Configure role-based access for Microsoft Purview
Microsoft Purview is configured to use a managed identity. In order to catalog data assets, this managed identity account must have access to the Azure Synapse Analytics workspace and the storage account for its data lake store.
- In the Azure portal, browse to the dp000-xxxxxxx resource group that was created by the setup script and view the resources that it created. These include:
- A storage account with a name similar to datalakexxxxxxx.
- A Microsoft Purview account with a name similar to purviewxxxxxxx.
- A dedicated SQL pool with a name similar to sqlxxxxxxx.
- A Synapse workspace with a name similar to synapsexxxxxxx.
-
Open the datalakexxxxxxx storage account, and on its Access Control (IAM) page, view the Role Assignments tab; as shown here:
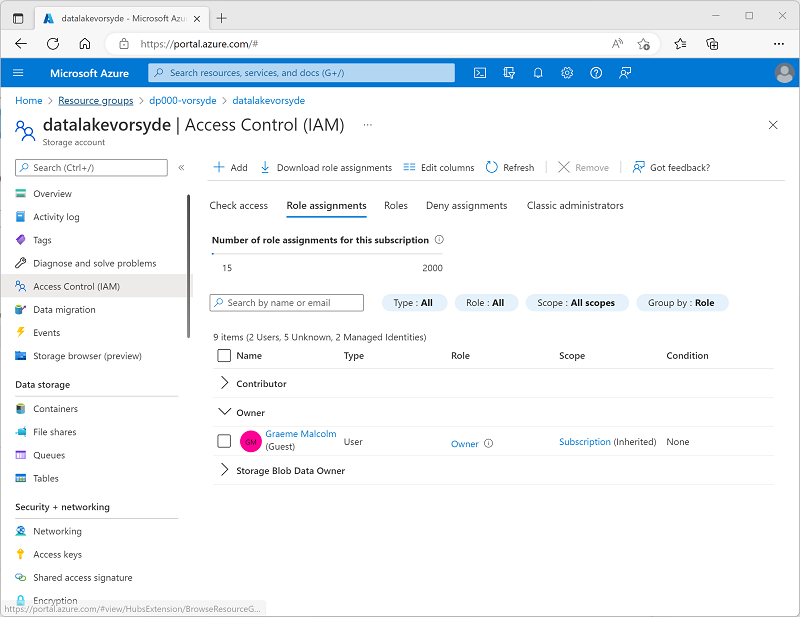
- On the + Add button menu, select Add role assignment.
-
In the Add role assigmnent page, on the Role tab, search for “storage blob” and select the Storage Blob Data Reader role. Then select Next to move to the Members tab:
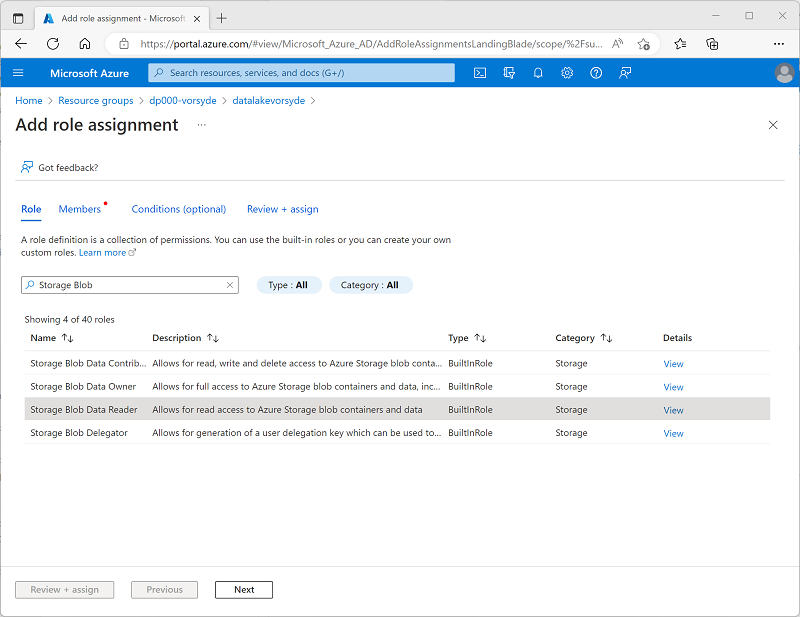
- On the Members tab, in the Assign access to list, select Managed identity; and then, under Members, select Select members.
-
In the Select managed identities pane, in the Managed identity list, select Microsoft Purview account (n) and select your Microsoft Purview account, which should have a name similar to purviewxxxxxxx; and use the Select button to add this account to the role assignment:
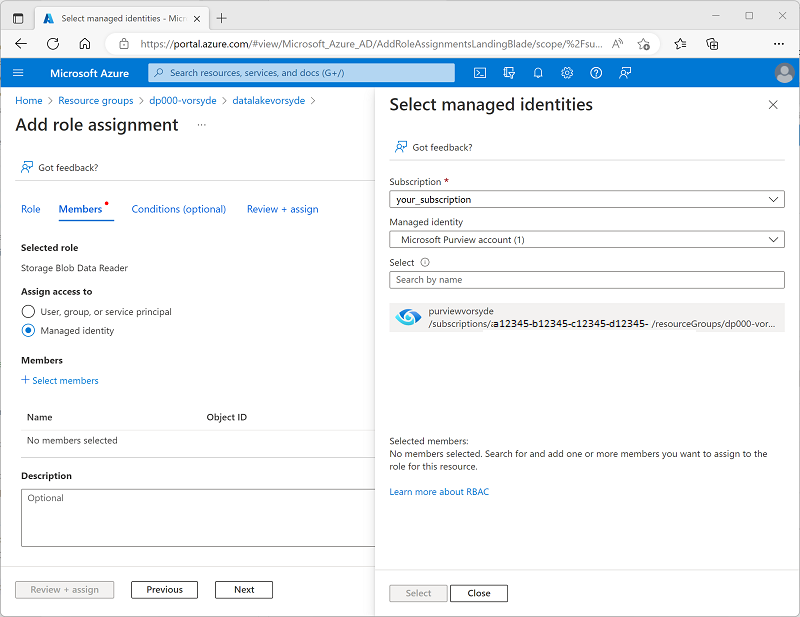
- Use the Review + Assign button to complete the role assignment, which makes the purviewxxxxxxx account used by the managed identity for your Microsoft Purview resource a member of the Storage Blob Data Reader role for your storage account.
- In the Azure portal, return to the dp000-xxxxxxx resource group and open the synapsexxxxxxx Synapse Analytics workspace. Then, on its Access Control (IAM) page, add a role assignment to make the purviewxxxxxxx managed identity account a member of the Reader role in the workspace.
Configure database permissions for Microsoft Purview
Your Azure Synapse Analytics workspace includes databases in both serverless and dedicated SQL pools, to which the managed identity used by Microsoft Purview requires access.
-
In the Azure portal, on the page for your Synapse Analytics workspace, view the Overview tab. Then in the Open Synapse Studio tile, use the link to open Azure Synapse Studio in a new browser tab - signing in if prompted.
Tip: Alternatively, you can open Azure Synapse Studio by browsing directly to https://web.azuresynapse.net in a new browser tab.
- On the left side of Synapse Studio, use the ›› icon to expand the menu - this reveals the different pages within Synapse Studio.
-
On the Manage page, on the SQL pools tab, select the row for the sqlxxxxxxx dedicated SQL pool and use its ▷ icon to start it; confirming that you want to resume it when prompted.
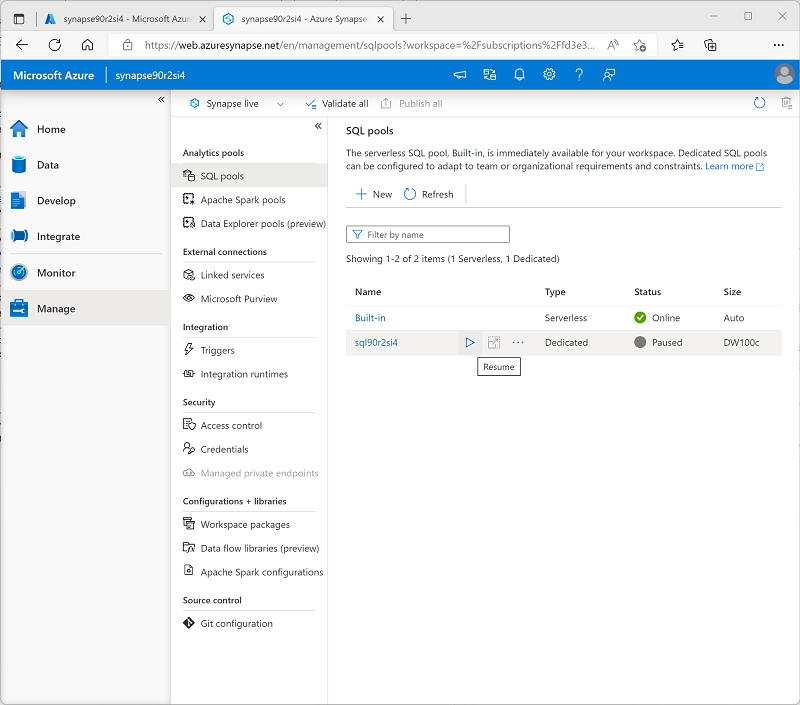
- Wait for the SQL pool to resume. This can take a few minutes. You can use the ↻ Refresh button to check its status periodically. The status will show as Online when it is ready.
- In Azure Synapse Studio, view the Data page, and in the Workspace tab, expand SQL database to see the databases in your workspace. These should include:
- A serverless SQL pool database named lakedb.
- A dedicated SQL pool database named sqlxxxxxxx.

- Select the lakedb database, and then in its … menu, select New SQL script > Empty script to open a new SQL script 1 pane. You can use the Properties button (which looks similar to 🗏*) on the right end of the toolbar to hide the Properties pane and see the script pane more easily.
-
In the SQL script 1 pane, enter the following SQL code, replacing all instances of purviewxxxxxxx with the managed identity name for your Microsoft Purview account:
CREATE LOGIN purviewxxxxxxx FROM EXTERNAL PROVIDER; GO CREATE USER purviewxxxxxxx FOR LOGIN purviewxxxxxxx; GO ALTER ROLE db_datareader ADD MEMBER purviewxxxxxxx; GO - Use the ▷ Run button to run the script, which creates a login in the serverless pool and a user in the lakedb user for the managed identity used by Microsoft Purview, and adds the user to the db_datareader role in the lakedb database.
-
Create a new empty script for the sqlxxxxxxx decicated SQL pool database, and use it to run the following SQL code (replacing purviewxxxxxxx with the managed identity name for your Microsoft Purview account); which creates a user in the dedicated SQL pool for the managed identity used by Microsoft Purview, and adds it to the db_datareader role in the sqlxxxxxxx database.
 CREATE USER purviewxxxxxxx FROM EXTERNAL PROVIDER;
 GO

 EXEC sp_addrolemember 'db_datareader', purviewxxxxxxx;
 GO
Register sources in the Microsoft Purview catalog
Now that you’ve configured the required access for Microsoft Purview to scan the data sources used by your Azure Synapse Analytics workspace, you can register them in your Microsoft Purview catalog.
- Switch back to the browser tab containing the Azure portal, and view the page for the dp000-xxxxxxx resource group.
-
Open the purviewxxxxxxx Microsoft Purview account, and on its Overview page, use the link to open the Microsoft Purview Governance Portal in a new browser tab - signing in if prompted.
Tip: Alternatively, you can browse directly to https://web.purview.azure.com in a new browser tab.
- On the left side of the Azure Purview Governance Portal, use the ›› icon to expand the menu - this reveals the different pages within the portal.
-
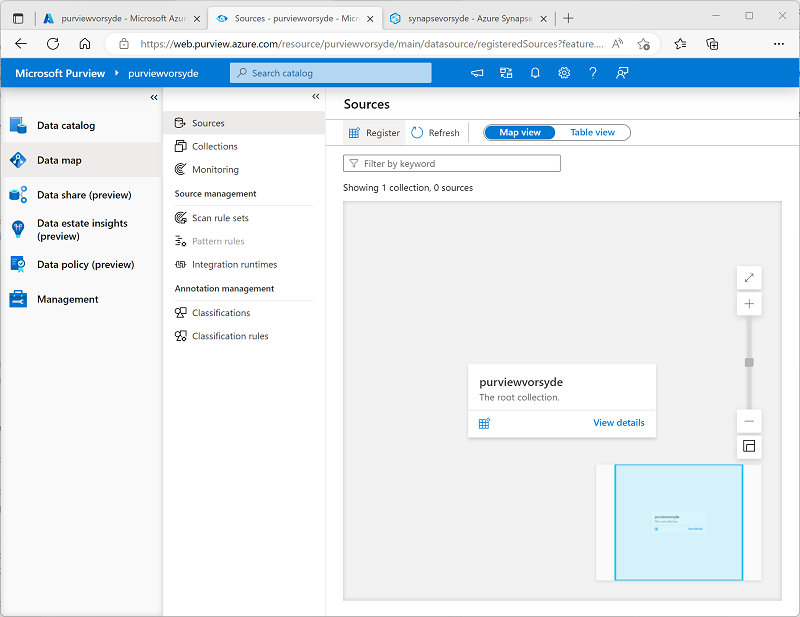
On the Data map page, on the Sources sub-page, select Register:
- In the Register sources tab that appears, select Azure Synapse Analytics, and continue to register a source with the following settings:
- Name: Synapse_data
- Azure subscription: Select your Azure subscription
- Workspace name: Select your synapsexxxxxxx workspace
- Dedicated SQL endpoint: sqlxxxxxxx.sql.azuresynapse.net
- Serverless SQL endpoint: sqlxxxxxxx-ondemand.sql.azuresynapse.net
- Select a collection: Root (purviewxxxxxxx)
This data source includes the SQL databases in your Azure Synapse Analytics workspace.
- After registering the Synapse_data source, select Register again, and register a second source for the data lake storage used by your Azure Synapse workspace. Select Azure Data Lake Storage Gen2, and specify the following settings:
- Name: Data_lake
- Azure subscription: Select your Azure subscription
- Workspace name: Select your datalakexxxxxxx storage account
- Endpoint: https:/ /datalakexxxxxxx.dfs.core.windows.net/
- Select a collection: Root (purviewxxxxxxx)
- Data use management: Disabled
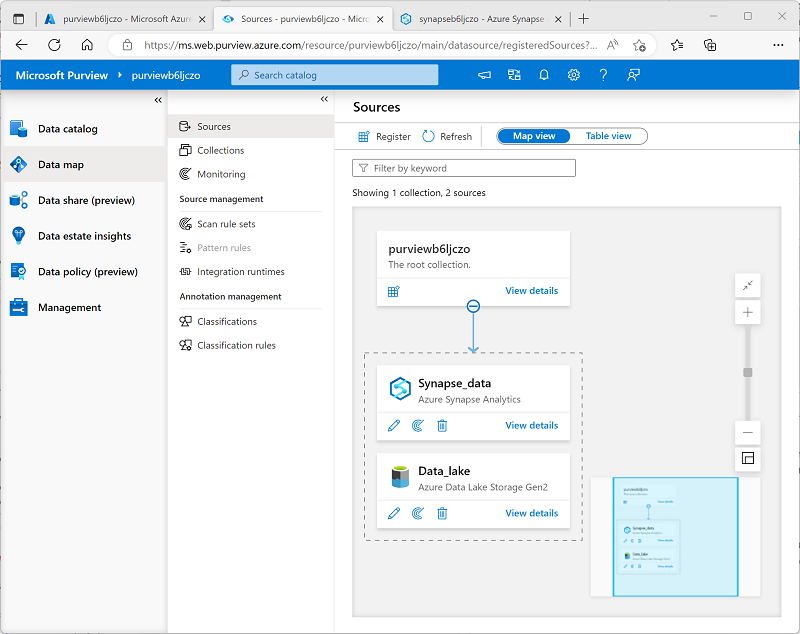
After registering both the Synapse_data and Data_lake sources, they should both be displayed under the purviewxxxxxxx root collection in the data map as shown here:
Scan registered sources
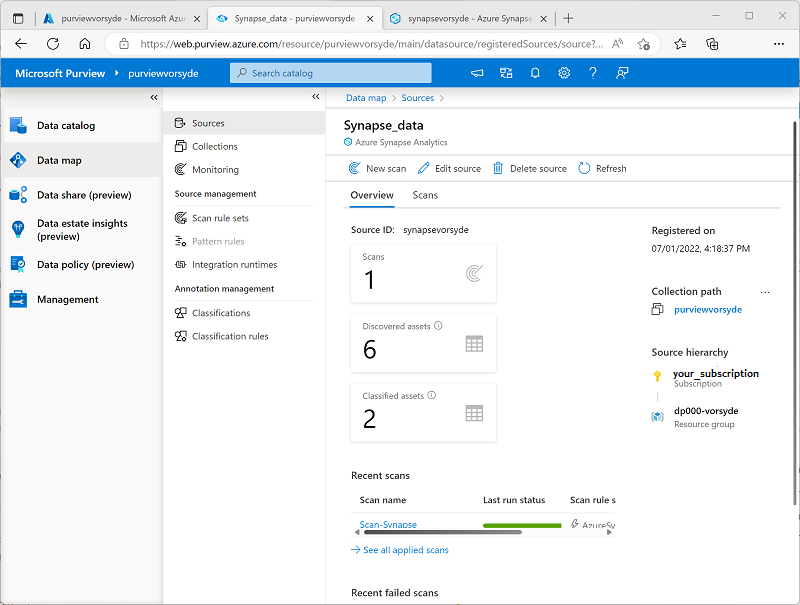
- In the data map, in the Synapse_data source, select View details; and observe that the source has no assets cataloged. You will need to scan the source to find the data assets it contains.
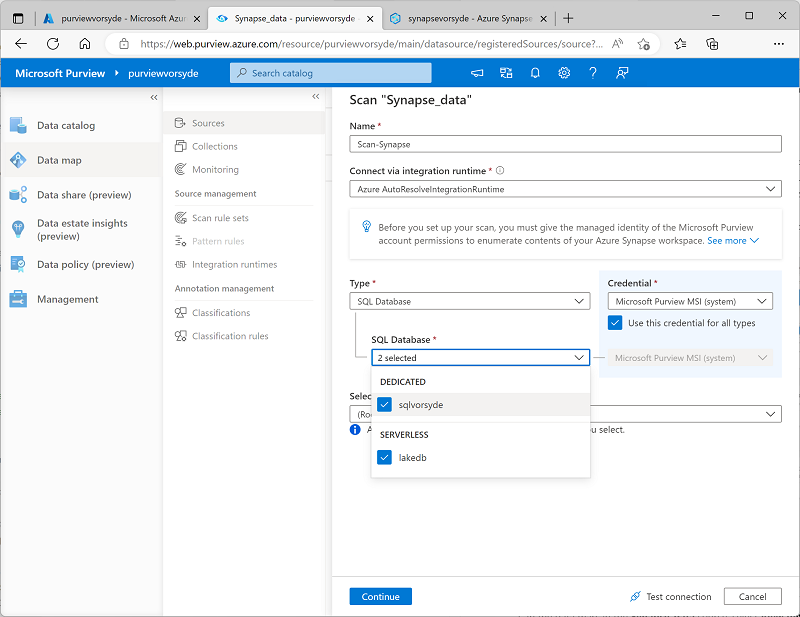
- In the Synapse_data details page, select New scan, and then configure a scan with the following settings:
- Name: Scan-Synapse
- Connect to integration runtime: Azure AutoresolveIntegrationRuntime
- Type: SQL Database
- Credential: Microsoft Purview MSI (system)
- SQL Database: Select both the sqlxxxxxxx dedicated database and the lakedb serverless database.
- Select a collection: Root (purviewxxxxxxx)
- Continue to the Select a scan rule set page, on which the default AzureSynapseSQL rule set should be selected.
- Continue to the Set a scan trigger page, and select Once to run the scan one-time.
- Continue to the Review your scan page, and then save and run the scan.
- While the Synapse_data scan is running, return to the Sources page to view the data map, and in the Data_lake source use the New scan icon to start a scan of the data lake with the following settings:
- Name: Scan-Data-Lake
- Connect to integration runtime: Azure AutoresolveIntegrationRuntime
- Credential: Microsoft Purview MSI (system)
- Select a collection: Root (purviewxxxxxxx)
- Scope your scan: Select Data_lake and all sub-assets
- Select a scan rule set: AdlsGen2
- Set a scan trigger: Once
- Review your scan Save and run
-
Wait for both scans to complete - this may take several minutes. You can view the details page for each of the sources to see the Last run status, as shown below (you can use the ↻ Refresh button to update the status). You can also view the Monitoring page (though it may take some time for the scans to appear there):
View the scanned assets
- On the Data catalog page, on the Browse sub-page, select the purviewxxxxxxx collection. Here you can see the data assets that were cataloged in your Azure Synapse Workspace and data lake storage, including the Azure Synapse Analytics workspace, the Azure Storage account for the data lake, the two SQL pool databases in Azure Synapse Analytics, the dbo schema in each database, the tables and views in the databases, and the folders and files in the data lake.
-
To filter the results, in the Narrow results by list of object types, select Files and Tables so that only the files, tables, and views that were cataloged by the scan are listed:
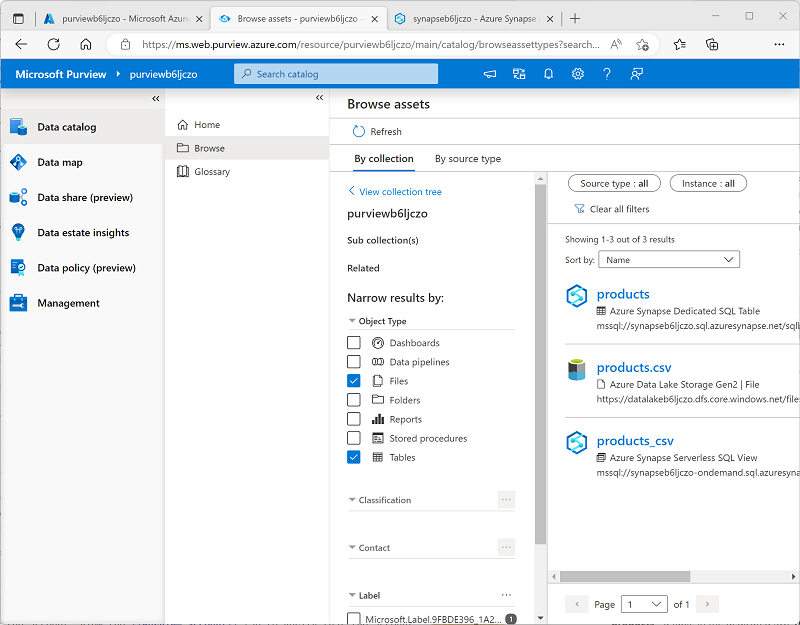
Note that the data assets include:
- products - a table in the dedicated SQL pool for product data.
- products.csv - a file in the data lake.
- products_csv - a view in the serverless SQL pool that reads product data from the products.csv file.
- Explore the assets that were found by selecting them and viewing their properties and schema. You can edit the properties of the assets (including individual fields) to add metadata, categorizations, contact details for subject-matter experts, and other useful details so that data analysts can find a lot of information about the data assets in your data estate by exploring them in the Microsoft Purview data catalog.
So far, you’ve used Microsoft Purview to catalog data assets in your Azure Synapse Analytics workspace. You can register multiple kinds of data source in a Microsoft Purview catalog, enabling you to create a central, consolidated view of data assets.
Now let’s explore some other ways to integrate Azure Synapse Analytics and Microsoft Purview.
Integrate Microsoft Purview with Azure Synapse Analytics
Azure Synapse Analytics supports integration with Microsoft Purview to make data assets discoverable and to track data lineage through ingestion pipelines that transfer data from one source to another.
Enable Microsoft Purview integration in Azure Synapse Analytics
- Switch back to the browser tab containing Synapse Studio, and on the Manage page, select the Microsoft Purview tab, and then use the Connect to a Purview account button to connect the purviewxxxxxxx account in your subscription to the workspace.
-
After connecting the account, view the Purview account tab to verify that the account is has a Data Lineage - Synapse Pipeline status of Connected:

Search the Purview catalog in Synapse Studio
Now that you’ve connected your Microsoft Purview account to your Azure Synapse Analytics workspace, you can search the catalog from Synapse Studio, enabling you to discover data assets across your data estate.
- In Synapse Studio, view the Integrate page.
-
At the top of the page, use the Search box at the top to search the Purview source for the term “products”, as shown here:
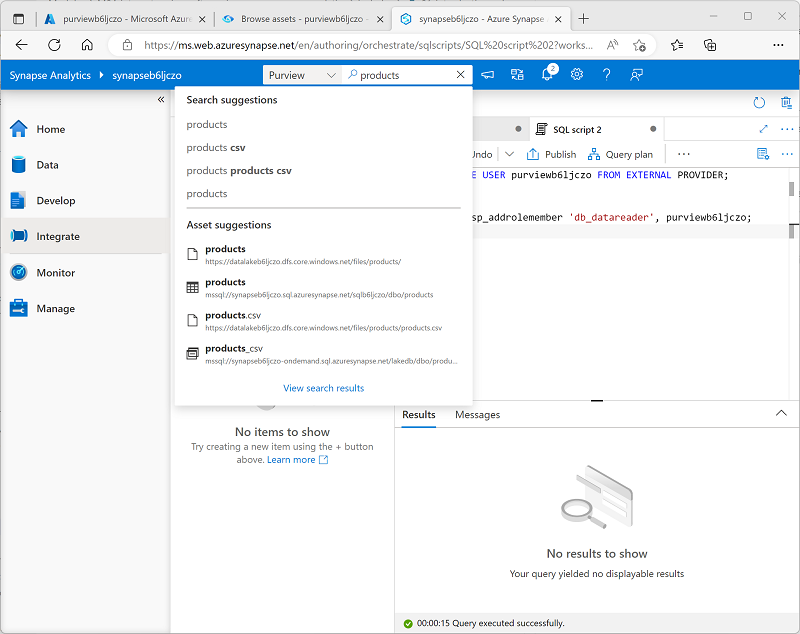
- In the results, select products.csv to view its details from the Purview catalog.
By integrating the Purview catalog into the Synapse Studio interface, data analysts and engineers can find and examine registered data assets from across the entire data estate (not just within the Azure Synapse Studio workspace).
Create and run a pipeline
The products_csv view in the lakedb database is based on a text file in the data lake that contains product data. The products table in the sqlxxxxxxx dedicated SQL database is currently empty. Let’s use a Synapse pipeline to load data from the data lake into the table.
- In Synapse Studio, on the Integrate page, in the + menu, select Copy Data tool.
- In the Copy Data tool, select Built-in copy task, and Run once now, and then select Next.
- On the Source data store page, in the Connection list, select the synapsexxxxxxx-WorkspaceDefaultStorage connection (which references the data lake for the workspace), and for the File or folder, browse to the files/products/products.csv file. Then select Next.
- On the File format settings page, select Detect text format. Then ensure the following settings are specified before selecting Next:
- File format: DelimitedText
- Column delimiter: Comma (,)
- Row delimiter: Line feed (\n)
- First row as header: Selected
- Compression type: None
- On the Destination data store page, in the Connection list, select sqlxxxxxxx (the connection to your dedicated SQL pool). Then set the target to the existing dbo.products table, and select Next.
- On the Column mapping page, review the default column mappings and then select Next.
- On the Settings page, set the Task name to Load_Product_Data. Then select the Bulk insert copy method and select Next.
- On the Summary page, select Next.
- Wait for the pipeline to be deployed, and then select Finish.
- In Synapse Studio, view the Monitor page. Then on the Pipeline runs tab, observe the status of the Load_Product_Data pipeline. It may take a few minutes for the status to change to Succeeded.
- When the pipeline run has completed successfully, select its name (Load_Product_Data) to view details of the activities in the pipeline; and observe that the pipeline includes a Copy data task with an automatically-derived name similar to Copy_xxx. This activity copied the data from the text file in the data lake into the products table in the sqlxxxxxxx database.
View data lineage in Microsoft Purview
You’ve used a Synapse pipeline to load data into a database. Let’s verify that this activity has been tracked in Microsoft Purview.
- Switch to the browser tab containing the Microsoft Purview Governance Portal.
- On the Data catalog page, on the Browse sub-page, select the purviewxxxxxxx collection.
- Filter the assets to show only Data pipelines, Files, and Tables. The list of assets should include the products.csv file, the Copy_xxx pipeline activity, and the products table.
- Select the Copy_xxx asset to view its details, noting the Updated time reflects the recent pipeline run.
-
On the Lineage tab for the Copy_xxx asset, view the diagram showing the data flow from the products.csv file to the products table:
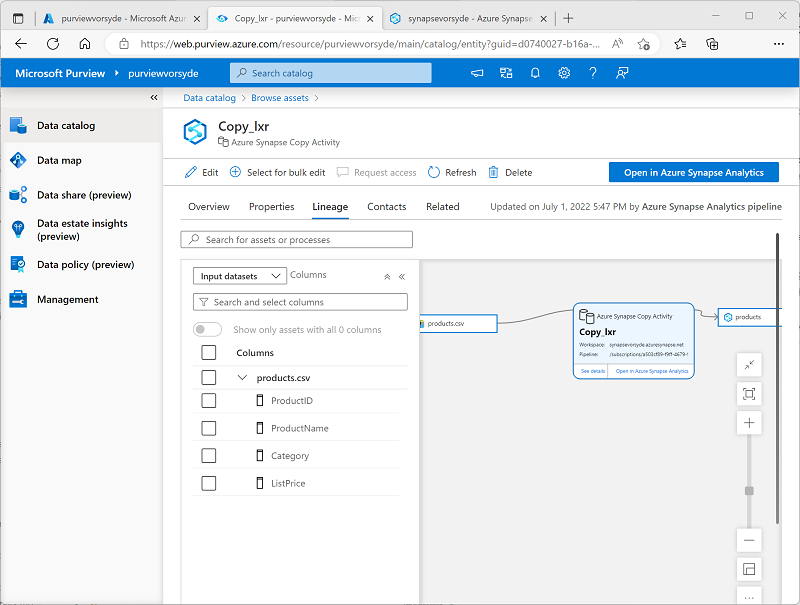
- In the Copy_xxx lineage diagram, select the products.csv file and use its Switch to asset link to view details of the source file.
- In the products.csv lineage diagram, select the products table and use its Switch to asset link to view details of the table (you may need to use the ↻ Refresh button to see the table lineage diagram).
The lineage tracking capability enabled by integrating Azure Synapse Analytics with Microsoft Purview enables you to determine how and when the data in your data stores was loaded, and where it came from.
Tip: In this exercise, you viewed the lineage information for in the Microsoft Purview Governance portal; but remember that the same assets can also be viewed in Synapse Studio through the search integration feature.
Pause the dedicated SQL pool
- Switch back to the Synapse Studio tab, and on the Manage page, pause the sqlxxxxxxx dedicated SQL pool.
Delete Azure resources
If you’ve finished exploring Azure Synapse Analytics, you should delete the resources you’ve created to avoid unnecessary Azure costs.
- Close the Synapse Studio browser tab and return to the Azure portal.
- On the Azure portal, on the Home page, select Resource groups.
- Select the dp000-xxxxxxx resource group for your Synapse Analytics workspace (not the managed resource group), and verify that it contains the Synapse workspace, storage account, and dedicated SQL pool for your workspace.
- At the top of the Overview page for your resource group, select Delete resource group.
-
Enter the dp000-xxxxxxx resource group name to confirm you want to delete it, and select Delete.
After a few minutes, your Azure Synapse workspace resource group and the managed workspace resource group associated with it will be deleted.