Migrate SQL Server databases to Azure SQL Database
In this exercise, you’ll learn how to migrate specific tables from a SQL Server database to Azure SQL Database using the Azure migration extension for Azure Data Studio.
Important: To avoid impacting migration duration—which can be affected by network and connectivity constraints—we will migrate only a few tables (Customer, ProductCategory, Product, and Address) as an example. The same process can be used to migrate the entire schema when needed.
This exercise takes approximately 45 minutes.
Note: To complete this exercise, you need access to an Azure subscription to create Azure resources. If you don’t have an Azure subscription, create a free account before you begin.
Before you start
To run this exercise, you need:
| Item | Description |
|---|---|
| Target server | An Azure SQL Database server. We’ll create it during this exercise. |
| Target database | A database on Azure SQL Database server. We’ll create it during this exercise. |
| Source server | An instance of SQL Server 2019 or a newer version installed on a server of your preference. |
| Source database | The lightweight AdventureWorks database to be restored on the SQL Server instance. |
| Azure Data Studio | Install Azure Data Studio in the same server where the source database is located. If it’s already installed, update it to make sure that you’re using the most recent version. |
| Microsoft.DataMigration resource provider | Make sure the subscription is registered to use the Microsoft.DataMigration namespace. To learn how to perform a resource provider registration, see Register the resource provider. |
| Microsoft Integration runtime | Install Microsoft Integration Runtime. |
Restore a SQL Server database
Let’s restore the AdventureWorksLT database on the SQL Server instance. This database will serve as the source database for this lab exercise. You can skip these steps if the database is already restored.
-
Select the Windows Start button and type SSMS. Select Microsoft SQL Server Management Studio 18 from the list.
-
When SSMS opens, notice that the Connect to Server dialog will be pre-populated with the default instance name. Select Connect.
-
Select the Databases folder, and then New Query.
-
In the new query window, copy and paste the below T-SQL into it. Ensure that the database backup file name and path match your actual backup file. If they don’t, the command will fail. Execute the query to restore the database.
RESTORE DATABASE AdventureWorksLT FROM DISK = 'C:\<FolderName>\AdventureWorksLT2019.bak' WITH RECOVERY, MOVE 'AdventureWorksLT2019_Data' TO 'C:\<FolderName>\AdventureWorksLT2019.mdf', MOVE 'AdventureWorksLT2019_Log' TO 'C:\<FolderName>\AdventureWorksLT2019.ldf';Note: Make sure you have the lightweight AdventureWorks backup file on the SQL Server machine before running the T-SQL command.
-
You should see a successful message after the restore is complete.
Register Microsoft.DataMigration namespace
Skip these steps if the Microsoft.DataMigration namespace is already registered on your subscription.
-
From the Azure portal, search for Subscription in the search box at the top, then select Subscriptions. Select your subscription on the Subscriptions blade.
-
On your subscription page, select Resource providers under Settings. Search for Microsoft.DataMigration in the search box at the top, then select Microsoft.DataMigration.
Note: If the Resource Provider Details side bar opens, you can close it.
-
Select Register.
Provision an Azure SQL Database
Let’s set up an Azure SQL Database that will serve as our target environment.
-
From the Azure portal, search for SQL databases in the search box at the top, then select SQL databases.
-
On the SQL databases blade, select + Create.
-
On the Create SQL Database page, select the following options.
- Subscription: <Your subscription>
- Resource group: <Your resource group>
- Database name: AdventureWorksLT
- Server: Select the Create new link. Provide the server details on the Create SQL Database Server page.
- Server name: <Choose a server name>. Server name must be globally unique.
- Location: <Your region, same as your resource group>
- Authentication method: Use SQL authentication
- Server admin login: sqladmin
- Password: <Your password>
-
Confirm password: <Your password>
Note: Make note of this server name, and credentials. You’ll use it in subsequent tasks.
- Want to use SQL elastic pool? No
- Workload environment: Production
-
On Compute + storage, select Configure database. On the Configure page, for Service tier dropdown, select Basic, and then Apply.
-
For the Backup storage redundancy option, keep the default value: Geo-redundant backup storage. Select Review + Create.
-
Review the settings, then select Create.
-
Once the deployment is complete, select Go to resource.
Enable access to an Azure SQL Database
Let’s enable access to Azure SQL Database so we can connect to it through the client tools.
-
From the SQL database page, select the Overview section, and then select the link for the server name in the top section:
-
On the SQL server blade, select Networking under the Security section.
-
On the Public access tab, select Selected networks.
-
In Firewall rules, select + Add your client IPv4 address.
-
On Exceptions, check the Allow Azure services and resources to access this server property.
-
Select Save.
Connect to Azure SQL Database in Azure Data Studio
Before start using the Azure migration extension, let’s connect to the target database.
-
Launch Azure Data Studio.
-
Select Connections, then Add Connection.
-
Fill out the Connection Details fields with the SQL Server name and other information.
Note: Enter the name of the SQL Server created previously. The format should be in the format of **
.database.windows.net**. -
In the Authentication type, select SQL Login and provide the user name and password.
-
Select Connect.
Install and launch the Azure migration extension for Azure Data Studio
Follow these steps to install the migration extension. If the extension is already installed, you can skip these steps.
-
Open the extensions manager in Azure Data Studio.
-
Search for Azure SQL Migration and select the extension.
-
Install the extension. Once you install it, the Azure SQL Migration extension is in the list of installed extensions.
-
Connect to a SQL Server instance in Azure Data Studio. In the new connection tab, select Optional (False) for the Encrypt option.
-
To launch the Azure migration extension, right-click on the SQL Server instance name and select Manage to access the dashboard and the landing page of the Azure SQL Migration extension.
Note: If Azure SQL Migration isn’t visible in the server dashboard side bar, reopen Azure Data Studio.
Create the target schema
Let’s manually create the schema for the target tables before beginning the data migration.
-
In Azure Data Studio, connect to your Azure SQL Database.
-
Right-click on the AdventureWorksLT database and select New Query.
-
Copy and paste the following T-SQL script to create the schema for the tables we’ll migrate:
CREATE SCHEMA [SalesLT] GO CREATE TYPE [dbo].[Name] FROM [nvarchar](50) NULL GO CREATE TYPE [dbo].[NameStyle] FROM [bit] NOT NULL GO CREATE TYPE [dbo].[Phone] FROM [nvarchar](25) NULL GO CREATE TABLE [SalesLT].[Address]( [AddressID] [int] IDENTITY(1,1) NOT FOR REPLICATION NOT NULL, [AddressLine1] [nvarchar](60) NOT NULL, [AddressLine2] [nvarchar](60) NULL, [City] [nvarchar](30) NOT NULL, [StateProvince] [dbo].[Name] NOT NULL, [CountryRegion] [dbo].[Name] NOT NULL, [PostalCode] [nvarchar](15) NOT NULL, [rowguid] [uniqueidentifier] ROWGUIDCOL NOT NULL, [ModifiedDate] [datetime] NOT NULL, CONSTRAINT [PK_Address_AddressID] PRIMARY KEY CLUSTERED ( [AddressID] ASC )WITH (PAD_INDEX = OFF, STATISTICS_NORECOMPUTE = OFF, IGNORE_DUP_KEY = OFF, ALLOW_ROW_LOCKS = ON, ALLOW_PAGE_LOCKS = ON, OPTIMIZE_FOR_SEQUENTIAL_KEY = OFF) ON [PRIMARY], CONSTRAINT [AK_Address_rowguid] UNIQUE NONCLUSTERED ( [rowguid] ASC )WITH (PAD_INDEX = OFF, STATISTICS_NORECOMPUTE = OFF, IGNORE_DUP_KEY = OFF, ALLOW_ROW_LOCKS = ON, ALLOW_PAGE_LOCKS = ON, OPTIMIZE_FOR_SEQUENTIAL_KEY = OFF) ON [PRIMARY] ) ON [PRIMARY] GO CREATE TABLE [SalesLT].[Customer]( [CustomerID] [int] IDENTITY(1,1) NOT FOR REPLICATION NOT NULL, [NameStyle] [dbo].[NameStyle] NOT NULL, [Title] [nvarchar](8) NULL, [FirstName] [dbo].[Name] NOT NULL, [MiddleName] [dbo].[Name] NULL, [LastName] [dbo].[Name] NOT NULL, [Suffix] [nvarchar](10) NULL, [CompanyName] [nvarchar](128) NULL, [SalesPerson] [nvarchar](256) NULL, [EmailAddress] [nvarchar](50) NULL, [Phone] [dbo].[Phone] NULL, [PasswordHash] [varchar](128) NOT NULL, [PasswordSalt] [varchar](10) NOT NULL, [rowguid] [uniqueidentifier] ROWGUIDCOL NOT NULL, [ModifiedDate] [datetime] NOT NULL, CONSTRAINT [PK_Customer_CustomerID] PRIMARY KEY CLUSTERED ( [CustomerID] ASC )WITH (PAD_INDEX = OFF, STATISTICS_NORECOMPUTE = OFF, IGNORE_DUP_KEY = OFF, ALLOW_ROW_LOCKS = ON, ALLOW_PAGE_LOCKS = ON, OPTIMIZE_FOR_SEQUENTIAL_KEY = OFF) ON [PRIMARY], CONSTRAINT [AK_Customer_rowguid] UNIQUE NONCLUSTERED ( [rowguid] ASC )WITH (PAD_INDEX = OFF, STATISTICS_NORECOMPUTE = OFF, IGNORE_DUP_KEY = OFF, ALLOW_ROW_LOCKS = ON, ALLOW_PAGE_LOCKS = ON, OPTIMIZE_FOR_SEQUENTIAL_KEY = OFF) ON [PRIMARY] ) ON [PRIMARY] GO CREATE TABLE [SalesLT].[Product]( [ProductID] [int] IDENTITY(1,1) NOT NULL, [Name] [dbo].[Name] NOT NULL, [ProductNumber] [nvarchar](25) NOT NULL, [Color] [nvarchar](15) NULL, [StandardCost] [money] NOT NULL, [ListPrice] [money] NOT NULL, [Size] [nvarchar](5) NULL, [Weight] [decimal](8, 2) NULL, [ProductCategoryID] [int] NULL, [ProductModelID] [int] NULL, [SellStartDate] [datetime] NOT NULL, [SellEndDate] [datetime] NULL, [DiscontinuedDate] [datetime] NULL, [ThumbNailPhoto] [varbinary](max) NULL, [ThumbnailPhotoFileName] [nvarchar](50) NULL, [rowguid] [uniqueidentifier] ROWGUIDCOL NOT NULL, [ModifiedDate] [datetime] NOT NULL, CONSTRAINT [PK_Product_ProductID] PRIMARY KEY CLUSTERED ( [ProductID] ASC )WITH (PAD_INDEX = OFF, STATISTICS_NORECOMPUTE = OFF, IGNORE_DUP_KEY = OFF, ALLOW_ROW_LOCKS = ON, ALLOW_PAGE_LOCKS = ON, OPTIMIZE_FOR_SEQUENTIAL_KEY = OFF) ON [PRIMARY], CONSTRAINT [AK_Product_Name] UNIQUE NONCLUSTERED ( [Name] ASC )WITH (PAD_INDEX = OFF, STATISTICS_NORECOMPUTE = OFF, IGNORE_DUP_KEY = OFF, ALLOW_ROW_LOCKS = ON, ALLOW_PAGE_LOCKS = ON, OPTIMIZE_FOR_SEQUENTIAL_KEY = OFF) ON [PRIMARY], CONSTRAINT [AK_Product_ProductNumber] UNIQUE NONCLUSTERED ( [ProductNumber] ASC )WITH (PAD_INDEX = OFF, STATISTICS_NORECOMPUTE = OFF, IGNORE_DUP_KEY = OFF, ALLOW_ROW_LOCKS = ON, ALLOW_PAGE_LOCKS = ON, OPTIMIZE_FOR_SEQUENTIAL_KEY = OFF) ON [PRIMARY], CONSTRAINT [AK_Product_rowguid] UNIQUE NONCLUSTERED ( [rowguid] ASC )WITH (PAD_INDEX = OFF, STATISTICS_NORECOMPUTE = OFF, IGNORE_DUP_KEY = OFF, ALLOW_ROW_LOCKS = ON, ALLOW_PAGE_LOCKS = ON, OPTIMIZE_FOR_SEQUENTIAL_KEY = OFF) ON [PRIMARY] ) ON [PRIMARY] TEXTIMAGE_ON [PRIMARY] GO CREATE TABLE [SalesLT].[ProductCategory]( [ProductCategoryID] [int] IDENTITY(1,1) NOT NULL, [ParentProductCategoryID] [int] NULL, [Name] [dbo].[Name] NOT NULL, [rowguid] [uniqueidentifier] ROWGUIDCOL NOT NULL, [ModifiedDate] [datetime] NOT NULL, CONSTRAINT [PK_ProductCategory_ProductCategoryID] PRIMARY KEY CLUSTERED ( [ProductCategoryID] ASC )WITH (PAD_INDEX = OFF, STATISTICS_NORECOMPUTE = OFF, IGNORE_DUP_KEY = OFF, ALLOW_ROW_LOCKS = ON, ALLOW_PAGE_LOCKS = ON, OPTIMIZE_FOR_SEQUENTIAL_KEY = OFF) ON [PRIMARY], CONSTRAINT [AK_ProductCategory_Name] UNIQUE NONCLUSTERED ( [Name] ASC )WITH (PAD_INDEX = OFF, STATISTICS_NORECOMPUTE = OFF, IGNORE_DUP_KEY = OFF, ALLOW_ROW_LOCKS = ON, ALLOW_PAGE_LOCKS = ON, OPTIMIZE_FOR_SEQUENTIAL_KEY = OFF) ON [PRIMARY], CONSTRAINT [AK_ProductCategory_rowguid] UNIQUE NONCLUSTERED ( [rowguid] ASC )WITH (PAD_INDEX = OFF, STATISTICS_NORECOMPUTE = OFF, IGNORE_DUP_KEY = OFF, ALLOW_ROW_LOCKS = ON, ALLOW_PAGE_LOCKS = ON, OPTIMIZE_FOR_SEQUENTIAL_KEY = OFF) ON [PRIMARY] ) ON [PRIMARY] GO ALTER TABLE [SalesLT].[Address] ADD CONSTRAINT [DF_Address_rowguid] DEFAULT (newid()) FOR [rowguid] GO ALTER TABLE [SalesLT].[Address] ADD CONSTRAINT [DF_Address_ModifiedDate] DEFAULT (getdate()) FOR [ModifiedDate] GO ALTER TABLE [SalesLT].[Customer] ADD CONSTRAINT [DF_Customer_NameStyle] DEFAULT ((0)) FOR [NameStyle] GO ALTER TABLE [SalesLT].[Customer] ADD CONSTRAINT [DF_Customer_rowguid] DEFAULT (newid()) FOR [rowguid] GO ALTER TABLE [SalesLT].[Customer] ADD CONSTRAINT [DF_Customer_ModifiedDate] DEFAULT (getdate()) FOR [ModifiedDate] GO ALTER TABLE [SalesLT].[Product] ADD CONSTRAINT [DF_Product_rowguid] DEFAULT (newid()) FOR [rowguid] GO ALTER TABLE [SalesLT].[Product] ADD CONSTRAINT [DF_Product_ModifiedDate] DEFAULT (getdate()) FOR [ModifiedDate] GO ALTER TABLE [SalesLT].[ProductCategory] ADD CONSTRAINT [DF_ProductCategory_rowguid] DEFAULT (newid()) FOR [rowguid] GO ALTER TABLE [SalesLT].[ProductCategory] ADD CONSTRAINT [DF_ProductCategory_ModifiedDate] DEFAULT (getdate()) FOR [ModifiedDate] GO ALTER TABLE [SalesLT].[Product] WITH CHECK ADD CONSTRAINT [FK_Product_ProductCategory_ProductCategoryID] FOREIGN KEY([ProductCategoryID]) REFERENCES [SalesLT].[ProductCategory] ([ProductCategoryID]) GO ALTER TABLE [SalesLT].[Product] CHECK CONSTRAINT [FK_Product_ProductCategory_ProductCategoryID] GO ALTER TABLE [SalesLT].[ProductCategory] WITH CHECK ADD CONSTRAINT [FK_ProductCategory_ProductCategory_ParentProductCategoryID_ProductCategoryID] FOREIGN KEY([ParentProductCategoryID]) REFERENCES [SalesLT].[ProductCategory] ([ProductCategoryID]) GO ALTER TABLE [SalesLT].[ProductCategory] CHECK CONSTRAINT [FK_ProductCategory_ProductCategory_ParentProductCategoryID_ProductCategoryID] GO ALTER TABLE [SalesLT].[Product] WITH NOCHECK ADD CONSTRAINT [CK_Product_ListPrice] CHECK (([ListPrice]>=(0.00))) GO ALTER TABLE [SalesLT].[Product] CHECK CONSTRAINT [CK_Product_ListPrice] GO ALTER TABLE [SalesLT].[Product] WITH NOCHECK ADD CONSTRAINT [CK_Product_SellEndDate] CHECK (([SellEndDate]>=[SellStartDate] OR [SellEndDate] IS NULL)) GO ALTER TABLE [SalesLT].[Product] CHECK CONSTRAINT [CK_Product_SellEndDate] GO ALTER TABLE [SalesLT].[Product] WITH NOCHECK ADD CONSTRAINT [CK_Product_StandardCost] CHECK (([StandardCost]>=(0.00))) GO ALTER TABLE [SalesLT].[Product] CHECK CONSTRAINT [CK_Product_StandardCost] GO ALTER TABLE [SalesLT].[Product] WITH NOCHECK ADD CONSTRAINT [CK_Product_Weight] CHECK (([Weight]>(0.00))) GO ALTER TABLE [SalesLT].[Product] CHECK CONSTRAINT [CK_Product_Weight] GO -
Execute the script by pressing F5 or clicking Run.
-
Verify that the tables have been created successfully by expanding the Tables folder in the database explorer.
Perform an offline migration of a SQL Server database to Azure SQL Database
We’re now ready to migrate the data. Follow these steps to perform an offline migration using Azure Data Studio.
-
Launch the Migrate to Azure SQL wizard within the extension in Azure Data Studio, and then select Migrate to Azure SQL.
-
On Step 1: Databases for assessment, select No on “Do you want to track the migration process in Azure portal?”, then select the AdventureWorksLT database. Select Next.
-
On Step 2: Assessment summary and SKU recommendations, wait for the assessment to complete, and review the results. Select Next.
-
On Step 3: Target platform and & assessment results, select Azure SQL Database as the target type. After reviewing the assessment results, select Next.
-
On Step 4: Azure SQL target, if the account isn’t linked yet, make sure you add an account selecting the Link account link. Then, select an Azure account, Microsoft Entra tenant, subscription, location, resource group, Azure SQL Database server, and credentials of the Azure SQL Database.
-
Select Connect, and then select the AdventureWorksLT database as Target database. Select Next.
-
On Step 5: Azure Database Migration Service, select the Create new link to create a new Azure Database Migration Service using the wizard. Follow the Configure manually steps provided by the wizard to set up the self-hosted integration runtime. If you have previously created one, you can reuse it.
-
On Step 6: Data source configuration, enter the credentials to connect to the SQL Server instance from the self-hosted integration runtime.
-
Select Edit for the Select tables column for the AdventureWorksLT database.
-
Uncheck the Migrate schema to target option (since we’ve already created the schema manually).
- On the Avaiable on target tab it shows there are four tables ready to migrate:
- SalesLT.Customer
- SalesLT.ProductCategory
- SalesLT.Product
- SalesLT.Address
-
Select Update to save your table selection.
-
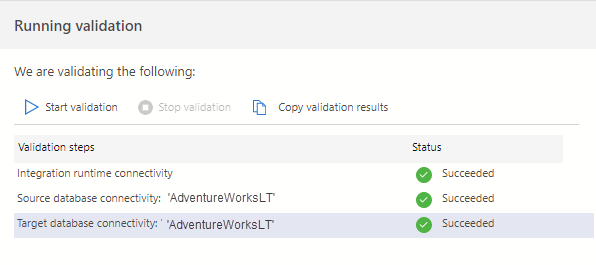
Select Run validation.

-
After the validation completes, select Done, and then Next.
-
On Step 7: Summary, select Start migration.
-
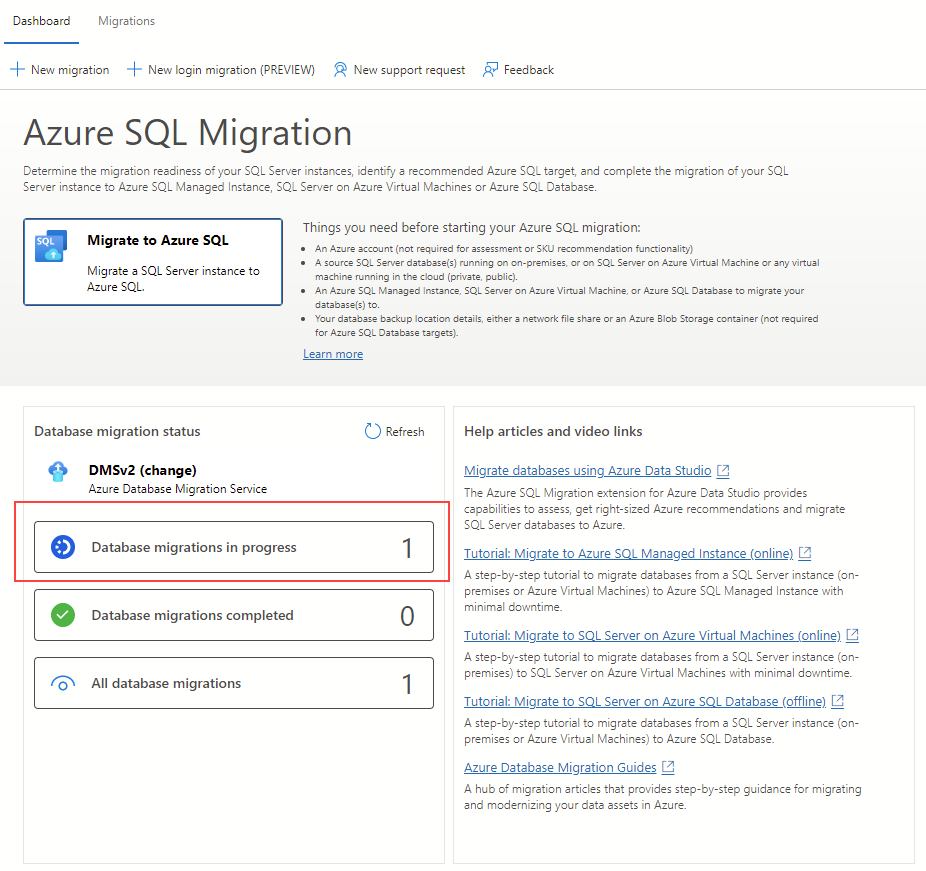
Select Database migrations in progress in the migration dashboard to view the migration status.

-
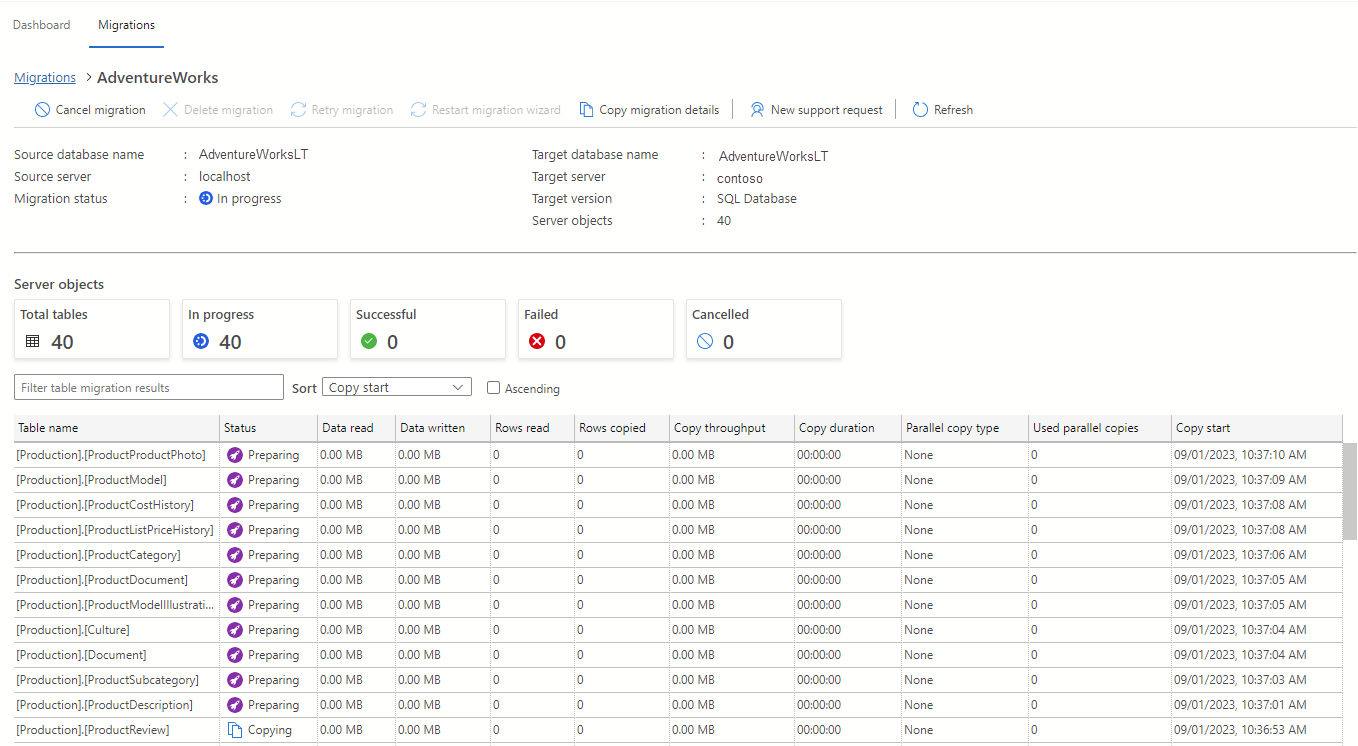
Select the AdventureWorks database name to see more details.

-
After the status is Succeeded, navigate to the target server, and validate the target database.
-
Run the following query to verify data migration success:
 -- Check row counts for migrated data
 SELECT 'Customer' AS TableName, COUNT(*) AS [RowCount] FROM [SalesLT].[Customer]
 UNION ALL
 SELECT 'ProductCategory' AS TableName, COUNT(*) AS [RowCount] FROM [SalesLT].[ProductCategory]
 UNION ALL
 SELECT 'Product' AS TableName, COUNT(*) AS [RowCount] FROM [SalesLT].[Product]
 UNION ALL
 SELECT 'Address' AS TableName, COUNT(*) AS [RowCount] FROM [SalesLT].[Address];
You’ve also learned how to perform a selective migration of specific tables from a SQL Server database to Azure SQL Database using the Azure migration extension. You’ll also learn how to monitor the migration process.
Clean up
When you’re working in your own subscription, it’s a good idea at the end of a project to identify whether you still need the resources you created.
Leaving resources running unnecessarily can result in extra costs. You can delete resources individually or delete the entire set of resources in the Azure portal.
More information
For more information about Azure SQL Database, see What is Azure SQL Database.