Perform Inference using Azure Machine Learning
As the lead developer for Margie’s Travel (MT), you have been asked to help develop a feature estimating nightly rental prices for short-term rentals. You have collected some historical data as a text file and would like to use this to train a simple regression model in Azure Machine Learning. Then, you would like to use that model against data you have hosted in an Azure Database for PostgreSQL flexible server database.
In this exercise, you will deploy a model created using Azure Machine Learning’s Automated machine learning functionality. Then, you will use that deployed model to estimate nightly sale prices for short-term rental properties.
Before you start
You need an Azure subscription with administrative rights.
Deploy resources into your Azure subscription
This step will guide you through using Azure CLI commands from the Azure Cloud Shell to create a resource group and run a Bicep script to deploy the Azure services necessary for completing this exercise into your Azure subscription.
-
Open a web browser and navigate to the Azure portal.
-
Select the Cloud Shell icon in the Azure portal toolbar to open a new Cloud Shell pane at the bottom of your browser window.

If prompted, select the required options to open a Bash shell. If you have previously used a PowerShell console, switch it to a Bash shell.
-
At the Cloud Shell prompt, enter the following to clone the GitHub repo containing exercise resources:
git clone https://github.com/MicrosoftLearning/mslearn-postgresql.gitIf you have already cloned this GitHub repo in a prior module, it will still be available to you, and you may receive the following error message:
fatal: destination path 'mslearn-postgresql' already exists and is not an empty directory.If you receive this message, you can safely continue to the next step.
-
Next, you run three commands to define variables to reduce redundant typing when using Azure CLI commands to create Azure resources. The variables represent the name to assign to your resource group (
RG_NAME), the Azure region (REGION) into which resources will be deployed, and a randomly generated password for the PostgreSQL administrator login (ADMIN_PASSWORD).In the first command, the region assigned to the corresponding variable is
eastus, but you can also replace it with a location of your preference. However, if replacing the default, you must select another Azure region that supports abstractive summarization to ensure you can complete all of the tasks in the modules in this learning path.REGION=eastusThe following command assigns the name to be used for the resource group that will house all the resources used in this exercise. The resource group name assigned to the corresponding variable is
rg-learn-postgresql-ai-$REGION, where$REGIONis the location you specified above. However, you can change it to any other resource group name that suits your preference.RG_NAME=rg-learn-postgresql-ai-$REGIONThe final command randomly generates a password for the PostgreSQL admin login. Make sure you copy it to a safe place to use later to connect to your PostgreSQL flexible server.
a=() for i in {a..z} {A..Z} {0..9}; do a[$RANDOM]=$i done ADMIN_PASSWORD=$(IFS=; echo "${a[*]::18}") echo "Your randomly generated PostgreSQL admin user's password is:" echo $ADMIN_PASSWORD -
If you have access to more than one Azure subscription, and your default subscription is not the one in which you want to create the resource group and other resources for this exercise, run this command to set the appropriate subscription, replacing the
<subscriptionName|subscriptionId>token with either the name or ID of the subscription you want to use:az account set --subscription <subscriptionName|subscriptionId> -
Run the following Azure CLI command to create your resource group:
az group create --name $RG_NAME --location $REGION -
Finally, use the Azure CLI to execute a Bicep deployment script to provision Azure resources in your resource group:
az deployment group create --resource-group $RG_NAME --template-file "mslearn-postgresql/Allfiles/Labs/Shared/deploy-azure-machine-learning.bicep" --parameters adminLogin=pgAdmin adminLoginPassword=$ADMIN_PASSWORDThe Bicep deployment script provisions the Azure services required to complete this exercise into your resource group. The resources deployed include an Azure Database for PostgreSQL flexible server and an Azure Machine Learning workspace. The deployment script will also create all pre-requisite services for instantiating an Azure Machine Learning workspace, including an Azure Blob Storage account, an Azure Key Vault, an Azure Container Repository, an Azure Log Analytics Workspace, and an instance of Azure Application Insights. The Bicep script also performs some configuration steps, such as adding the
azure_aiandvectorextensions to the PostgreSQL server’s allowlist (via the azure.extensions server parameter) and creating a database namedrentalson the server. Note that the Bicep file differs from the other modules in this learning path.The deployment typically takes several minutes to complete. You can monitor it from the Cloud Shell or navigate to the Deployments page for the resource group you created above and observe the deployment progress there.
-
Close the Cloud Shell pane once your resource deployment is complete.
Troubleshooting deployment errors
You may encounter a few errors when running the Bicep deployment script.
-
If you previously ran the Bicep deployment script for this learning path and subsequently deleted the resources, you may receive an error message like the following if you are attempting to rerun the script within 48 hours of deleting the resources:
  {"code": "InvalidTemplateDeployment", "message": "The template deployment 'deploy' is not valid according to the validation procedure. The tracking id is '4e87a33d-a0ac-4aec-88d8-177b04c1d752'. See inner errors for details."}

  Inner Errors:
  {"code": "FlagMustBeSetForRestore", "message": "An existing resource with ID '/subscriptions/{subscriptionId}/resourceGroups/rg-learn-postgresql-ai-eastus/providers/Microsoft.CognitiveServices/accounts/{accountName}' has been soft-deleted. To restore the resource, you must specify 'restore' to be 'true' in the property. If you don't want to restore existing resource, please purge it first."}
If you receive this message, modify the
azure deployment group createcommand above to set therestoreparameter equal totrueand rerun it. -
If the selected region is restricted from provisioning specific resources, you must set the
REGIONvariable to a different location and rerun the commands to create the resource group and run the Bicep deployment script.{"status":"Failed","error":{"code":"DeploymentFailed","target":"/subscriptions/{subscriptionId}/resourceGroups/{resourceGrouName}/providers/Microsoft.Resources/deployments/{deploymentName}","message":"At least one resource deployment operation failed. Please list deployment operations for details. Please see https://aka.ms/arm-deployment-operations for usage details.","details":[{"code":"ResourceDeploymentFailure","target":"/subscriptions/{subscriptionId}/resourceGroups/{resourceGrouName}/providers/Microsoft.DBforPostgreSQL/flexibleServers/{serverName}","message":"The resource write operation failed to complete successfully, because it reached terminal provisioning state 'Failed'.","details":[{"code":"RegionIsOfferRestricted","message":"Subscriptions are restricted from provisioning in this region. Please choose a different region. For exceptions to this rule please open a support request with Issue type of 'Service and subscription limits'. See https://review.learn.microsoft.com/en-us/azure/postgresql/flexible-server/how-to-request-quota-increase for more details."}]}]}} -
If the script is unable to create an AI resource due to the requirement to accept the responsible AI agreement, you may experience the following error; in which case use the Azure Portal user interface to create an Azure AI Services resource, and then re-run the deployment script.
  {"code": "InvalidTemplateDeployment", "message": "The template deployment 'deploy' is not valid according to the validation procedure. The tracking id is 'f8412edb-6386-4192-a22f-43557a51ea5f'. See inner errors for details."}

  Inner Errors:
  {"code": "ResourceKindRequireAcceptTerms", "message": "This subscription cannot create TextAnalytics until you agree to Responsible AI terms for this resource. You can agree to Responsible AI terms by creating a resource through the Azure Portal then trying again. For more detail go to https://go.microsoft.com/fwlink/?linkid=2164190"}
Deploy an Azure Machine Learning model
The first step is to deploy a model to Azure Machine Learning. The repository contains an example of a model trained on a set of listing data, which you will use in your PostgreSQL integration.
-
Download the
mlflow-model.zipfile from the mslearn-postgresql repository. Extract the files from this into a folder called mlflow-model. -
In the Azure portal, navigate to your newly created Azure Machine Learning workspace.
-
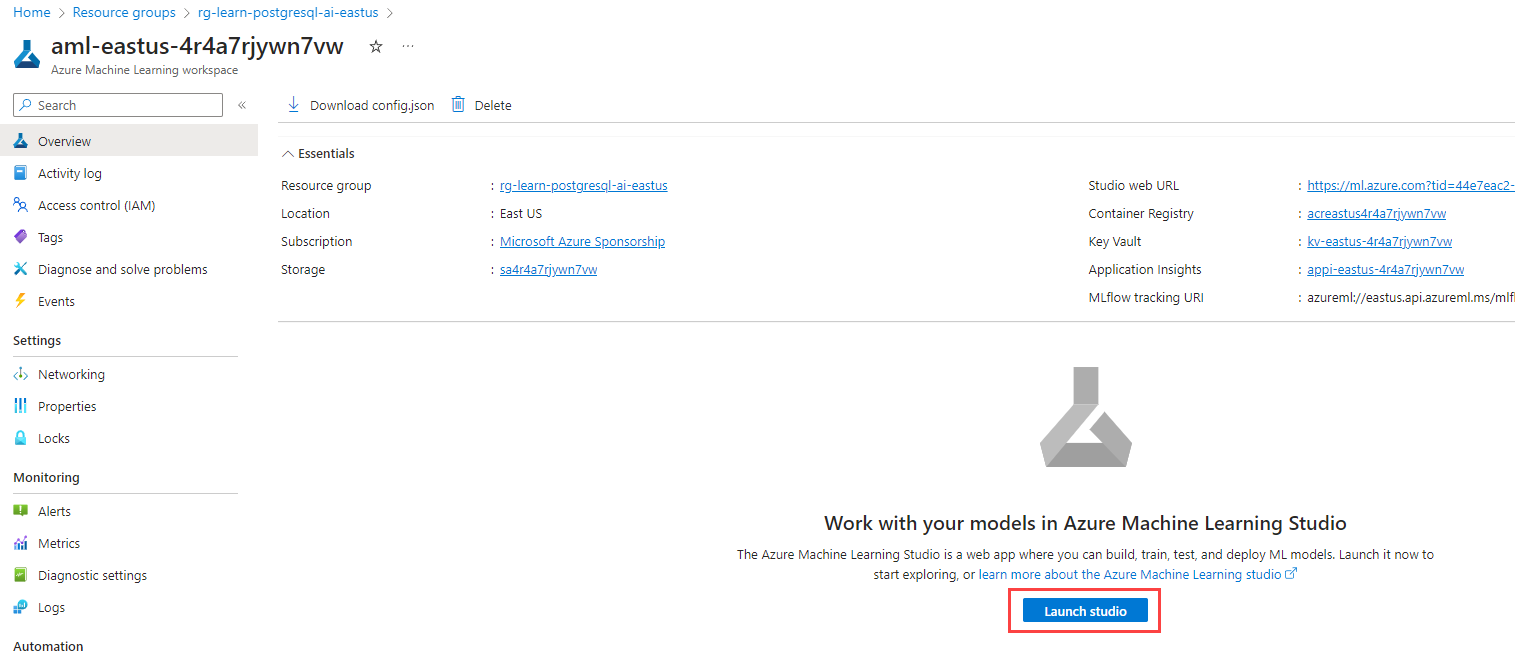
Select the Launch studio button to open the Azure Machine Learning Studio.
-
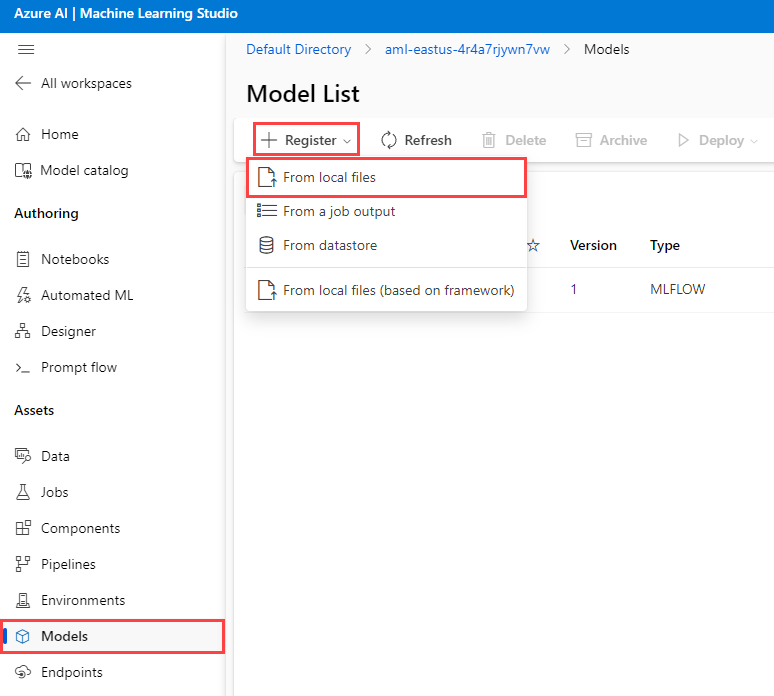
Select the Models menu option from the Assets menu. Then, select the + Register menu option and choose From local files.
-
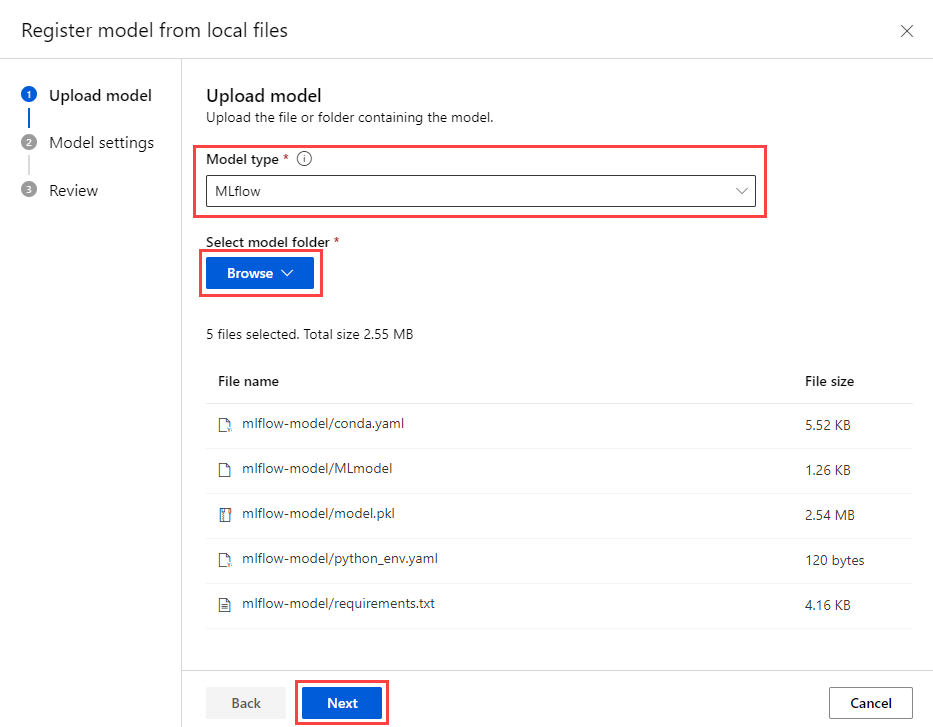
In the Upload model menu, set the model type to MLflow. Then, choose Browse and navigate to your mlflow-model folder, uploading the assets. After that, select the Next button to continue.
-
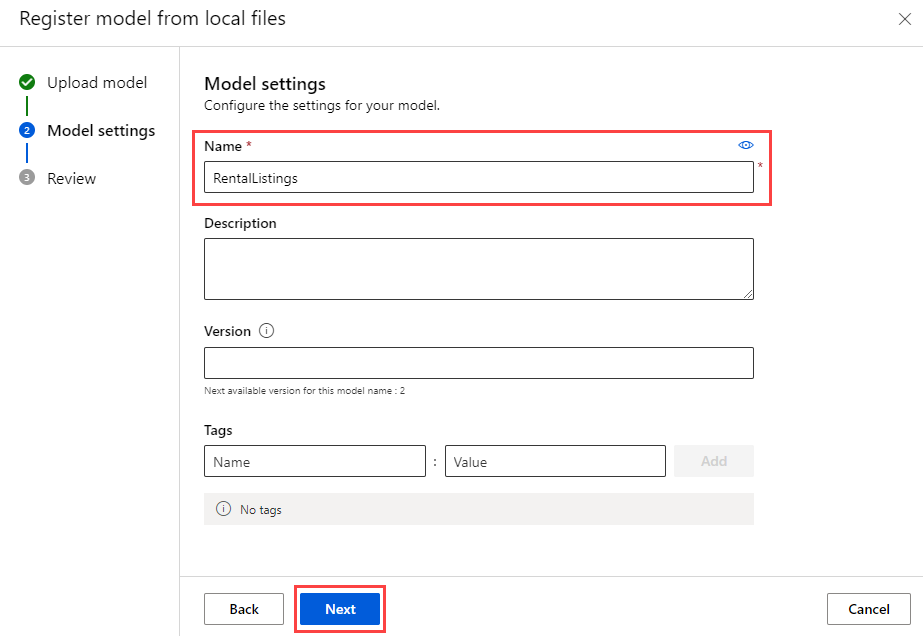
Name the model RentalListings and then select the Next button.
-
Select the Register button to complete model registration. This action will take you back to the Models page. Select the newly created model.
[!Note]
If you do not see a model, select the Refresh menu option button to reload the page. After that, you should see the RentalListings model.
-
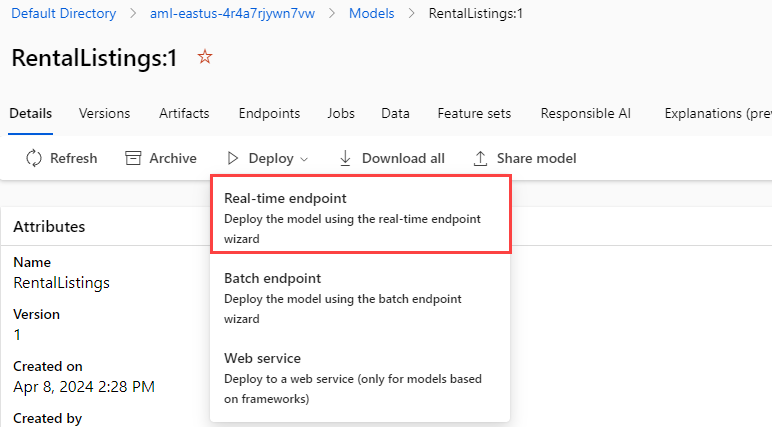
Select the Deploy button option and create a new Real-time endpoint.
-
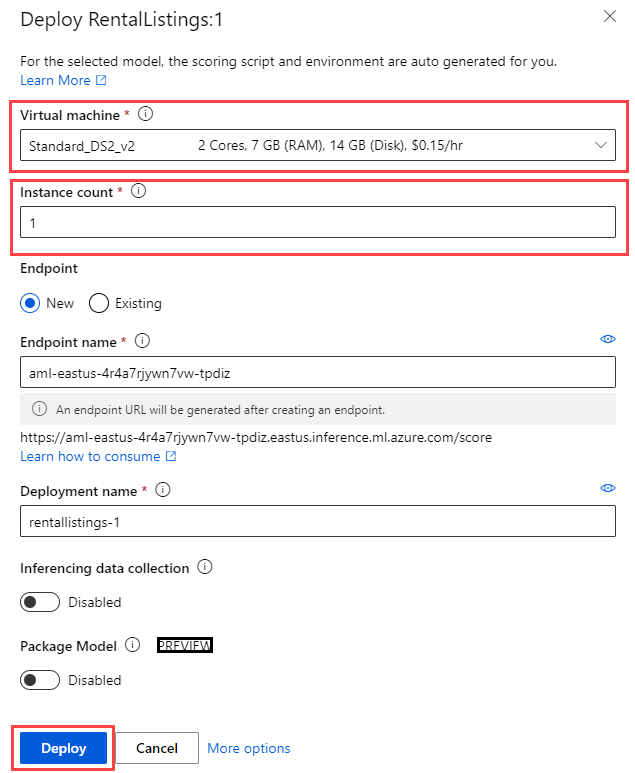
On the deployment fly-out menu, set the Virtual machine to something like Standard_DS2_v2 and the Instance count to 1. Select the Deploy button. Deployment may take several minutes to complete, as the deployment process includes provisioning a virtual machine and deploying the model as a Docker container.
-
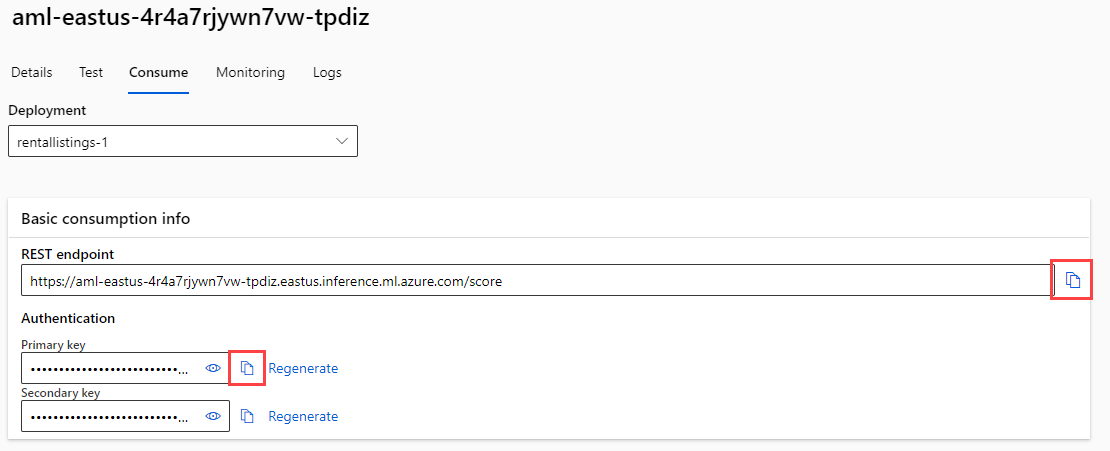
After the endpoint deploys, navigate to the Consume tab and copy the REST endpoint and primary key so you can use them in the next section.
-
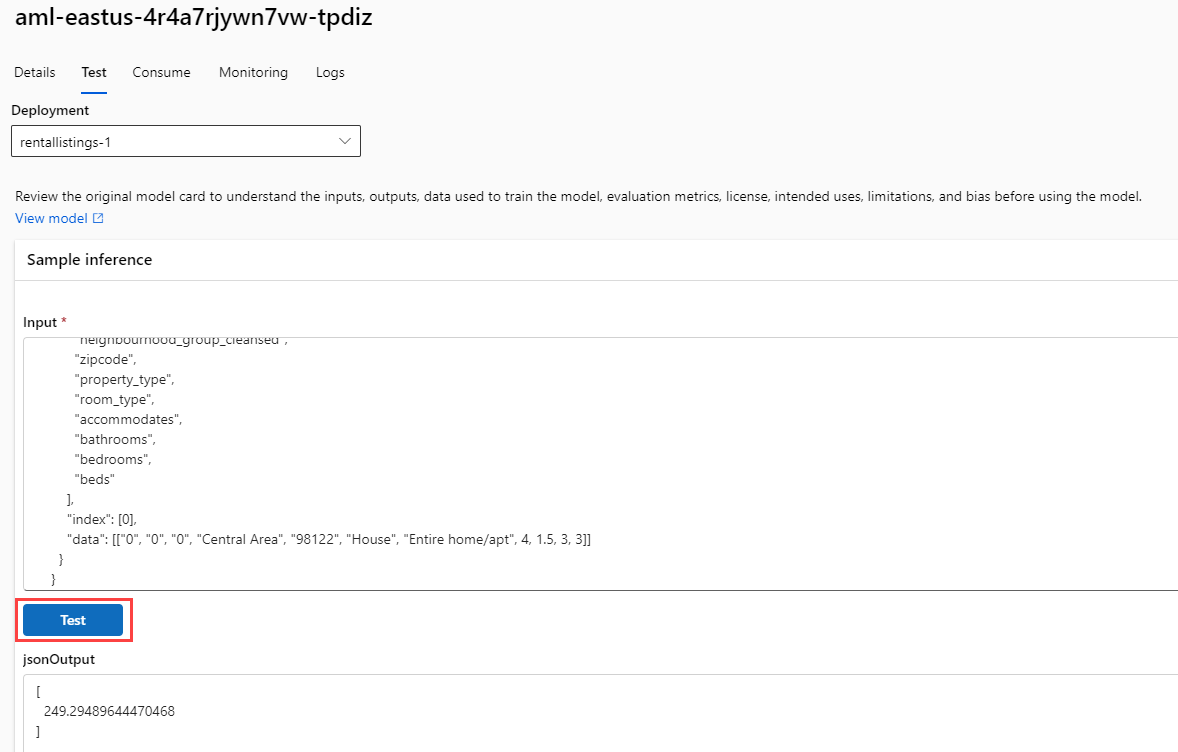
To test that your endpoint is running correctly, you can use the Test tab on your endpoint. Then, paste in the following block, replacing any input that currently exists. Select the Test button, and you should see a JSON output containing an array with a single decimal value indicating the number of US dollars you should expect this particular property to earn for a single night of rental.
{
    "input_data": {
        "columns": [
            "host_is_superhost",
            "host_has_profile_pic",
            "host_identity_verified",
            "neighbourhood_group_cleansed",
            "zipcode",
            "property_type",
            "room_type",
            "accommodates",
            "bathrooms",
            "bedrooms",
            "beds"
        ],
        "index": [0],
        "data": [["0", "0", "0", "Central Area", "98122", "House", "Entire home/apt", 4, 1.5, 3, 3]]
    }
}
Connect to your database using psql in the Azure Cloud Shell
In this task, you connect to the rentals database on your Azure Database for PostgreSQL flexible server using the psql command-line utility from the Azure Cloud Shell.
-
In the Azure portal, navigate to your newly created Azure Database for PostgreSQL flexible server.
-
In the resource menu, under Settings, select Databases select Connect for the
rentalsdatabase. Note that selecting Connect does not actually connect you to the database; it simply provides instructions for connecting to the database using various methods. Review the instructions to Connect from browser or locally and use those to connect using the Azure Cloud Shell.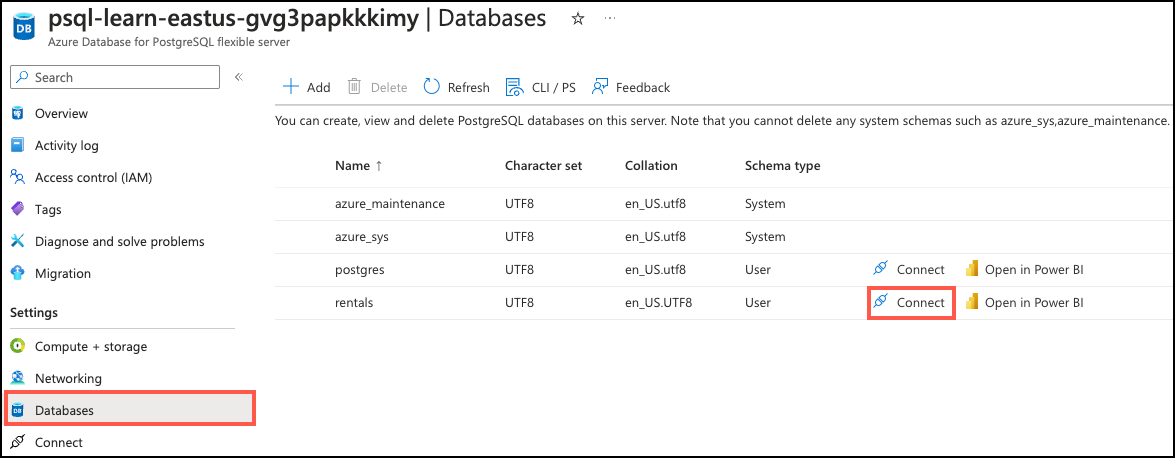
-
At the “Password for user pgAdmin” prompt in the Cloud Shell, enter the randomly generated password for the pgAdmin login.
Once logged in, the
psqlprompt for therentalsdatabase is displayed. -
Throughout the remainder of this exercise, you continue working in the Cloud Shell, so it may be helpful to expand the pane within your browser window by selecting the Maximize button at the top right of the pane.

Install and configure the azure_ai extension
Before using the azure_ai extension, you must install it into your database and configure it to connect to your Azure AI Services resources. The azure_ai extension allows you to integrate the Azure OpenAI and Azure AI Language services into your database. To enable the extension in your database, follow these steps:
-
Execute the following command at the
psqlprompt to verify that theazure_aiand thevectorextensions were successfully added to your server’s allowlist by the Bicep deployment script you ran when setting up your environment:SHOW azure.extensions;The command displays the list of extensions on the server’s allowlist. If everything was correctly installed, your output must include
azure_aiandvector, like this:azure.extensions ------------------ azure_ai,vectorBefore an extension can be installed and used in Azure Database for PostgreSQL flexible server, it must be added to the server’s allowlist, as described in how to use PostgreSQL extensions.
-
Now, you are ready to install the
azure_aiextension using the CREATE EXTENSION command.CREATE EXTENSION IF NOT EXISTS azure_ai;CREATE EXTENSIONloads a new extension into the database by running its script file. This script typically creates new SQL objects such as functions, data types, and schemas. An error is thrown if an extension of the same name already exists. AddingIF NOT EXISTSallows the command to execute without throwing an error if it is already installed. -
You must then use the
azure_ai.set_setting()function to configure the connection to your Azure Machine Learning deployed endpoint. Configure theazure_mlsettings to point to your deployed endpoint and its key. The value forazure_ml.scoring_endpointwill be your endpoint’s REST URL. The value forazure_ml.endpoint_keywill be the value of Key 1 or Key 2.SELECT azure_ai.set_setting('azure_ml.scoring_endpoint','https://<YOUR_ENDPOINT>.<YOUR_REGION>.inference.ml.azure.com/score');SELECT azure_ai.set_setting('azure_ml.endpoint_key', '<YOUR_KEY>');
Create a table containing listings to price
You will need one table to store short-term rental listings you want to price.
-
Run the following command in the
rentalsdatabase to create a newlistings_to_pricetable.CREATE TABLE listings_to_price ( id INT GENERATED BY DEFAULT AS IDENTITY PRIMARY KEY, host_is_superhost INT NOT NULL, host_has_profile_pic INT NOT NULL, host_identity_verified INT NOT NULL, neighbourhood_group_cleansed VARCHAR(75) NOT NULL, zipcode VARCHAR(5) NOT NULL, property_type VARCHAR(30) NOT NULL, room_type VARCHAR(30) NOT NULL, accommodates INT NOT NULL, bathrooms DECIMAL(3,1) NOT NULL, bedrooms INT NOT NULL, beds INT NOT NULL ); -
Next, run the following command in the
rentalsdatabase to insert new rental listing data.INSERT INTO listings_to_price(host_is_superhost, host_has_profile_pic, host_identity_verified, neighbourhood_group_cleansed, zipcode, property_type, room_type, accommodates, bathrooms, bedrooms, beds) VALUES (1, 1, 1, 'Queen Anne', '98119', 'House', 'Private room', 2, 1.0, 1, 1), (0, 1, 1, 'University District', '98105', 'Apartment', 'Entire home/apt', 4, 1.5, 2, 2), (0, 0, 0, 'Central Area', '98122', 'House', 'Entire home/apt', 4, 1.5, 3, 3), (0, 0, 0, 'Downtown', '98101', 'House', 'Entire home/apt', 4, 1.5, 3, 3), (0, 0, 0, 'Capitol Hill', '98122', 'House', 'Entire home/apt', 4, 1.5, 3, 3);This command inserts five rows of new listing data.
Create a function to translate listings data
To populate the language translation table, you will create a stored procedure to load data in batches.
-
Run the following command at the
psqlprompt to create a new function namedprice_listing.CREATE OR REPLACE FUNCTION price_listing ( IN host_is_superhost INT, IN host_has_profile_pic INT, IN host_identity_verified INT, IN neighbourhood_group_cleansed VARCHAR(75), IN zipcode VARCHAR(5), IN property_type VARCHAR(30), IN room_type VARCHAR(30), IN accommodates INT, IN bathrooms DECIMAL(3,1), IN bedrooms INT, IN beds INT) RETURNS DECIMAL(6,2) AS $$ SELECT CAST(jsonb_array_elements(inference.inference) AS DECIMAL(6,2)) AS expected_price FROM azure_ml.inference((' { "input_data": { "columns": [ "host_is_superhost", "host_has_profile_pic", "host_identity_verified", "neighbourhood_group_cleansed", "zipcode", "property_type", "room_type", "accommodates", "bathrooms", "bedrooms", "beds" ], "index": [0], "data": [["' || host_is_superhost || '", "' || host_has_profile_pic || '", "' || host_identity_verified || '", "' || neighbourhood_group_cleansed || '", "' || zipcode || '", "' || property_type || '", "' || room_type || '", ' || accommodates || ', ' || bathrooms || ', ' || bedrooms || ', ' || beds || ']] } }')::jsonb, deployment_name=>'rentallistings-1'); $$ LANGUAGE sql;
[!Note]
By default, the deployment name is a combination of the model name (rentallistings) and the version number (1). If you deploy a new version of the model and use the default deployment name, the new deployment name would be rentallistings-2.
-
Execute the function using the following SQL command:
SELECT * FROM price_listing(0, 0, 0, 'Central Area', '98122', 'House', 'Entire home/apt', 4, 1.5, 3, 3);This query returns a nightly rental price estimate in decimal format.
-
Call the function for each row in the
listings_to_pricetable using the following SQL command:SELECT l2p.*, expected_price FROM listings_to_price l2p CROSS JOIN LATERAL price_listing(l2p.host_is_superhost, l2p.host_has_profile_pic, l2p.host_identity_verified, l2p.neighbourhood_group_cleansed, l2p.zipcode, l2p.property_type, l2p.room_type, l2p.accommodates, l2p.bathrooms, l2p.bedrooms, l2p.beds) expected_price;This query returns five rows, one for each row in
listings_to_price. It will include all of the columns in thelistings_to_pricetable and the result of theprice_listing()function asexpected_price.
Clean up
Once you have completed this exercise, delete the Azure resources you created. You are charged for the configured capacity, not how much the database is used. Follow these instructions to delete your resource group and all resources you created for this lab.
-
Open a web browser and navigate to the Azure portal, and on the home page, select Resource groups under Azure services.

-
In the filter for any field search box, enter the name of the resource group you created for this lab, and then select the resource group from the list.
-
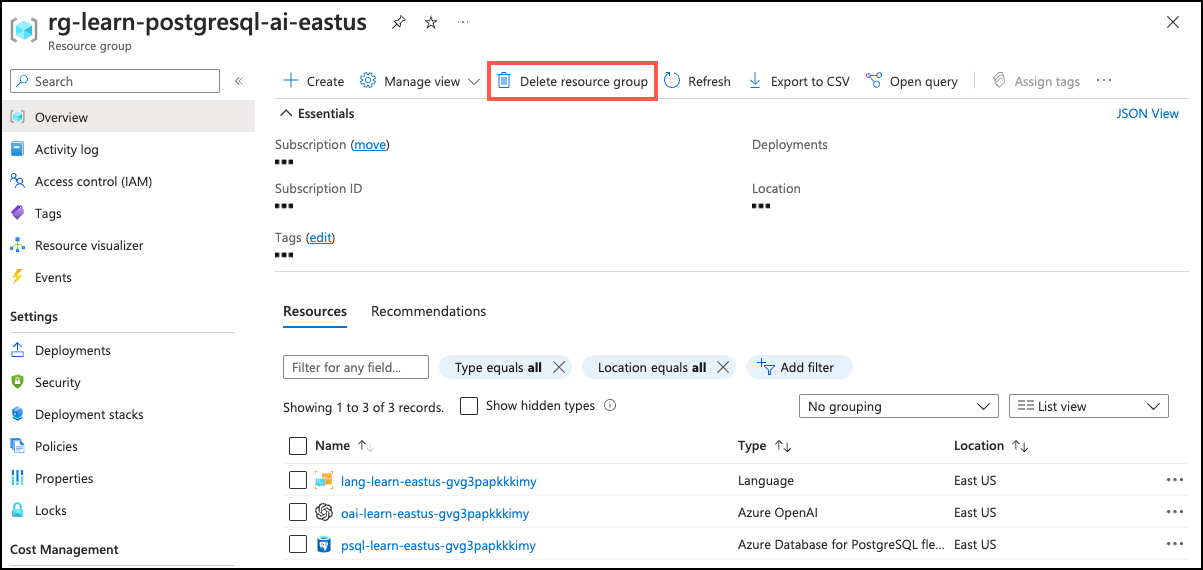
On the Overview page of your resource group, select Delete resource group.
-
In the confirmation dialog, enter the resource group name you are deleting to confirm and then select Delete.