Enrich an AI search index with custom classes
You’ve built a search solution and now want to add Azure AI Services for language enrichments to your indexes.
In this exercise, you’ll create an Azure AI Search solution and enrich an index with the results from a Language Studio custom text classification project. You’ll create a function app to connect search and your classification model together.
Note To complete this exercise, you will need a Microsoft Azure subscription. If you don’t already have one, you can sign up for a free trial at https://azure.com/free.
Set up your development environment with Python, VS Code and VS Code Extensions
Install these tools to complete this exercise. You can still follow along with the steps without these tools.
- Install VS Code
- Install Azure Core Functions Tool
- Install Azure Tools Extensions for VS Code
- Install Python 3.8 for your operating system.
- Install Python Extension for VS Code
Set up your Azure resources
To save you time, select this Azure ARM template to create resources you’ll need later in the exercise.
Deploy a pre-built ARM template
-
 select this link to create your starting resources. You might need to copy and paste the direct link into your search bar.
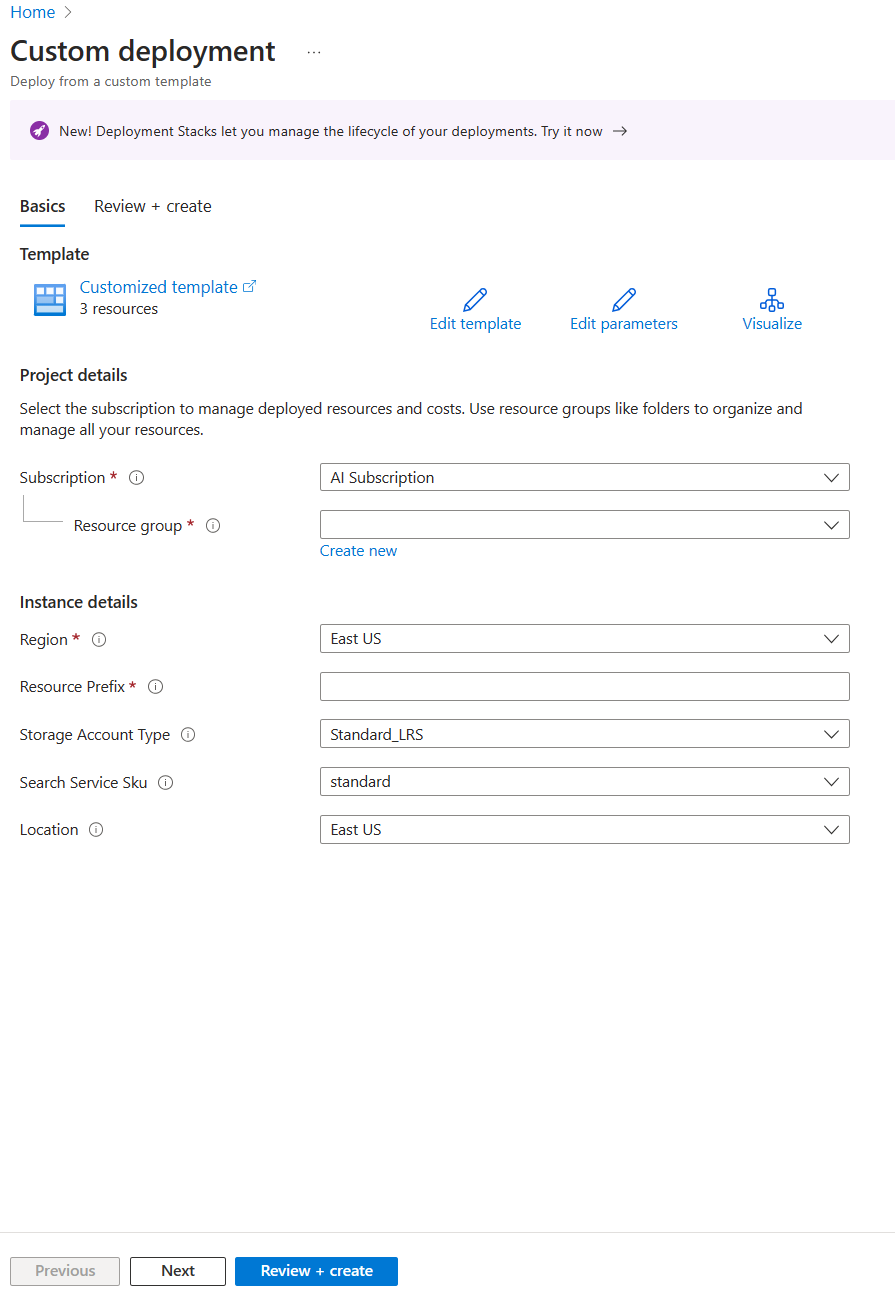
- In Resource group, select Create new, name it cog-search-language-exe.
- In Region, select a supported region that is close to you.
- The Resource Prefix needs to be globally unique, enter a random numeric and lower-case character prefix, for example acs18245.
- In Location, select the same region you chose above.
- Select Review + create.
-
Select Create.
Note There’s an error shown, You will need to Agree to the terms of service below to create this resource successfully., by selecting Create you are agreeing to them.
-
Select Go to resource group to see all the resources that you’ve created.
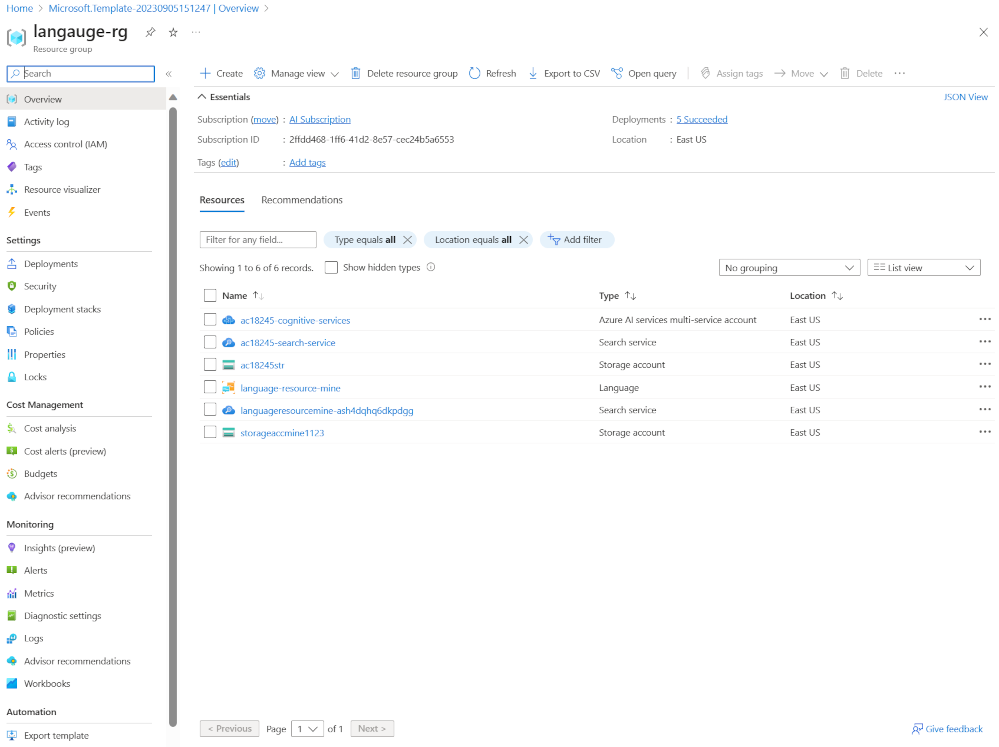 You’ll be setting up an Azure Cognitive Search index, creating an Azure function, and creating a Language Studio project to identify movie genres from their summaries.
Upload sample data to train language services
This exercise uses 210 text files that contain a plot summary for a movie. The text files name is the movie title. The folder also contains a movieLabels.json file that maps the genres of a movie to the file, for each file there’s a JSON entry like this:
{
    "location": "And_Justice_for_All.txt",
    "language": "en-us",
    "classifiers": [
        {
            "classifierName": "Mystery"
        },
        {
            "classifierName": "Drama"
        },
        {
            "classifierName": "Thriller"
        },
        {
            "classifierName": "Comedy"
        }
    ]
},
-
Navigate to Labfiles/04-enrich-custom-classes and extract the movies summary.zip folder containing all the files.
Note You use these files to train a model in Language Studio, and will also index all the files in Azure AI Search.
- In the Azure portal, select Resource groups, then select your resource group.
- Select the storage account you created, for example acs18245str.
-
Select Configuration from the left pane, select the Enable option for the Allow Blob anonymous access setting and then select Save at the top of the page.
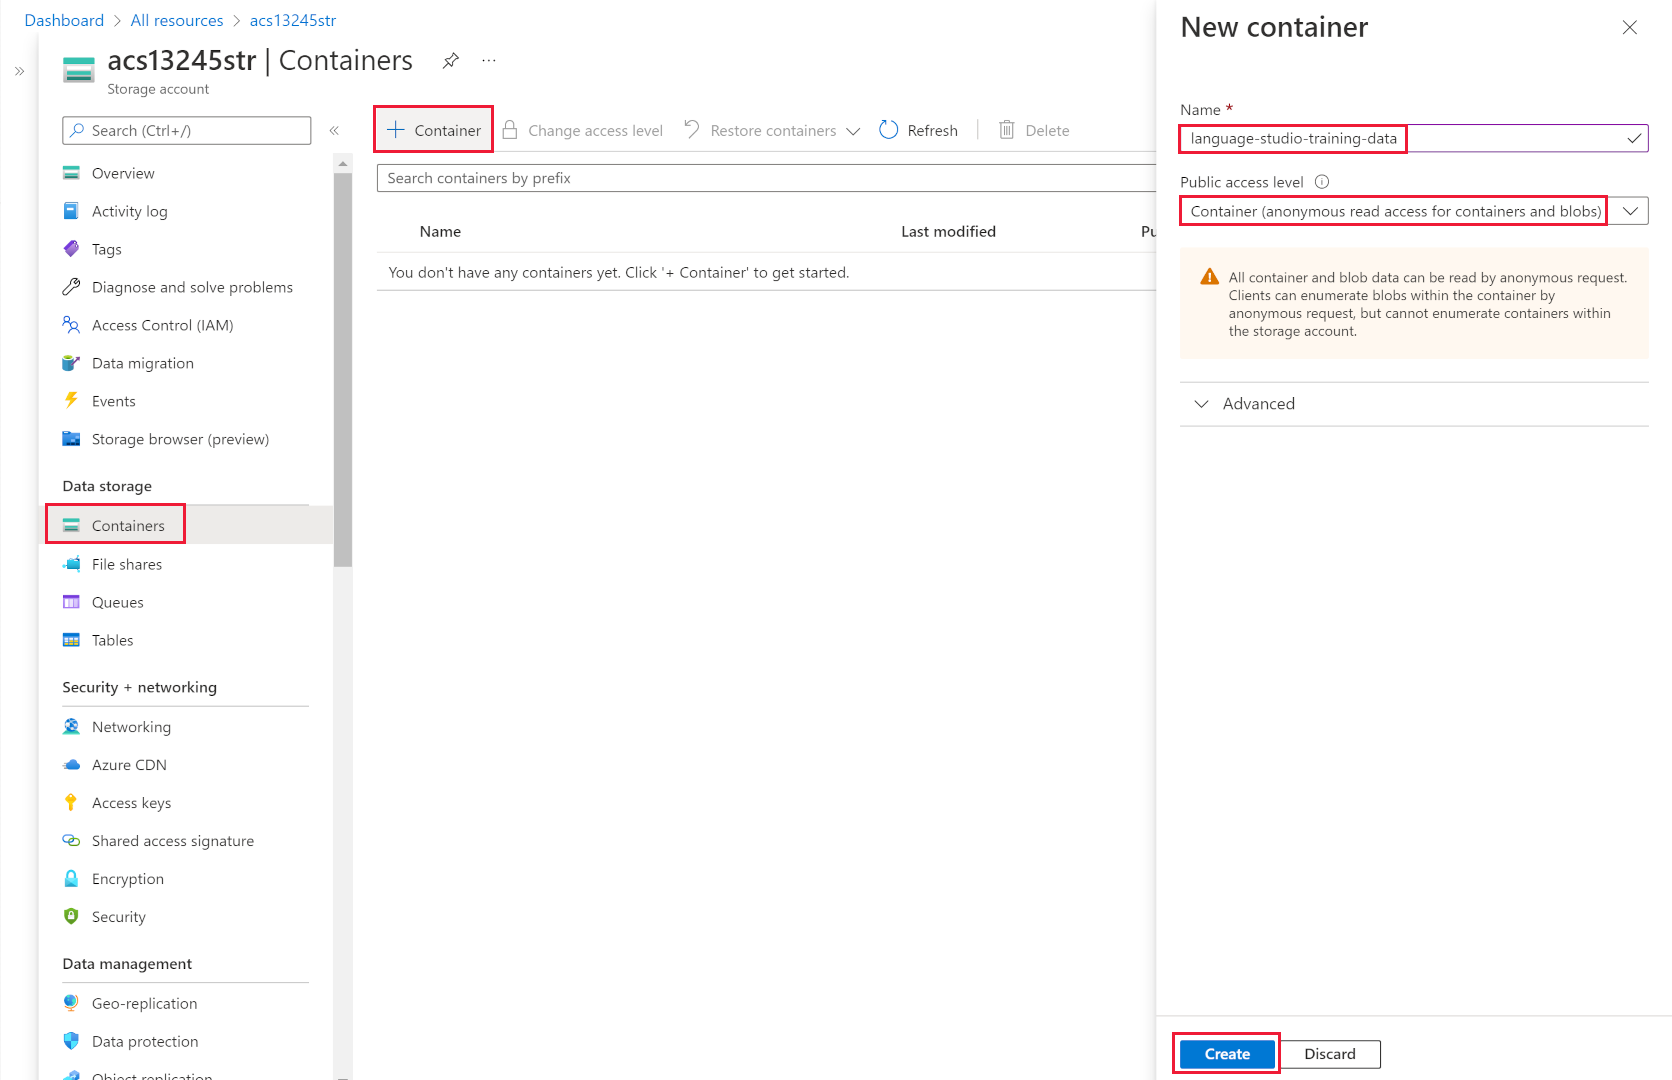
- Select Containers from the left, then select + Container.
- In the New container pane, in Name, enter language-studio-training-data.
- In Anonymous access level, choose Container (anonymous read access for containers and blobs) and select Create.
- Select the new container you just created, language-studio-training-data.
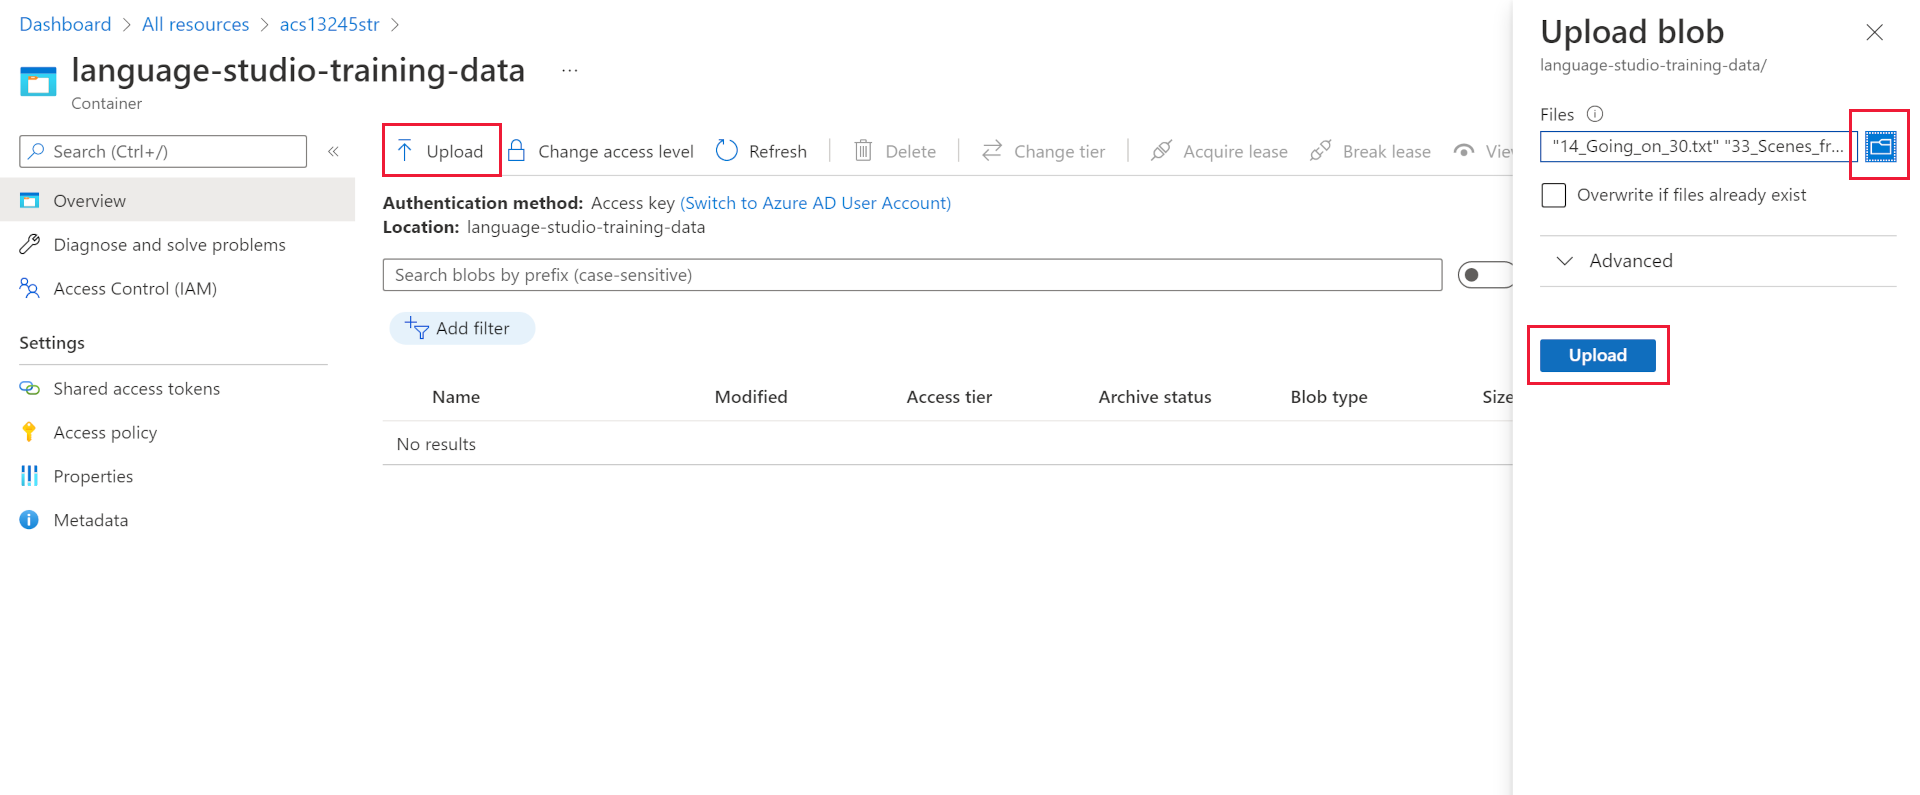
- Select Upload at the top of the pane.
- In the Upload blob pane, select Browse for files.
- Navigate to where you extracted the sample files, select all the text (
.txt) and json (.json) files. - Select Upload in the pane.
- Close the Upload blob pane.
Create a language resource
- In the breadcrumb link at the top of the page, select Home.
- Select + Create a resource and search for Language service.
- Select Create under Language Service.
- Select the option that includes Custom text classification and Custom named entity recognition.
- Select Continue to create your resource.
- In Resource group, choose cog-search-language-exe.
- In Region, select the region you used above.
- In Name, enter learn-language-service-for-custom-text. This needs to be unique globally, so you might need to add a random numbers or characters at the end of it.
- In Pricing tier, select S.
- In New/Existing storage account, select Existing storage account.
- In Storage account in current selected subscription and resource region, select the storage account you created, for example acs18245str.
- Agree to the Responsible AI Notice terms, then select Review + create.
- Select Create.
- Wait for the resources to be deployed, then select Go to resource group.
-
Select learn-language-service-for-custom-text.
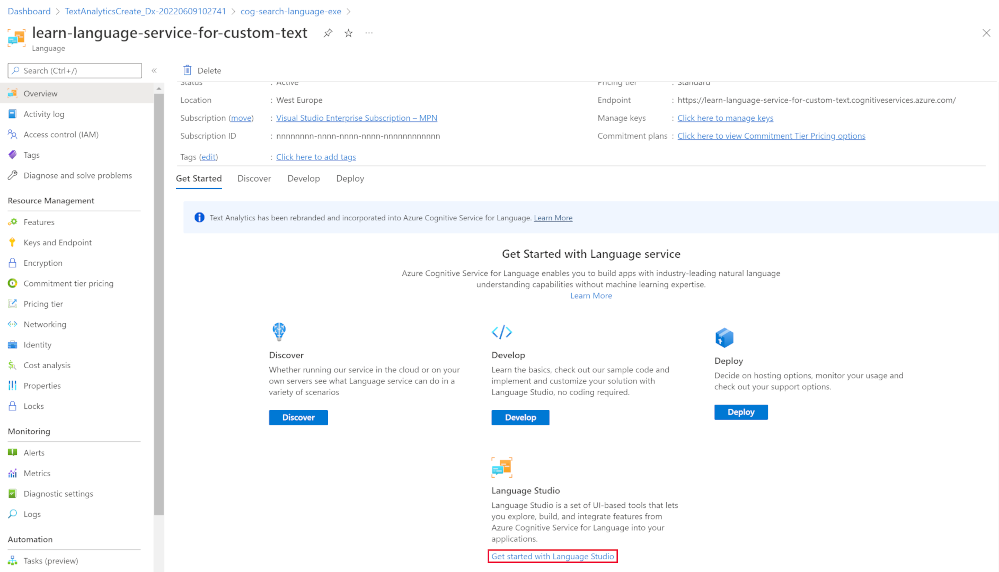
- Scroll down on the Overview pane, and select Get started with Language Studio.
- Sign in the language studio. If you are prompted to choose a Language resource select the resource you created earlier.
Create a custom text classification project in Language Studio
-
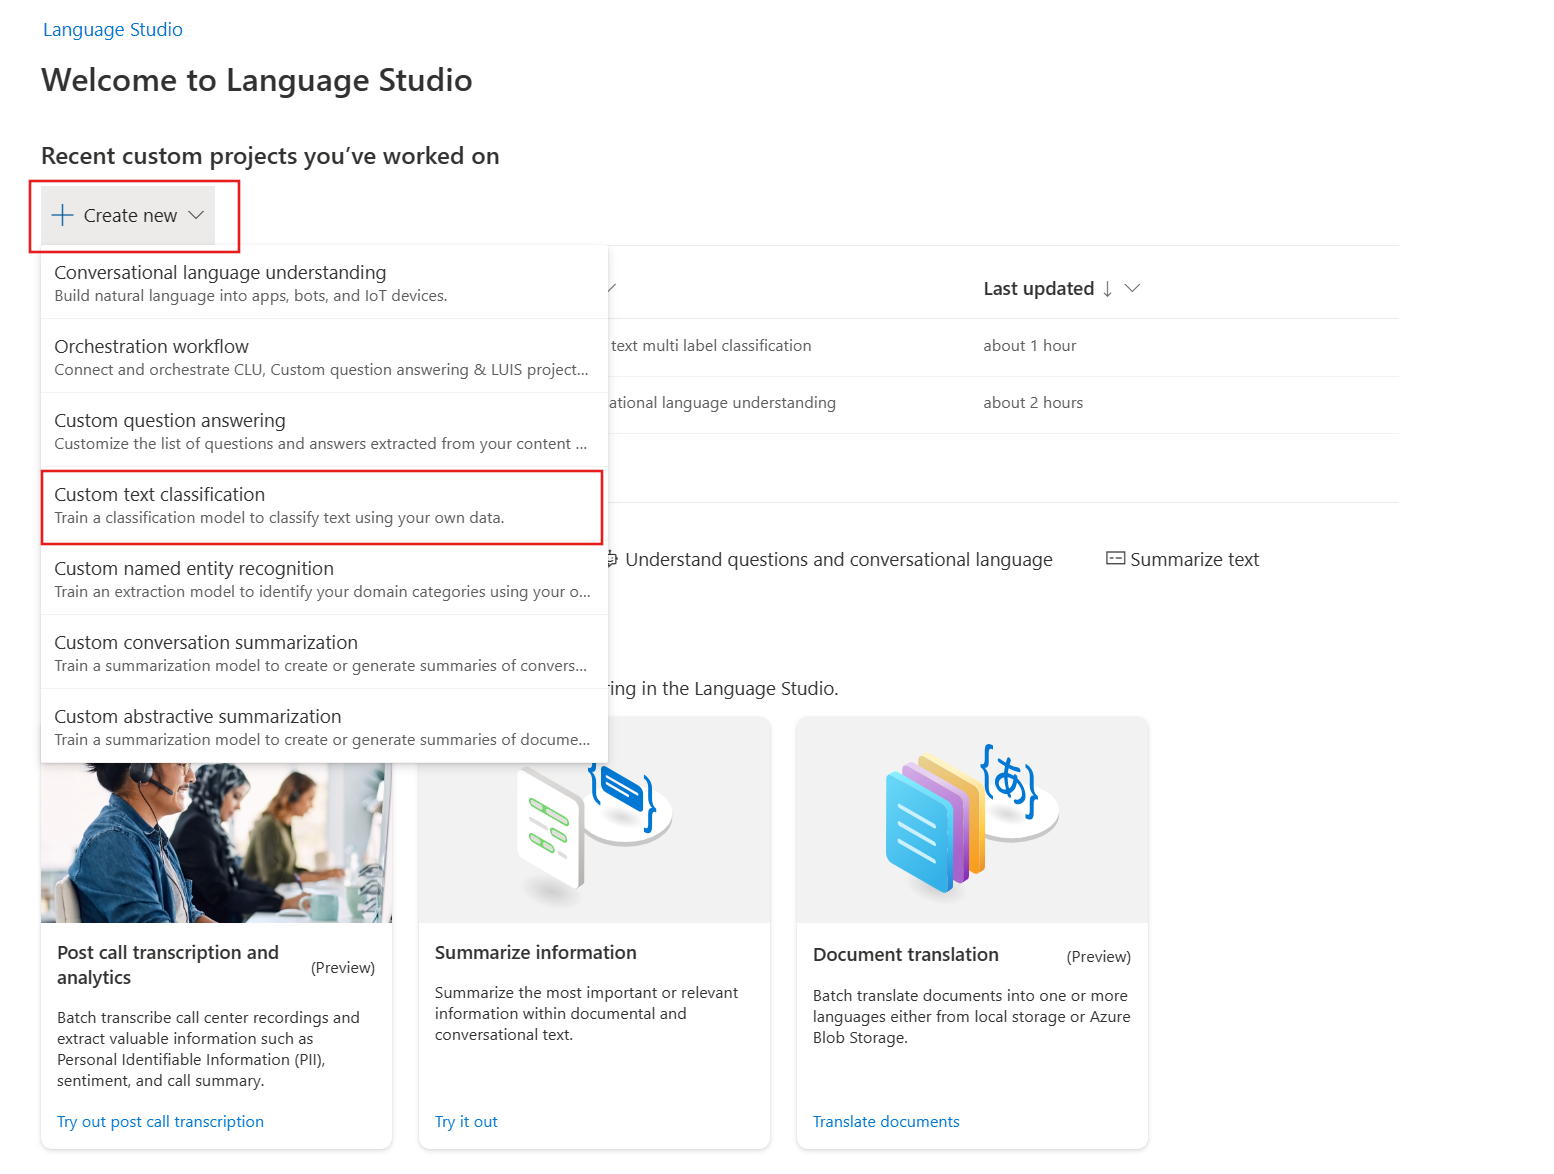
On the Language Studio home page, select Create new, then select Custom text classification.
-
Select Next.
-
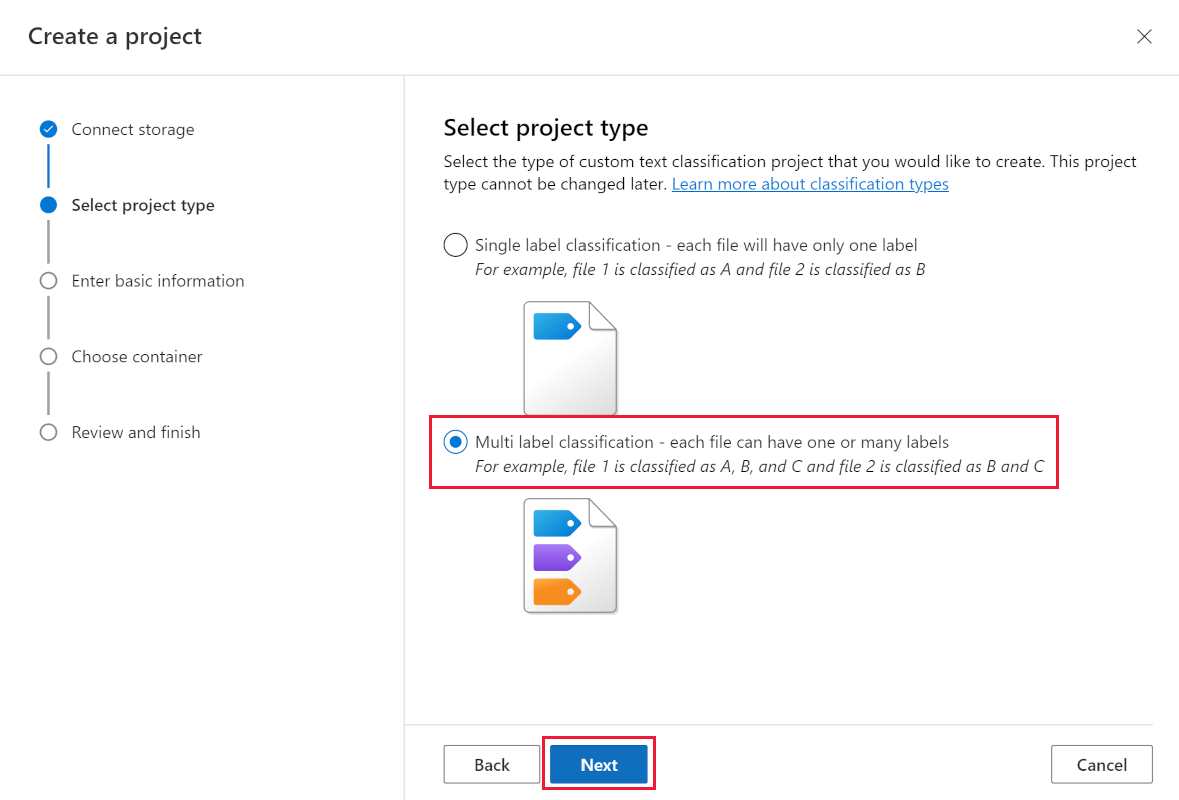
Select Multi label classification, then select Next.
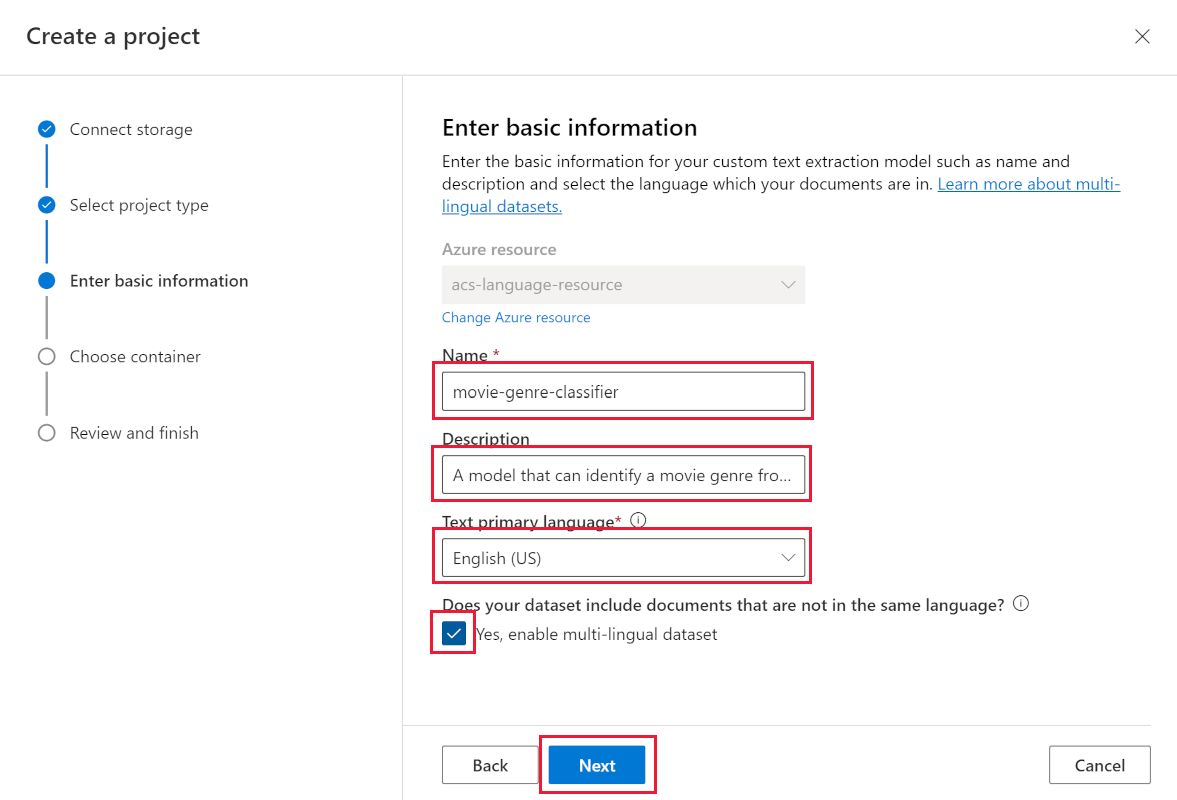
- In Name, enter movie-genre-classifier.
- In Text primary language, select English (US).
- Select Yes, enable multi-lingual dataset.
- In Description, enter A model that can identify a movie genre from the summary.
-
Select Next.
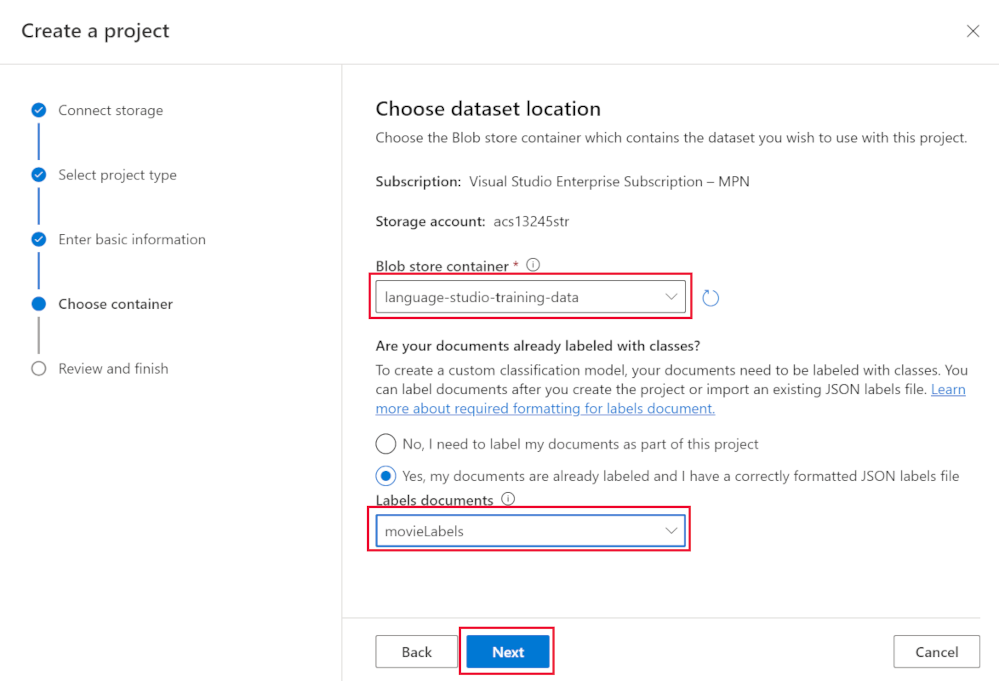
- In Blob storage container, choose language-studio-training-data.
- Select Yes, my documents are already labeled and I have a correctly formatted JSON labels file.
- In Label documents, choose movieLabels.
- Select Next.
- Select Create project.
Train your custom text classification AI model
-
On the left, select Training jobs.
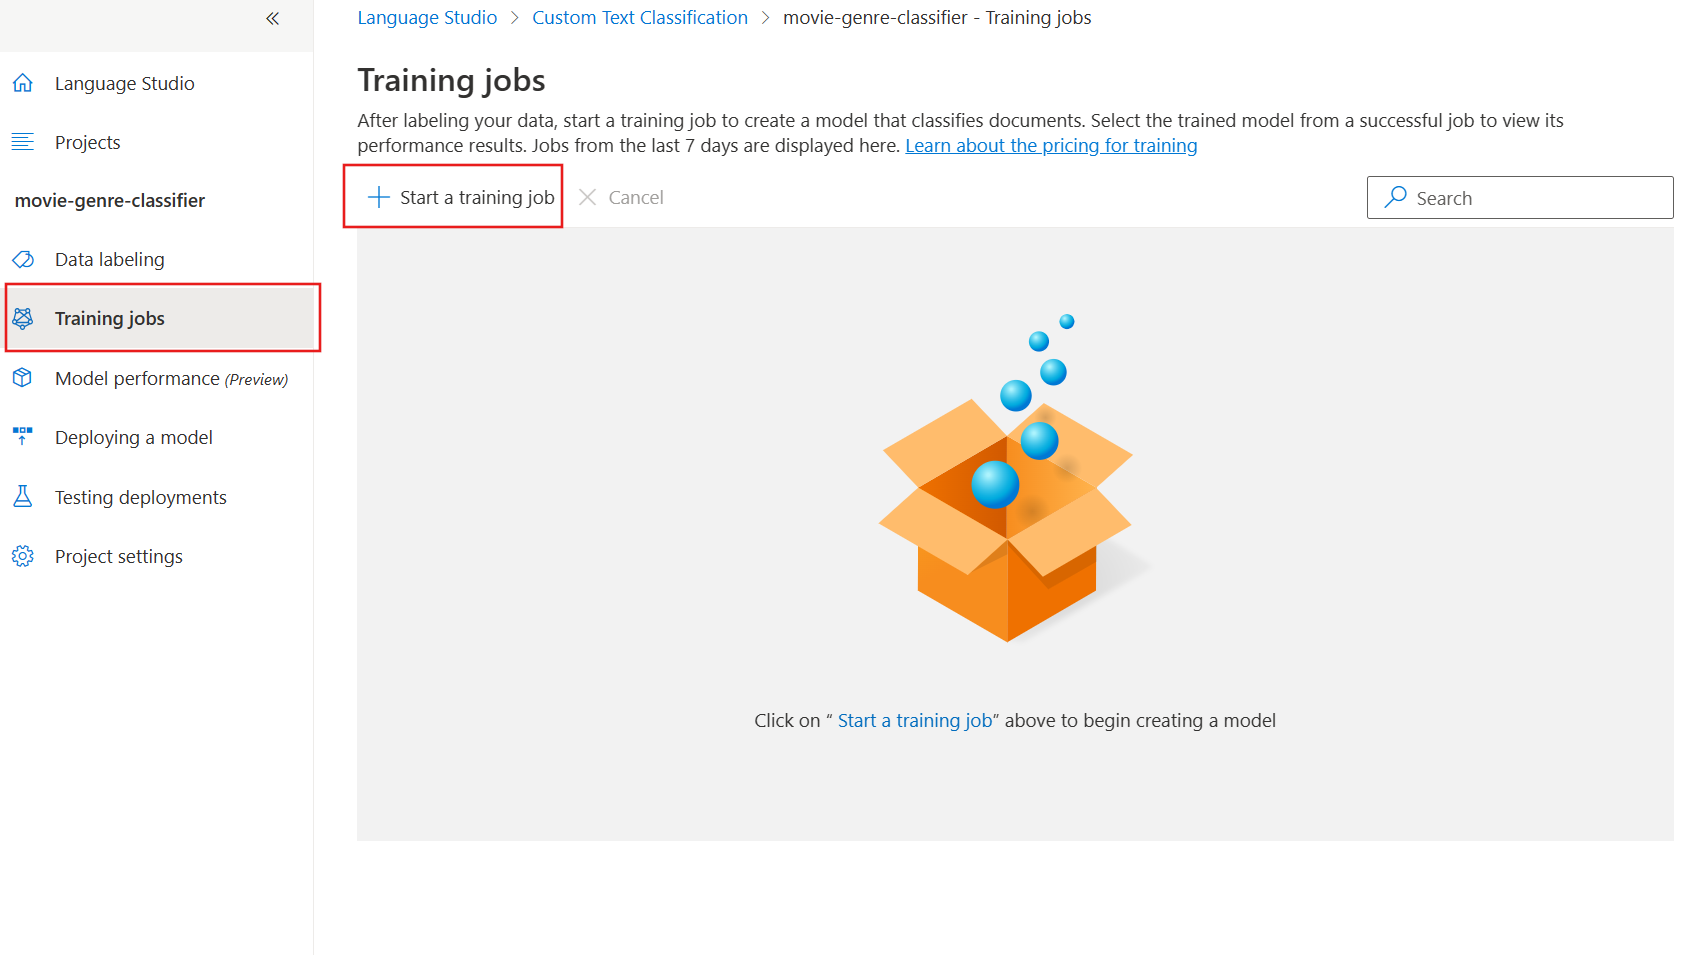
-
Select + Start a training job.
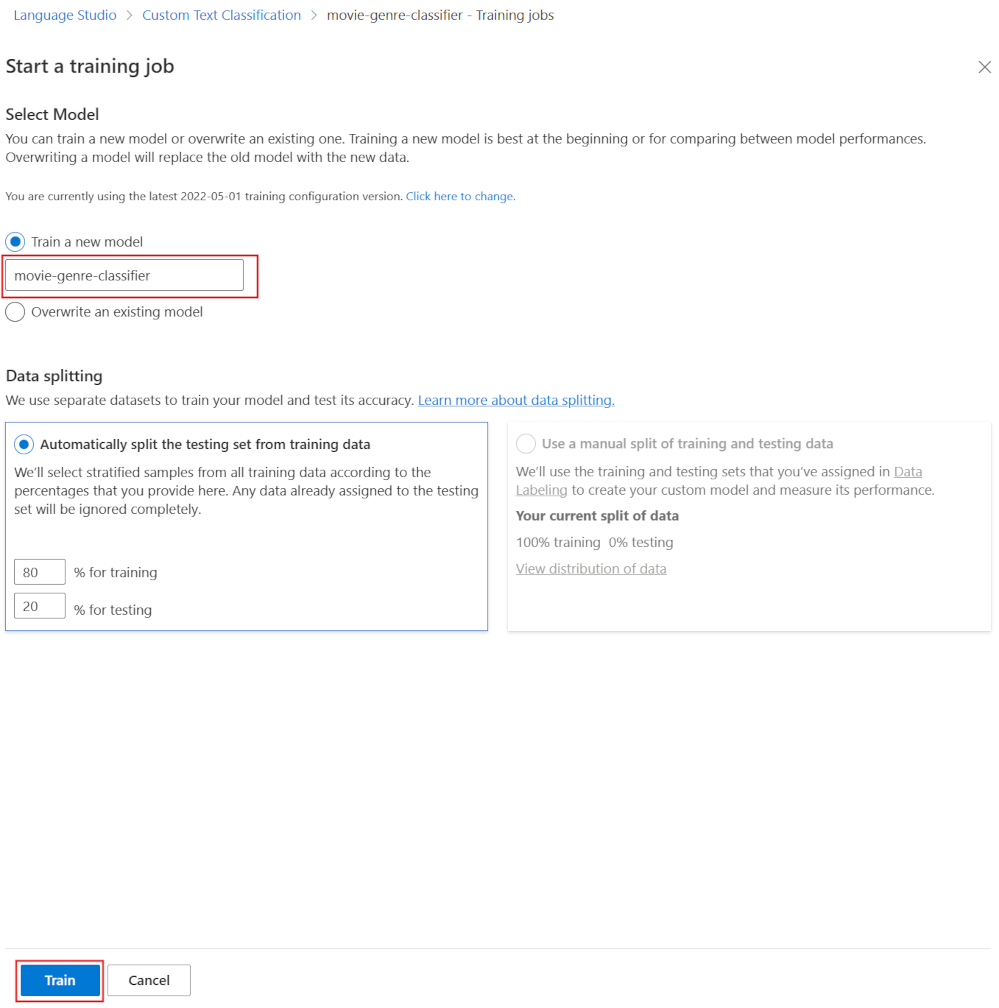
- In Train a new modal, enter movie-genre-classifier.
- Select Train.
- Training the classifier model should take less than 10 minutes. Wait for the status to change to Training succeeded.
Deploy your custom text classification AI model
-
On the left, select Deploying a model.
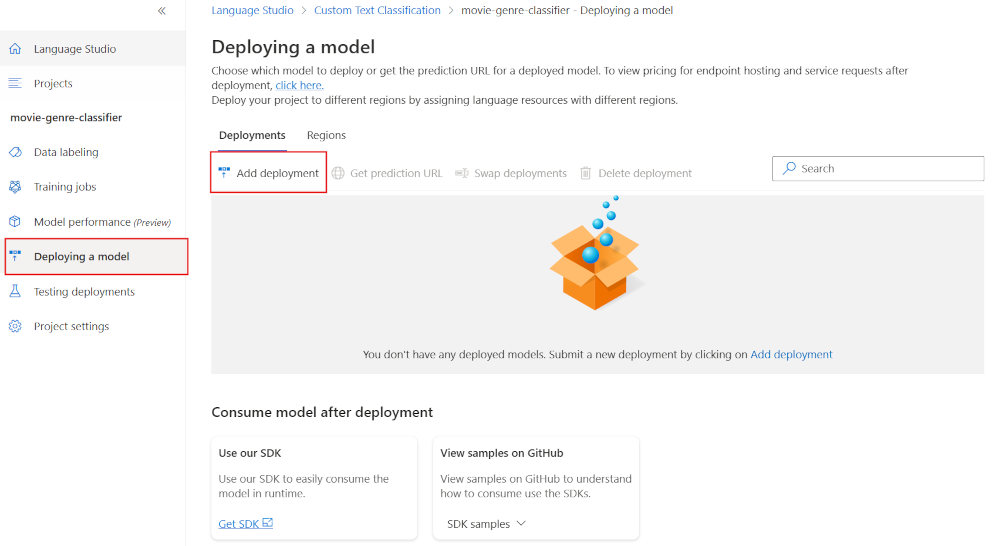
-
Select Add a deployment.
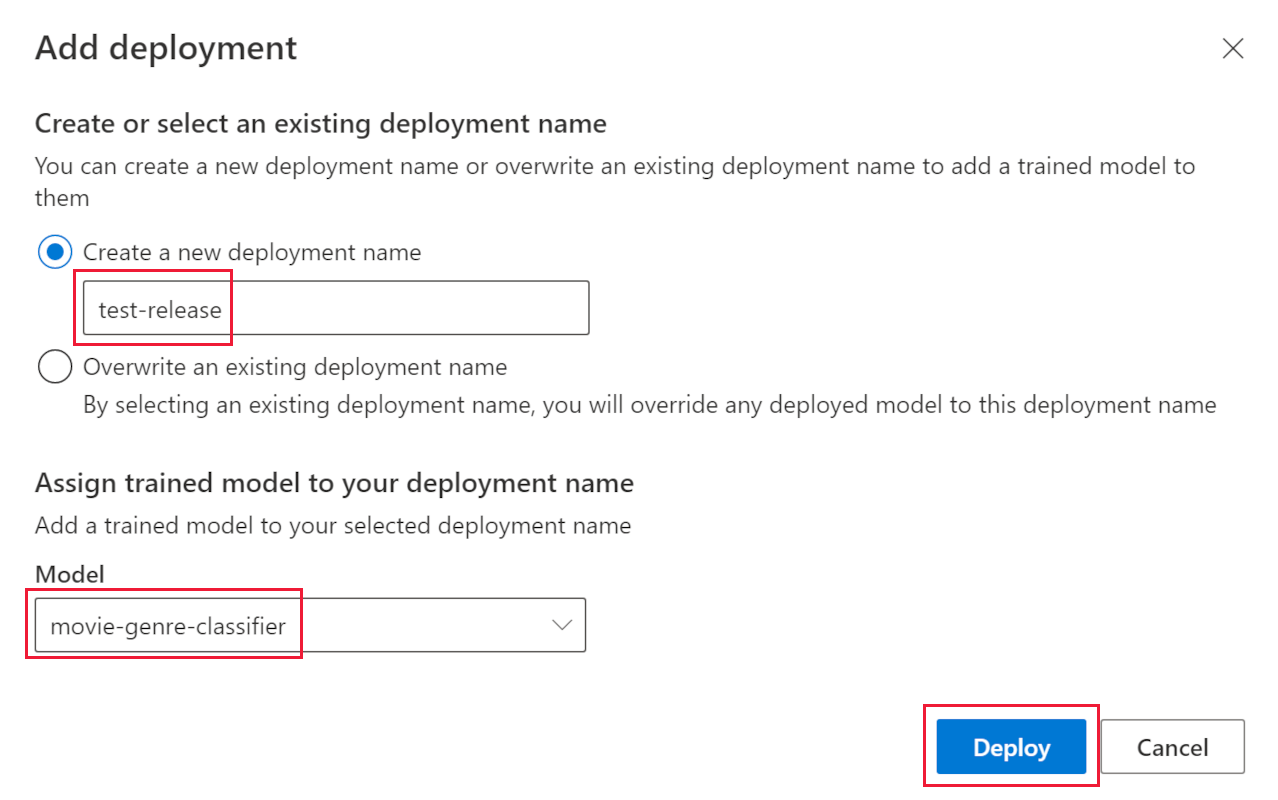
- In Create a new deployment name, enter test-release.
- In Model, select movie-genre-classifier.
- Select Deploy.
Leave this web page open for later in this exercise.
Create an Azure AI Search index
Create a search index that you can enrich with this model, you’ll index all the text files that contain the movie summaries you’ve already downloaded.
- In the Azure portal, select Resource groups, select your resource group, then select the storage account you created, for example acs18245str.
- Select Containers from the left, then select + Container.
- In the New container pane, in Name, enter search-data.
- In Anonymous access level, choose Container.
- Select Create.
- Select the new container you just created, search-data.
- Select Upload at the top of the pane.
- In the Upload blob pane, select Browse for files.
- Navigate to where you downloaded the sample files, select ONLY the text (
.txt) files. - Select Upload in the pane.
- Close the Upload blob pane.
Import documents into Azure AI Search
-
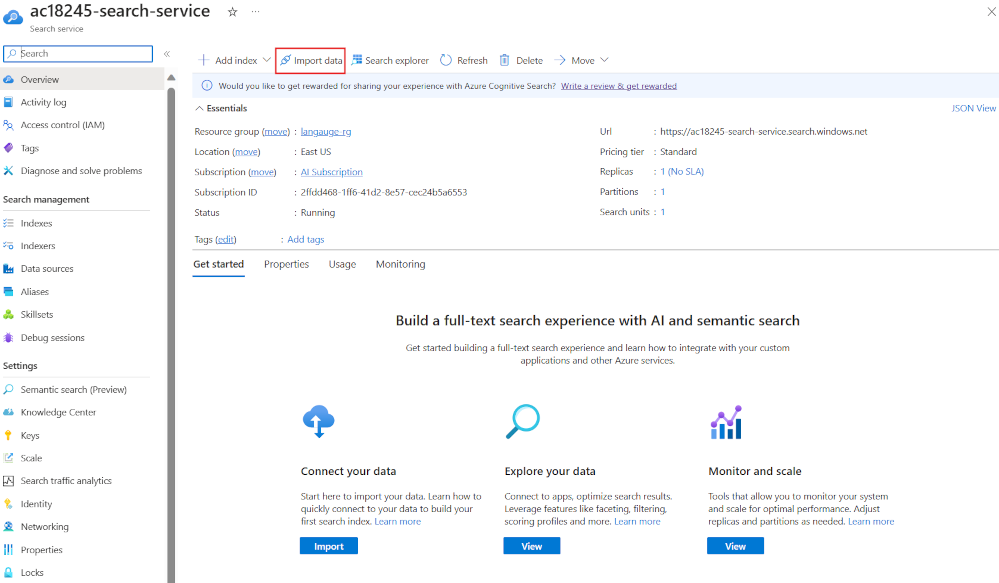
On the left, select Resource groups, select your resource group, then select your search service.
-
Select Import data.
- In Data Source, select Azure Blob Storage.
- In Data source name, enter movie-summaries.
- Select Choose an existing connection, select your storage account, then select the container you just created, search-data.
- Select Add cognitive skills (optional).
-
Expand the Attach AI Services section, then select the Azure AI service you created earlier.
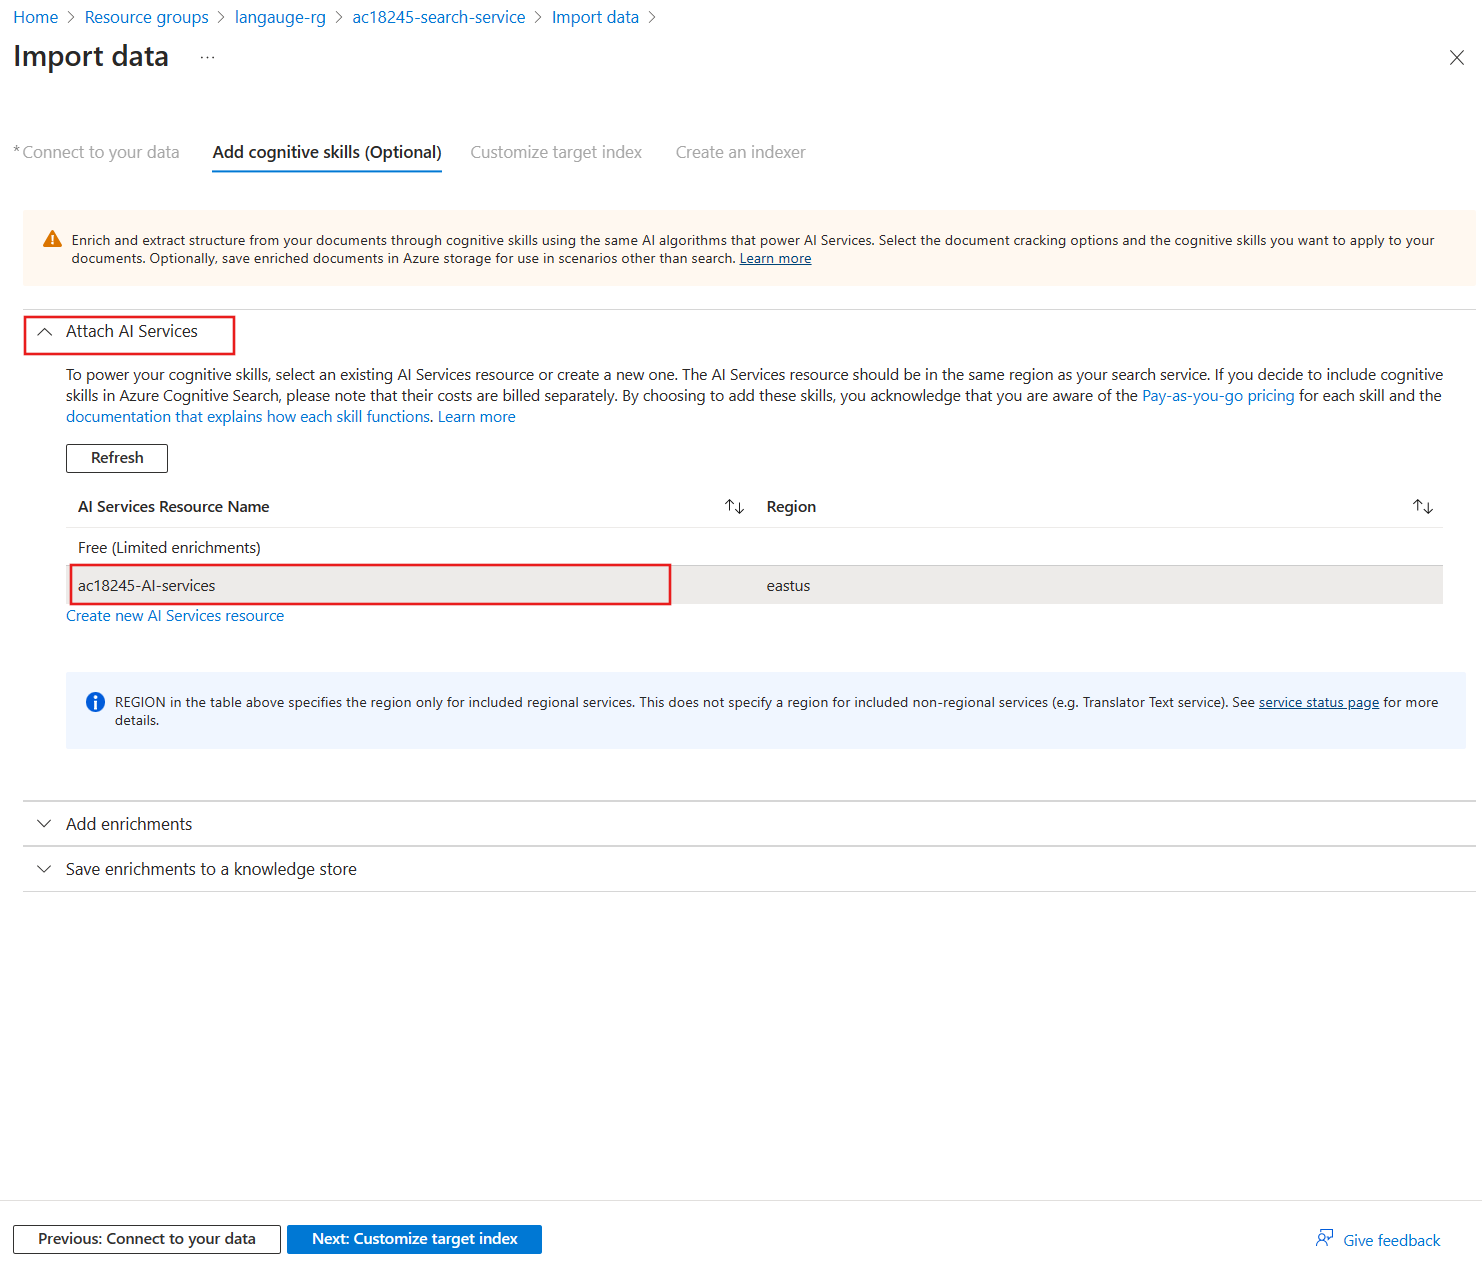
-
Expand the Add enrichments section.
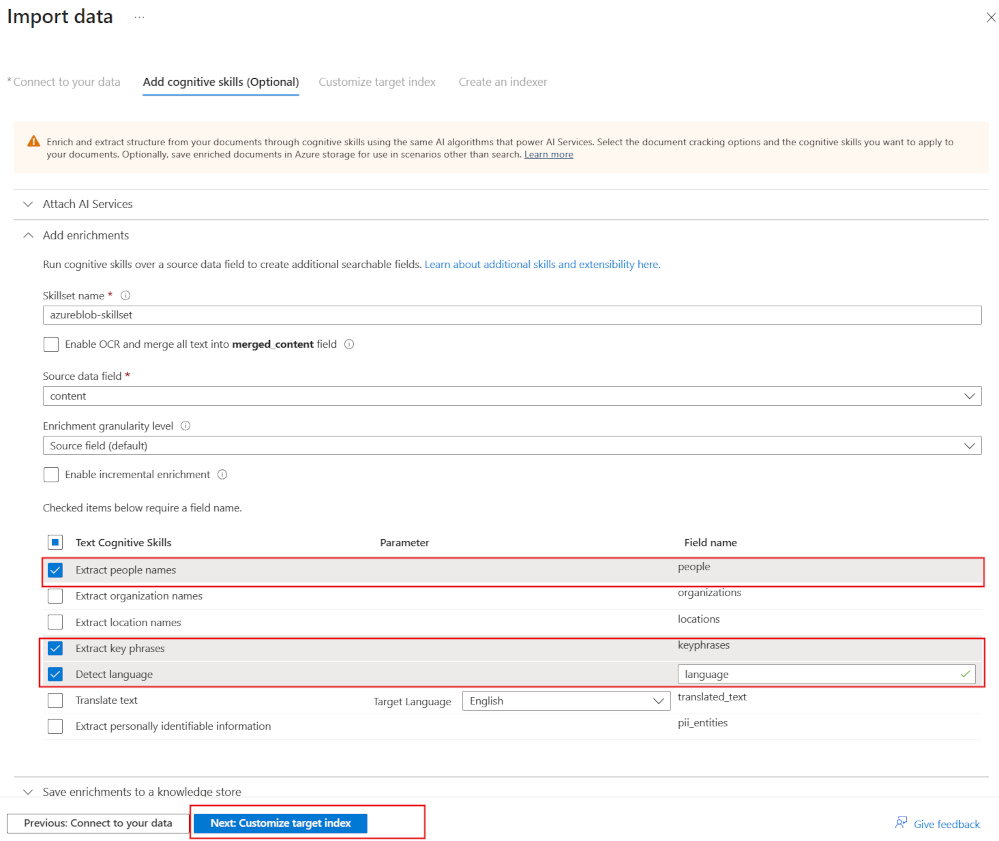
- Leave all the fields with their default values, then select Extract people names.
- Select Extract key phrases.
- Select Detect language.
-
Select Next: Customize target index.
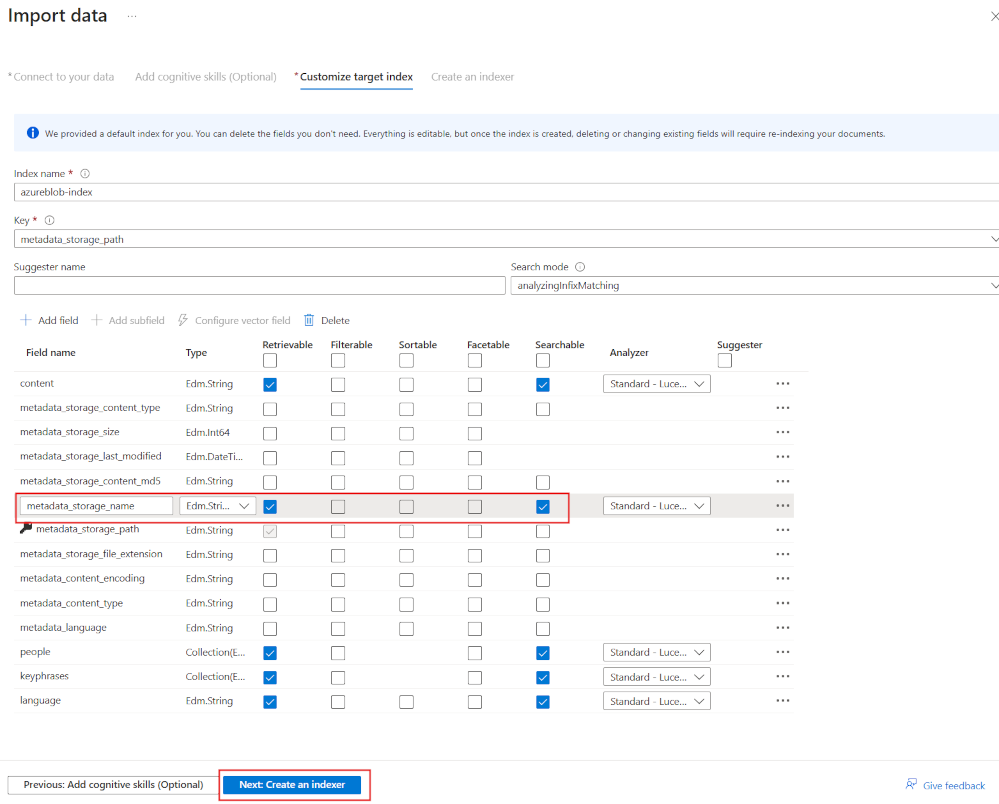
- Leave all the fields with their default values, for metadata_storage_name select Retrievable and Searchable.
- Select Next: Create an indexer.
- Select Submit.
The indexer will run and create an index of the 210 text files. You don’t need to wait for it to continue with the next steps.
Create a function app to enrich your search index
You’ll now create a Python function app that your cognitive search custom skillset will call. The function app will use your custom text classifier model to enrich your search index.
- Download required files and extract the folder containing all the files.
-
Open Visual Studio Code, open the movie-genre-function folder you’ve just downloaded.
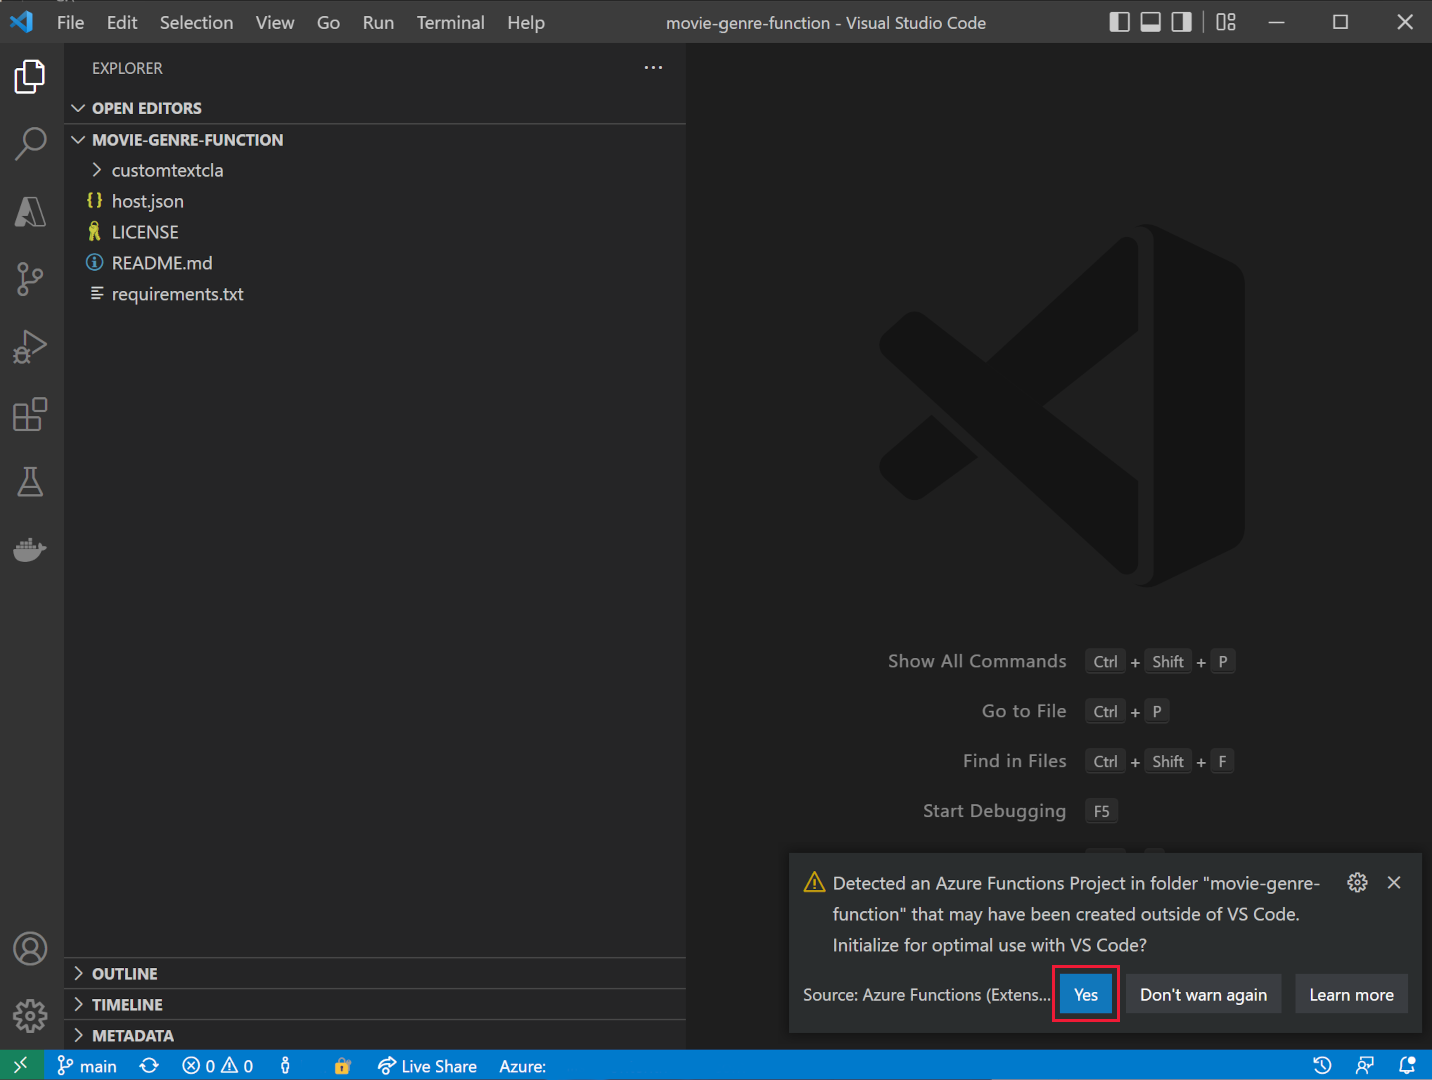
- If you’ve installed all the required extensions, you’re prompted to optimize the project. Select Yes.
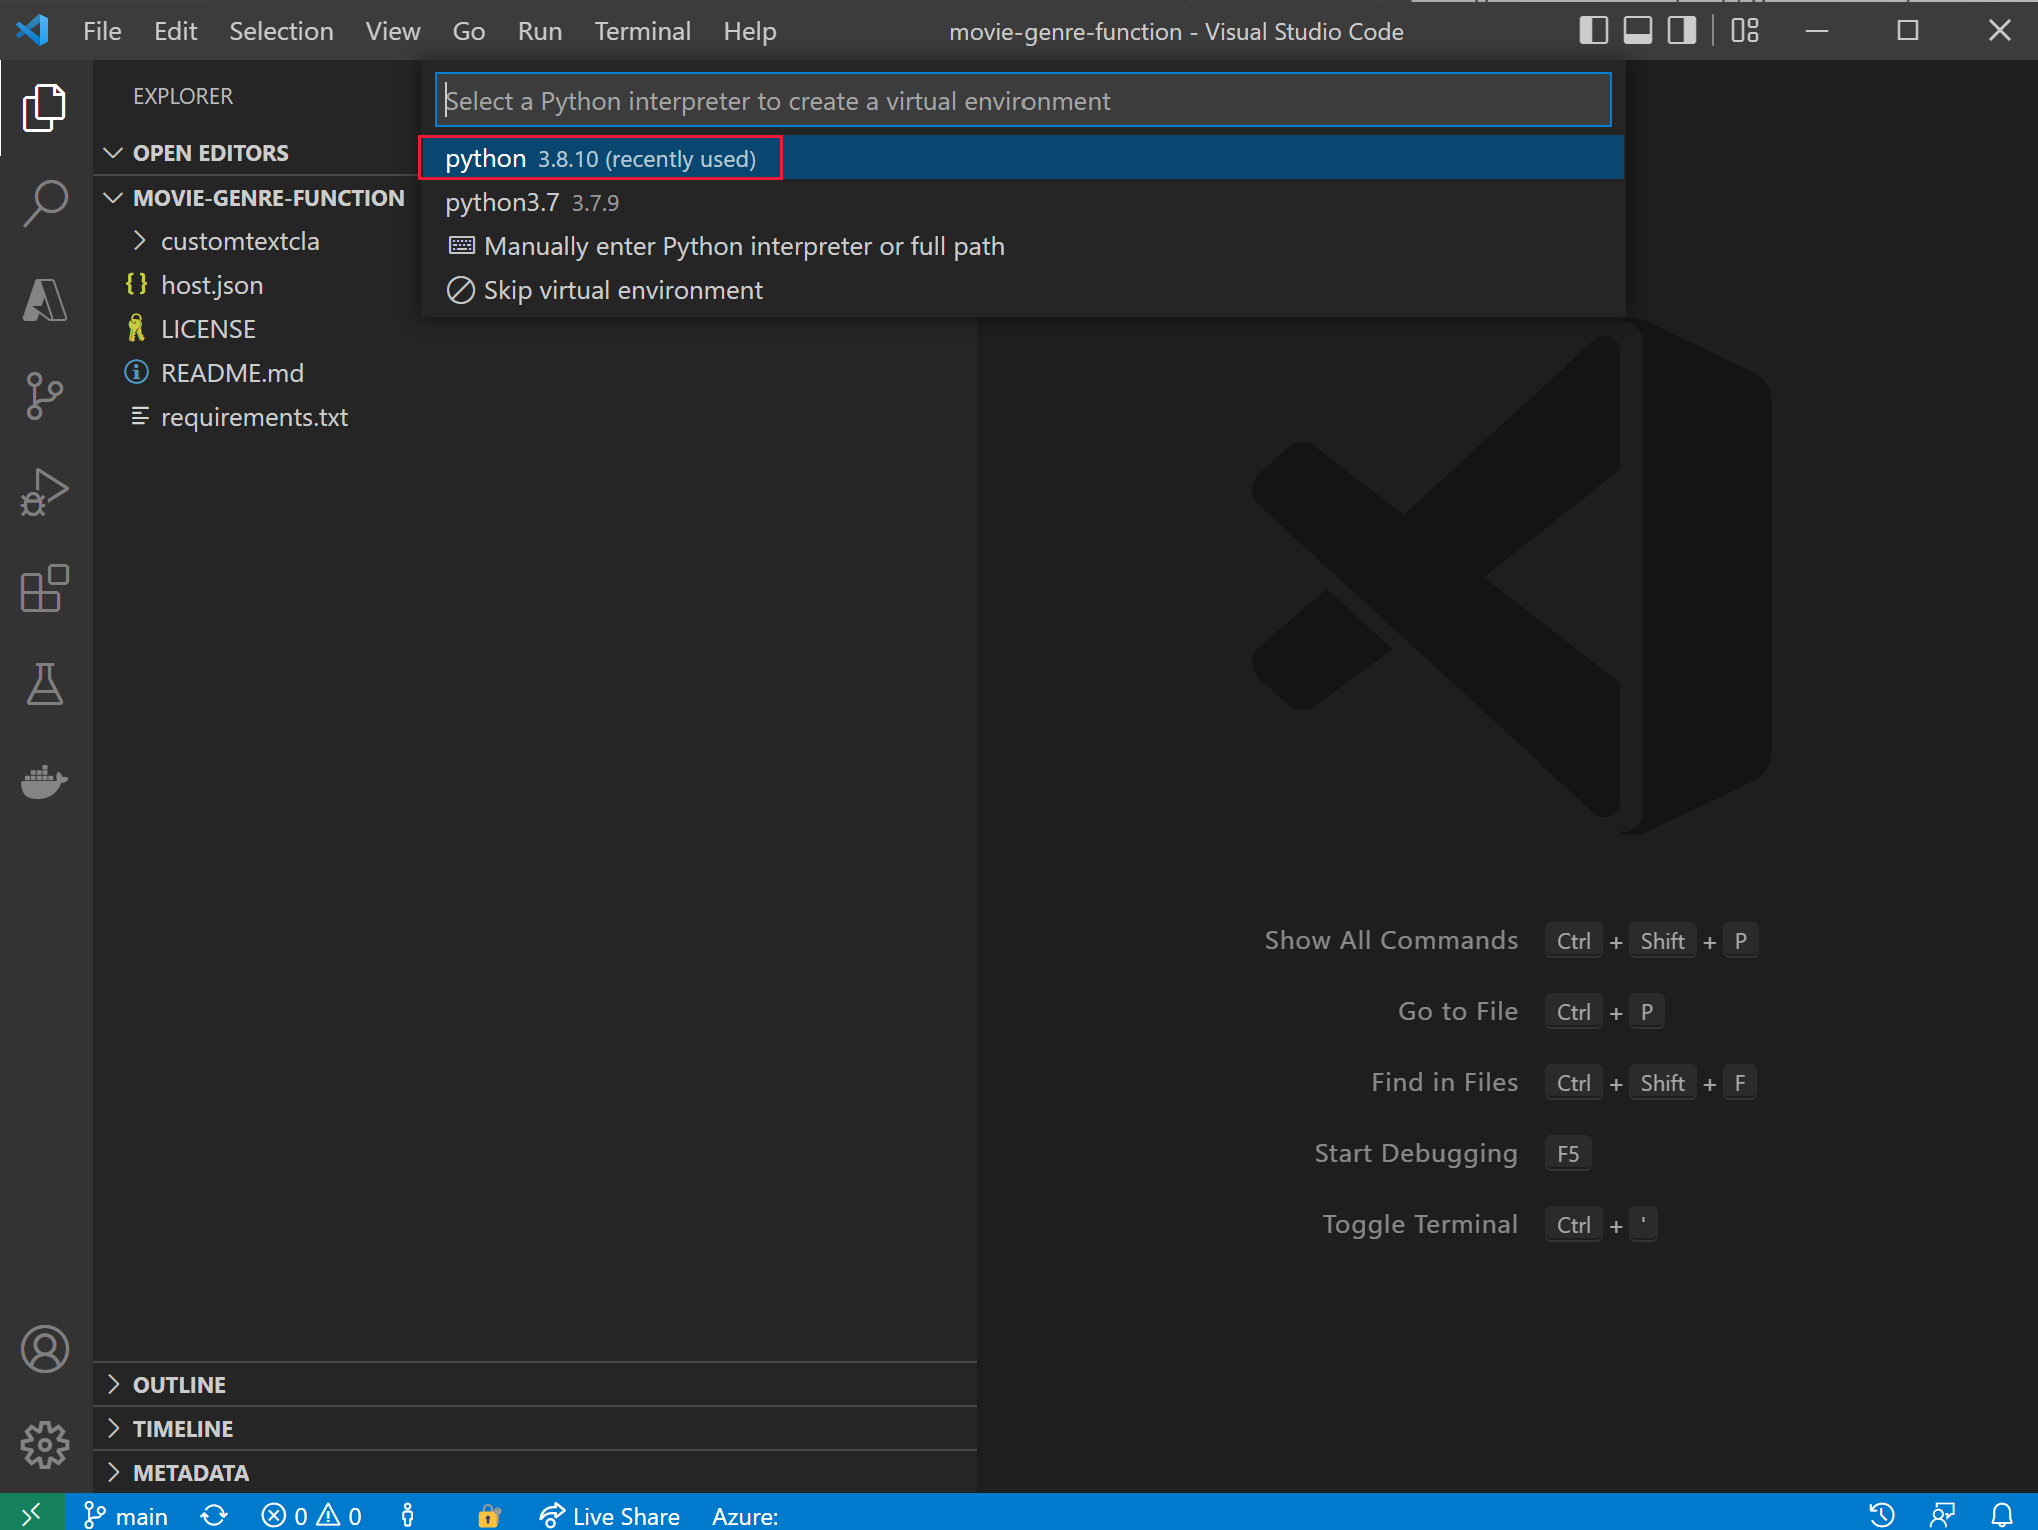
- Select your Python interpreter, it should be version 3.8.
- The workspace will be updated, if you’re asked to connect it to the workspace folder, select Yes.
-
Press F5 to debug the app.
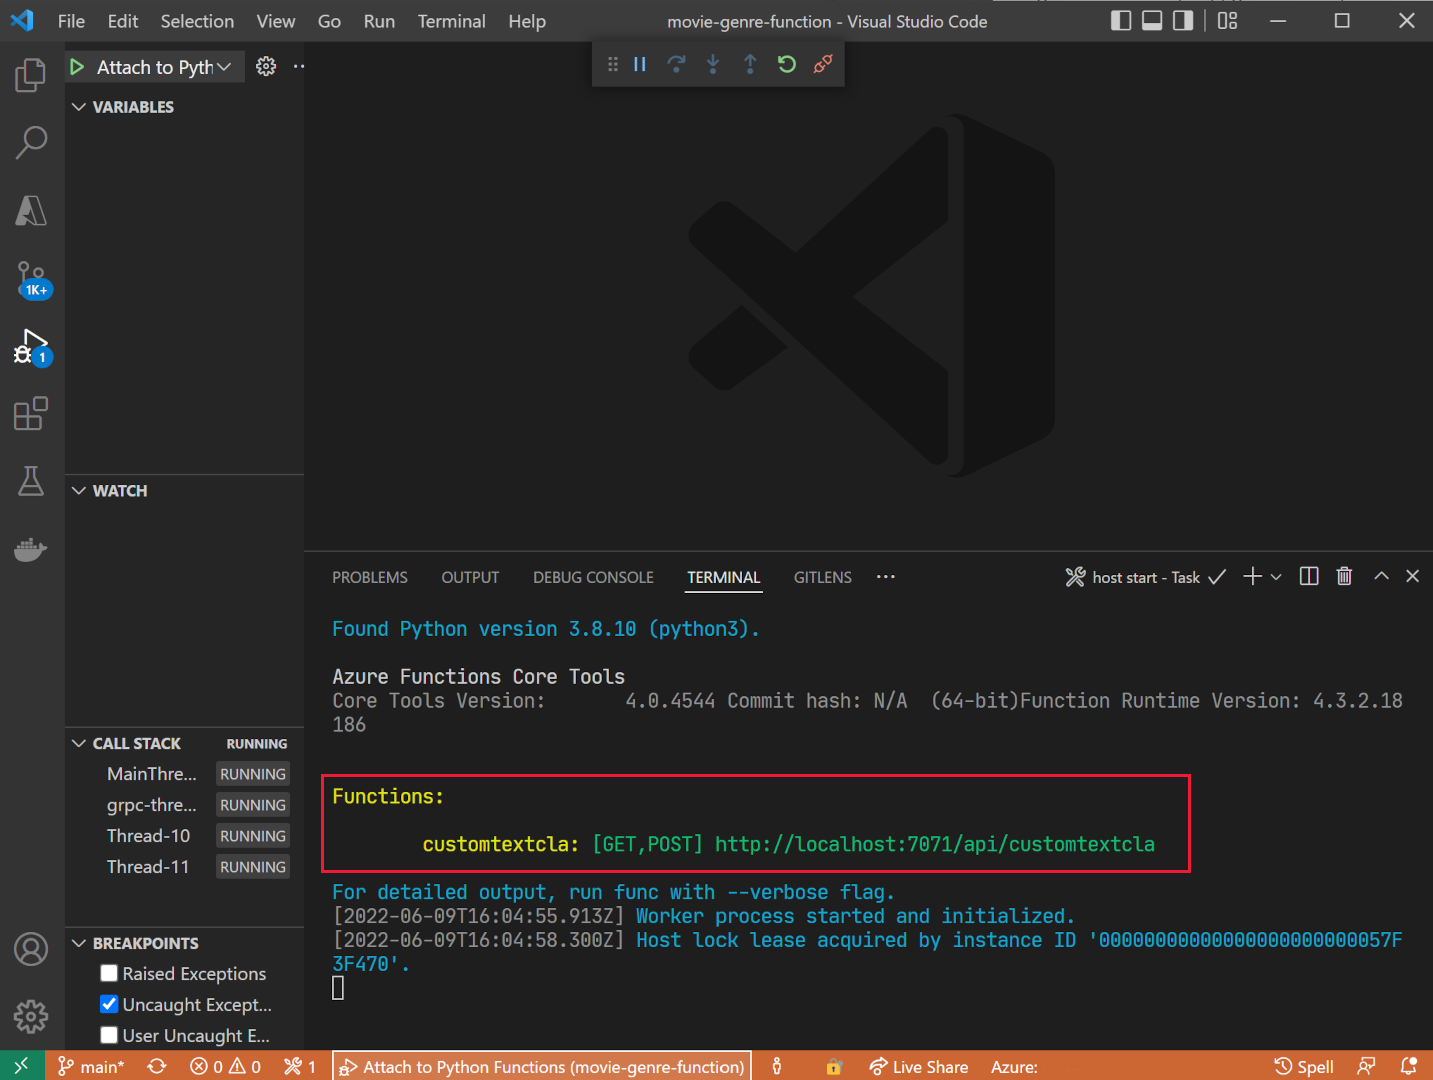 If the app is running you should see a localhost URL that you can use for local testing.
 - Stop debugging the app, press SHIFT + F5.
Deploy your local function app to Azure
- In Visual Studio Code, press F1 to open the command palette.
- In the command palette, search for and select
Azure Functions: Create Function App in Azure.... - Enter a globally unique name for your function app, for example acs13245str-function-app.
- In Select a runtime stack, select Python 3.8.
-
Select the same location you used above.
- In the left navigation, select the Azure extension.
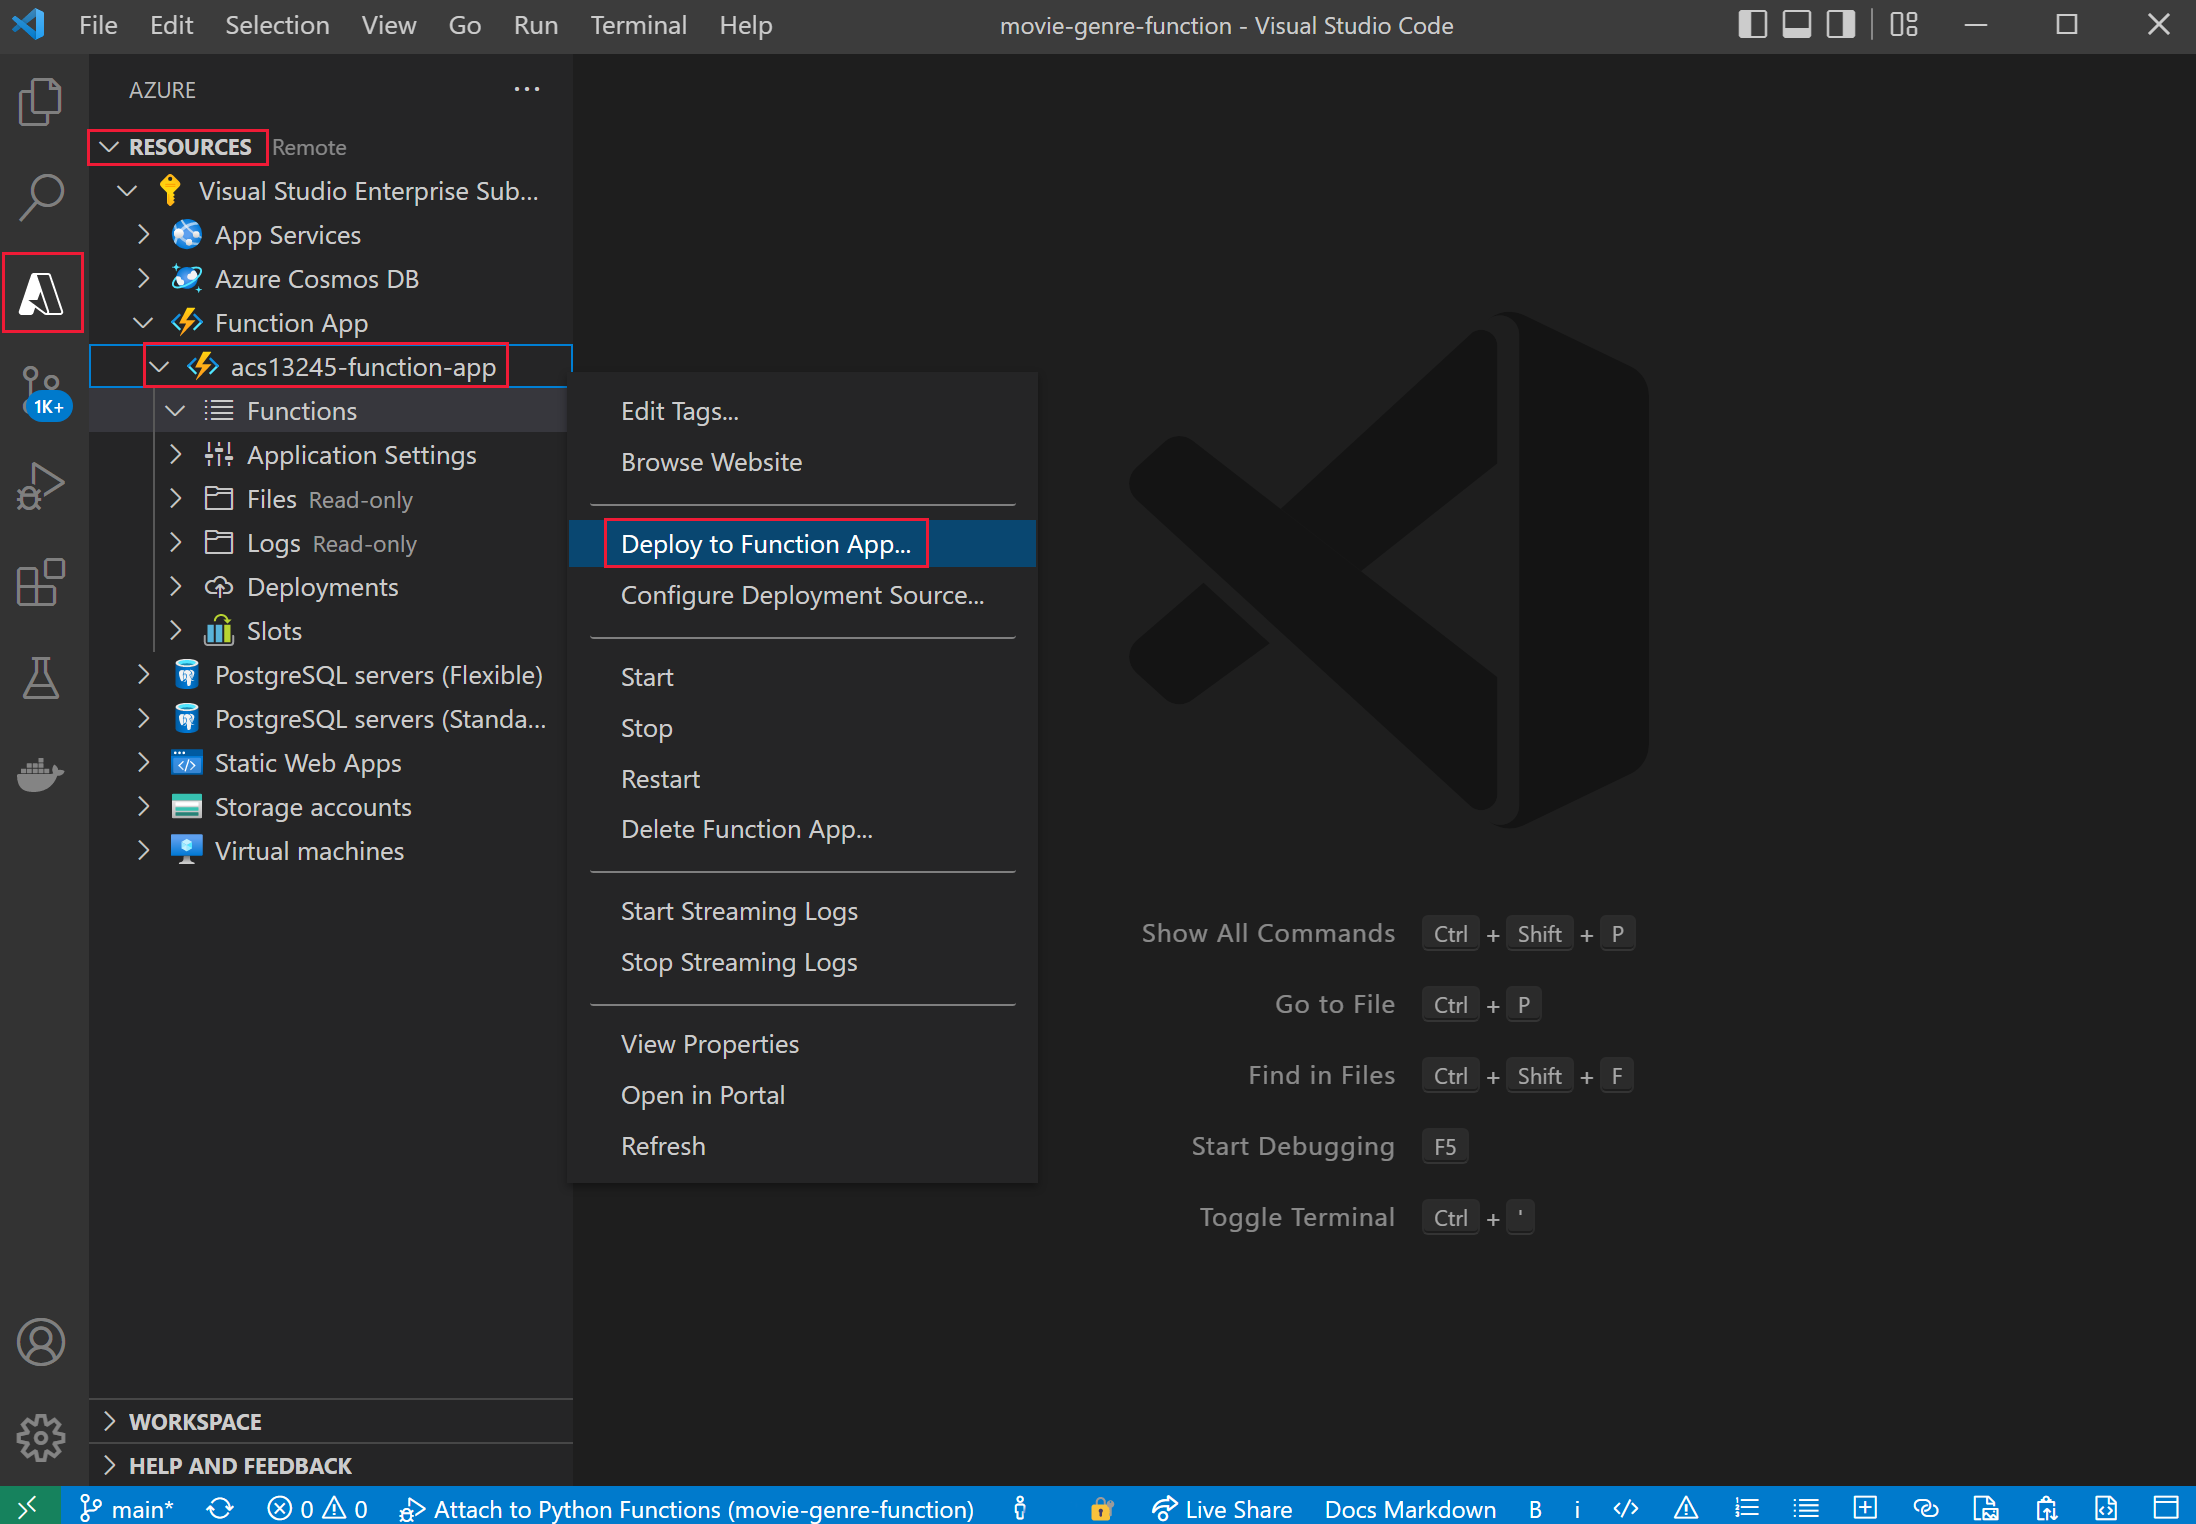
- Expand Resources, expand Function App under your subscription, then right-click on the function, for example acs13245-function-app.
- Select Deploy to Function App. Wait for the app to be deployed.
- Expand the app, right-click on Application Settings, select Download Remote Settings.
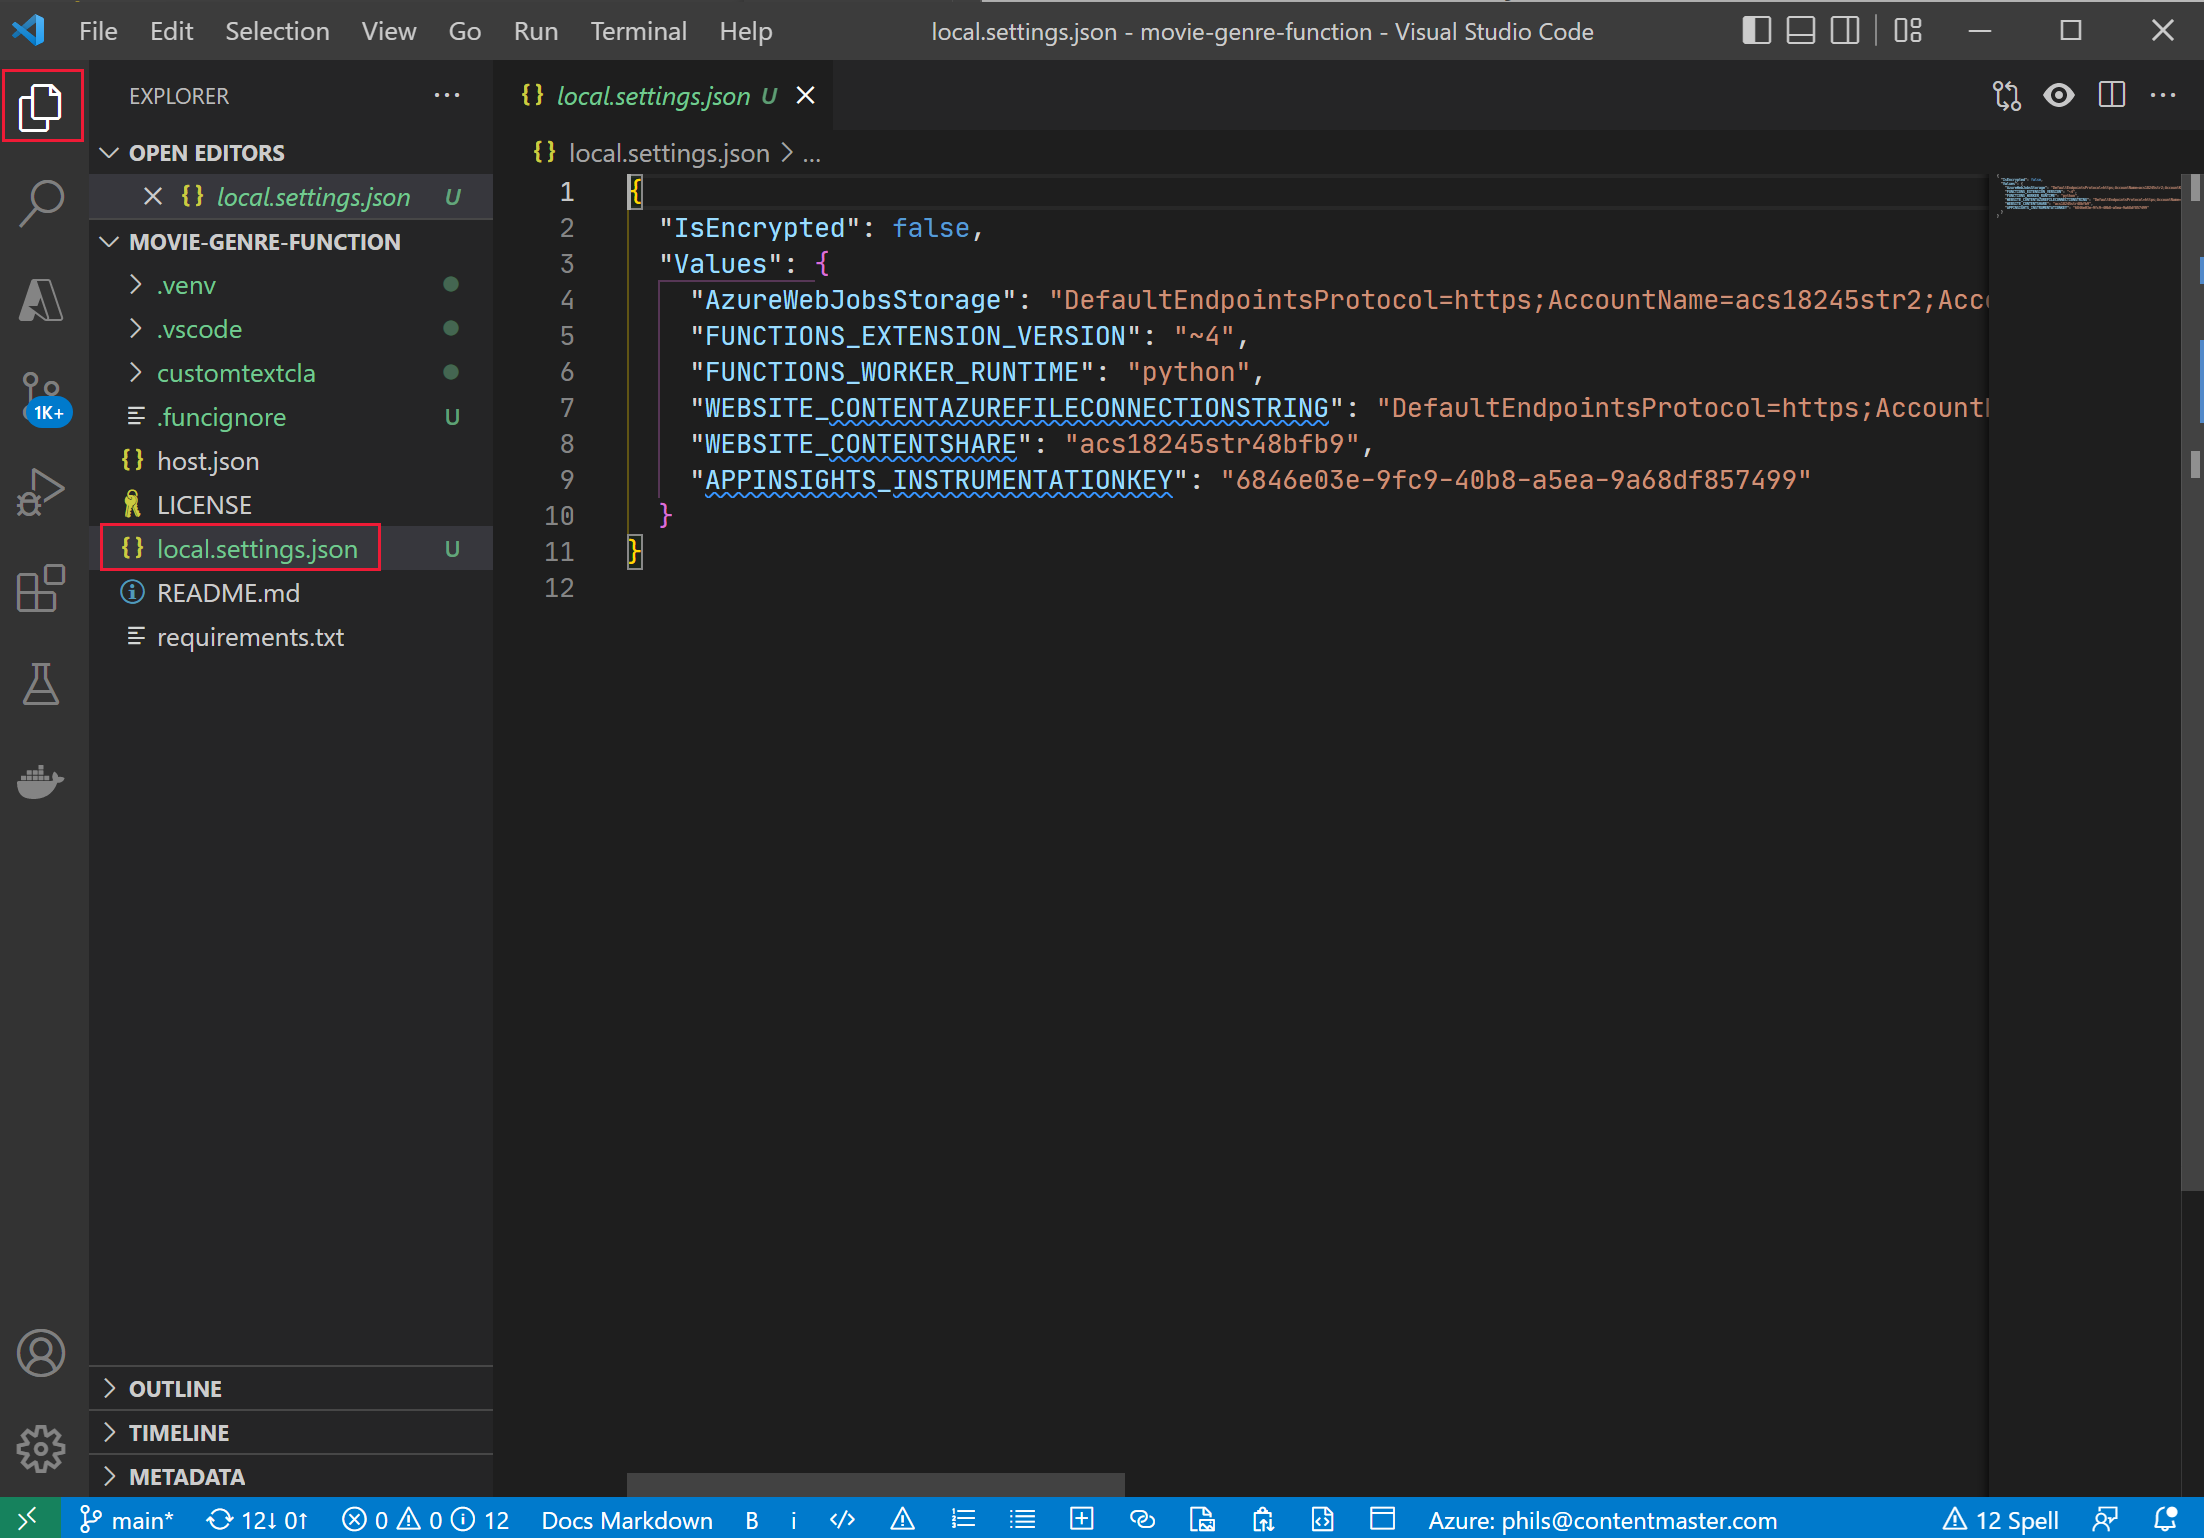
-
On the left, select Explorer, then select local.settings.json.
 The function app needs to be connected to your custom text classification model. Follow these steps to get the configuration settings.
 -
In your browser, navigate to Language Studio, you should be on the Deploying a model page.
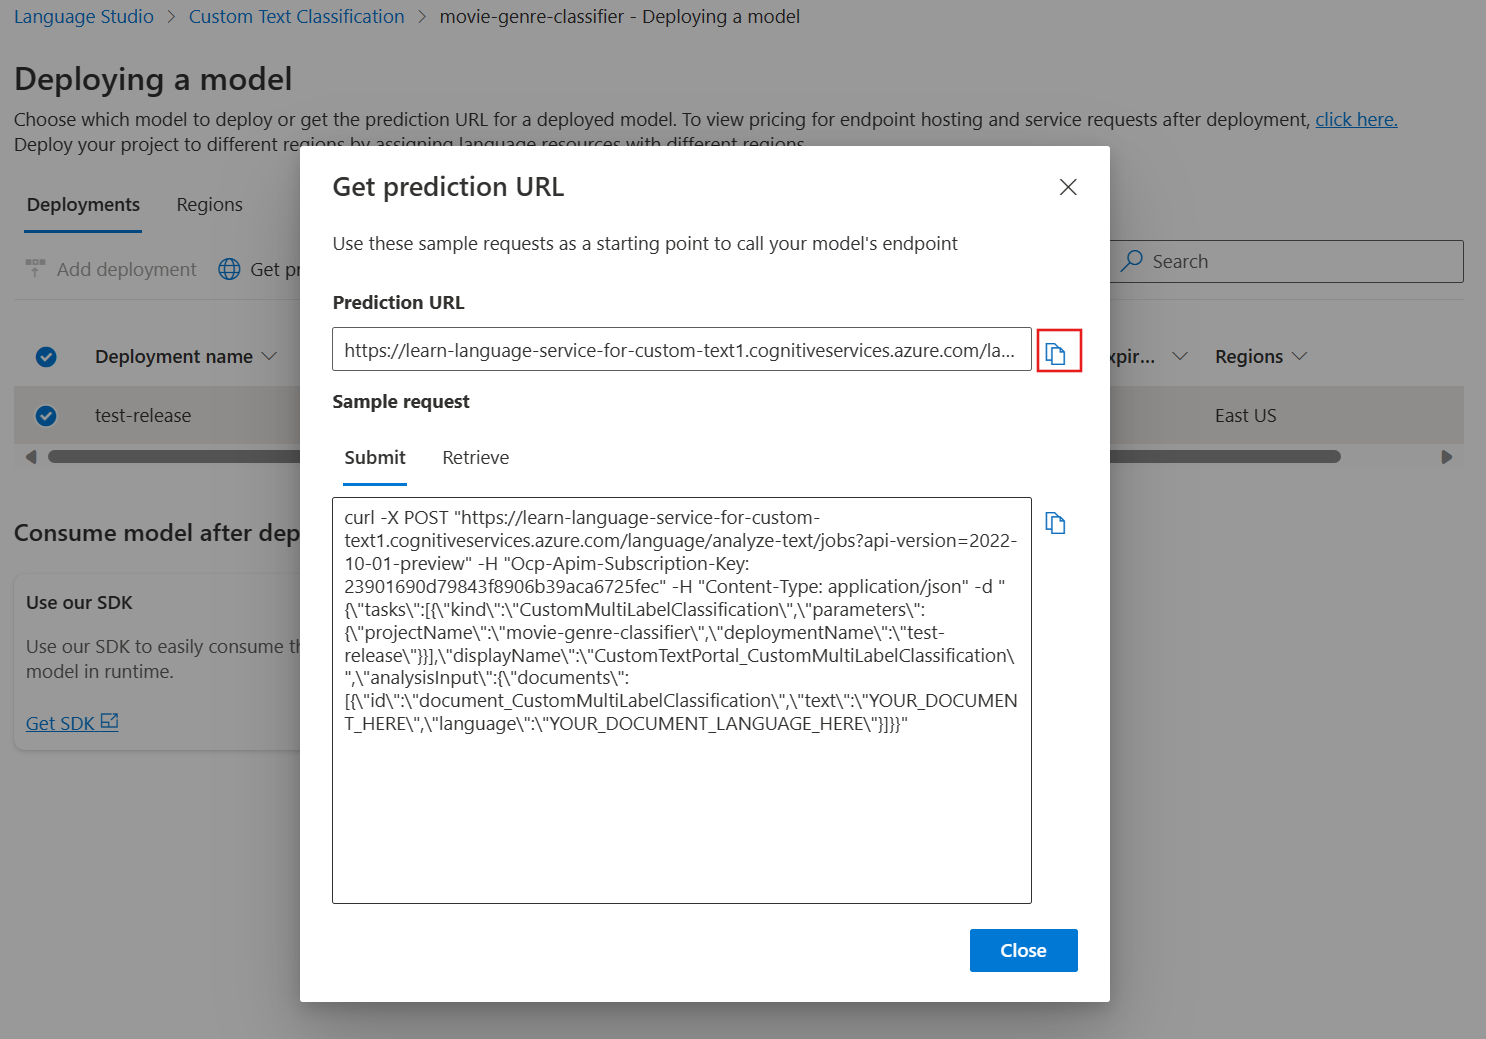
- Select your model. Then select Get prediction URL.
- Select the copy icon next to the Prediction URL.
- In Visual Studio Code, at the bottom of local.settings.json, paste the prediction URL.
-
In Language Studio, on the left, select Project settings.
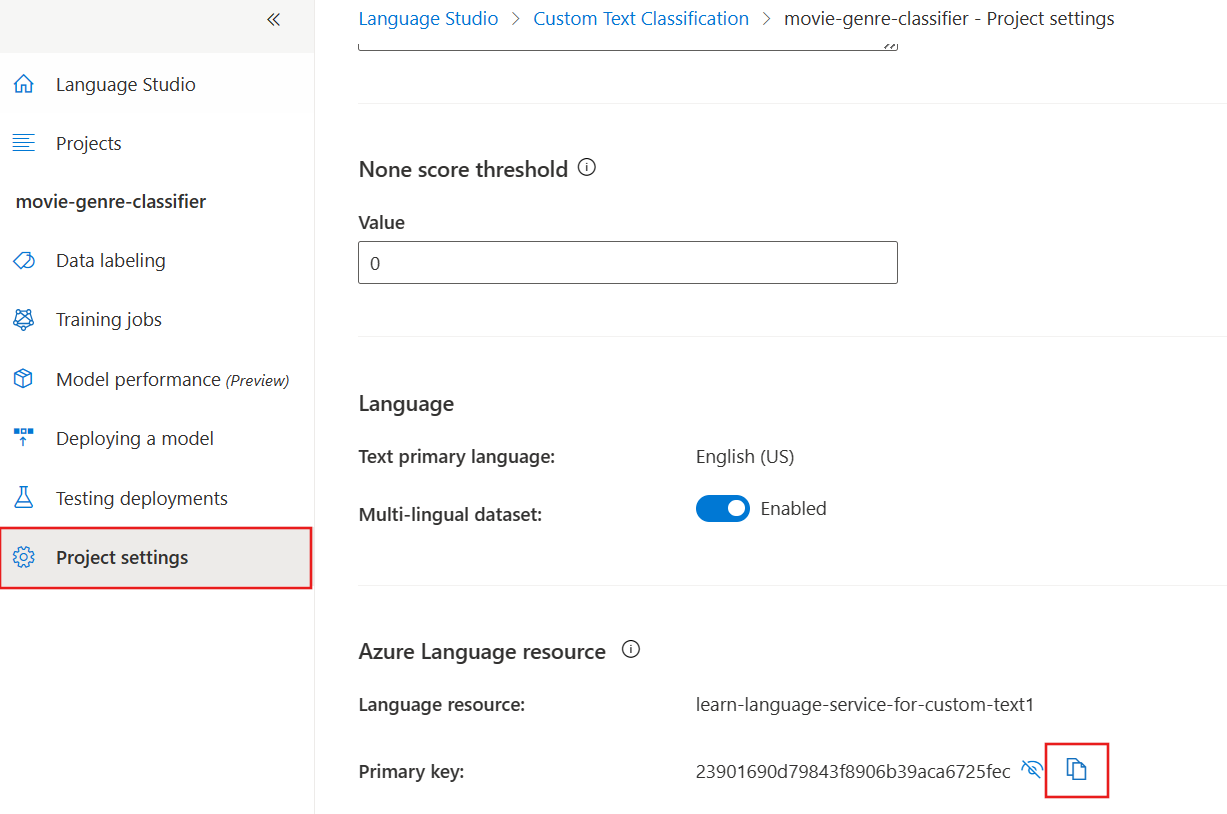
- Select the copy icon next to the Primary key.
- In Visual Studio Code, at the bottom of local.settings.json, paste the primary key.
-
Edit the settings to add these four lines at the bottom, copy the endpoint into the
TA_ENDPOINTvalue., "TA_ENDPOINT": " [your endpoint] ", "TA_KEY": " [your key] ", "DEPLOYMENT": "test-release", "PROJECT_NAME": "movie-genre-classifier" -
Copy the primary key into the
TA_KEYvalue.{ "IsEncrypted": false, "Values": { "AzureWebJobsStorage": "DefaultEndpointsProtocol=https;AccountName=...", "FUNCTIONS_EXTENSION_VERSION": "~4", "FUNCTIONS_WORKER_RUNTIME": "python", "WEBSITE_CONTENTAZUREFILECONNECTIONSTRING": "DefaultEndpointsProtocol=https;AccountName=...", "WEBSITE_CONTENTSHARE": "acs...", "APPINSIGHTS_INSTRUMENTATIONKEY": "6846...", "TA_ENDPOINT": "https://learn-languages-service-for-custom-text.cognitiveservices.azure.com/language/analyze-text/jobs?api-version=2022-05-01", "TA_KEY": "7105e938ce1...", "DEPLOYMENT": "test-release", "PROJECT_NAME": "movie-genre-classifier" } }The settings should look like above, with the values of your project.
- Press CTRL+S to save your local.settings.json changes.
- In the left navigation, select the Azure extension.
- Expand Resources, and under your subscription, expand Function App, then right-click on Application Settings, select Upload Local Settings.
Test your remote function app
There’s a sample query you can use to test that your function app and classifier model are working correctly.
-
On the left, select Explorer, expand the customtextcla folder, then select sample.dat.
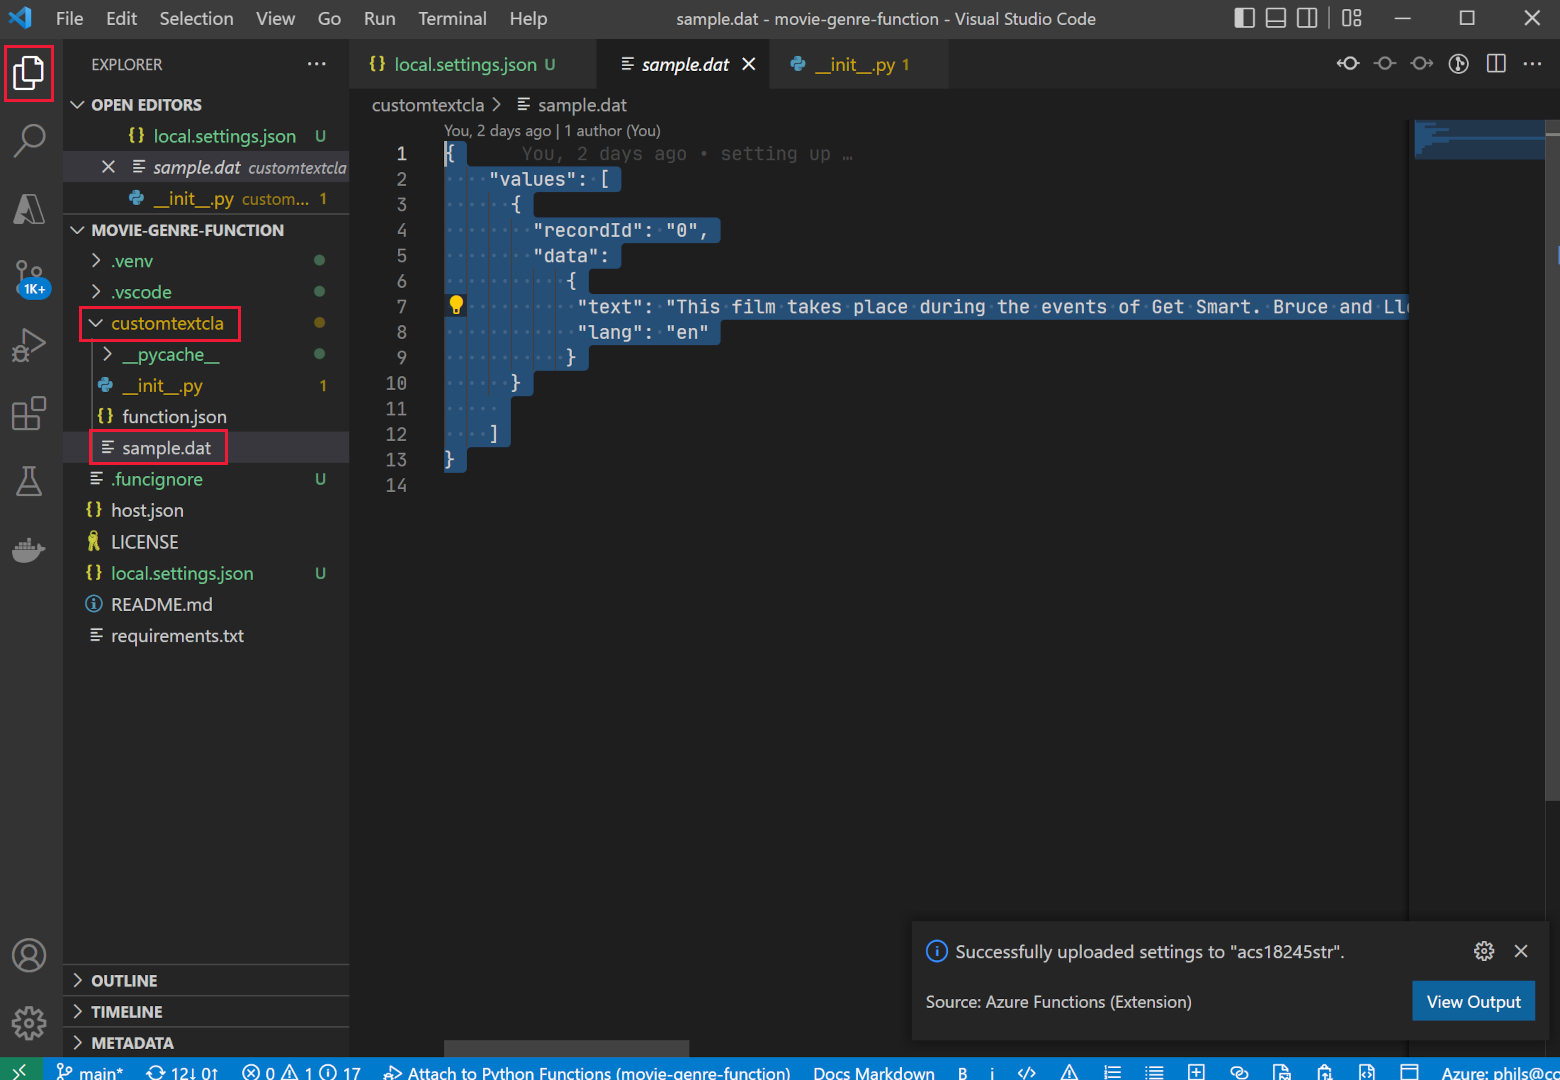
- Copy the contents of the file.
-
On the left, select the Azure extension.
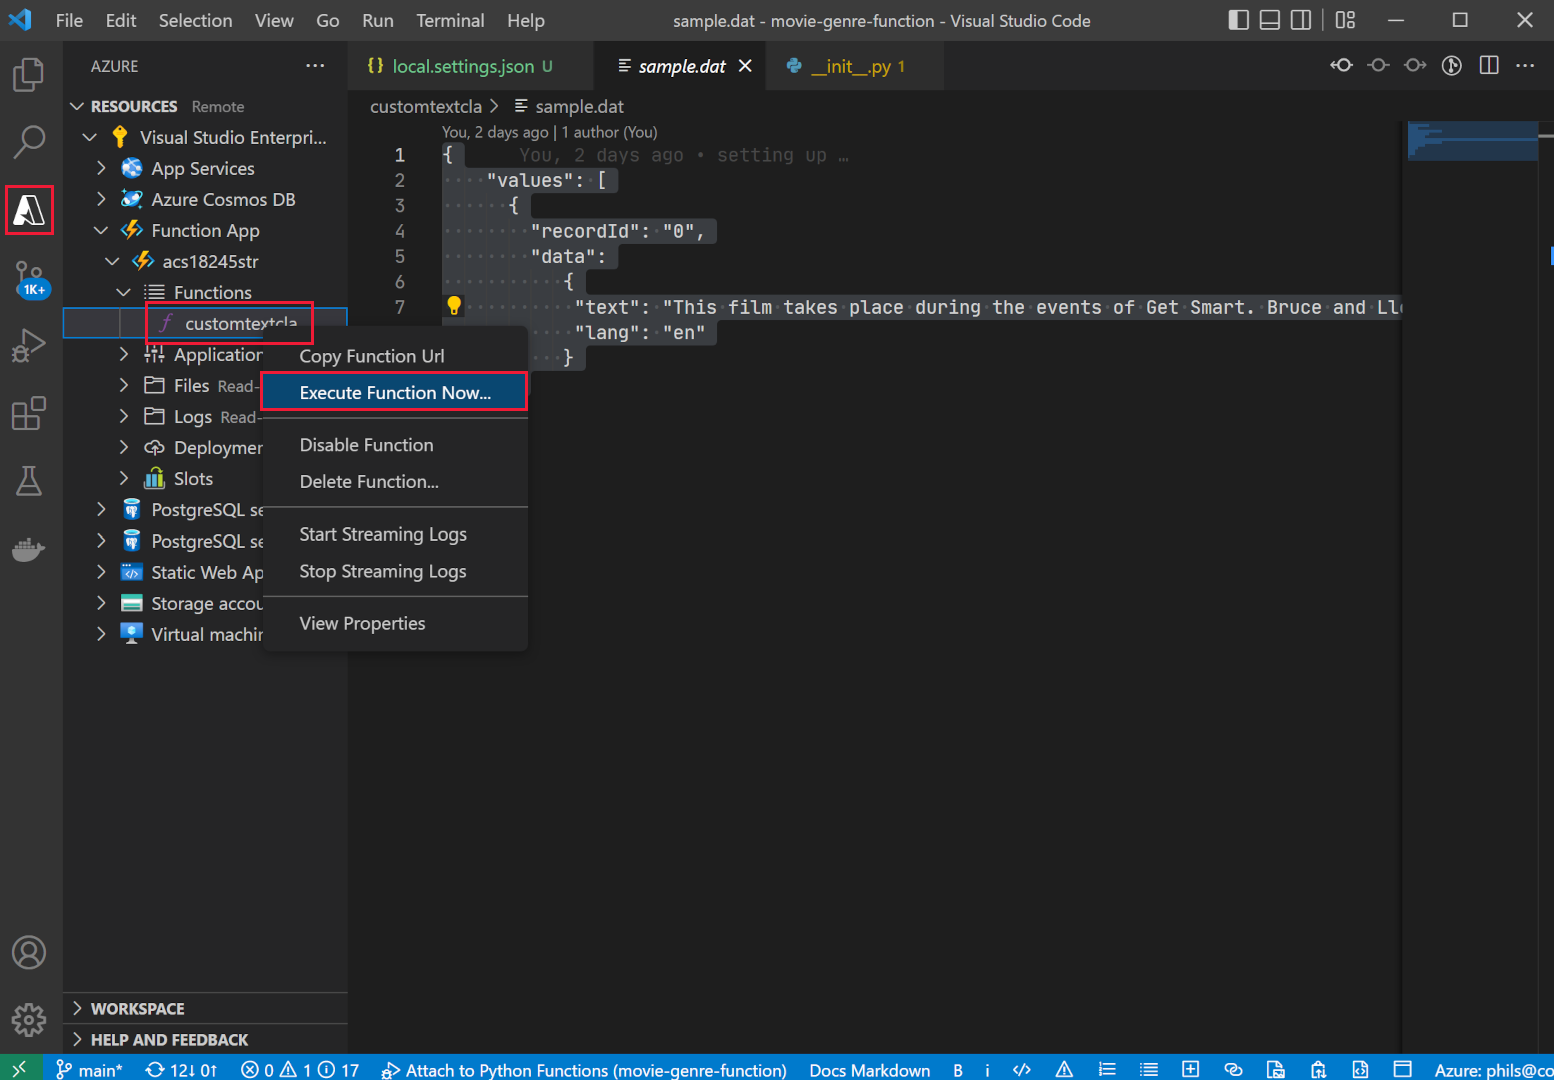
- Under the Function App, expand Functions, right-click on customtextcla, then select Execute Function now.
-
In Enter request body, paste the sample data you copied, then press Enter.
The function app will respond with JSON results.
-
Expand the notification to see the whole results.
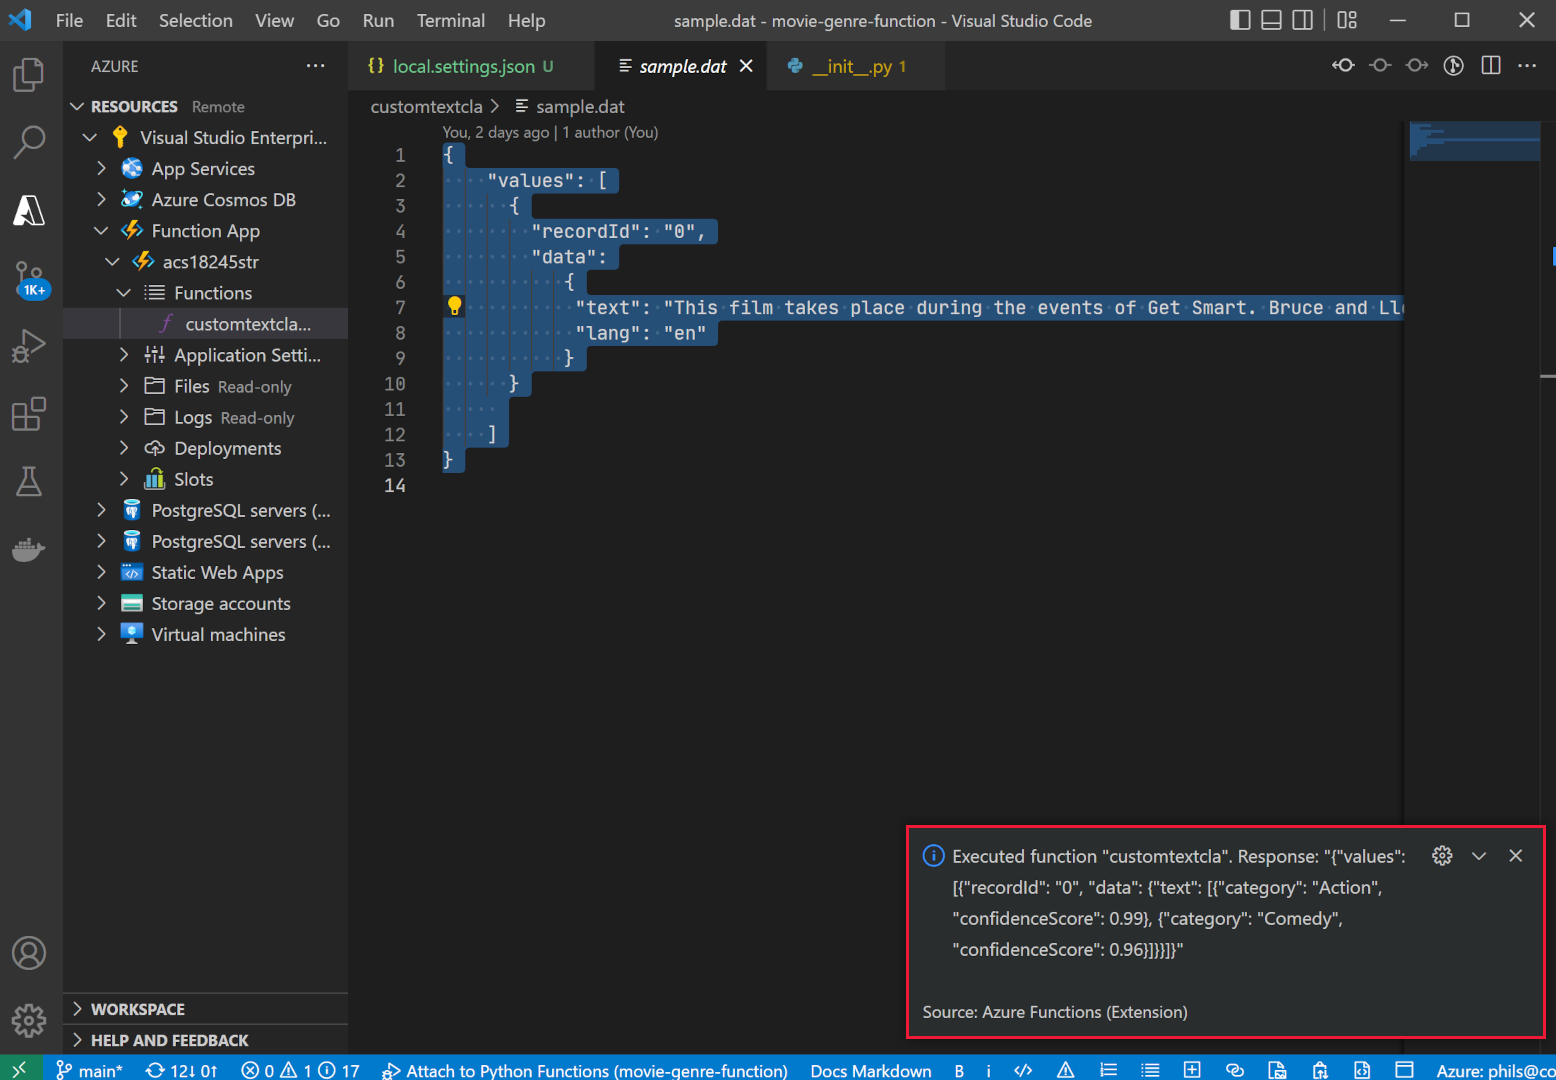 The JSON response should look like this:
 {"values":
     [
         {"recordId": "0",
         "data": {"text":
         [
             {"category": "Action", "confidenceScore": 0.99},
             {"category": "Comedy", "confidenceScore": 0.96}
         ]}}
     ]
 }
Add a field to your search index
You need a place to store the enrichment returned by your new function app. Follow these steps to add a new compound field to store the text classification and confidence score.
- In the Azure portal, go to the resource group that contains your search service, then select the cognitive search service you created, for example acs18245-search-service.
- On the Overview pane, select Indexes.
- Select azurebob-index.
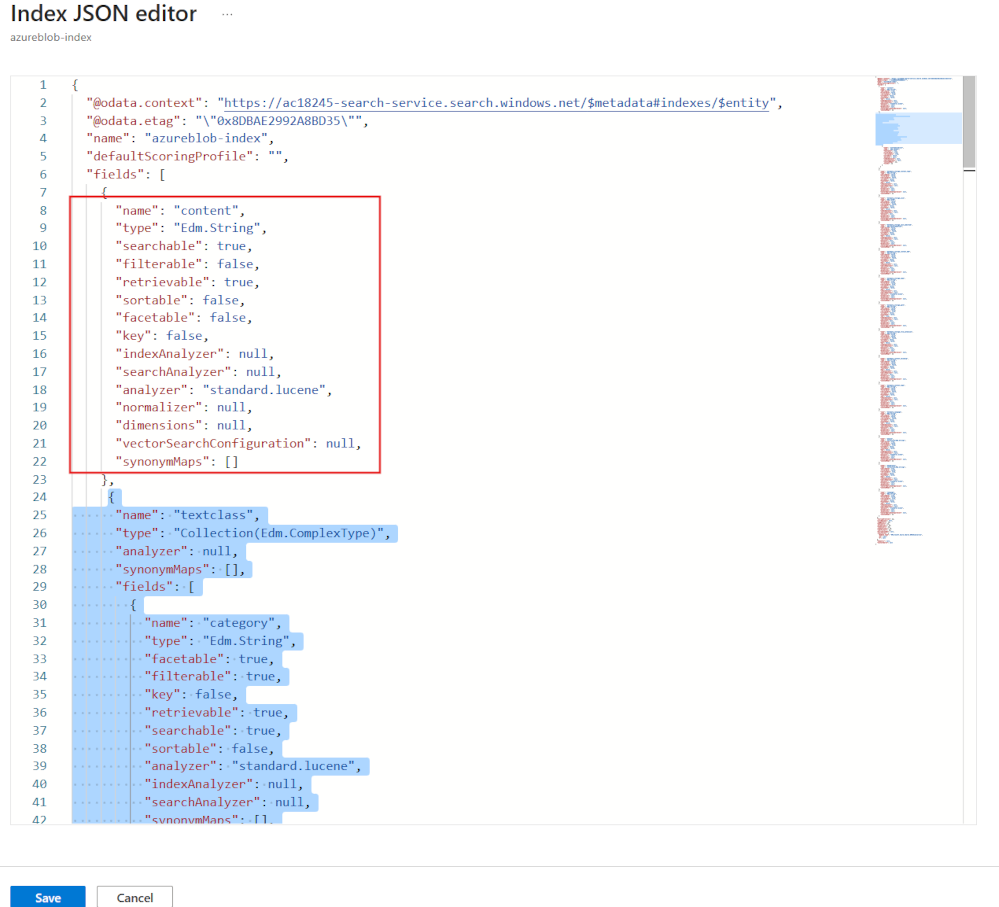
- Select Edit JSON.
-
Add the new fields to the index, paste the JSON below the content field.
 {
   "name": "textclass",
   "type": "Collection(Edm.ComplexType)",
   "analyzer": null,
   "synonymMaps": [],
   "fields": [
     {
       "name": "category",
       "type": "Edm.String",
       "facetable": true,
       "filterable": true,
       "key": false,
       "retrievable": true,
       "searchable": true,
       "sortable": false,
       "analyzer": "standard.lucene",
       "indexAnalyzer": null,
       "searchAnalyzer": null,
       "synonymMaps": [],
       "fields": []
     },
     {
       "name": "confidenceScore",
       "type": "Edm.Double",
       "facetable": true,
       "filterable": true,
       "retrievable": true,
       "sortable": false,
       "analyzer": null,
       "indexAnalyzer": null,
       "searchAnalyzer": null,
       "synonymMaps": [],
       "fields": []
     }
   ]
 },
Your index should now look like this.
- Select Save.
Edit the custom skillset to call your function app
The cognitive search index needs a way to have these new fields populated. Edit the skillset you created earlier to call your function app.
-
At the top of the page, select the search service link, for example **acs18245-search-service Indexes**. -
On the Overview pane, select Skillsets.
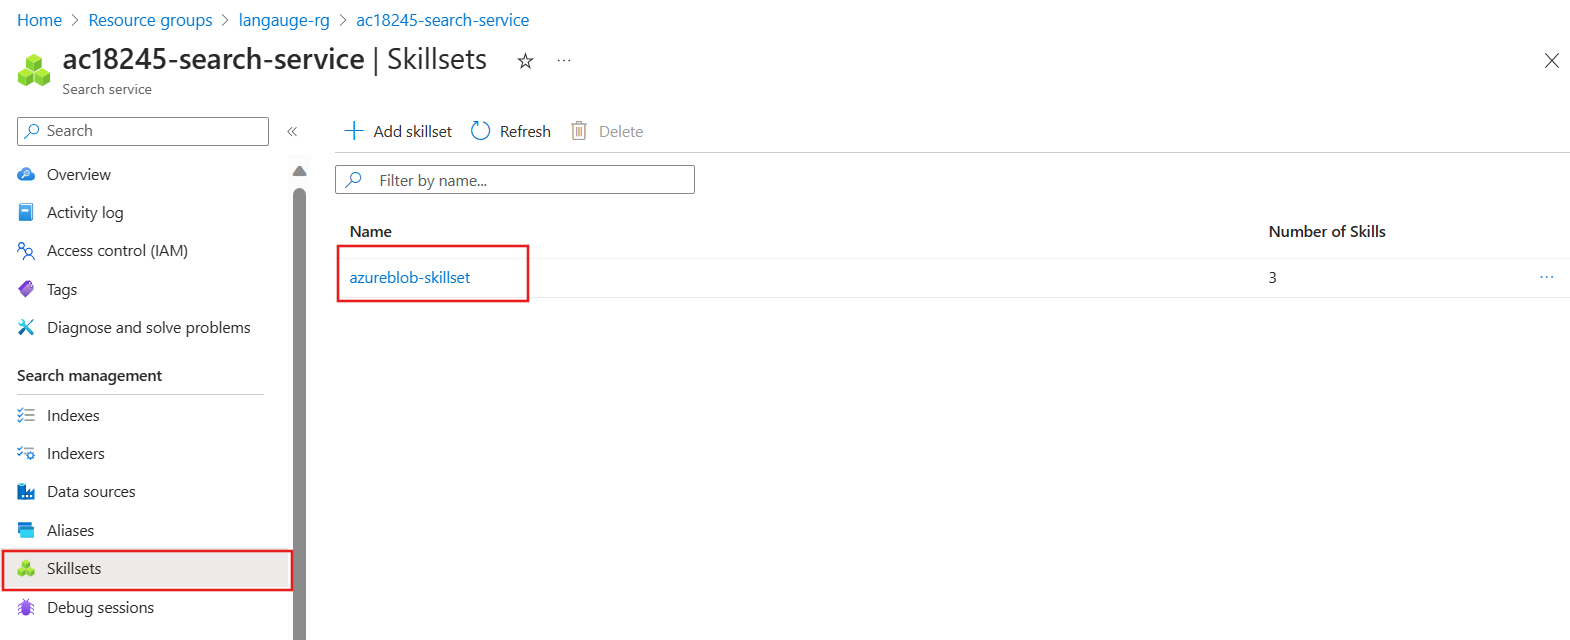
- Select azureblob-skillset.
-
Add the custom skillset definition below, by pasting it as the first skillset.
 {
   "@odata.type": "#Microsoft.Skills.Custom.WebApiSkill",
   "name": "Genre Classification",
   "description": "Identify the genre of your movie from its summary",
   "context": "/document",
   "uri": "URI",
   "httpMethod": "POST",
   "timeout": "PT30S",
   "batchSize": 1,
   "degreeOfParallelism": 1,
   "inputs": [
     {
       "name": "lang",
       "source": "/document/language"
     },
     {
       "name": "text",
       "source": "/document/content"
     }
   ],
   "outputs": [
     {
       "name": "text",
       "targetName": "class"
     }
   ],
   "httpHeaders": {}
 },
You need to change the "uri": "URI" to point to your function app.
-
In Visual Studio Code, select the Azure extension.
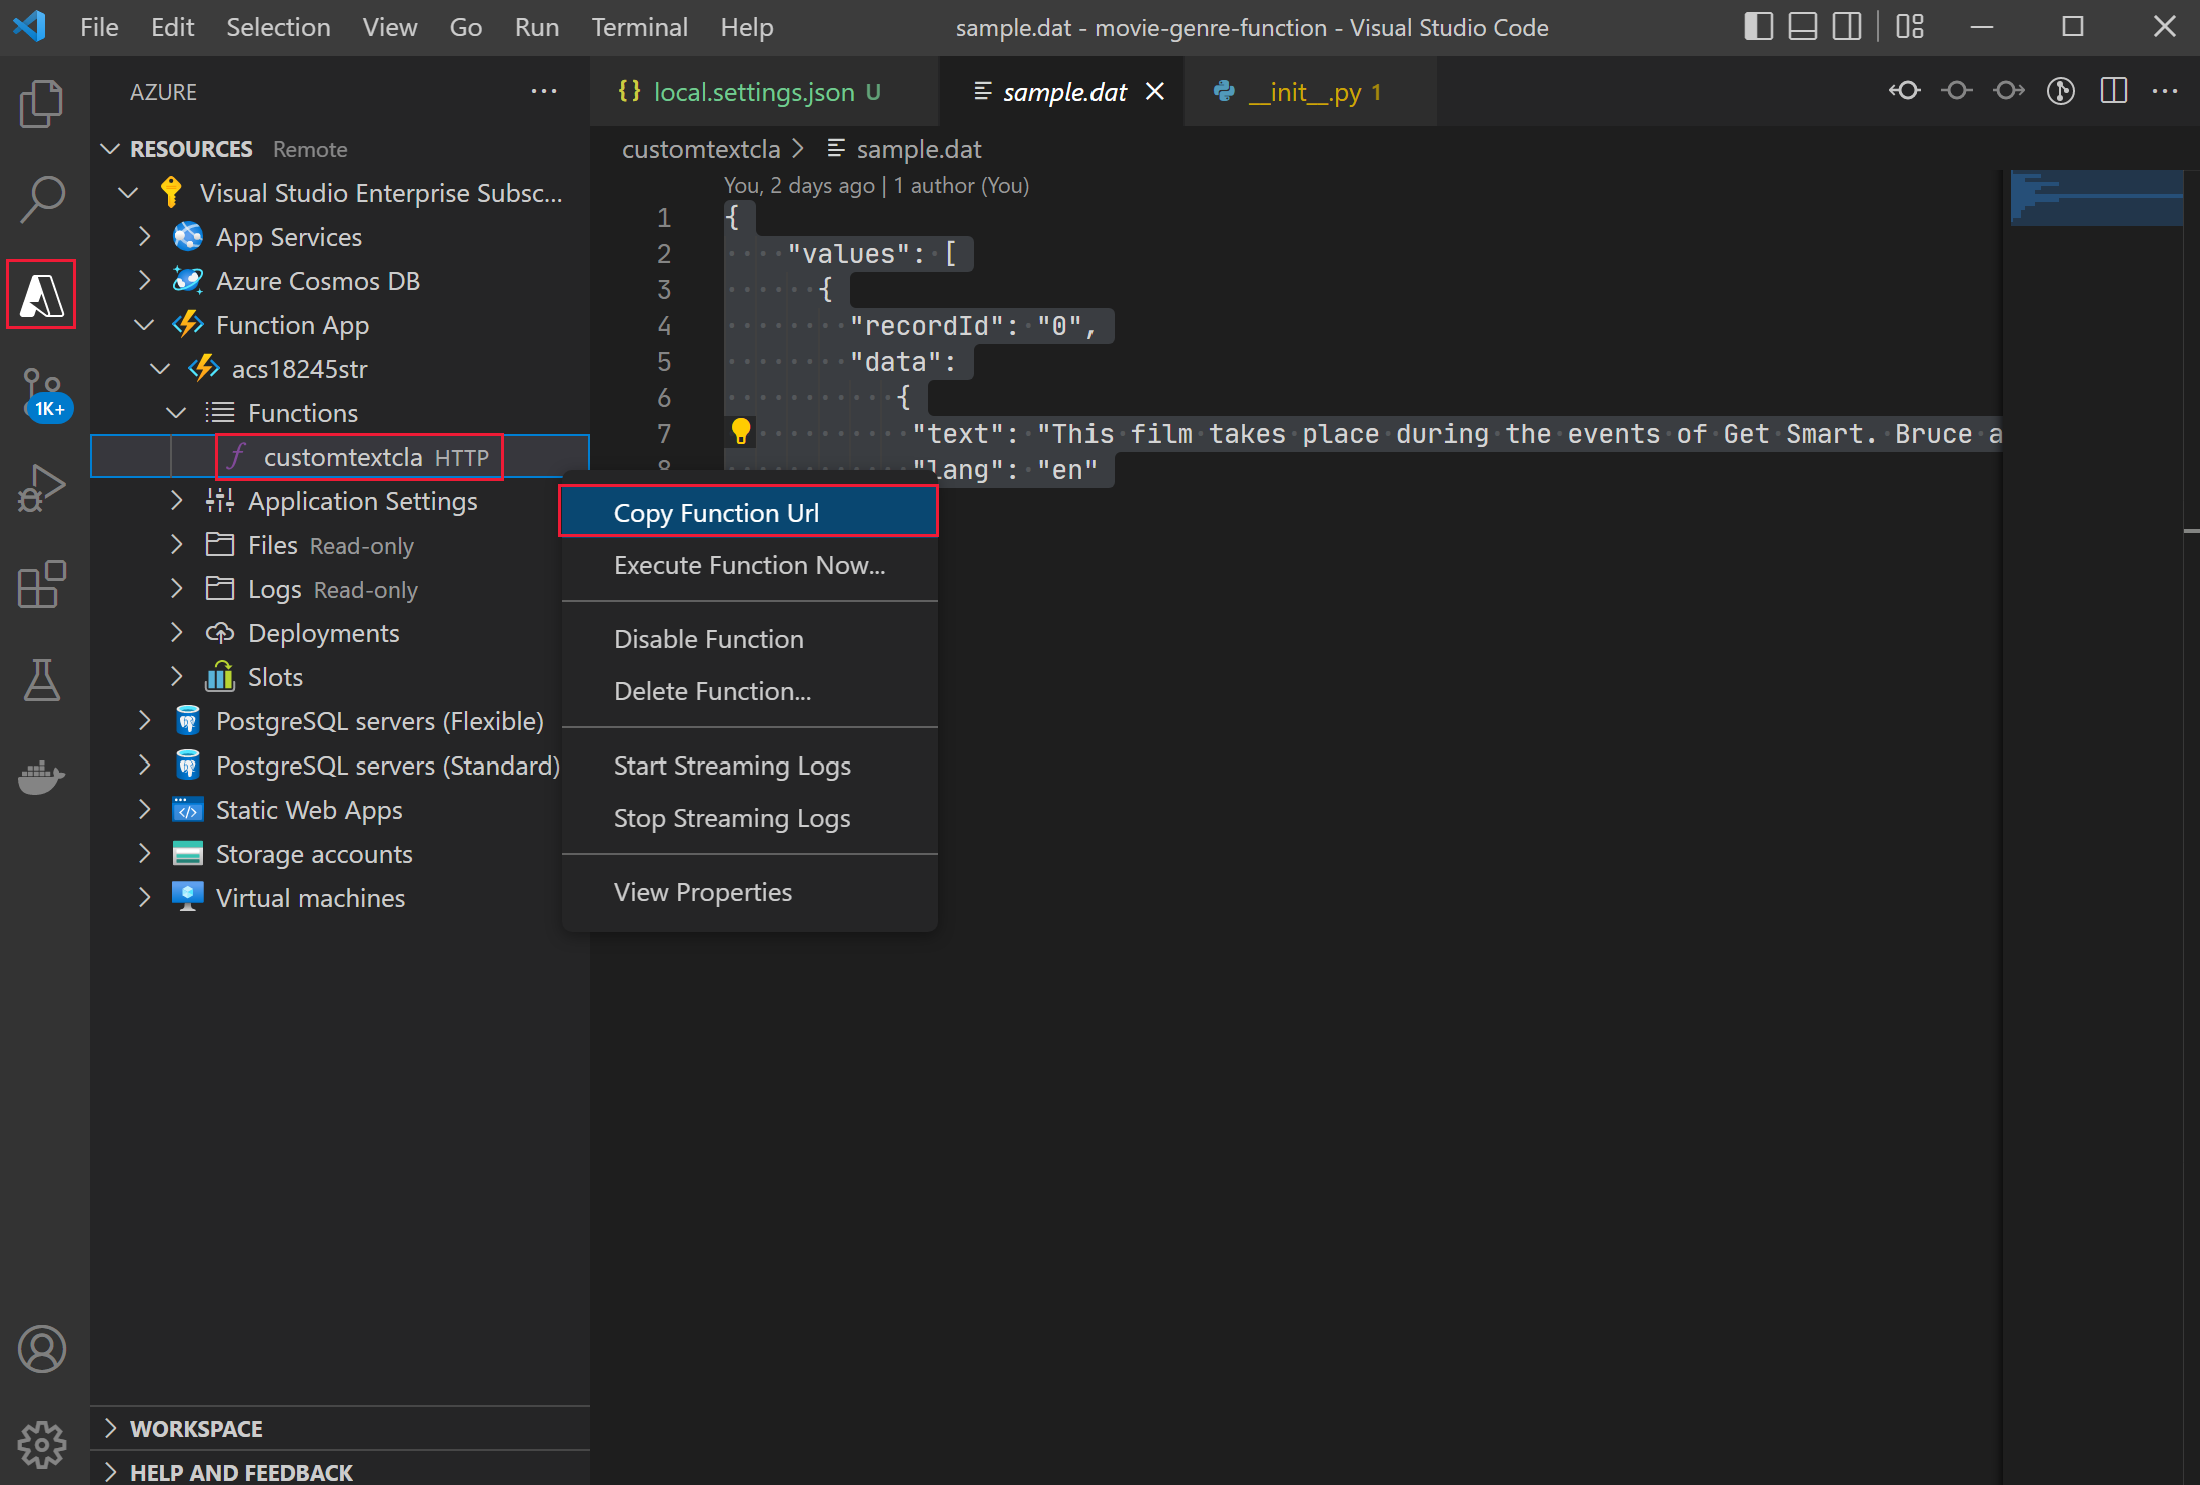
- Under Functions, right-click customtextcla, then select Copy Function Url.
- On the Azure portal, replace the URI with the copied function URL.
- Select Save.
Edit the field mappings in the indexer
You now have fields to store the enrichment, a skillset to call your function app, the last step is to tell the cognitive search where to put the enrichment.
-
At the top of the page, select the search service, for example, **acs18245-search-service Skillsets** link. 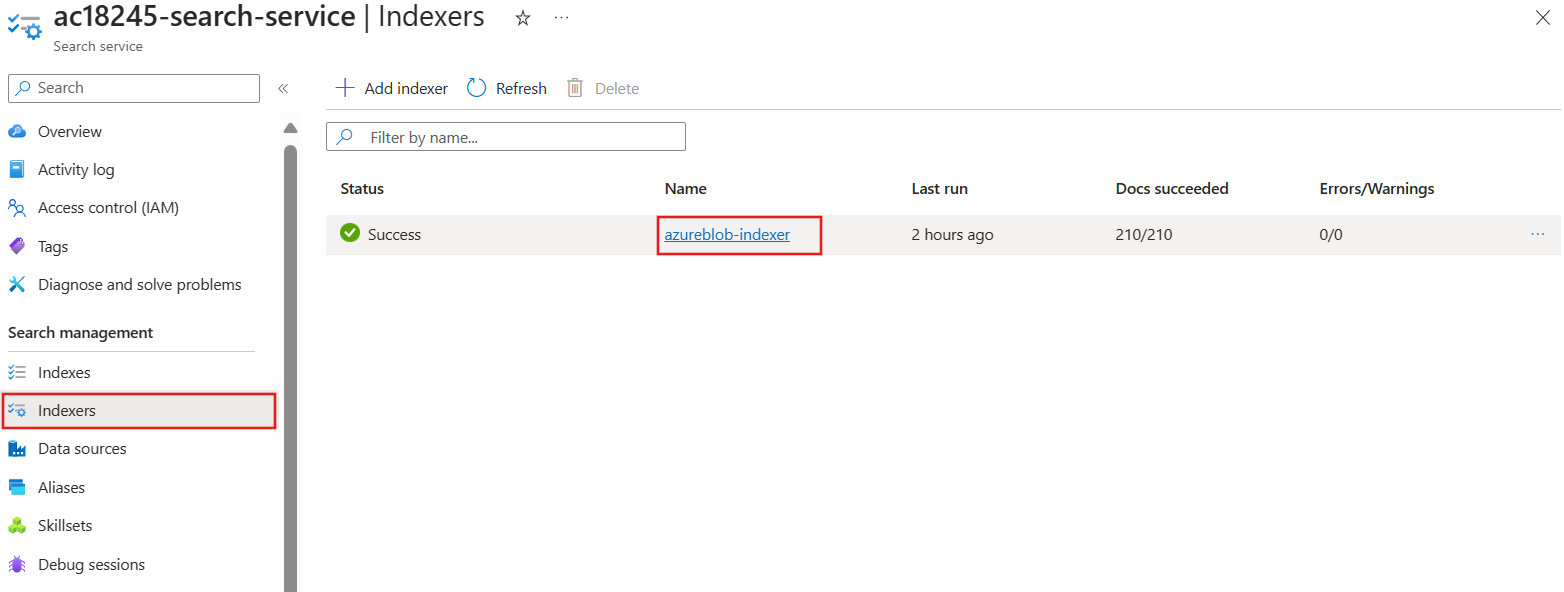
- On the Overview pane, select Indexers.
- Select azureblob-indexer.
- Select Indexer Definition (JSON).
-
Add a new output field mapping, by pasting this field definition to the top of the output field section.
 {
   "sourceFieldName": "/document/class",
   "targetFieldName": "textclass"
 },
The indexer JSON definition should now look like this:
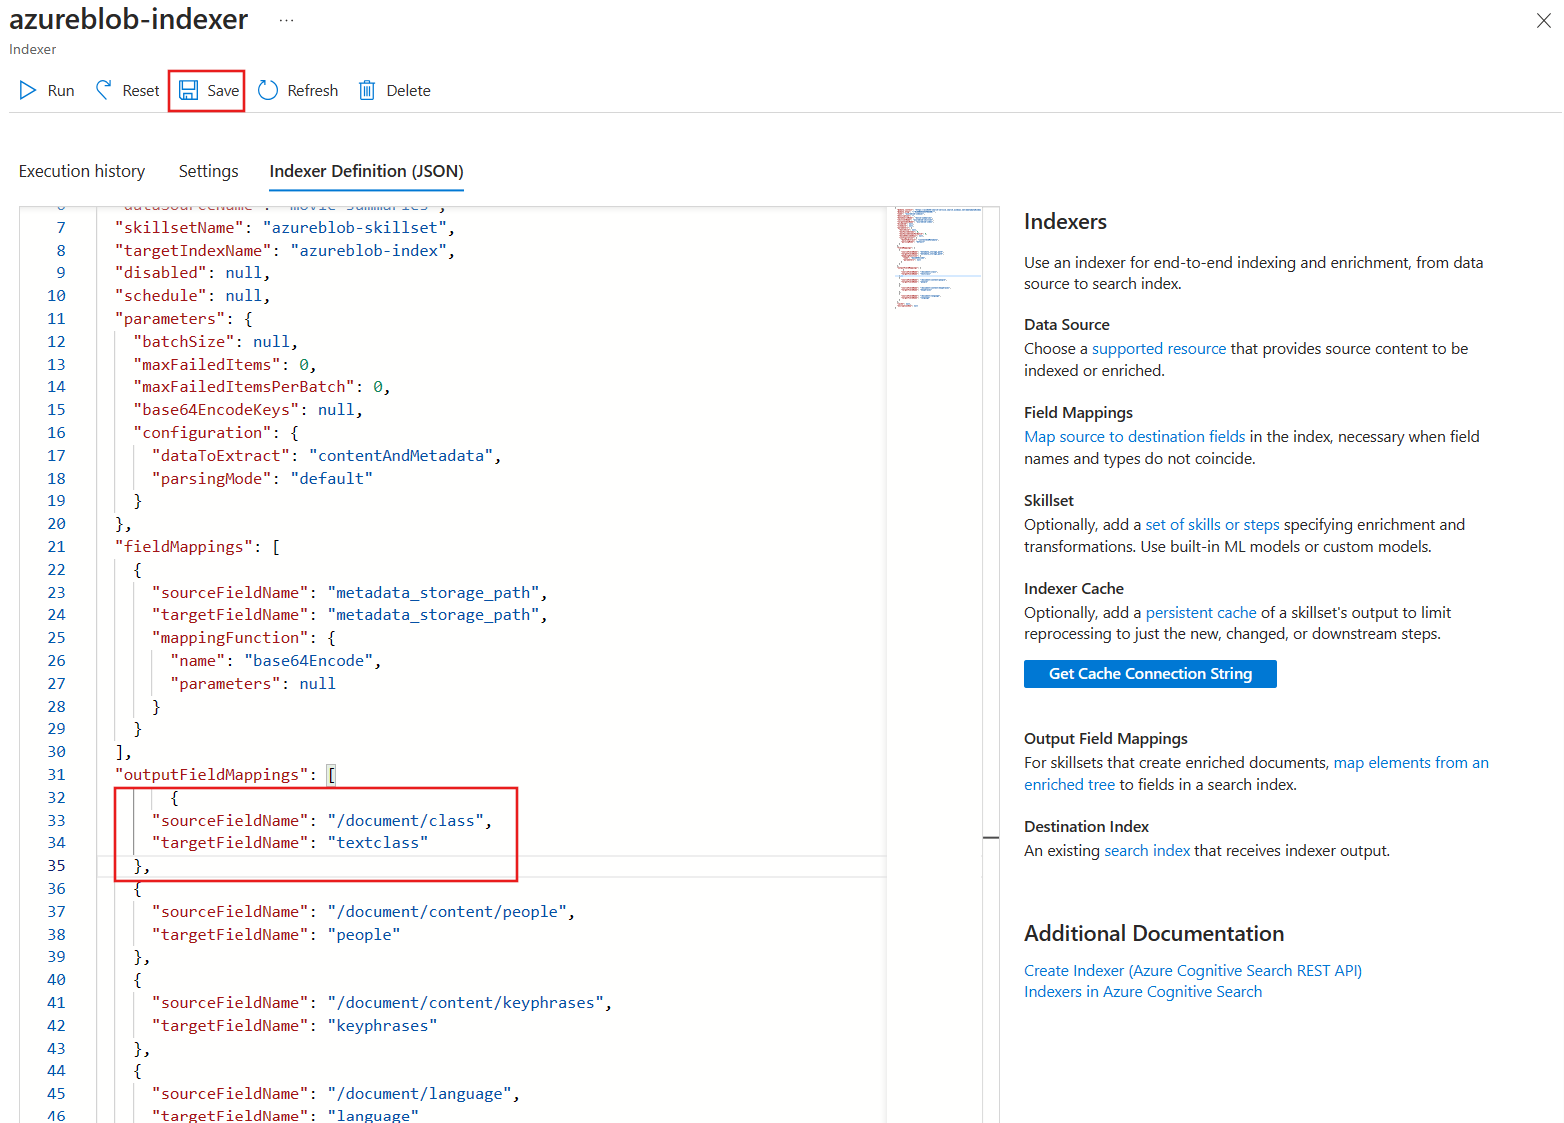
- Select Save.
- Select Reset, then select Yes.
-
Select Run, then select Yes.
Your Azure cognitive search service runs your updated indexer. The indexer uses the edited custom skillset. The skillset calls your function app with the document being indexed. The custom text classifier model uses the text in the document to try and identify the genre of the movie. The model returns a JSON document with genres and confidence levels. The indexer maps the JSON results to the fields in your index using the new output field mapping.
- Select Execution history.
-
Check that the indexer has successfully run against the 210 documents.
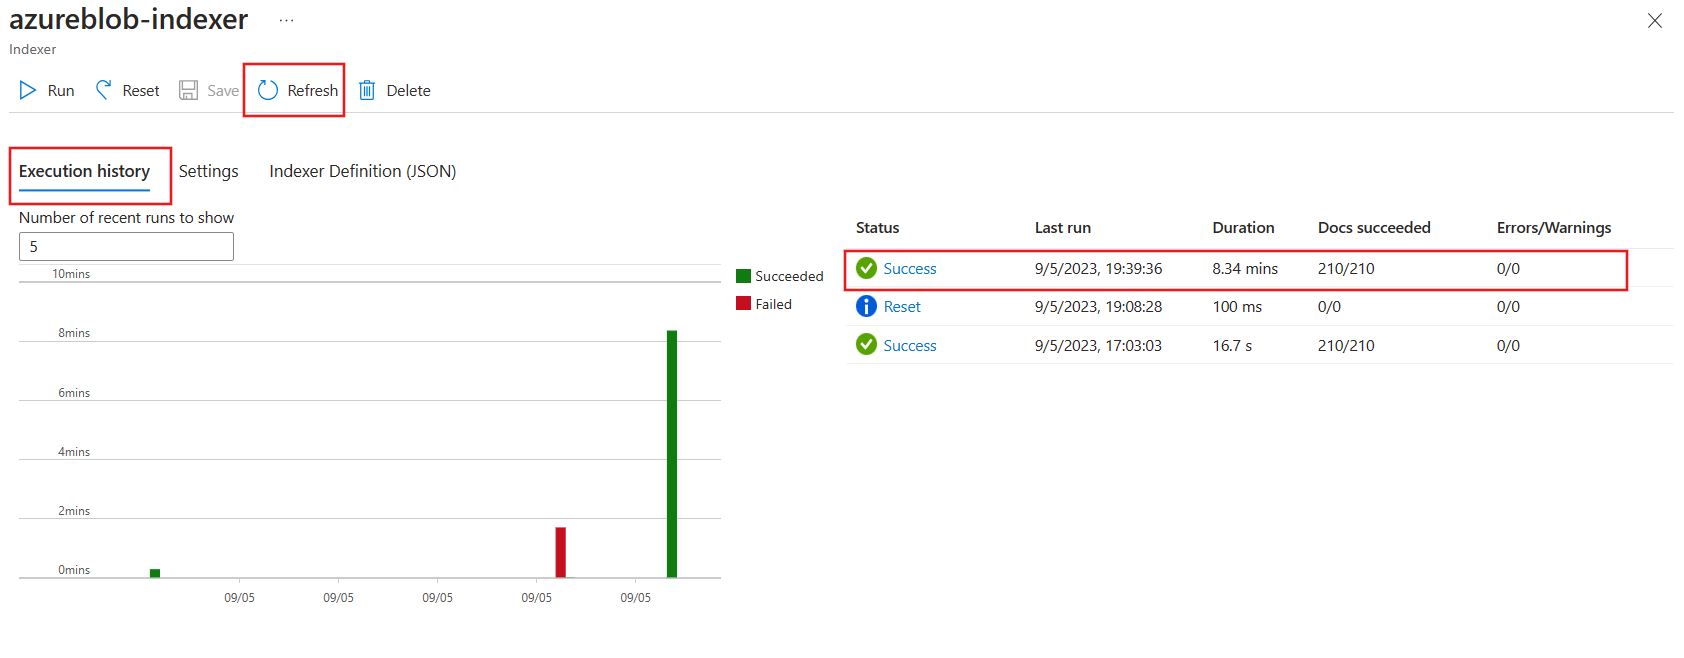 You might need to select Refresh to update the status of the indexer.
Test your enriched search index
-
At the top of the page, select the search service, for example **acs18245-search-service Indexers**. - On the Overview pane, select Indexes.
-
Select azurebob-index.
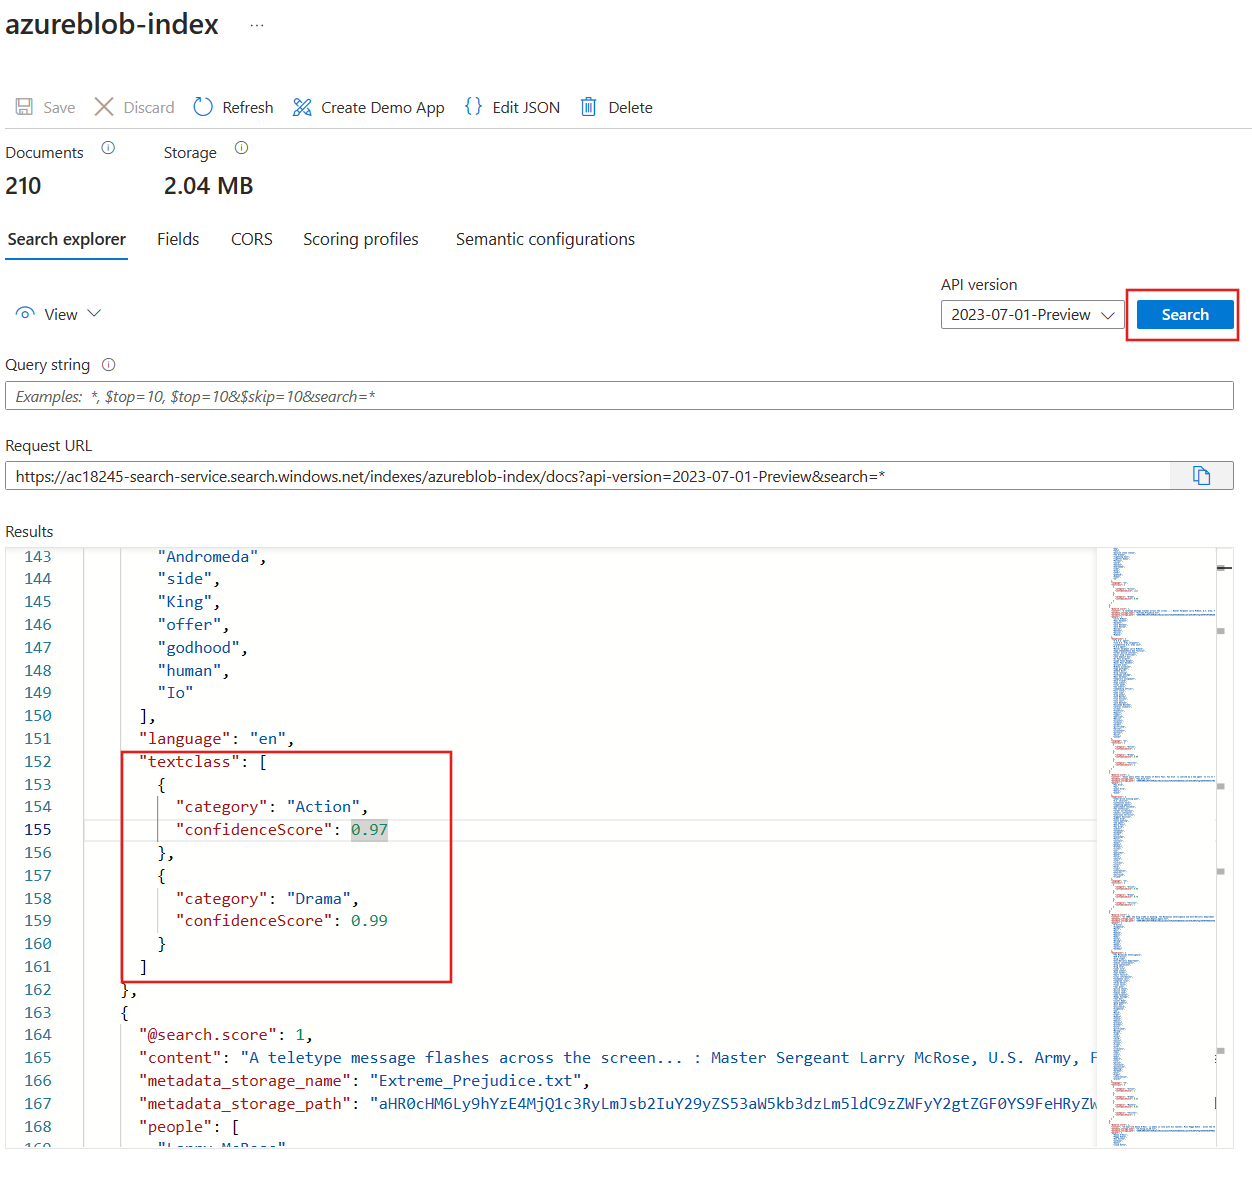
- Select Search.
- Explore the search results.
Each document in the index should have a new textclass field that can be searched. It contains a category field with the movies genres. It can be more than one. It also shows how confident the custom text classification model is about the identified genre.
Now that you’ve completed the exercise, delete all the resources you no longer need.
Clean-up
- In the Azure portal, go to the Home page, and select Resource groups.
- Select the resource groups you don’t need, then select Delete resource group.