Set up and run functional tests
You will learn how to configure a CI pipeline for a .NET application that includes unit tests, integration tests, and functional tests. You'll understand the different types of automated testing and how they fit into a continuous integration strategy.
This lab takes approximately 20 minutes to complete.
Before you start
You need:
- Microsoft Edge or an Azure DevOps supported browser
- Azure DevOps organization: Create one at Create an organization or project collection if you don't have one
About software testing
Software of any complexity can fail in unexpected ways in response to changes. Testing after making changes is required for all but the most trivial applications. Manual testing is the slowest, least reliable, most expensive way to test software.
There are many kinds of automated tests for software applications:
- Unit Tests: Test a single part of your application's logic. They don't test how your code works with dependencies or infrastructure
- Integration Tests: Test how your code works with dependencies or infrastructure. They verify that your code's layers interact as expected when dependencies are fully resolved
- Functional Tests: Written from the user's perspective, they verify the correctness of the system based on its requirements
For more information about testing types, see Test ASP.NET Core MVC apps.
Create and configure the team project
First, you'll create an Azure DevOps project for this lab.
- In your browser, open your Azure DevOps organization
- Select New Project
- Give your project the name eShopOnWeb
- Leave other fields with defaults
- Select Create
Import the eShopOnWeb Git Repository
Next, you'll import the sample repository that contains the application code and test projects.
- In your Azure DevOps organization, open the eShopOnWeb project
- Select Repos > Files
- Select Import a Repository
- Select Import
- In the Import a Git Repository window, paste this URL:
https://github.com/MicrosoftLearning/eShopOnWeb.git - Select Import
The repository is organized this way:
- .ado folder contains Azure DevOps YAML pipelines
- .devcontainer folder contains setup to develop using containers
- infra folder contains Bicep & ARM infrastructure as code templates
- .github folder contains YAML GitHub workflow definitions
- src folder contains the .NET website used in the lab scenarios
- tests folder contains the different test projects (Unit, Integration, Functional)
- Go to Repos > Branches
- Hover on the main branch then select the ellipsis on the right
- Select Set as default branch
Setup Tests in CI pipeline
You'll configure a CI pipeline that includes different types of tests.
Import the YAML build definition for CI
You'll add the YAML build definition that implements Continuous Integration.
- Go to Pipelines > Pipelines
- Select New Pipeline (or Create Pipeline if you don't have any pipelines)
- Select Azure Repos Git (YAML)
- Select the eShopOnWeb repository
- Select Existing Azure Pipelines YAML File
- Select the main branch and the /.ado/eshoponweb-ci.yml file
- Select Continue
The CI definition consists of these tasks:
- DotNet Restore: Installs all project dependencies without storing them in source control
- DotNet Build: Builds a project and all its dependencies
- DotNet Test: .Net test driver used to execute unit tests
- DotNet Publish: Publishes the application and its dependencies to a folder for deployment
- Publish Artifact - Website: Publishes the app artifact and makes it available as a pipeline artifact
- Publish Artifact - Bicep: Publishes the infrastructure artifact and makes it available as a pipeline artifact
- Select the Save button (not Save and run) to save the pipeline definition
You can find the Save button by selecting on the arrow to the right of the Save and Run button.
Add tests to the CI pipeline
You'll add integration and functional tests to the CI Pipeline. Notice that Unit Tests are already part of the pipeline.
-
Edit the pipeline by pressing the Edit button
-
Add the Integration Tests task after the Unit Tests task:
- task: DotNetCoreCLI@2
  displayName: Integration Tests
  inputs:
    command: "test"
    projects: "tests/IntegrationTests/*.csproj"
Integration Tests test how your code works with dependencies or infrastructure. Although it's good to encapsulate code that interacts with infrastructure like databases and file systems, you'll still have some of that code, and you'll want to test it. Additionally, you should verify that your code's layers interact as expected when your application's dependencies are fully resolved.
-
Add the Functional tests task after the Integration Tests task:
- task: DotNetCoreCLI@2
  displayName: Functional Tests
  inputs:
    command: "test"
    projects: "tests/FunctionalTests/*.csproj"
Functional Tests are written from the user's perspective and verify the correctness of the system based on its requirements. Unlike integration tests that are written from the developer's perspective to verify that components work correctly together, functional tests validate the system's behavior from an end-user standpoint.
-
Select Validate and Save
-
If validation is successful, select Save again to commit the changes directly to the main branch
Check the tests summary
Now you'll run the pipeline and examine the test results.
-
Select Run
-
From the Run pipeline tab, select Run again
-
Wait for the pipeline to start and complete the Build Stage successfully
-
Once completed, the Tests tab will appear as part of the pipeline run
-
Select on it to check the summary
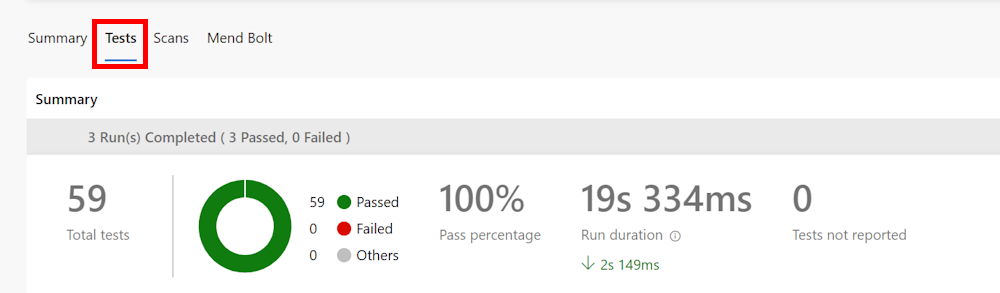
-
For more details, at the bottom of the page, the table shows a list of the different run tests
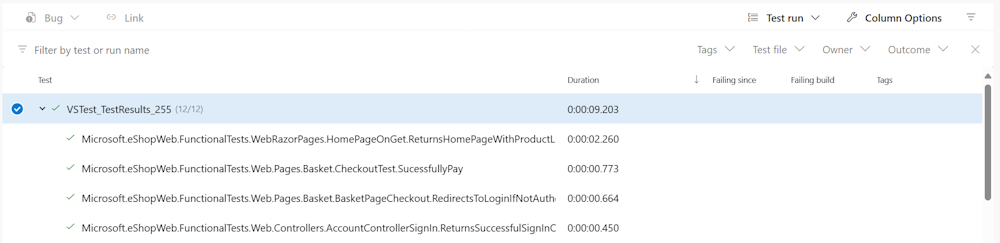
Note: If the table is empty, you need to reset the filters to see all the details about the tests run.
Troubleshooting
Functional Tests Failure
If you encounter the following error when running functional tests:
System.IO.FileNotFoundException : Could not load file or assembly 'Microsoft.Extensions.Configuration.Abstractions, Version=9.0.0.0, Culture=neutral, PublicKeyToken=adb9793829ddae60'. The system cannot find the file specified.
This error occurs due to version mismatches in the eShopOnWeb repository dependencies. The project targets .NET 8.0, but some packages reference .NET 9.0 assemblies.
Workaround options:
-
Skip Functional Tests (Recommended for Lab Completion): Modify the pipeline to exclude functional tests and only run Unit and Integration tests to complete the lab objectives.
-
Manual Fix: After importing the repository, you can manually edit the
Directory.Packages.propsfile to downgrade the conflicting packages:- Change
Microsoft.EntityFrameworkCore.Toolsfrom version9.0.4to8.0.8 - Change
System.Text.Jsonfrom version9.0.4(or9.0.2) to8.0.1
- Change
Summary
In this lab, you learned how to set up and run different test types using Azure Pipelines and .NET. You configured a CI pipeline that includes:
- Unit Tests: Testing individual components in isolation
- Integration Tests: Testing how components work together with dependencies
- Functional Tests: Testing the system from the user's perspective
These different testing layers provide comprehensive coverage and help ensure code quality throughout your development lifecycle. Automated testing in CI/CD pipelines helps catch issues early and maintains confidence in your deployments.