Configure Agent Pools and Understand Pipeline Styles
In this lab, you'll learn how to implement and use self-hosted agents with YAML pipelines. YAML-based pipelines allow you to fully implement CI/CD as code, in which pipeline definitions reside in the same repository as the code that is part of your Azure DevOps project.
Regardless of the choice of the pipeline style, to build your code or deploy your solution by using Azure Pipelines, you need an agent. An agent hosts compute resources that run one job at a time. Jobs can be run directly on the host machine of the agent or in a container. You have an option to run your jobs using Microsoft-hosted agents, which are managed for you, or implementing a self-hosted agent that you set up and manage on your own.
You will learn how to:
- Create and configure Azure VMs as build agents.
- Implement YAML-based pipelines.
- Implement self-hosted agents.
- Configure agent pools for pipelines.
This lab takes approximately 45 minutes to complete.
Before you start
To complete the lab, you need:
- Microsoft Edge or an Azure DevOps supported browser.
- An Azure DevOps organization. If you don't already have one, create one by following the instructions at Create an organization or project collection.
- An Azure subscription: If you don't already have an Azure subscription, sign up for a free account at Azure Free Account.
- Git 2.47.0 or later: If you don't have Git installed yet, navigate to the Git for Windows download page download it, and install it.
- Visual Studio Code: If you don't have Visual Studio Code installed yet, navigate to the Visual Studio Code download page, download it, and install it.
Set up Azure DevOps organization (if needed)
If you don't already have an Azure DevOps organization, follow these steps:
-
Use a private browser session to get a new personal Microsoft Account (MSA) at
https://account.microsoft.com(skip if you already have one). -
Using the same browser session, sign up for a free Azure subscription at
https://azure.microsoft.com/free(skip if you already have one). -
Open a browser and navigate to Azure portal at
https://portal.azure.com, then search at the top of the Azure portal screen for Azure DevOps. In the resulting page, select Azure DevOps organizations. -
Next, select on the link labelled My Azure DevOps Organizations or navigate directly to
https://aex.dev.azure.com. -
On the We need a few more details page, select Continue.
-
In the drop-down box on the left, choose Default Directory, instead of Microsoft Account.
-
If prompted ("We need a few more details"), provide your name, e-mail address, and location and select Continue.
-
Back at
https://aex.dev.azure.comwith Default Directory selected select the blue button Create new organization. -
Accept the Terms of Service by selecting Continue.
-
If prompted ("Almost done"), leave the name for the Azure DevOps organization at default (it needs to be a globally unique name) and pick a hosting location close to you from the list.
-
Once the newly created organization opens in Azure DevOps, select Organization settings in the bottom left corner.
-
At the Organization settings screen select Billing (opening this screen takes a few seconds).
-
Select Setup billing and on the right-hand side of the screen, select your Azure Subscription and then select Save to link the subscription with the organization.
-
Once the screen shows the linked Azure Subscription ID at the top, change the number of Paid parallel jobs for MS Hosted CI/CD from 0 to 1. Then select SAVE button at the bottom.
Note: You may wait a couple of minutes before using the CI/CD capabilities so that the new settings are reflected in the backend. Otherwise, you will still see the message "No hosted parallelism has been purchased or granted".
-
In Organization Settings, go to section Pipelines and select Settings.
-
Toggle the switch to Off for Disable creation of classic build pipelines and Disable creation of classic release pipelines.
-
In Organization Settings, go to section Security and select Policies.
-
Toggle the switch to On for Allow public projects.
Create and configure the Azure DevOps project (if needed)
- Open your browser and navigate to your Azure DevOps organization.
- Select the New Project option and use the following settings:
- name: eShopOnWeb
- visibility: Private
- Advanced: Version Control: Git
- Advanced: Work Item Process: Scrum
- Select Create.
Import eShopOnWeb git repository (if needed)
-
Open the previously created eShopOnWeb project.
-
Select the Repos > Files, Import a Repository and then select Import.
-
On the Import a Git Repository window, paste the following URL
https://github.com/MicrosoftLearning/eShopOnWeb.gitand select Import: -
The repository is organized the following way:
- .ado folder contains Azure DevOps YAML pipelines.
- .devcontainer folder container setup to develop using containers (either locally in VS Code or GitHub Codespaces).
- infra folder contains Bicep & ARM infrastructure as code templates used in some lab scenarios.
- .github folder contains YAML GitHub workflow definitions.
- src folder contains the .NET 8 website used in the lab scenarios.
-
Leave the web browser window open.
-
Go to Repos > Branches.
-
Hover on the main branch then select the ellipsis on the right of the column.
-
Select on Set as default branch.
Create agents and configure agent pools
In this section, you will create an Azure virtual machine (VM) and use it to create an agent and configure agent pools.
Create and connect to an Azure VM
-
In your browser, open the Azure Portal at
https://portal.azure.com. If prompted, sign in by using an account with the Owner role in your Azure subscription. -
In the Search resources, services and docs (G+/) box, type
Virtual Machinesand select it from the dropdown list. -
Select the Create button.
-
Select the Presets.
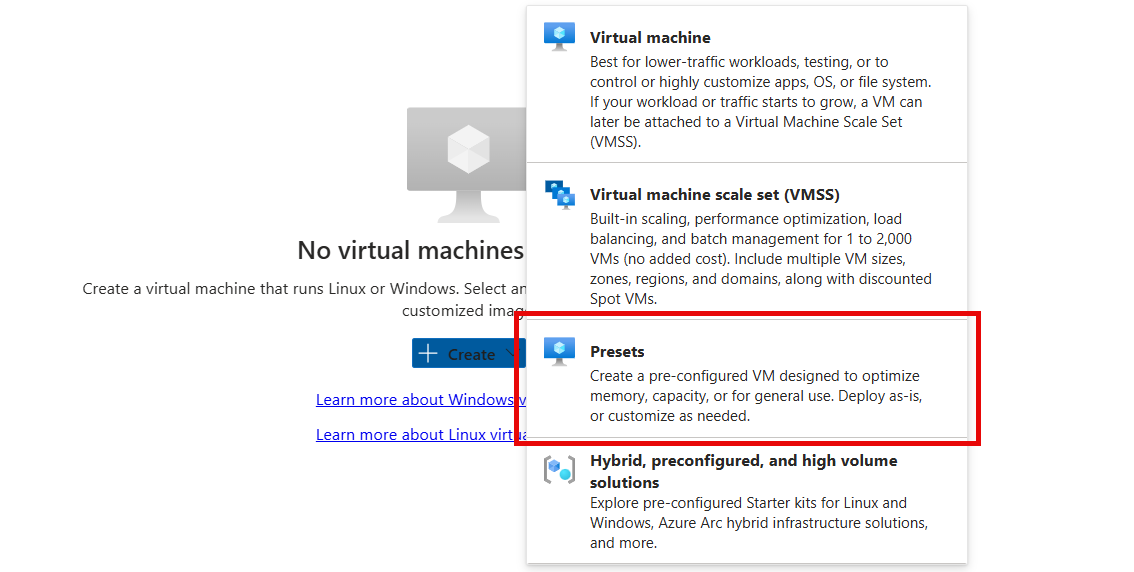
-
Select the Dev/Test as the workload environment and the General purpose as the workload type.
-
Select the Continue to create a VM button, on the Basics tab perform the following actions and then select Management:
Setting Action Subscription drop-down list Select your Azure subscription. Resource group section Create a new resource group named rg-eshoponweb-agentpool. Virtual machine name text box Enter name of your preference, for example, eshoponweb-vm.Region drop-down list You can choose your closest azure region. For example, "eastus", "eastasia", "westus", etc. Availability options drop-down list Select No infrastructure redundancy required. Security type drop-down list Select the Trusted launch virtual machines option. Image drop-down list Select the Windows Server 2022 Datacenter: Azure Edition - x64 Gen2 image. Size drop-down list Select the cheapest Standard size for testing purposes. Username text box Enter the username of your preference Password text box Enter the password of your preference Public inbound ports section Select Allow selected ports. Select inbound ports drop-down list Select RDP (3389). Note: If the Windows Server 2022 Datacenter: Azure Edition - x64 Gen2 image is not available in the list of images suggested by the portal, select on the See all images link, then, on the marketplace page, select the Select combo box for the Windows Server product and choose the right image.
Note: If you are looking for a specific Size for the virtual machine and you do not find it in the drop-down list (the list only offers suggested sizes), click on the see all sizes link, write the size you are looking for in the Search by VM size... textbox of the Select the VM size page to find the size, select it and click on the Selectbutton on the botton part of the page.
-
On the Management tab, in the Identity section, select the Enable system assigned managed identity checkbox and then select Review + create:
-
On the Review + create tab, select Create.
Note: Wait for the provisioning process to complete. This should take about 2 minutes.
-
In the Azure portal, navigate to the page displaying configuration of the newly created Azure VM.
-
On the Azure VM page, select Connect, in the drop-down menu, select Connect, then select Download RDP file.
-
Use the downloaded RDP file to establish a Remote Desktop session to the operating system running in the Azure VM.
Create an agent pool
-
In the Remote Desktop session to the Azure VM, start Microsoft Edge web browser.
-
In the web browser, navigate to the Azure DevOps portal at
https://aex.dev.azure.comand sign in to access your organization.Note: If it is your first time accessing the Azure DevOps portal, you may need to create your profile.
-
Open the eShopOnWeb project, and select Project settings from the left-side bottom menu.
-
From Pipelines > Agent Pools, select the Add pool button.
-
Choose the Self-hosted pool type.
-
Provide a name for the agent pool, such as eShopOnWebSelfPool, and add an optional description.
-
Leave the Grant access permission to all pipelines option unchecked.
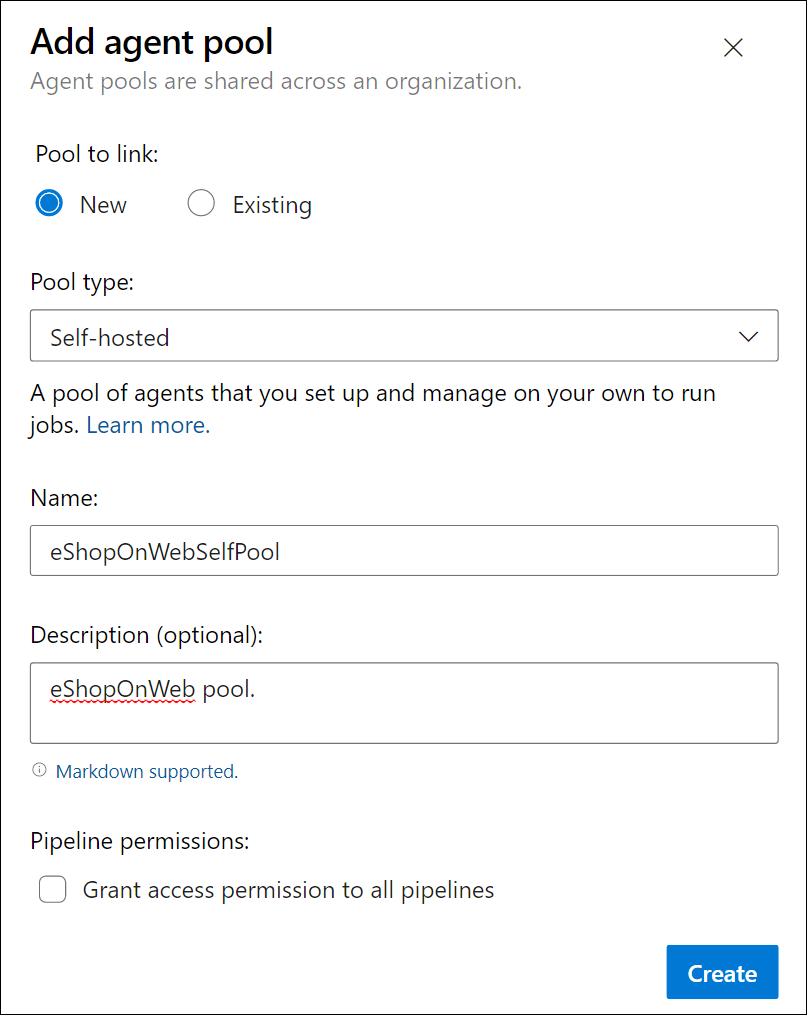
Note: Granting access permission to all pipelines is not recommended for production environments. It is only used in this lab to simplify the configuration of the pipeline.
-
Select Create button to create the agent pool.
Download and extract the agent installation files
-
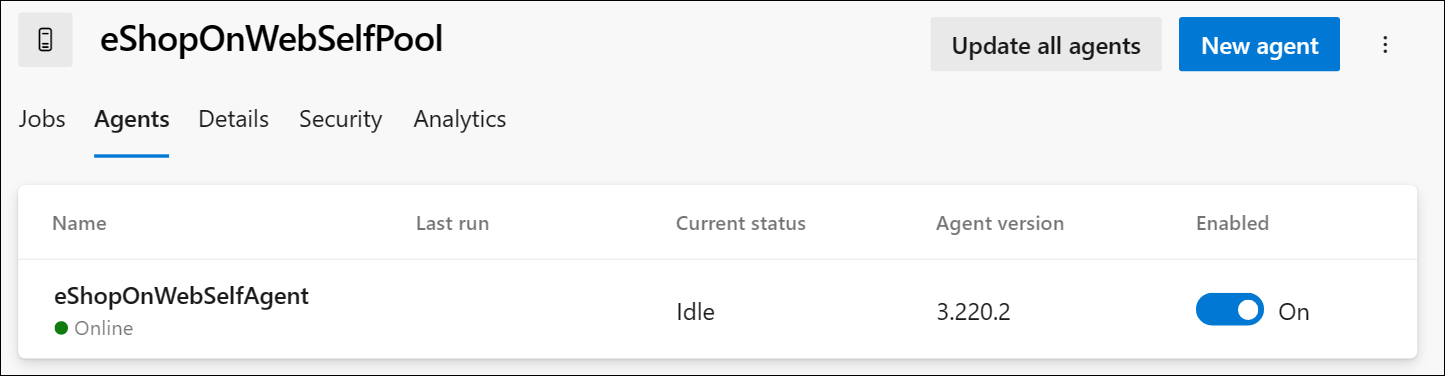
In the Azure DevOps portal, select the newly created agent pool and then select the Agents tab.
-
Select the New agent button and then Download button from the Download agent in the new pop-up window.
Note: Follow the installation instructions to install the agent.
Note: The name of the zip file you downloaded with the Download button should be similar to the following
vsts-agent-win-x64-X.YYY.Z.zip(at the time of writing this lab the file name isvsts-agent-win-x64-4.255.0.zip). The file name will be used later in one of the agent installation commands. -
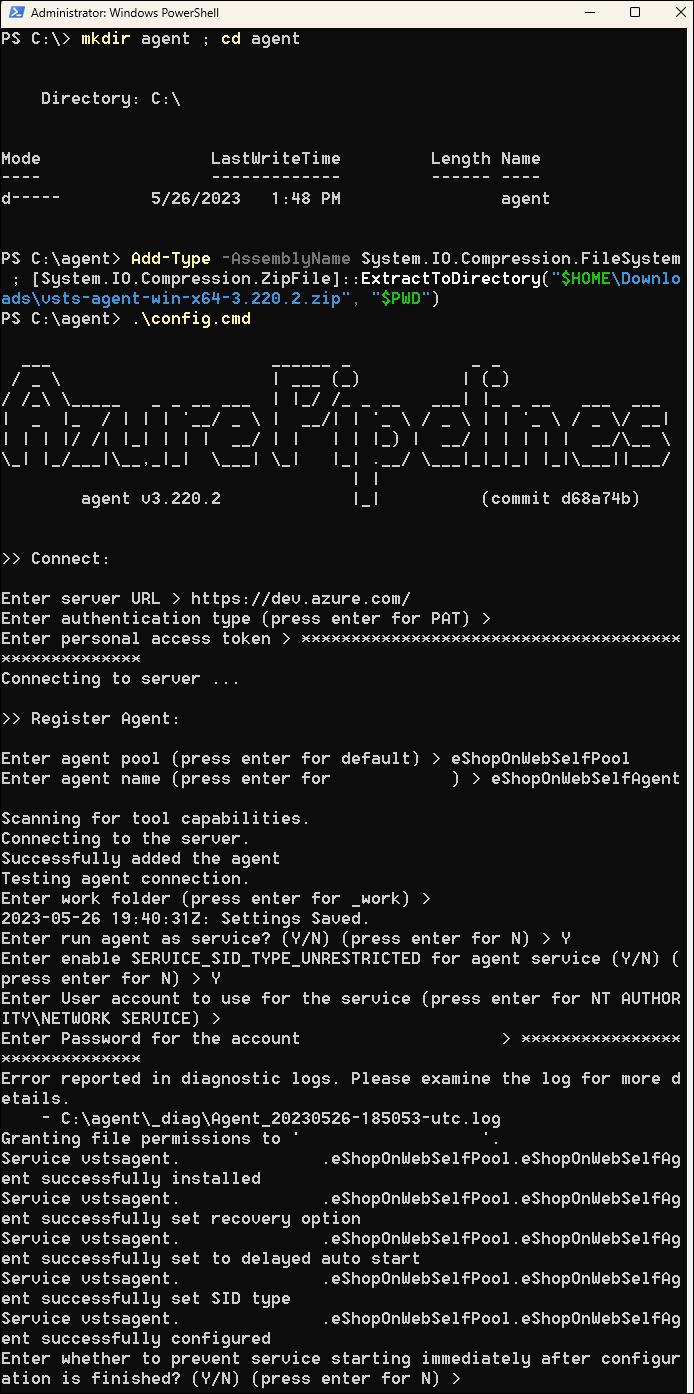
Start a PowerShell session and run the following commands to create a folder named agent.
mkdir agent ; cd agentNote: Make sure you are in the folder where you want to install the agent, for example, C:\agent.
-
Run the following command to extract the content of the downloaded agent installer files:
Add-Type -AssemblyName System.IO.Compression.FileSystem ; [System.IO.Compression.ZipFile]::ExtractToDirectory("$HOME\Downloads\vsts-agent-win-x64-4.255.0.zip", "$PWD")Note: If you downloaded the agent to a different location (or the downloaded version differs), adjust the above command accordingly.
Note: Make sure that the zip file name specified inside the
ExtractToDirectorycommand is the same as the zip file name you previously downloaded.
Create a PAT token
Note: Before configuring the agent, you need to create a PAT token (unless you have an existing one). To create a PAT token, follow the steps below:
-
Within the Remote Desktop session to the Azure VM, open another browser window, navigate to the Azure DevOps portal at
https://aex.dev.azure.com, and access your organization and project. -
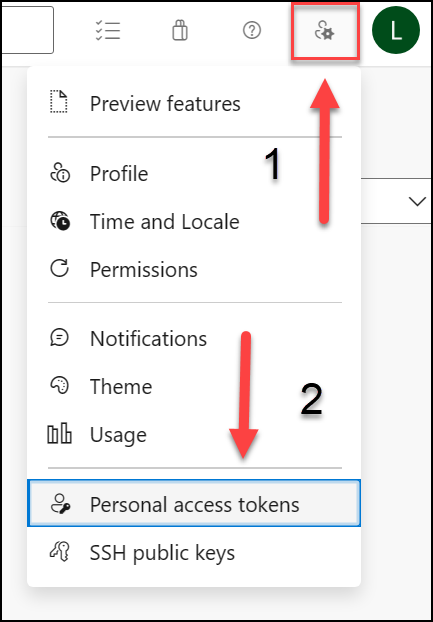
Select User settings from the right-side top menu (directly to the left of your user's avatar icon).
-
Select the Personal access tokens menu item.
-
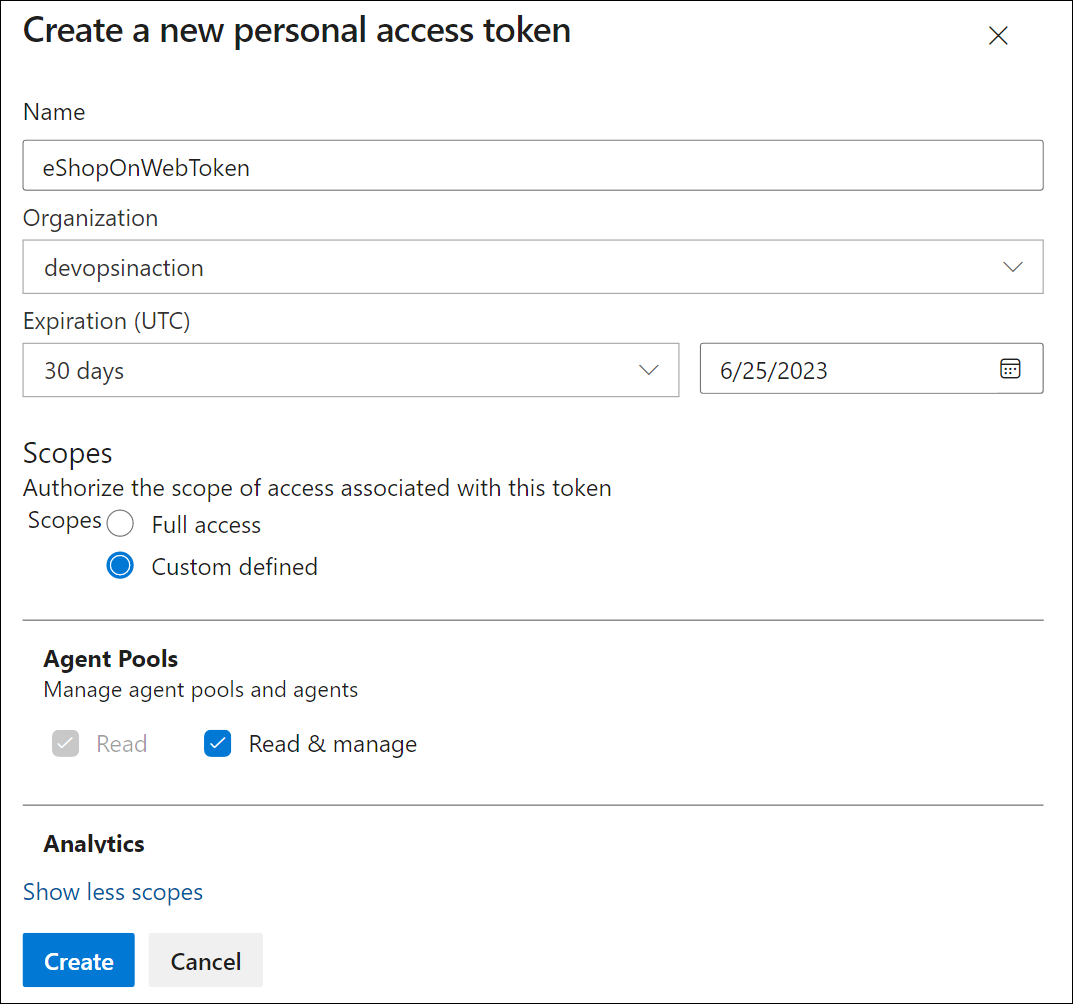
Select the New Token button.
-
Provide a name for the token, such as eShopOnWebToken.
-
Select the Azure DevOps organization for you want to use the token.
-
Set the expiration date for the token (only used to configure the agent).
-
Select the custom defined scope.
-
Select to show all scopes.
-
Select the Agent Pools (Read & Manage) scope.
-
Select the Create button to create the token.
-
Copy the token value and save it in a safe place (you will not be able to see it again. You can only regenerate the token).
[!IMPORTANT] Use the least privilege option, Agent Pools (Read & Manage), only for the agent configuration. Also, make sure you set the minimum expiration date for the token if that is the only purpose of the token. You can create another token with the same privileges if you need to configure the agent again.
Configure the agent
-
Within the Remote Desktop session to the Azure VM, switch back to the PowerShell window. If necessary, change the current directory to the one into which you extracted the agent installation files earlier in this exercise.
-
To configure your agent to run unattended, invoke the following command:
.\config.cmdNote: If you want to run the agent interactively, use
.\run.cmdinstead. -
To configure the agent, perform the following actions when prompted:
- Enter the URL of the Azure DevOps organization (server URL) in the format
https://dev.azure.com/{your organization name}. - Accept the default authentication type (
PAT). - Enter the value of the PAT token you created in the previous step.
- Enter the agent pool name
eShopOnWebSelfPoolyou created earlier in this exercise. - Enter the agent name
eShopOnWebSelfAgent. - Accept the default agent work folder (_work).
- Enter Y to configure the agent to run as service.
- Enter Y to enable SERVICE_SID_TYPE_UNRESTRICTED for the agent service.
- Enter
NT AUTHORITY\SYSTEMto set the security context for the service.
[!IMPORTANT] In general, you should follow the principle of least privilege when configuring the service security context.
- Accept the default option (N) to allow the service to start immediately after configuration is finished.
Note: The agent configuration process will take a few minutes to complete. Once it is done, you will see a message indicating that the agent is running as a service.
[!IMPORTANT] If you see an error message indicating that the agent is not running, you may need to start the service manually. To do this, open the Services applet in the Windows Control Panel, locate the service named Azure DevOps Agent (eShopOnWebSelfAgent), and start it.
[!IMPORTANT] If your agent fails to start, you may need to choose a different folder for the agent work directory. To do this, re-run the agent configuration script and choose a different folder.
- Enter the URL of the Azure DevOps organization (server URL) in the format
-
Check the agent status by switching to the web browser displaying the Azure DevOps portal, navigating to the agent pool and selecting on the Agents tab. You should see the new agent in the list.
Note: For more details on Windows agents, see: Self-hosted Windows agents
[!IMPORTANT] In order for the agent to be able to build and deploy Azure resources from the Azure DevOps pipelines (which you will step through in the upcoming labs), you need to install Azure CLI within the operating system of the Azure VM that is hosting the agent.
-
Start a web browser and navigate to the page
https://learn.microsoft.com/en-us/cli/azure/install-azure-cli-windows?tabs=azure-cli&pivots=msi#install-or-update. -
Download and install Azure CLI.
-
(Optional) If you prefer, run the following PowerShell command to install Azure CLI:
$ProgressPreference = 'SilentlyContinue'; Invoke-WebRequest -Uri https://aka.ms/installazurecliwindows -OutFile .\AzureCLI.msi; Start-Process msiexec.exe -Wait -ArgumentList '/I AzureCLI.msi /quiet'; Remove-Item .\AzureCLI.msiNote: If you are using a different version of the Azure CLI, you may need to adjust the above command accordingly.
-
In the web browser navigate to the page Microsoft .NET 8.0 SDK installer page at
https://dotnet.microsoft.com/en-us/download/dotnet/thank-you/sdk-8.0.403-windows-x64-installer.[!IMPORTANT] You need to install the .NET 8.0 SDK (or higher) on the Azure VM that is hosting the agent. This is required to build the eShopOnWeb application in the upcoming labs. Any other tools or SDKs required for the application build should also be installed on the Azure VM.
-
Download and install Microsoft .NET 8.0 SDK.
Author YAML-based Azure Pipelines
In this section, you will create an application lifecycle build pipeline, using a YAML-based template.
Create an Azure DevOps YAML pipeline
In this task, you will create a YAML-based pipeline for the eShopOnWeb project.
-
From the web browser displaying the Azure DevOps portal with the eShopOnWeb project open, in the vertical navigational pane on the left side, select Pipelines.
-
Select the Create Pipeline button - if you don't have any other pipelines created yet or select New pipeline to create an additional new one.
-
On the Where is your code? pane, select Azure Repos Git.
-
On the Select a repository pane, select eShopOnWeb.
-
On the Configure your pipeline pane, select Existing Azure Pipelines YAML File.
-
On the Select an existing YAML file, select main for the Branch, and /.ado/eshoponweb-ci-pr.yml for the Path.
-
Select Continue.
-
On the Review your pipeline YAML pane, review the sample pipeline. This is a rather straight-forward .NET application Build pipeline, which does the following:
- A single Stage: Build
- A single Job: Build
- 4 tasks within the Build Job:
- Dotnet Restore
- Dotnet Build
- Dotnet Test
- Dotnet Publish
-
On the Review your pipeline YAML pane, select the down-facing caret symbol next to the Run button, select Save.
Note: We are just creating the pipeline definition for now, without running it. You will first set up an Azure DevOps agent pool and run the pipeline in a later exercise.
Update the YAML pipeline with the self-hosted agent pool
-
In the Azure DevOps portal, navigate to the eShopOnWeb project, and select Pipelines from the left-side menu.
-
Select on the Edit button for the pipeline you created in the previous task.
-
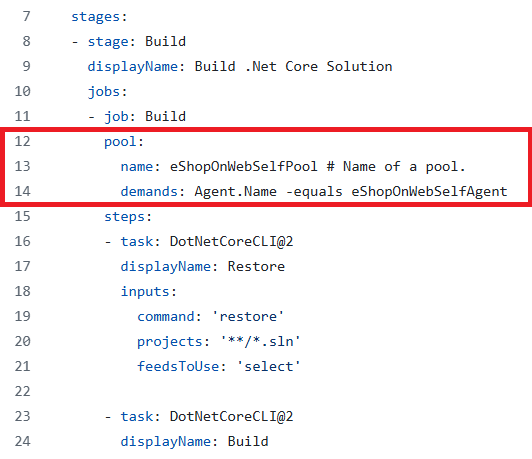
On the eShopOnWeb edit pane, in the existing YAML-based pipeline, remove line 13 which says vmImage: ubuntu-latest designating the target agent pool the following content, designating the newly created self-hosted agent pool:
pool: name: eShopOnWebSelfPool demands: Agent.Name -equals eShopOnWebSelfAgentWARNING: Be careful with copy/paste, make sure you have the same indentation shown above.
-
On the eShopOnWeb edit pane, in the upper right corner of the pane, select Validate and save. Then select Save.
-
On the eShopOnWeb edit pane, in the upper right corner of the pane, select Run.
Note: The pipeline will run on the self-hosted agent pool you created in the previous exercise.
-
Open the pipeline run and monitor the job until its successful completion.
Note: If you receive a permissions prompt, select Permit to allow the pipeline to run.
-
Once the pipeline run is complete, review the output and verify that the pipeline ran successfully.
Clean up resources
When you complete the lab, it's important to clean up your Azure resources to avoid unnecessary charges:
Delete the Azure resources
- In the Azure Portal at
https://portal.azure.com, navigate to the Resource groups section. - Find and select the rg-eshoponweb-agentpool resource group.
- On the resource group page, select Delete resource group.
- Type the resource group name to confirm deletion and select Delete.
- Wait for the deletion process to complete.
Clean up Azure DevOps resources
You don't need to clean up your Azure DevOps organization or project, as they will remain available for you to use as a reference and portfolio item. Azure DevOps provides free tier usage that includes basic features for small teams.
If you want to remove the agent pool and clean up the project:
- In your Azure DevOps project, go to Project Settings.
- Navigate to Pipelines > Agent pools.
- Find the eShopOnWebSelfPool agent pool and delete it.
- If you want to delete the entire project, go to the project Overview page and select Delete at the bottom.
CAUTION: Deleting a project deletes all work items, repositories, builds, and other project artifacts. If you used an existing project for this exercise, any existing resources outside the scope of this exercise will also be deleted.