Upgrade Tables to Unity Catalog
Unity Catalog provides a centralized governance solution for data assets in Azure Databricks. Unity Catalog delivers fine-grained access controls, automated data lineage tracking, and cross-workspace data sharing capabilities that build on the basic table management that the Hive metastore provides.
In this exercise, you’ll learn how to upgrade existing tables from the Hive metastore to Unity Catalog. You’ll use SQL commands and the Azure Databricks user interface to analyze existing data structures, apply migration techniques, evaluate transformation options, and upgrade metadata without moving data.
This exercise should take approximately 30 minutes to complete.
Note: The Azure Databricks user interface is subject to continual improvement. The user interface may have changed since the instructions in this exercise were written.
Before you start
You’ll need account administrator capabilities and cloud storage resources to support the metastore. You must also have metastore admin capability to create and manage catalogs.
Provision an Azure Databricks workspace
Tip: If you already have an Azure Databricks workspace, you can skip this procedure and use your existing workspace.
This exercise includes a script to provision a new Azure Databricks workspace. The script attempts to create a Premium tier Azure Databricks workspace resource in a region in which your Azure subscription has sufficient quota for the compute cores required in this exercise; and assumes your user account has sufficient permissions in the subscription to create an Azure Databricks workspace resource.
If the script fails due to insufficient quota or permissions, you can try to create an Azure Databricks workspace interactively in the Azure portal.
-
In a web browser, sign into the Azure portal at
https://portal.azure.com. -
Use the [>_] button to the right of the search bar at the top of the page to create a new Cloud Shell in the Azure portal, selecting a PowerShell environment. The cloud shell provides a command line interface in a pane at the bottom of the Azure portal, as shown here:
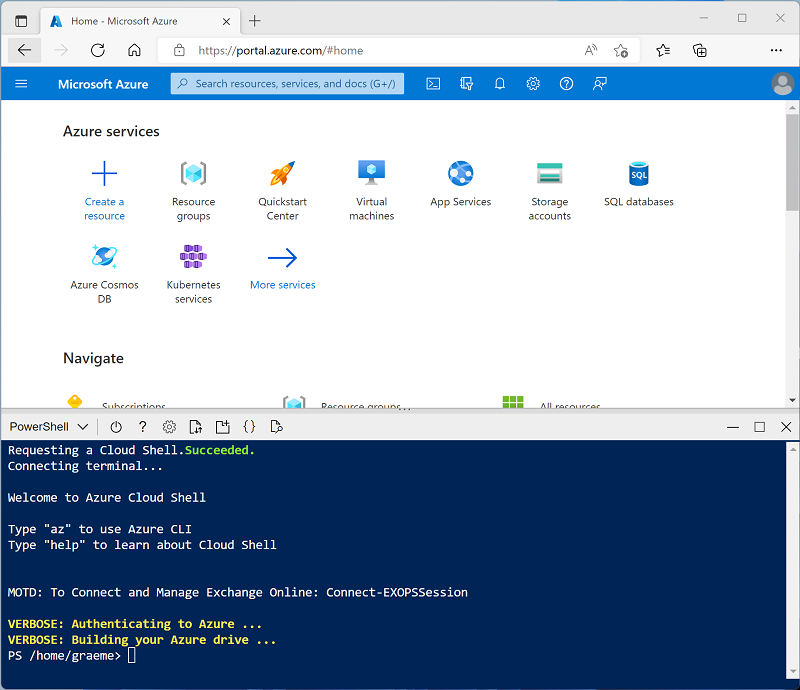
Note: If you have previously created a cloud shell that uses a Bash environment, switch it to PowerShell.
-
Note that you can resize the cloud shell by dragging the separator bar at the top of the pane, or by using the —, ⤢, and X icons at the top right of the pane to minimize, maximize, and close the pane. For more information about using the Azure Cloud Shell, see the Azure Cloud Shell documentation.
-
In the PowerShell pane, enter the following commands to clone this repo:
rm -r mslearn-databricks -f git clone https://github.com/MicrosoftLearning/mslearn-databricks -
After the repo has been cloned, enter the following command to run the setup.ps1 script, which provisions an Azure Databricks workspace in an available region:
./mslearn-databricks/setup.ps1 - If prompted, choose which subscription you want to use (this will only happen if you have access to multiple Azure subscriptions).
- Wait for the script to complete - this typically takes around 5 minutes, but in some cases may take longer. While you are waiting, review the What is Unity Catalog? article in the Azure Databricks documentation.
Open your Azure Databricks workspace
-
In the Azure portal, browse to the msl-xxxxxxx resource group that was created by the script (or the resource group containing your existing Azure Databricks workspace).
-
Select your Azure Databricks Service resource (named databricks-xxxxxxx if you used the setup script to create it).
-
In the Overview page for your workspace, use the Launch Workspace button to open your Azure Databricks workspace in a new browser tab; signing in if prompted.
Review what’s in catalog explorer
- Select Catalog on the left of your workspace.
- Note that there’s a catalog that was automatically created and has the same name as your workspace.
- Expand that catalog and note the default schema. We’ll migrate tables to that default schema later in the exercise.
- Note the hive_metastore catalog, also created automatically.
- Open the samples catalog, and note the bakehouse schema. Expand it and note the table named sales_customers.
- In this exercise, we’ll use sample data from the samples.bakehouse.sales_customers table to create and populate a table in the hive_metastore. Then we’ll explore options to upgrade that table to Unity Catalog.
Create a Notebook
You’ll use a notebook to run SQL commands that demonstrate various table upgrade techniques.
-
In the sidebar, use the (+) New link to create a Notebook.
-
Change the default notebook name (Untitled Notebook [date]) to
Upgrade tables to Unity Catalogand in the Connect drop-down list, select Serverless.
Create hive_metastore objects
Load sample data into a hive_metastore table so you can migrate it to Unity Catalog.
-
Add a new cell and run the following code to create a schema and a populated table in the hive_metastore, then confirm the rows are in the new table:
CREATE SCHEMA IF NOT EXISTS hive_metastore.bakehouse; CREATE TABLE hive_metastore.bakehouse.sales_customers AS SELECT * FROM samples.bakehouse.sales_customers; SELECT * FROM hive_metastore.bakehouse.sales_customers; -
In a new cell, run the following to set your default catalog and schema to the Unity Catalog that has the same name as your workspace.
Note: The name of your workspace is on the top right of your Azure Databricks workspace. Replace
<workspace_catalog>in the USE CATALOG statement below with the name of your workspace. If your workspace name has a-in it, replace that with a_.USE CATALOG <workspace_catalog>; USE SCHEMA default; SELECT current_catalog(), current_schema()
Overview of upgrade methods
There are a few different ways to upgrade a table, but the method you choose will be driven primarily by how you want to treat the table data. If you want to leave the table data in place, then the resulting upgraded table will be an external table. If you want to move the table data into your Unity Catalog metastore, then the resulting table will be a managed table.
Move table data into the Unity Catalog Metastore
In this approach, table data will be copied from wherever it resides into the managed data storage area for the destination schema. The result will be a managed Delta table in your Unity Catalog metastore.
Clone a Table
Cloning a table is optimal when the source table is Delta. It’s simple to use, will copy metadata, and gives you the option of copying data (deep clone) or leaving it in place (shallow clone).
-
Add a new cell and run the following code to check the format of the source table:
DESCRIBE EXTENDED hive_metastore.bakehouse.sales_customers;Notice that the Provider row shows the source is a Delta table, and the Location row shows that the table is stored in DBFS.
-
Add a new cell and run the following code to perform a deep clone operation. This will create a table in the default catalog in Unity Catalog. Add a new cell and run the following code to clone the hive_metastore into a new table in Unity Catalog. The new table will be created in the default schema of catalog that has the same name as your workspace.
CREATE OR REPLACE TABLE sales_customers_clone DEEP CLONE hive_metastore.bakehouse.sales_customers; -
Verify the cloned table by viewing your catalog in Catalog Explorer:
- Select the Catalog icon on the left side of your workspace
- Expand your catalog with the same name as your workspace
- Expand the default schema
- Notice that the sales_customer table has been cloned as sales_customer_clone
Create Table As Select (CTAS)
Using CTAS is a universally applicable technique that creates a new table based on the output of a SELECT statement. This will always copy the data, but no metadata will be copied.
-
Return to the notebook. Add a new cell and run the following code to copy the table using CTAS:
CREATE TABLE sales_customers_ctas AS SELECT * FROM hive_metastore.bakehouse.sales_customers; -
Add a new cell and run the following code to verify the table was created:
SHOW TABLES IN default;
Apply transformations during the upgrade
CTAS offers the ability to transform the data while copying it. When migrating tables to Unity Catalog, it’s a great time to consider whether your table structures still address your organization’s business requirements.
-
Add a new cell and run the following code to create a transformed version of the table:
CREATE TABLE sales_customers_transformed AS SELECT customerID as ID, first_name as first_name, last_name as last_name FROM hive_metastore.bakehouse.sales_customers; -
Verify the new table by viewing your catalog in Catalog Explorer:
- Select the Catalog icon on the left side of your workspace
- Expand your catalog with the same name as your workspace
- Expand the default schema
- Expand Tables
- Select the sales_customer_transformed table and note that the ID column name has been changed from customerID. If you don’t see the table, select the refresh button at the top of Catalog Explorer.
Upgrade external tables (Example)
Note: You may not have access to external tables so this is an example of what you can do in your environment.
When upgrading external tables, some use cases may call for leaving the data in place, such as when data location is dictated by regulatory requirements, you cannot change the data format to Delta, or you want to avoid the time and cost of moving large datasets.
Use the SYNC command
The SYNC SQL command allows you to upgrade external tables in Hive Metastore to external tables in Unity Catalog without moving the data.
Using Catalog Explorer to upgrade tables
You can also upgrade tables using the Catalog Explorer user interface:
- Select the catalog icon on the left
- Expand the hive_metastore
- Expand your bakehouse schema in the hive metastore
- Select the sales_customers table and click Upgrade
- Select your destination catalog and schema
- Configure the upgrade options as needed
For this exercise, you don’t need to actually run the upgrade since it uses SYNC behind the scenes.
Clean Up
When you’ve finished exploring Unity Catalog table upgrades, you can delete the resources you created to avoid unnecessary Azure costs.
When you’ve finished exploring Unity Catalog, you can delete the resources you created to avoid unnecessary Azure costs.
- Close the Azure Databricks workspace browser tab and return to the Azure portal.
- On the Azure portal, on the Home page, select Resource groups.
- Select the resource group containing your Azure Databricks workspace (not the managed resource group).
- At the top of the Overview page for your resource group, select Delete resource group.
-
Enter the resource group name to confirm you want to delete it, and select Delete.
After a few minutes, your resource group and the managed workspace resource group associated with it will be deleted.