Explore Unity Catalog in Azure Databricks
Unity Catalog offers a centralized governance solution for data and AI, simplifying security by providing a single place to administer and audit data access. In this exercise, you’ll configure Unity Catalog for an Azure Databricks workspace and use it to manage data.
Note: In some cases, Unity Catalog may already be enabled for your workspace. You can still follow the steps in this exercise to assign a new storage account for your catalog.
This lab will take approximately 45 minutes to complete.
Note: The Azure Databricks user interface is subject to continual improvement. The user interface may have changed since the instructions in this exercise were written.
Before you start
You’ll need an Azure subscription in which you have global administrator rights.
IMPORTANT: This exercise assumes you have Global Administrator rights in your Azure subscription. This level of access is required to manage the Databricks account in order to enable Unity Catalog in an Azure Databricks workspace.
Create an Azure Databricks workspace
Tip: If you already have a premium tier Azure Databricks workspace, you can skip this procedure and use your existing workspace.
- Sign into the Azure portal at
https://portal.azure.com. - Create an Azure Databricks resource with the following settings:
- Subscription: Select your Azure subscription
- Resource group: Create a new resource group named
msl-xxxxxxx(where “xxxxxxx” is a unique value) - Workspace name:
databricks-xxxxxxx(where “xxxxxxx” is the value used in the resource group name) - Region: Select any available region
- Pricing tier: Premium or Trial
- Managed Resource Group name:
databricks-xxxxxxx-managed(where “xxxxxxx” is the value used in the resource group name)
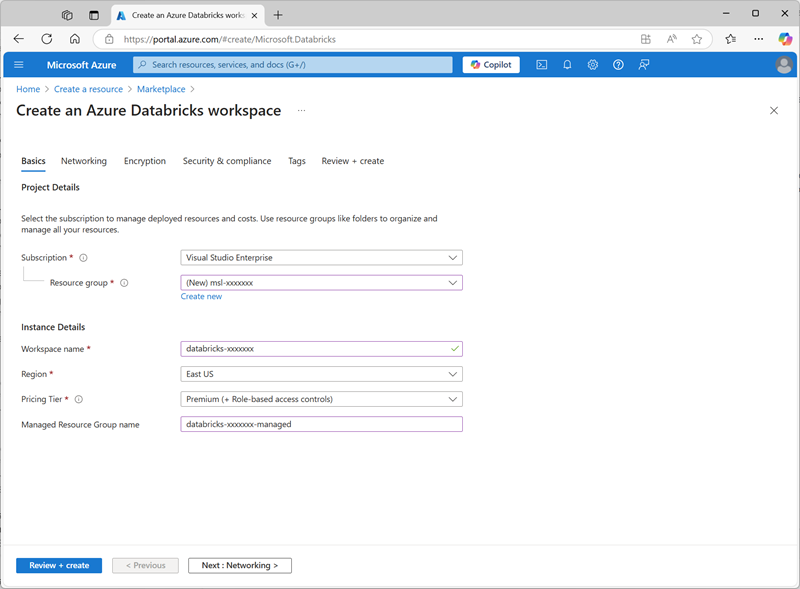
- Select Review + create and wait for deployment to complete.
Prepare storage for the catalog
When using Unity Catalog in Azure Databricks, data is stored in an external store; which can be shared across multiple workspaces. In Azure, it’s common to use an Azure Storage account with support for a Azure Data Lake Storage Gen2 hierarchical namespace for this purpose.
- In the Azure portal, create a new Storage account resource with the following settings:
- Basics:
- Subscription: Select your Azure subscription
- Resource group: Select the existing msl-xxxxxxx resource group where you created the Azure Databricks workspace.
- Storage account name:
storexxxxxxx(where “xxxxxxx” is the value used in the resource group name) - Region: Select the region where you created the Azure Databricks workspace
- Primary service: Azure Blob Storage or Azure Data Lake Storage Gen2
- Performance: Standard
- Redundancy: Locally-redundant storage (LRS) (For a non-production solution like this exercise, this option has lower cost and capacity consumption benefits)
- Advanced:
- Enable hierarchical namespace: Selected
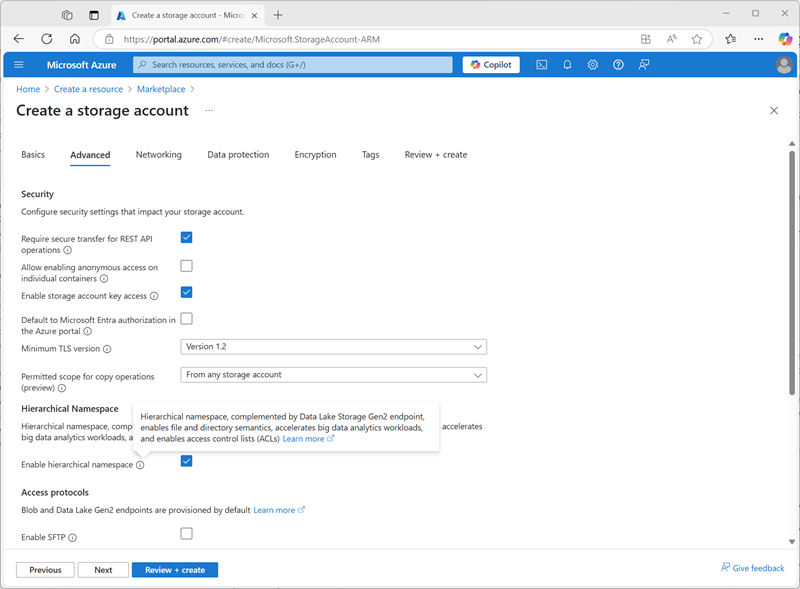
- Basics:
- Select Review + create and wait for deployment to complete.
-
When deployment has completed, go to the deployed storexxxxxxx storage account resource and use its Storage browser page to add a new blob container named
data. This is where the data for your Unity Catalog objects will be stored.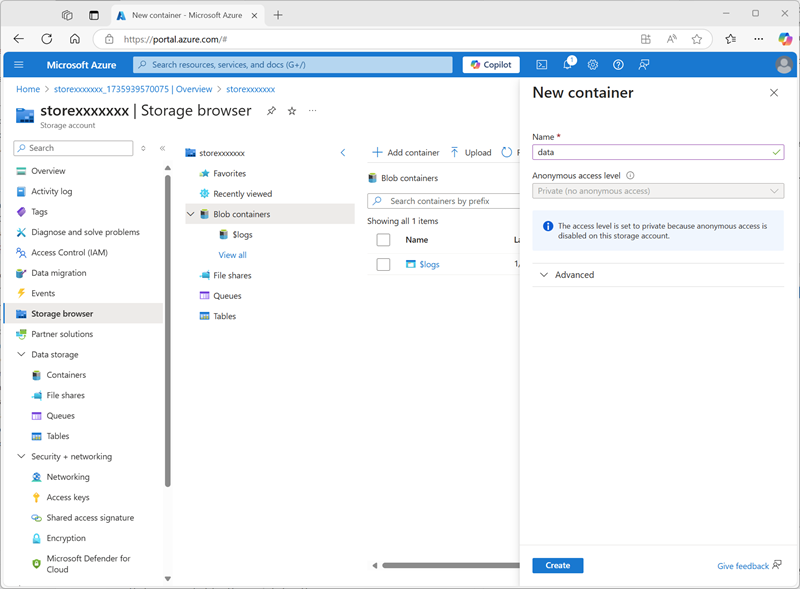
Configure access to catalog storage
To access the blob container you have created for Unity Catalog, your Azure Databricks workspace must use a managed account to connect to the storage account through an access connector.
- In the Azure portal, create a new Access connector for Azure Databricks resource with the following settings:
- Subscription: Select your Azure subscription
- Resource group: Select the existing msl-xxxxxxx resource group where you created the Azure Databricks workspace.
- Name:
connector-xxxxxxx(where “xxxxxxx” is the value used in the resource group name) - Region: Select the region where you created the Azure Databricks workspace
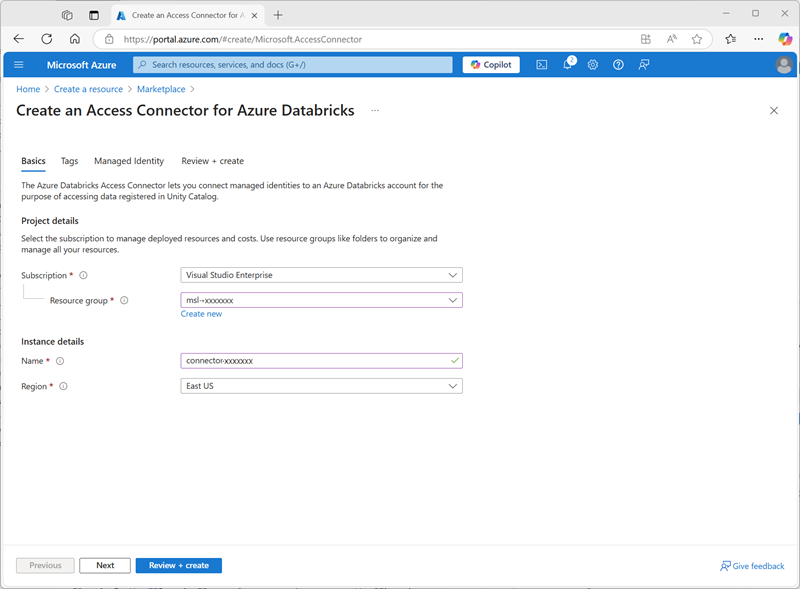
- Select Review + create and wait for deployment to complete. Then go to the deployed resource and on its Overview page, note the Resource ID, which should be in the format /subscriptions/abc-123…/resourceGroups/msl-xxxxxxx/providers/Microsoft.Databricks/accessConnectors/connector-xxxxxxx - you’ll need this later.
- In the Azure portal, return to the storexxxxxxx storage account resource and on its Access Control (IAM) page, add a new role assignment.
-
In the Job function roles list, search for and select the
Storage blob data contributorrole.
-
Select Next. Then on the Members page, select the option to assign access to a Managed Identity and then find and select the
connector-xxxxxxxaccess connector for Azure Databricks you created previously (you can ignore any other access connectors that have been created in your subscription)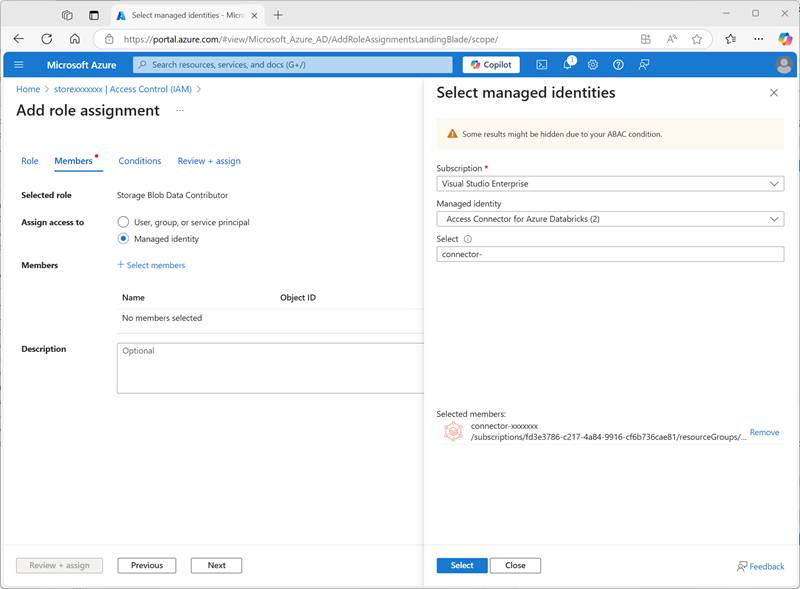
- Review and assign the role membership to add the managed identity for your connector-xxxxxxx access connector for Azure Databricks to the Storage blob data contributor role for your storexxxxxxx storage account - enabling it to access data in the storage account.
Configure Unity Catalog
Now that you have created a blob storage container for your catalog and provided a way for an Azure Databricks managed identity to access it, you can configure Unity Catalog to use a metastore based on your storage account.
- In the Azure portal, view the msl-xxxxxxx resource group, which should now contain three resources:
- The databricks-xxxxxxx Azure Databricks workspace
- The storexxxxxxx storage account
- The connector-xxxxxxx access connector for Azure Databricks
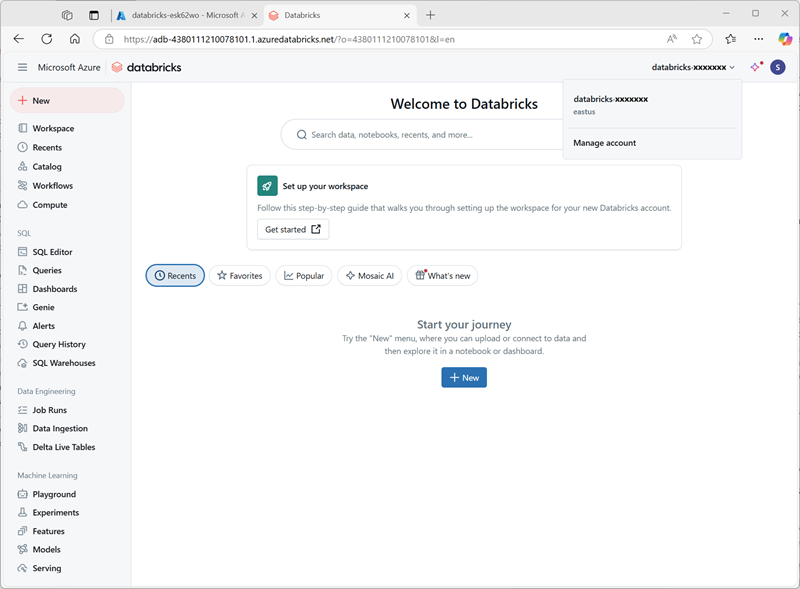
- Open the databricks-xxxxxxx Azure Databricks workspace resource you created and earlier, and on its Overview page, use the Launch Workspace button to open your Azure Databricks workspace in a new browser tab; signing in if prompted.
-
In the databricks-xxxxxxx menu at the top right, select Manage account to open the Azure Databricks account console in another tab.
Note: If Manage account is not listed or doesn’t successfully open, you may need to have a global administrator add your account to the Account Admin role in your Azure Databricks workspace.
If you’re using a personal Azure subscription that you created using a personal Microsoft account (such as an oultook.com account), an “external” Entra ID account may have been automatically created in your Azure directory, and you may need to sign in using that account name.
See this Q and A thread for help.
- In the Azure Databricks account console, on the catalog page, select Create metastore.
- Create a new metastore with the following settings:
- Name:
metastore-xxxxxxx(where xxxxxxx is the unique value you’ve been using for resources in this exercise) - Region: Select the region where you created your Azure resources
- ADLS Gen 2 path:
data@storexxxxxxx.dfs.core.windows.net/(where storexxxxxx is the your storage account name) - Access Connector Id: The resource ID for your access connector (copied from its Overview page in the Azure portal)
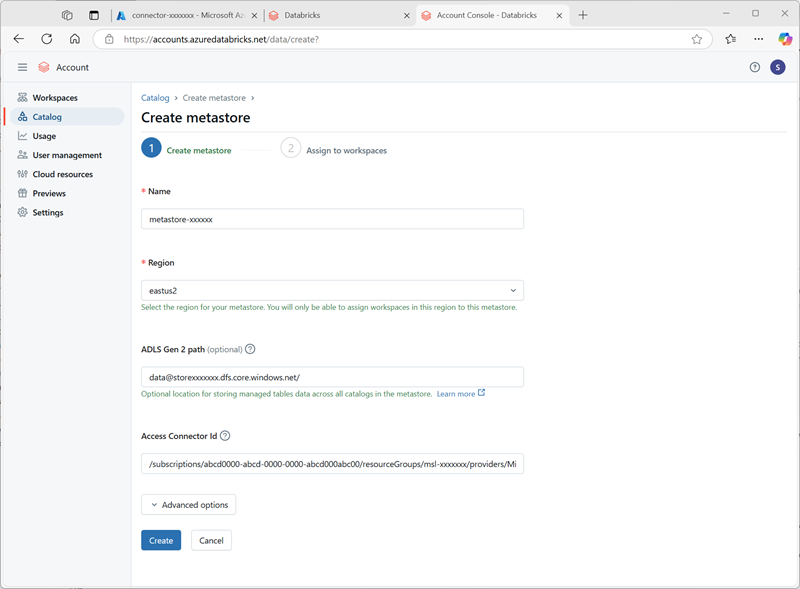
- Name:
-
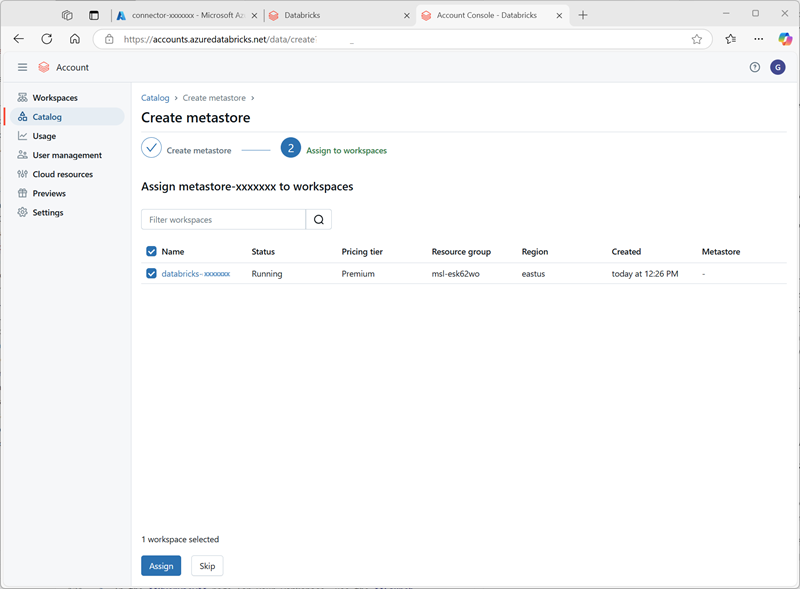
After creating the metastore, select the databricks-xxxxxxx workspace and assign the metastore to it.
Work with data in Unity Catalog
Now that you’ve assigned an eternal metastore and enabled Unity Catalog, you can use it to work with data in Azure Databricks.
Create and load a table
- Close the Azure Databricks account console browser tab and return to the tab for your Azure Databricks workapace. Then refresh the browser.
-
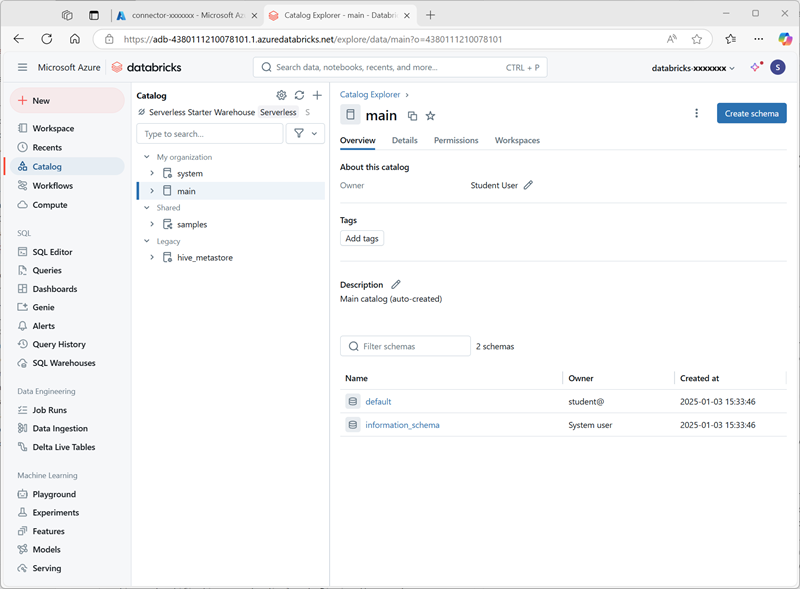
On the Catalog page, select the Main catalog for your organization and note that schemas named default and Information_schema have already been created in your catalog.
- Select Create Schema and create a new schema named
sales(leave the storage location unspecified so the default metastore for the catalog will be used). - In a new browser tab, download the products.csv file from
https://raw.githubusercontent.com/MicrosoftLearning/mslearn-databricks/main/data/products.csvto your local computer, saving it as products.csv. -
In the Catalog explorer in Azure Databricks workspace, with the sales schema selected, select Create > Create table. Then upload the products.csv file you downloaded to create a new table named products in the sales schema.
Note: You may need to wait a few minutes for serverless compute to start.
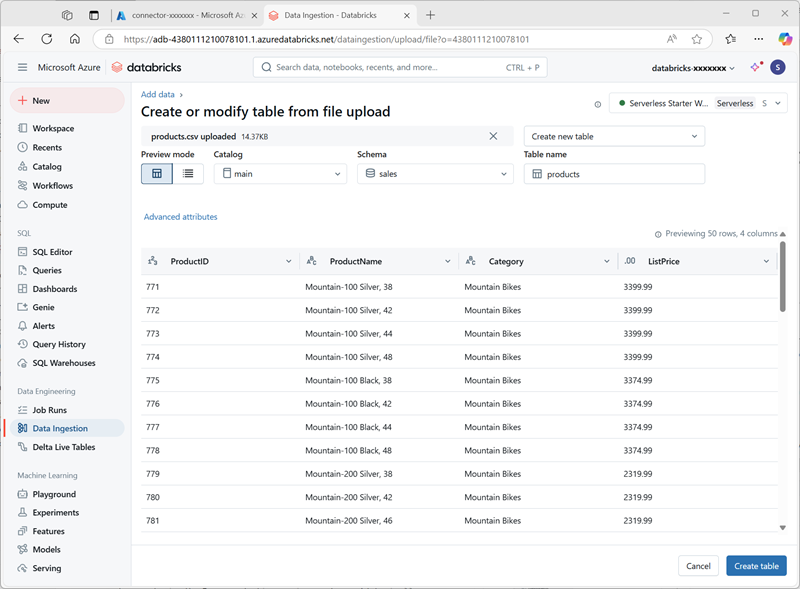
- Create the table. If an AI-generated description is suggested, accept it.
Manage permissions
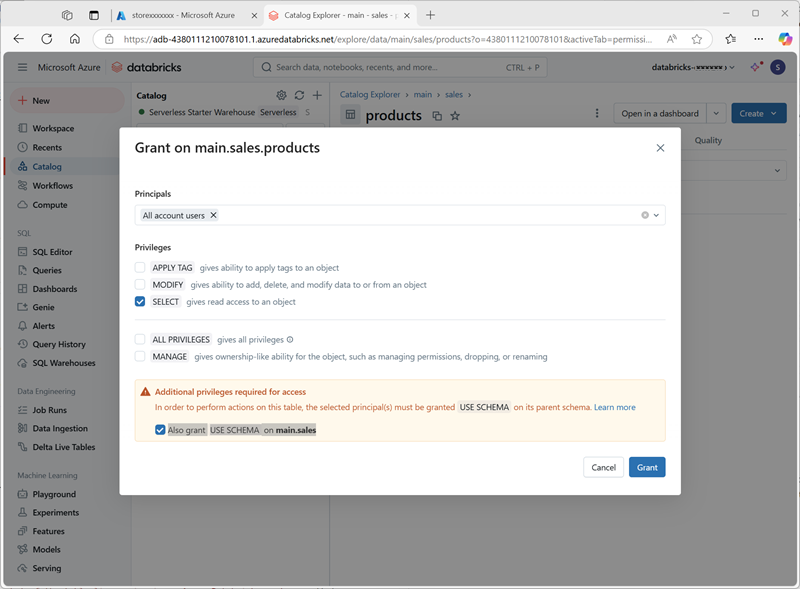
- With the products table selected, on the Permissions tab, verify that by default there are no permissions assigned for the new table (you can access it because you have full administrative rights, but no other users can query the table).
- Select Grant, and configure access to the table as follows:
- Principals: All account users
- Privileges: SELECT
- Additional privileges required for access: Also grant USE SCHEMA on main.sales
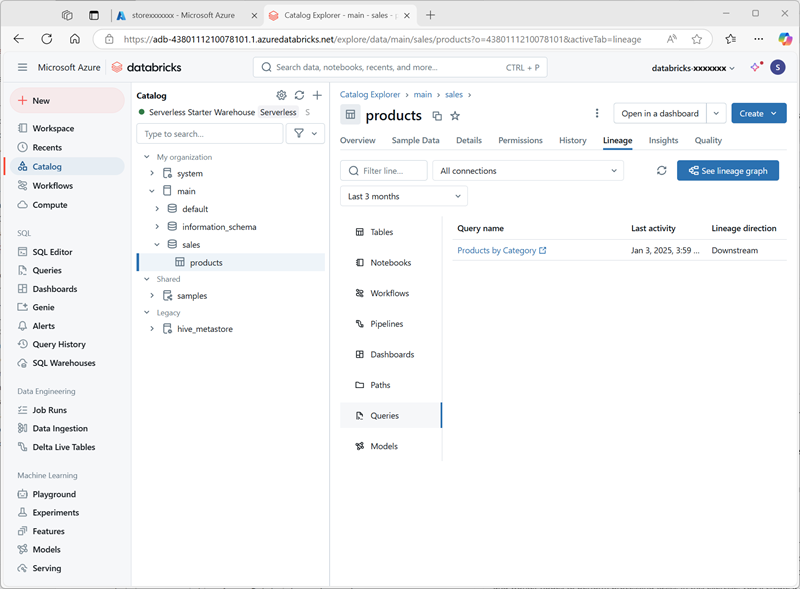
Track lineage
-
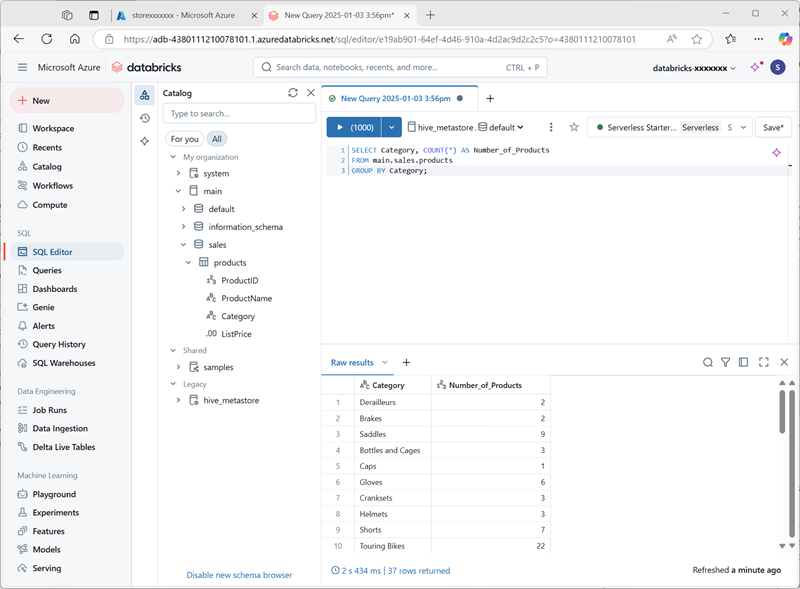
On the + New menu, select Query and create a new query with the following SQL code:
SELECT Category, COUNT(*) AS Number_of_Products FROM main.sales.products GROUP BY Category; -
Ensure serverless compute is connected, and run the query to see the results.
- Save the query as
Products by Categoryin the workspace folder for your Azure Databricks user account. - Return to the Catalog page. Then expand the main catalog and the sales schema, and select the products table.
-
On the Lineage tab, select Queries to verify that the lineage from the query you created to the source table has been tracked by Unity Catalog.
Clean up
In this exercise, you’ve enabled and configured Unity Catalog for an Azure Databricks workspace and used it to work with data in a metastore. To learn more about what you can do with Unity Catalog in Azure Databricks, see Data governance with Unity Catalog.
If you’ve finished exploring Azure Databricks, you can delete the resources you’ve created to avoid unnecessary Azure costs and free up capacity in your subscription.