Use Generative AI in Microsoft Copilot Studio
Scenario
In this lab, you will prepare your agent for production use by configuring grounding, fallback behavior, and safety controls while keeping generative AI enabled.
In this exercise, you will:
- Configure your agent to use generative AI only within approved knowledge sources
- Guide your agent to respond predictably and safely when it cannot answer a question
This exercise will take approximately 20 minutes to complete.
What you will learn
- How to constrain generative AI using grounding
- How to configure system topics for safe fallback behavior
Prerequisites
- Must have completed Lab: Create agent flows
Detailed steps
Exercise 1 - Configure authentication
Task - Configure authentication
-
If it’s not still open, go to the Microsoft Copilot Studio portal
https://copilotstudio.microsoft.comand ensure you are in the appropriate environment. -
Open the Real Estate Booking Service agent.
-
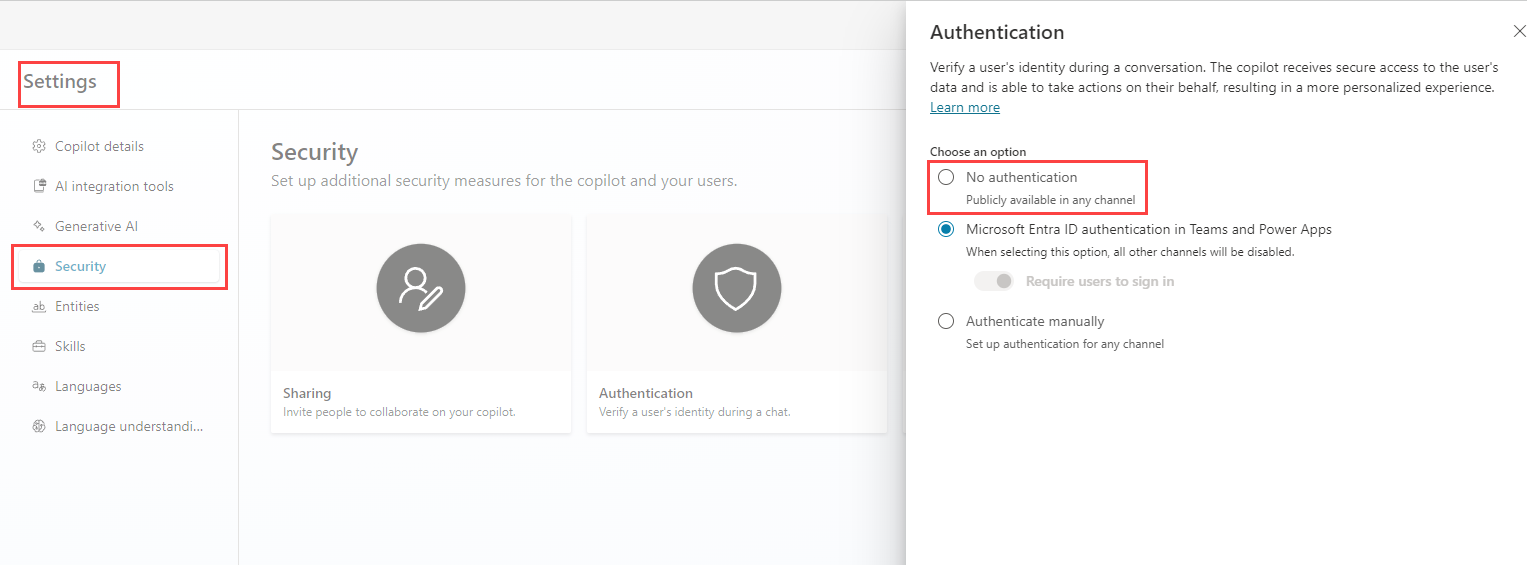
Select Settings in the upper-right of Real Estate Booking Service.
-
Select the Security tab.
-
Select Authentication.
-
Select Authenticate with Microsoft.
-
Select Save.
-
Select Save in the confirmation window.
-
Select the X in the upper-right to close out of the Settings.
-
Select Publish.
Exercise 2 - Ground generative answers to approved data
In this exercise, you will configure generative answers so the agent can only respond using approved knowledge.
Task 2.1 - Restrict generative answers in Conversational boosting
-
Select Topics
-
Filter by System topics.
-
Open the Conversational boosting topic.
-
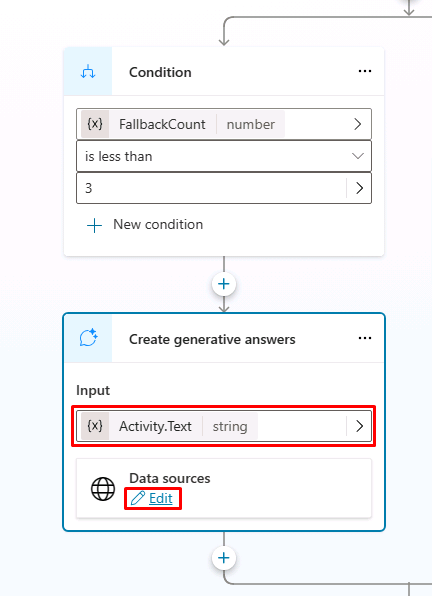
Select the Create generative answers node.
-
Select Edit for Data sources.
-
Select Search only selected sources.
-
Select Add knowledge.
-
Select the Real Estate Property Dataverse table and Add to agent.
-
Check both the website and the Real Estate Property table as the knowledge sources.
-
Scroll down and disable Allow the AI to use its own general knowledge.
-
Select Save.
The agent can no longer answer open-ended questions using general model knowledge.
Exercise 3 - Replace default fallback with a grounded fallback
In this exercise, you will reconfigure the system fallback behavior.
Task 3.1 - Use generative answers in System fallback topic
-
Select the Topics tab and select the System filter.
-
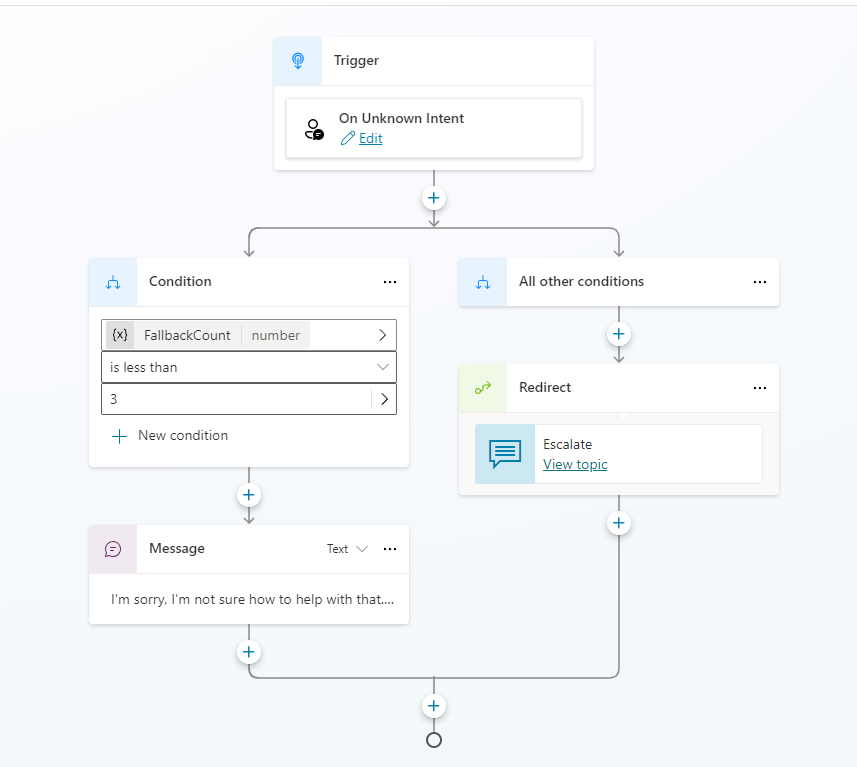
Select the Fallback topic.
-
Select the ellipses (…) menu in the Message node and select Delete.
-
Select the the + icon under the Condition node, select Advanced > Generative answers.
-
In the Input field, select the System tab and select Activity.Text.
-
Select Edit under Data sources.
-
Select Search only selected sources.
-
Add the website and the Real Estate Property Dataverse table.
-
Scroll down and disable Allow the AI to use its own general knowledge.
-
Select the Customize checkbox under Content moderation level and select Medium.
-
Select Save.
When an agent cannot answer a question, it will respond safely using grounded data instead of guessing.
Task 3.2 - Add a controlled fallback response
-
In the Fallback topic, add a Send a message node after the Generative answers node.
-
Enter the following message:
Sorry, I don’t have enough information to help with that request. I can assist with booking real estate showings or questions related to available properties. -
Select Save.
The agent now communicates scope and limitations clearly instead of generating ambiguous responses. Note that the Fallback topic only triggers when the agent cannot confidently select any topic of generative answer path. The Fallback topic is only for unknown intent.
Exercise 4 - Validate production behavior through action
In this exercise, you will ask your agent questions that are both inside and outside of its scope of knowledge.
Task 4.1 - Trigger a supported scenario
-
Open the Test panel.
-
Start a new test session.
-
Ask a question that is supported by your configured knowledge, such as
Is there a property on Oak Lane?
The agent should respond using grounded, approved data.
Task 3.2 - Trigger an unsupported scenario
- In the same test session, ask a question outside the agent’s scope, such as
What's for dinner?
The agent should avoid guessing at an answer.
Summary
In this lab, you actively configured generative AI behavior for production readiness by:
- Grounding generative answers to approved data
- Replacing default fallback behavior
- Enforcing safe, scoped responses
Challenge - Add knowledge from a file
For an added challenge, add a file as an additional knowledge source for your agent. Ensure that it is also added for Conversational boosting.
To download the file: open a new window and navigate to https://download.microsoft.com/documents/customerevidence/Files/4000007499/SummitRealtyCaseStudy.docx