Create agent flows
Scenario
In this lab, you will use the structured values collected in earlier labs (such as property type, property name, and visit date) to retrieve data from Dataverse and create a booking request in Dataverse.
In this exercise, you will:
- Create an agent flow
This exercise will take approximately 30 minutes to complete.
What you will learn
- How to create a tool for running an agent flow in Copilot Studio
High-level lab steps
- Create an agent flow to retrieve Dataverse data
- Create an agent flow to create Dataverse data
Prerequisites
- Must have completed Lab: Work with entities
Detailed steps
Exercise 1 - Create a tool to retrieve data property data from Dataverse
In this exercise, you will create an agent flow that retrieves a property based on user‑provided criteria.
Task 1.1 - Create the Get Property agent flow
-
Navigate to the Microsoft Copilot Studio portal
https://copilotstudio.microsoft.comand ensure you are in the appropriate environment. -
Select Agents from the left navigation pane.
-
Open the Real Estate Booking Service agent.
-
Select the Tools tab.
-
Select + Add a tool.
-
Select Add new Workflows.
-
Select the trigger step When an agent calls the flow and select + Add an input.
-
Select Text.
-
Enter
Bedroomsfor Input andNumber of Bedroomsfor Please enter your input.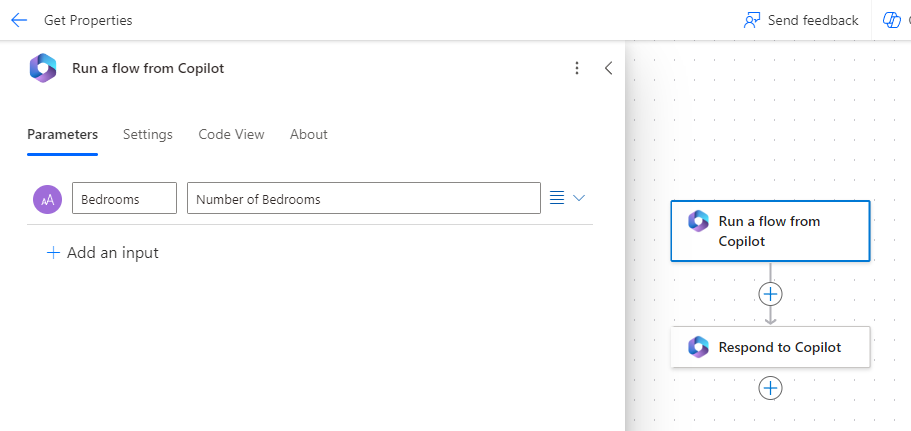
-
Select Save draft near the upper-right of the page.
-
Select the Overview tab.
-
Select Edit in the Details section.
-
Rename the agent flow
Get Property -
Select Save.
-
Select the Designer tab.
Task 1.2 - Retrieve data from Dataverse
-
Select the + icon between the two steps in the flow to add a new action.
-
Enter
Dataversein the Search field and select See more for the Microsoft Dataverse connector.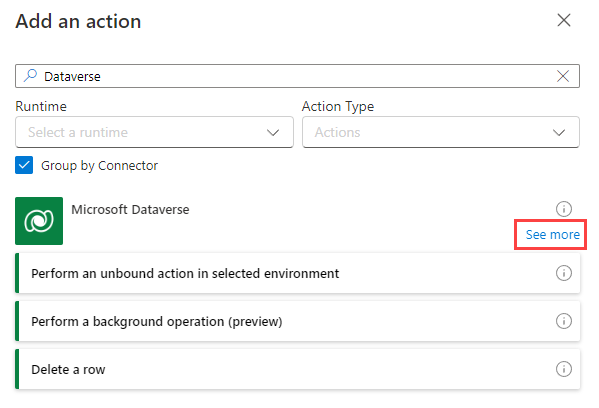
-
Select the List rows action.
-
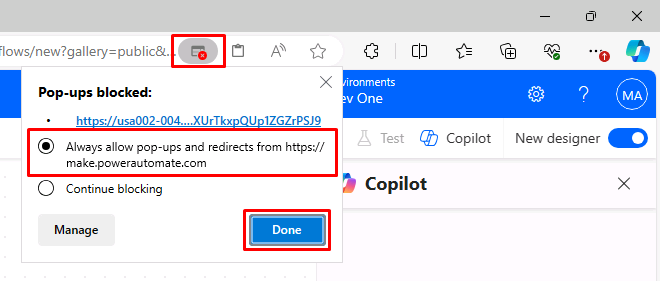
If prompted for authentication, enter
Lab connectionfor Connection name, select OAuth for Authentication Type, and select Sign in, and use your tenant credentials and Allow access.Note: If you see a ‘Failed to create OAuth connection’ error, you may need to allow popups in your browser.

-
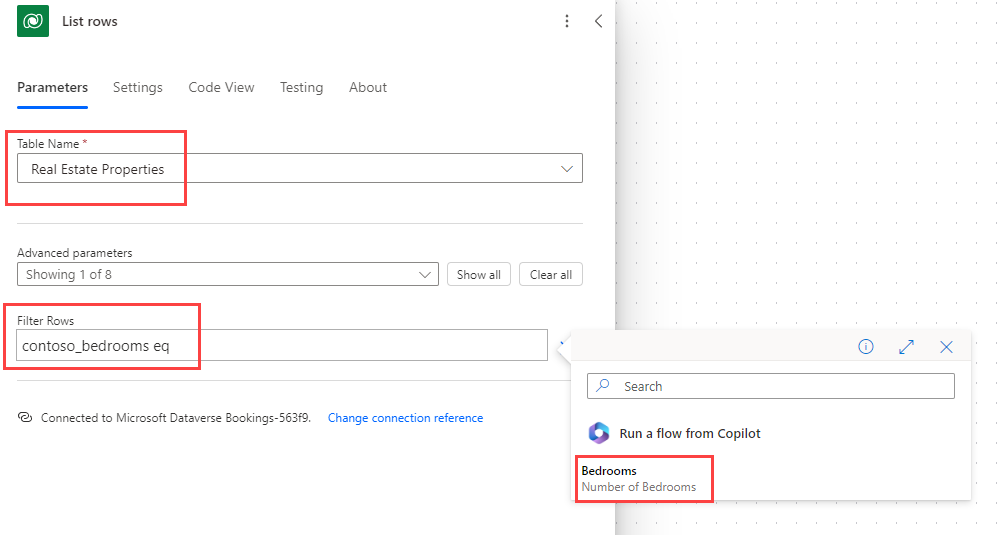
Select Real Estate Properties for table name.
-
Enter
contoso_bedrooms eq(with a space after eq) in the Filter Rows field. -
With the Filter Rows field still selected, select the lightning icon to its right, then select the Bedrooms parameter.
-
Select Save draft near the upper-right of the page.
Task 1.3 - Return results to agent
-
Select the Respond to the agent node in the authoring canvas and select + Add an output.
-
Select Text.
-
Enter
PropertyIdfor Enter a name -
Select the Enter a value to respond with field, and select fx (Insert Expression).
-
Enter the following expression into the top field:
first(outputs('List_rows')?['body/value'])['contoso_realestatepropertyid'] -
Select Add.
-
Select + Add an output.
-
Select Text.
-
Enter
PropertyNamefor Enter a name. -
Select the Enter a value to respond with field, and select fx (Insert Expression).
-
Enter the following expression:
first(outputs('List_rows')?['body/value'])['contoso_propertyname']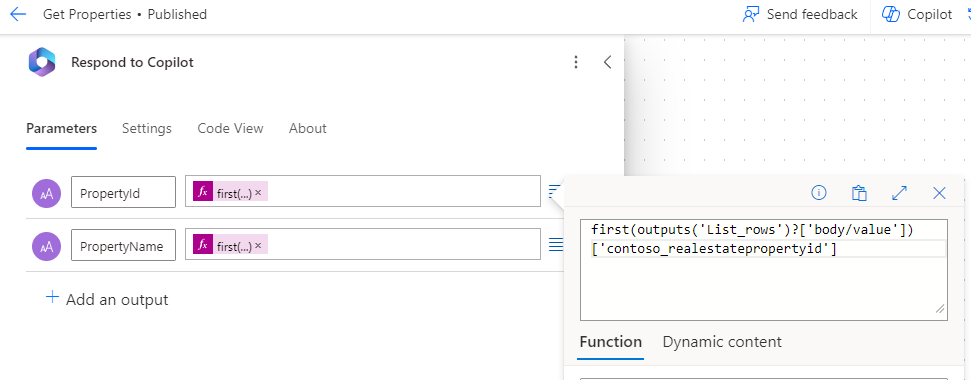
-
Select Add.
-
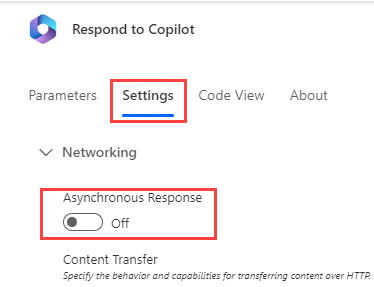
Select the Settings tab in the Respond to the agent pane.
-
Ensure that Asynchronous Response is set to Off.
-
Select Save draft near the upper-right of the page.
-
Select Publish.
-
Navigate back to the Real Estate Booking Service agent in Microsoft Copilot Studio.
-
Select the Tools tab.
-
Select the Get Property agent flow tool that you just created.
[!NOTE] If you don’t see the agent flow in the list of tools, select + Add a tool, select the Workflows tab, and select the Get Property agent flow. Select Add and configure.
-
In the Details section, update the Description to
Get properties with the right number of bedrooms. -
Select Save
-
Select the Tools tab and see the Get Property flow you created.
-
Select Publish.
Task 1.4 - Add the Get Property tool to the topic
-
Select the Topics tab.
-
Select the Book Showing topic.
-
Select the the + icon below the How many bedrooms do you need? question node, select Add a tool, select the Tool tab, and then select the Get Property agent flow.
-
In the Get Property action pane, select the variable list for Bedrooms (String) and choose the NumberofBedrooms variable.
-
Select the ellipses (…) in the Which property do you want to see? question node and select Delete.
-
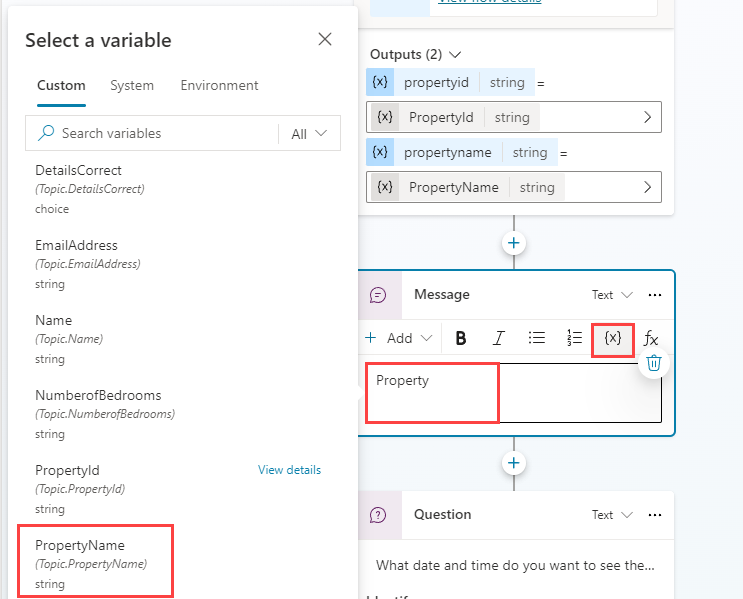
Select the the + icon under the Tool node and select Send a message.
-
In the Enter a message field, enter
Property(with a space following it). -
In the same node, select the {X} (Insert variable) icon and select the propertyname variable.
-
Select Save.
Exercise 2 - Create a tool to create a booking request
Microsoft Copilot Studio can create data in Microsoft Dataverse using agent flows.
Task 2.1 - Create agent flow to make a booking
-
Select the Tools tab in Real Estate Booking Service.
-
Select + Add a tool.
-
Under Create new, select Add new Workflows .
-
Select Save draft and wait for the agent flow to save.
-
Select the Overview tab
-
Select Edit in the Details section.
-
Rename the agent flow
Create Booking Request -
Select Save.
-
Select the Designer tab.
-
Select the trigger step When an agent calls the flow and select + Add an input.
-
Select Text.
-
Enter
PropertyIdfor Input andPropertyfor Please enter your input. -
Select + Add an input.
-
Select Text.
-
Enter
ViewerNamefor Input andViewer Namefor Please enter your input. -
Select + Add an input.
-
Select Text.
-
Enter
ViewerEmailfor Input andViewer Emailfor Please enter your input.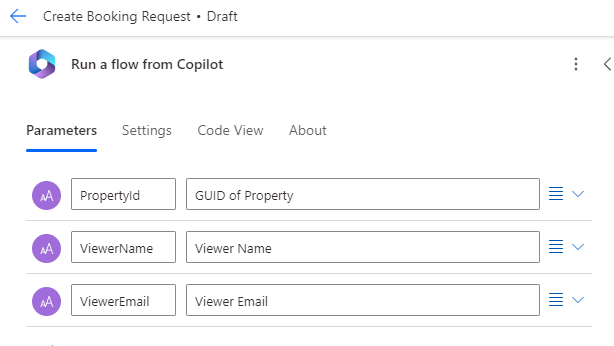
-
Select the + icon between the two steps in the flow to add a new action.
-
Enter
Dataversein the Search field and select See more for the Microsoft Dataverse connector. -
Select the Add a new row action.
-
Select Booking Requests for table name.
-
Enter
Copilot bookingin the Booking Name field. -
Select Show all under Advanced parameters.
-
Enter
contoso_bookingrequests()in the Property (Real Estate Properties) field, move the cursor within the parentheses, select the lightning icon, then select the PropertyId parameter. -
Select the Viewer Email field, select the lightning icon, then select the ViewerEmail parameter.
-
Select the Viewer Name field, select the lightning icon, then select the ViewerName parameter.

-
Select the Respond to the agent action and open the Respond to the agent pane.
-
Select the Settings tab.
-
Ensure that Asynchronous Response is set to Off.
-
Select Save draft in the upper-right of the window.
-
Wait for the save to complete, then select Publish.
Task 2.2 - Validate your tools
-
Return to your Real Estate Booking Service agent.
-
Select the Tools tab and validate that both of your agent flows are in the list. If not, select + Add a tool > Workflows > and select the missing agent flow. Select Add and configure.
Task 2.3 - Add the Create Booking Request tool to the topic
-
Select the Topics tab.
-
Select the Book Showing topic.
-
Select the the + icon above the End all topics node at the bottom, select Add a tool, then select the Create Booking Request agent flow.
-
Select the PropertyId variable for the PropertyId input parameter.
-
Select the Name variable for the ViewerName input parameter.
-
Select the EmailAddress variable for the ViewerEmail input parameter.
-
Select Save.
-
Select the Action node you just created for the Create Booking Request tool.
-
Select Copilot.
-
In What do you want to do?, enter:
After this action runs, send a message that the Real Estate Booking has been scheduled and thank the user. -
Select Update.
-
Select Save.
A Message node has been created. Revise the message as desired to let the user know that a booking has been scheduled.
Exercise 3 - Test your agent
Task 3.1 - Make a booking request
-
Open the Test panel.
-
If it’s not enabled, enable Track between topics.
-
Select the Start new test session icon at the top of the testing panel.
-
When the Conversation Start message appears, your agent will start a conversation. In response, enter a trigger phrase for the topic that you’ve created:
I want to book a real estate showing -
Enter a name and email address.
-
After you supply the information, an Adaptive Card displays the information that you entered and asks if the details are correct. Select Yes.
-
Select House for the type of property prompt.
-
Enter
3for the number of bedrooms prompts.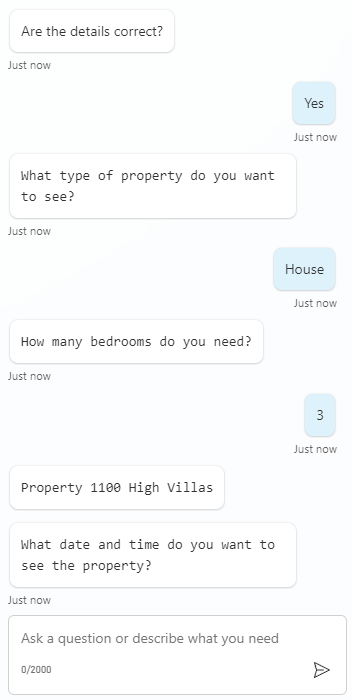
-
Enter
Tomorrow 2:00 PMto the What date and time do you want to see the property? prompt.
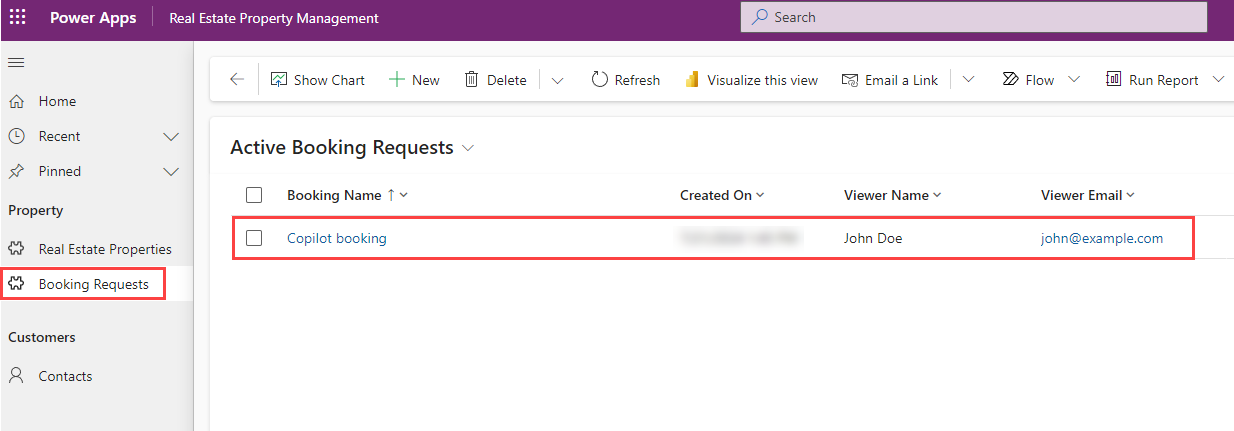
A Booking Request should be created based on the information you have given the agent.
Task 3.2 - Verify the booking request
-
Navigate to
https://make.powerapps.comin a new tab. -
Make sure you are in the appropriate environment.
-
Select Apps in the left navigation.
-
Select Play on the Real Estate Property Management model-driven app.
-
In the left navigation, select Booking Requests. View the booking request your agent just created for you.