Use workflows as tools
Scenario
In this exercise, you will:
- Create an agent
- Create workflows
- Add workflows as tools
- Use tools in the agent and in topics
- Test the agent
This exercise will take approximately 45 minutes to complete.
What you will learn
- How workflows enable agents to perform deterministic actions
- How to configure workflows as tools
- How to use workflows in a topic
High-level lab steps
- Create an agent using Copilot
- Create a workflow to send a message to Microsoft Teams
- Add the workflow as a tool to the agent
- Create a workflow and add to a topic
Prerequisites
- Have a Microsoft Entra ID account
- Have a Copilot Studio license or have signed up for a free trial.
- Have access to a Power Platform environment and a solution where you can create agents and related assets.
- Have access to Microsoft Teams and permission to post messages to a Teams channel.
- You can use:
- the environment and Lab Exercises solution created in the ILT Setup lab, or
- your own existing environment and solution.
- If you do not already have an environment and solution prepared, complete the steps in the ILT Setup lab before continuing.
[!IMPORTANT] You may notice a new Copilot Studio experience that is currently in preview. These labs use the current Copilot Studio interface, so some steps and screenshots may not match the preview experience. To follow the lab instructions successfully, use the current Copilot Studio UI throughout these exercises.
Key concept: Agent components and behavior
When generative orchestration is enabled, the agent can use instructions, knowledge, topics, and tools to generate responses dynamically. The agent can use tools to perform actions in external systems, retrieve data, and send messages. Tools are typically used for performing actions or retrieving external data, while topics guide structured conversational flows.
Exercise 1 - Create an agent
In this exercise, you will create a new agent using natural language to analyze, categorize, and prioritize tasks.
Task 1.1 – Create an agent to analyze tasks
-
In the Copilot Studio home page
https://copilotstudio.microsoft.com/, verify that you are working in the environment you want to use for this exercise. -
Select Agents in the left-hand navigation.
-
In the bottom-left of the Start building by describing what your agent needs to do text box, select the Agent Settings icon, which is displayed as a Cog image.

-
Leave English (United States) set as the primary language for the agent.
-
In the Solution drop-down, select Lab Exercises or another solution you want to use for this exercise.
-
Enter
analyzetaskagentfor the Schema name. -
Select Update.
-
In the Start building by describing what your agent needs to do text box, Enter the following prompt:
You are an agent that analyzes, categorizes, and prioritizes tasks. -
Select the Send icon.
Once your agent has been provisioned, you may proceed with configuring your agent.
Exercise 2 - Create a workflow tool
In this exercise, you create a workflow that sends a message to Microsoft Teams. You will add this workflow to the agent.
[!NOTE] Agent responses, orchestration behavior, and tool usage may vary slightly from the screenshots shown in this lab depending on your tenant configuration and model behavior.
Task 2.1 – Create the Send Message to Teams workflow
-
In Copilot Studio, select Tools in the left-hand navigation.

-
Select + New tool.
-
In the New Tool dialog, select the Agent flow tile.
-
Verify that the When an agent calls the flow trigger and the Respond to the agent action have been added to the workflow.
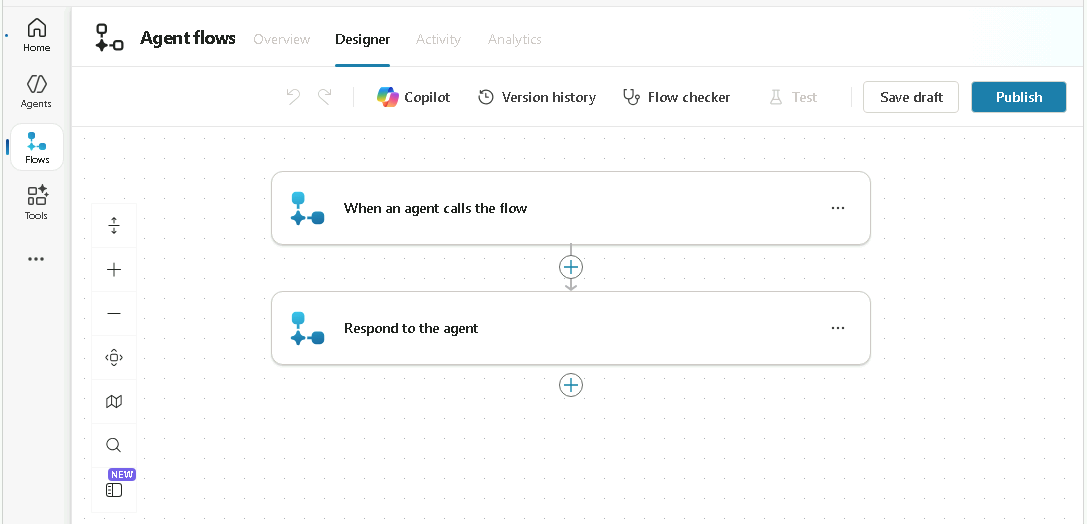
-
Select the trigger step When an agent calls the flow and select + Add an input.
-
Select Text.
-
Enter
Task Summaryfor Input andAnalyzed tasksfor Please enter your input.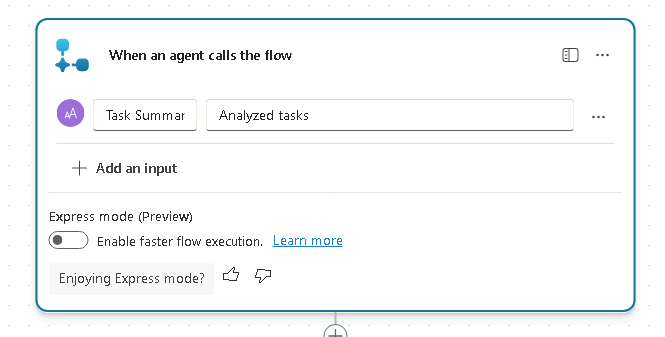
-
Select Save draft near the upper-right of the page.
-
Select the Overview tab.
-
In the Details section, select Edit.
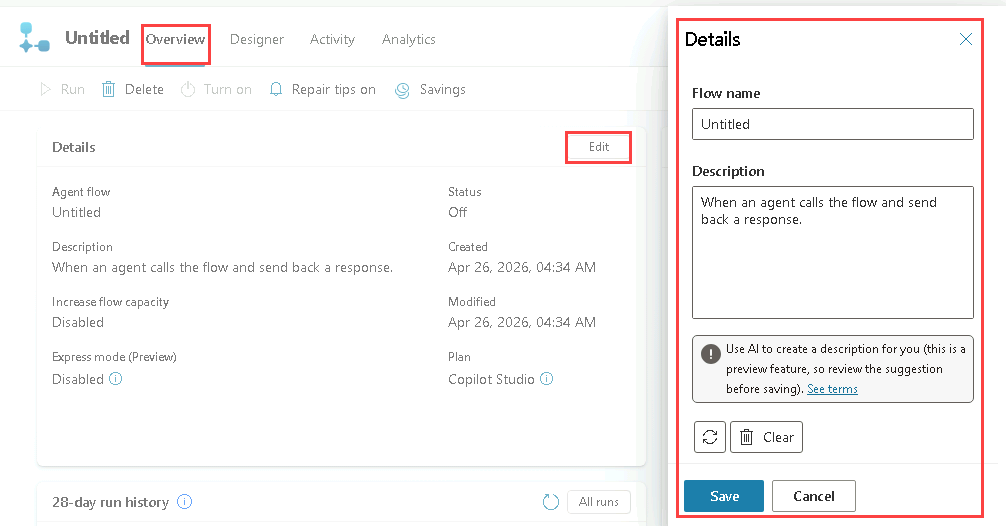
-
In the Details pane, update Flow name to
Send Summary to Teams. -
For Description, enter
Post a message to Teams with the summary of the task analysis. -
Select Save.
Task 2.2 - Post to Teams action
-
Select the Designer tab.
-
Select the + icon between the two steps in the workflow to insert a new action.
-
Enter
Teamsin the Search field and select See more for the Microsoft Teams connector.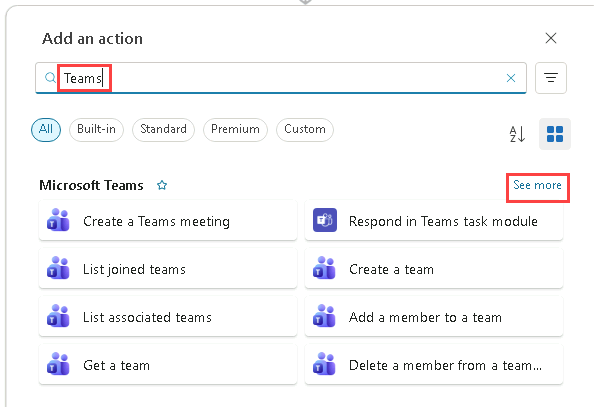
-
Select the Post message in a chat or channel action.
-
Select Sign in.
[!NOTE] If you receive the error “Failed to create OAuth connection: ClientWarning: The browser has blocked the connection authentication popup window”, select the pop-up blocked icon in the browser address bar and then select Always allow pop-ups and redirects from
https://copilotstudio.microsoft.com. -
Select your account.
-
In the Confirmation required dialog, select the I have verified this request and trust the source checkbox, then select Allow access.
-
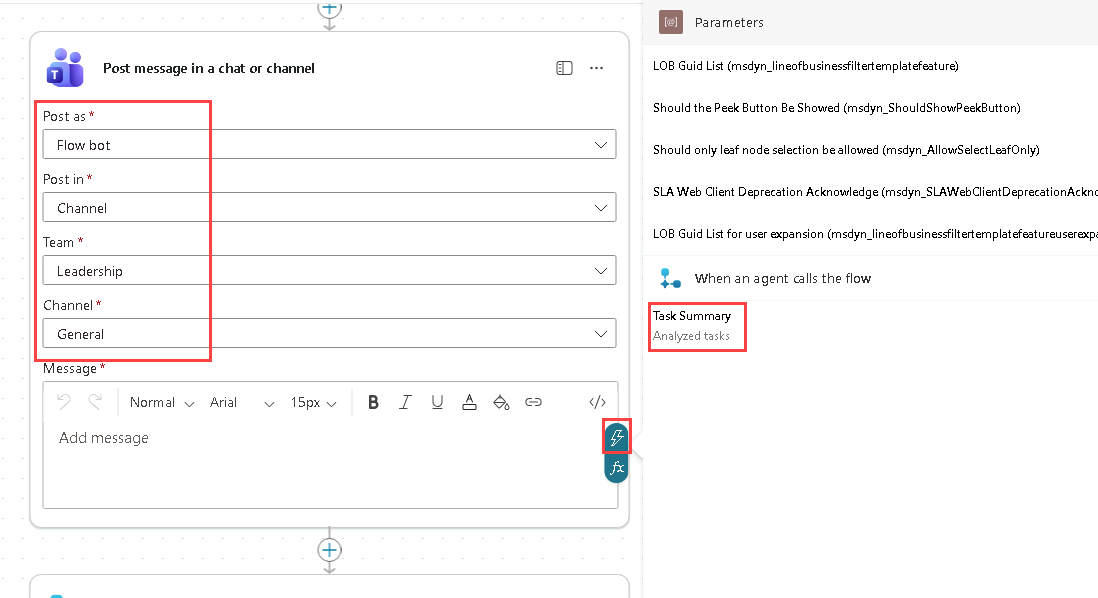
For Post as, select Flow bot.
-
For Post in, select Channel.
-
For Team, select a team from the list, for example, Leadership.
-
For Channel, select a channel from the list, for example, General.
-
For Message, use Dynamic Content to select Task Summary.
Task 2.3 - Response action
-
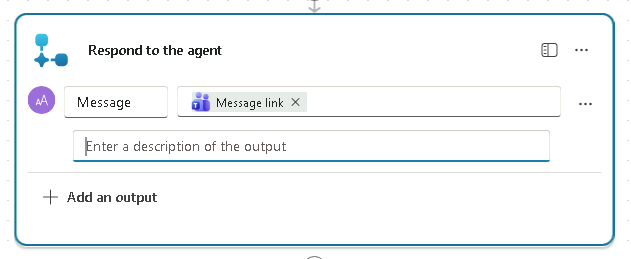
Select the Respond to the agent node in the authoring canvas and select + Add an output.
-
Select Text.
-
For Enter a name, enter
Message. -
For Enter a value to respond with, use Dynamic Content and select the Message link from the Teams action.
-
Select Save draft near the upper-right of the page.
-
Select Publish near the upper-right of the page.
-
In Copilot Studio, select Tools in the left-hand navigation to verify the workflow status is Ready.
Task 2.4 - Add workflow as a tool to the agent
-
Select Agents from the left navigation pane.
-
Open the Task Analysis agent.
-
Select the Tools tab.
-
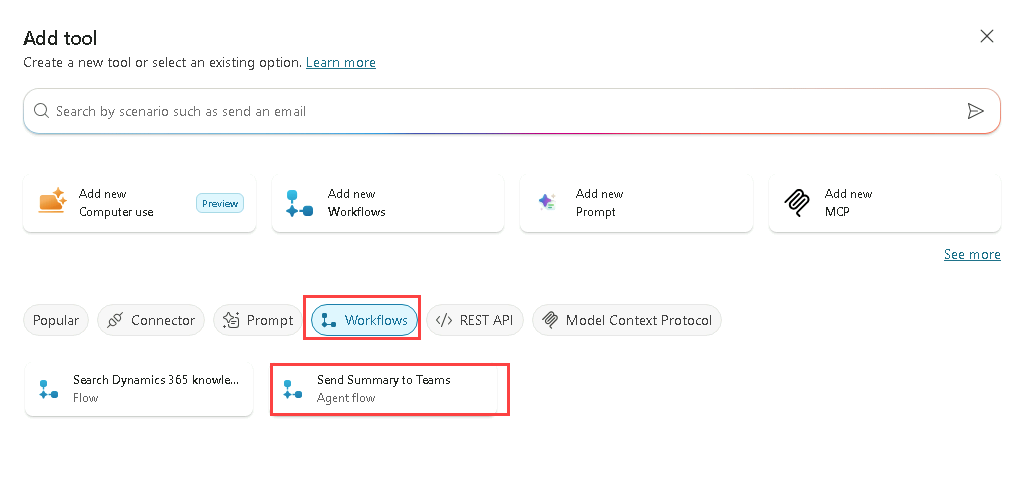
Select + Add a tool.
-
In the Add tool dialog, select the Workflows filter.
-
Select the Send Summary to Teams workflow.
-
Select Add and configure.
-
In the Details section, for Description, enter
Sends a summary of the completed task analysis to a Microsoft Teams channel. -
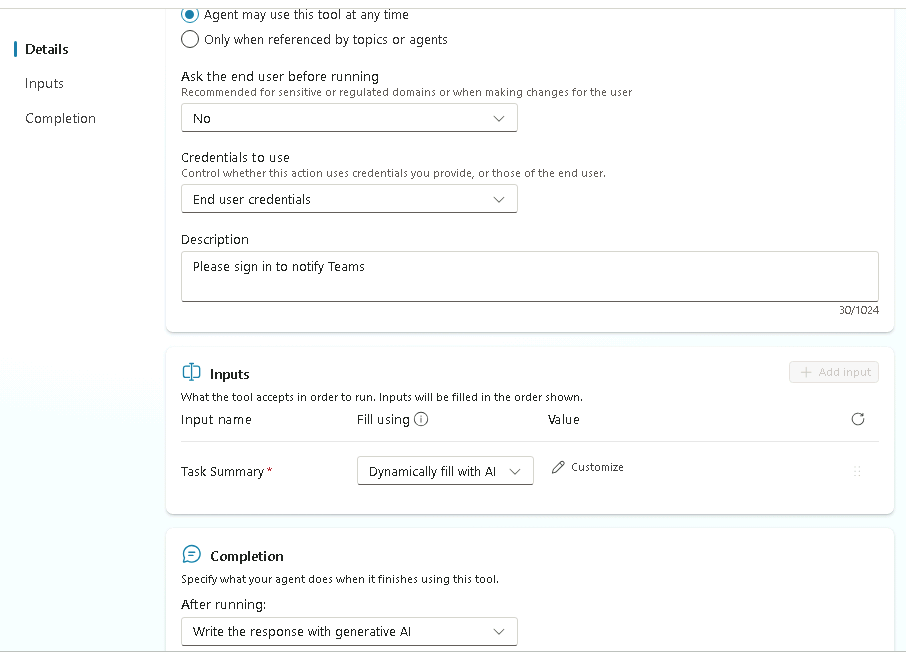
Expand Additional details and select or enter the following:
- When this tool may be used: Agent may use this tool at any time
- Ask the end user before running: No
- Credentials to use: End user credentials
- Description:
Please sign in to notify Teams
-
In the Inputs section, for Fill using select Dynamically fill with AI. This allows the agent to determine the appropriate input value dynamically from the conversation context.
-
In the Completion section, for After running, select Write the response with generative AI.
-
Select Save.
Task 2.5 - Update agent instructions
-
Select the Overview tab.
-
In the Instructions section, select Edit.
-
Under the # Step-by-Step Instructions in the agent instructions, add the following to the final step:
Use theand type/and select the Send Summary to Teams tool and then enter ` when the task analysis is complete.`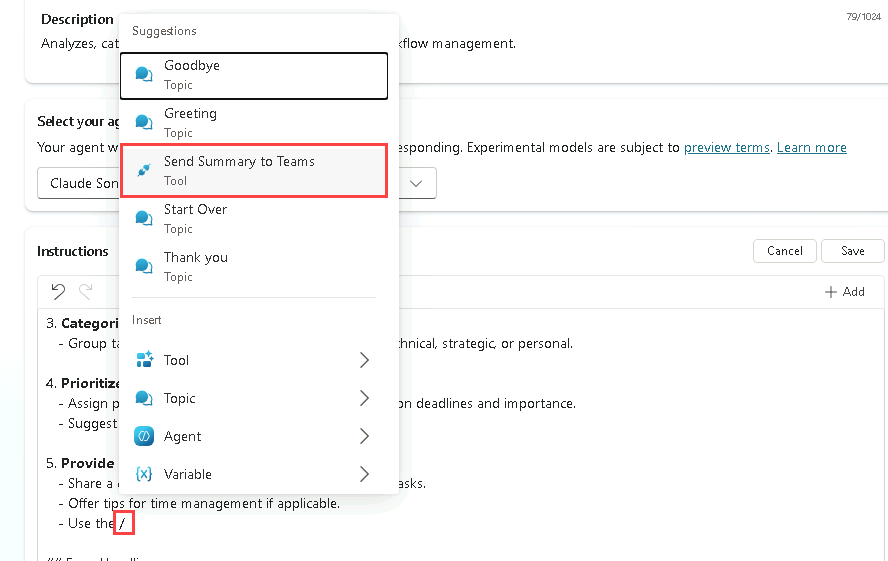
-
Select Save.
Task 2.6 - Test the workflow tool in the agent
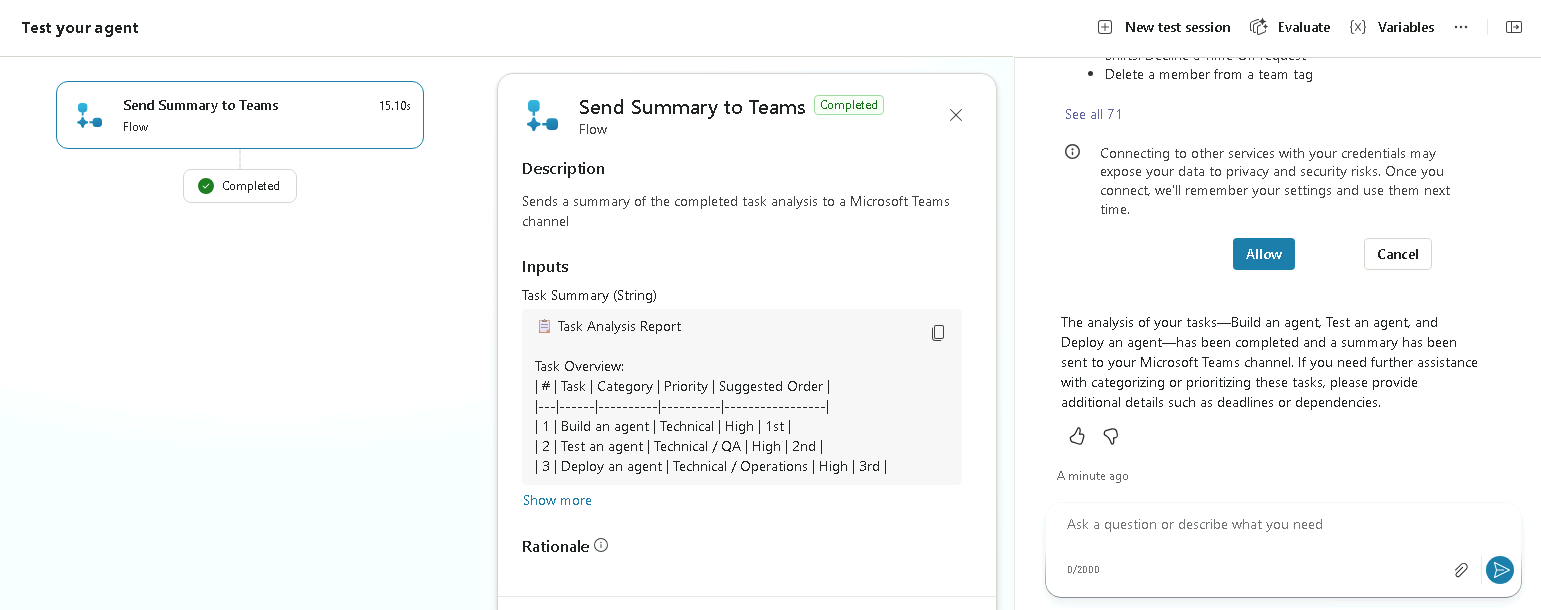
-
Select the Test icon in the upper-right of the page to open the testing pane.
-
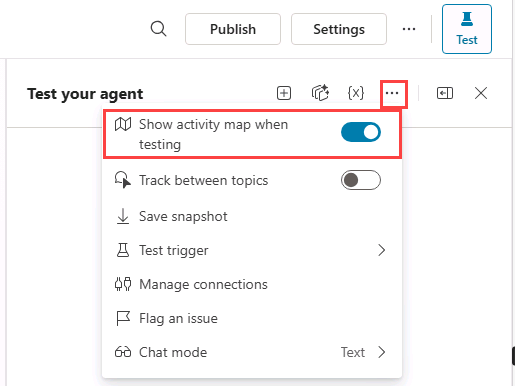
In the Test pane, select the ellipses (…) next to the variables {x} icon, and toggle Show activity map when testing to On and Track between topics to Off.
-
At the top of the Test pane, select the Start new test session icon +.
-
When the Conversation Start message appears, your agent will start a conversation. In response, let’s try to trigger the topic that you’ve created:
Analyze this list of tasks 1. Build an agent, 2. Test an agent, 3. Deploy an agent -
If prompted to connect to Microsoft Teams, select Allow.
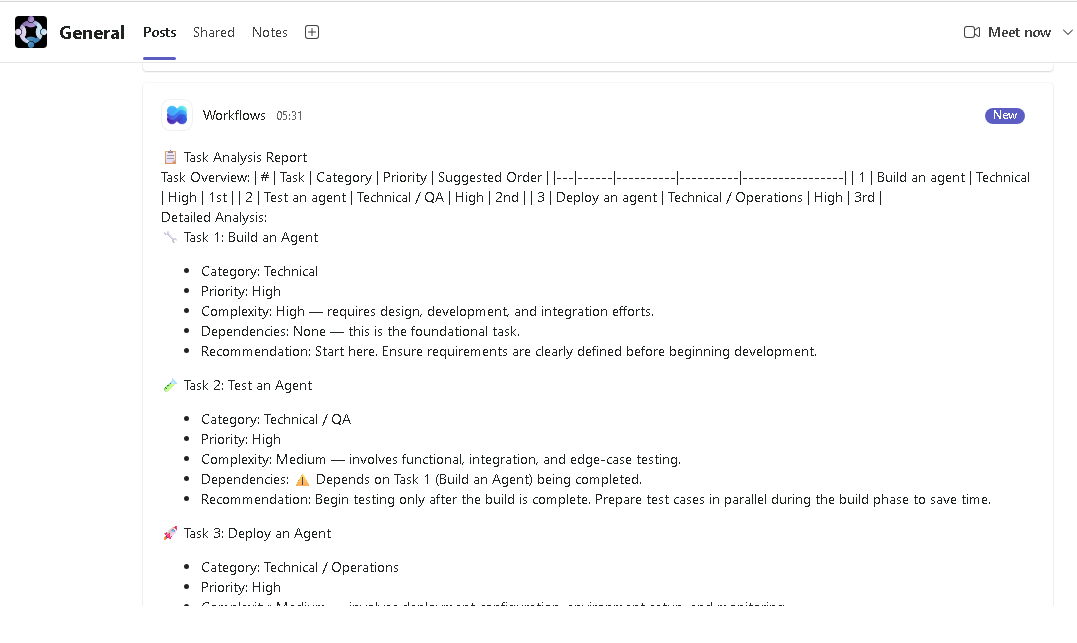
-
In a new browser tab, navigate to
https://teams.cloud.microsoft/and sign in if prompted. -
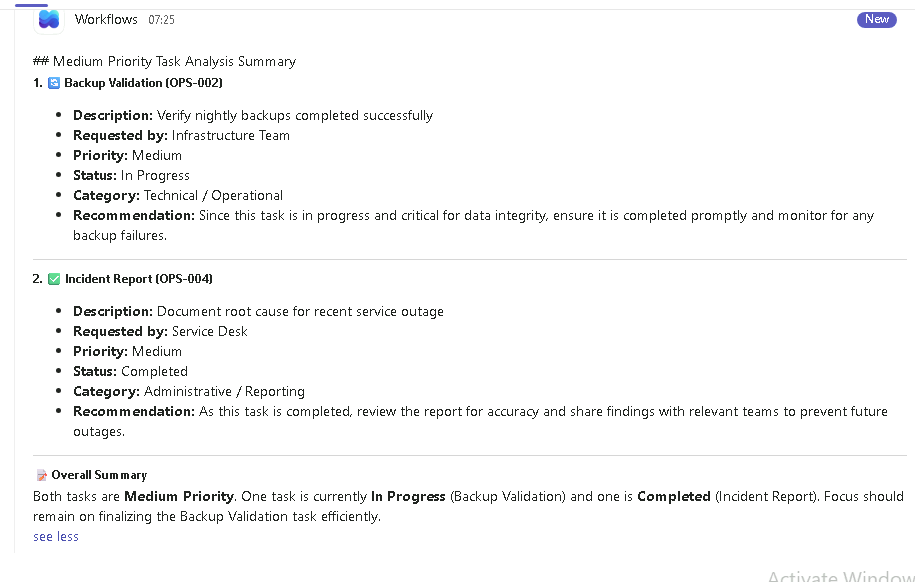
Navigate to the Team and channel you selected earlier in the workflow and verify the task analysis summary was posted to the Teams channel.
Exercise 3 - Create a workflow tool that analyzes an Excel file in a topic
In this exercise, you will use Copilot to create a topic from a description, create a workflow tool that analyzes the tasks in an Excel file, and call the tool from a topic.
Task 3.1 - Create an Excel file
[!NOTE]
If you have issues creating this spreadsheet you can download a copy from this link Download the file
-
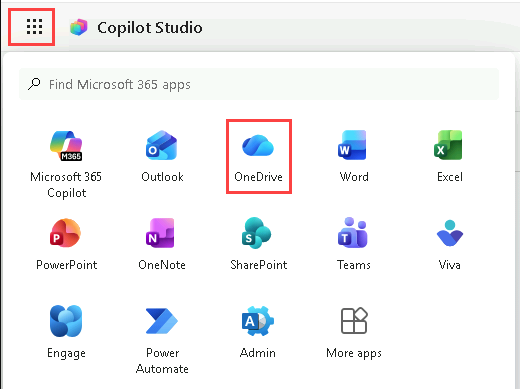
In Copilot Studio, select the App launcher icon in the upper-left corner, then select OneDrive.
-
If prompted, skip any welcome messages.
-
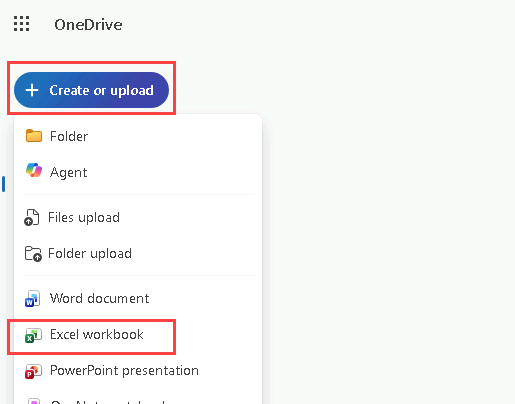
Select + Create or upload.
-
Select Excel workbook.
-
In the upper-left of the Excel workbook, rename the file by selecting Book and entering
Operations tasks.
-
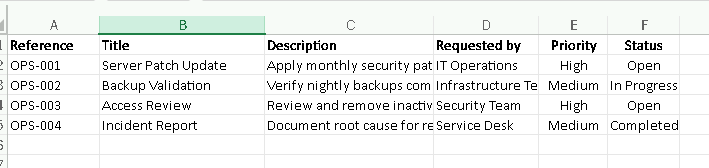
Create the following columns in the first row:
ReferenceTitleDescriptionRequested byPriorityStatus
-
In the second row, enter for the first task:
OPS-001Server Patch UpdateApply monthly security patches to production serversIT OperationsHighOpen
-
In the third row, enter for the second task:
OPS-002Backup ValidationVerify nightly backups completed successfullyInfrastructure TeamMediumIn Progress
-
In the fourth row, enter for the third task:
OPS-003Access ReviewReview and remove inactive user accountsSecurity TeamHighOpen
-
In the fifth row, enter for the fourth task:
OPS-004Incident ReportDocument root cause for recent service outageService DeskMediumCompleted
-
Select the rows and columns containing data (A1:F5), and in the toolbar select the Insert tab, and select Table, check the box My table has headers, then select OK.
-
Select the Table Design tab and in the upper-left change the name of the table from Table1 to
Tasks.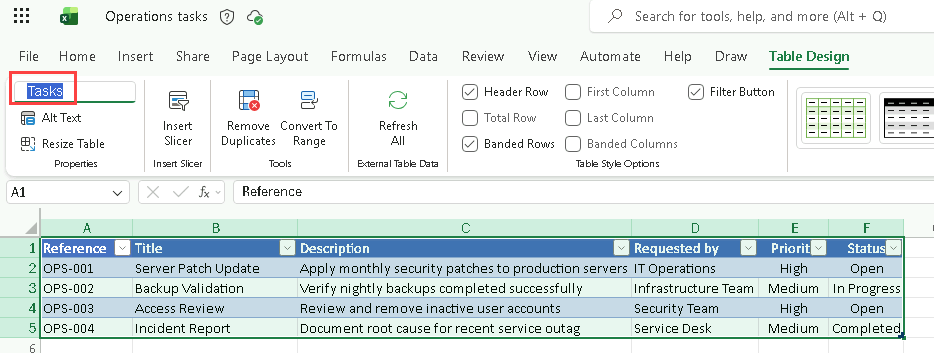
-
Close the browser tab containing the Excel workbook.
-
In OneDrive, select My files and verify that the Operations tasks Excel workbook is listed.
-
Close the OneDrive browser tab.
Task 3.2 – Create the Analyze Excel tasks workflow
-
In Copilot Studio, in the left-hand navigation, select Tools.
-
Select + Add a tool.
-
In the Add tool dialog, select the Agent flow tile.
-
Verify that the When an agent calls the flow trigger and the Respond to the agent action have been added to the workflow.
-
Select the trigger step When an agent calls the flow and select + Add an input.
-
Select Text.
-
Enter
Priorityfor Input andPriority of Tasksfor Please enter your input. -
Select Save draft near the upper-right of the page.
-
Select the Overview tab.
-
In the Details section, select Edit.
-
In the Details pane, update Flow name to
Get Task List. -
For Description, enter
Retrieve a list of tasks with a matching priority. -
Select Save.
-
Select the Designer tab.
-
Select the + icon between the two steps in the workflow to insert a new action.
-
Enter
Excelin the Search field and select See more for the Excel Online (Business) connector. -
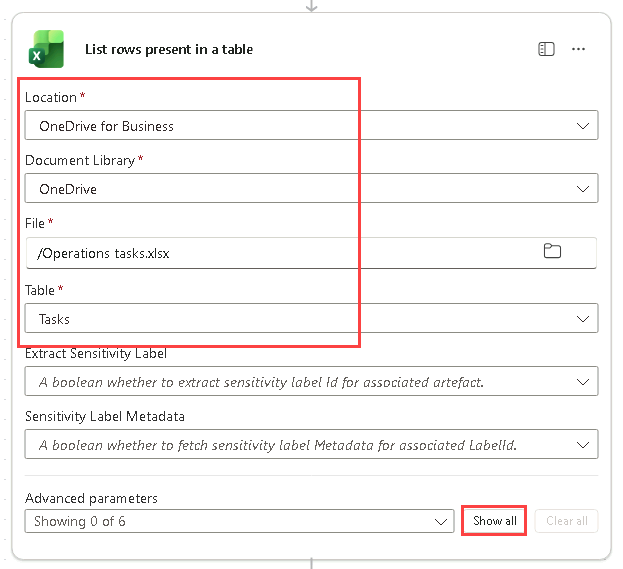
Select the List rows present in a table action.
-
Select Sign in to create a connection.
-
In the Sign into your account dialog, select the account you are using for this lab environment (such as MOD Administrator), select the I have verified this request and trust the source checkbox, and select Allow access.
-
For Location select OneDrive for Business.
-
For Document library select OneDrive.
-
For File browse and select the Operations tasks workbook.
-
For Table select Tasks.
-
Select Show all.
-
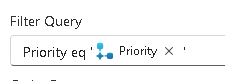
For Filter query, enter
Priority eq ''. -
Move the cursor between the two single quotes and use Dynamic content to insert the Priority input parameter.
-
Select the Respond to the agent node in the authoring canvas and select + Add an output.
-
Select Text.
-
For Enter a name, enter
Task list. -
For Enter a value to respond with, select the field, and then select the Expression (fx) option. Enter the following expression to convert the returned rows into text that matches the Text output type, and then select Add:
string(outputs('List_rows_present_in_a_table')?['body/value']) -
Select Save draft near the upper-right of the page.
-
Select Publish near the upper-right of the page.
-
Select Tools in the left-hand navigation to verify the workflow status is Ready.
Task 3.3 – Add a topic to the agent
-
Select Agents from the left navigation pane.
-
Open the Task Analysis agent.
-
Select the Topics tab.
-
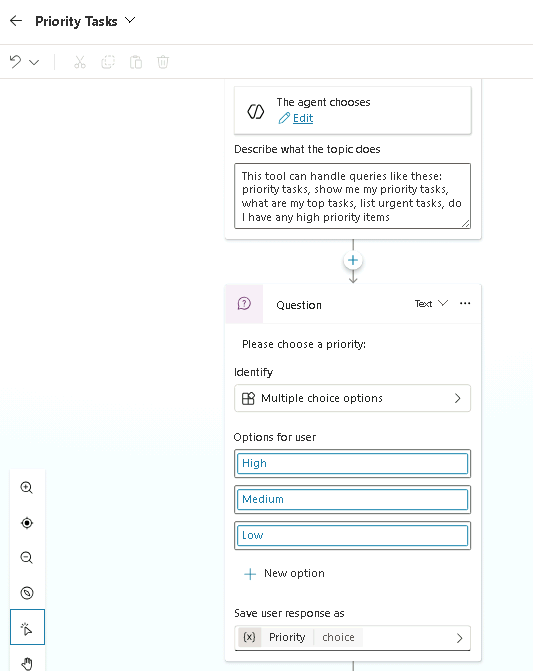
Select + Add a topic and select Add from description with Copilot. A new dialog window appears.
-
In the Name your topic text box, enter
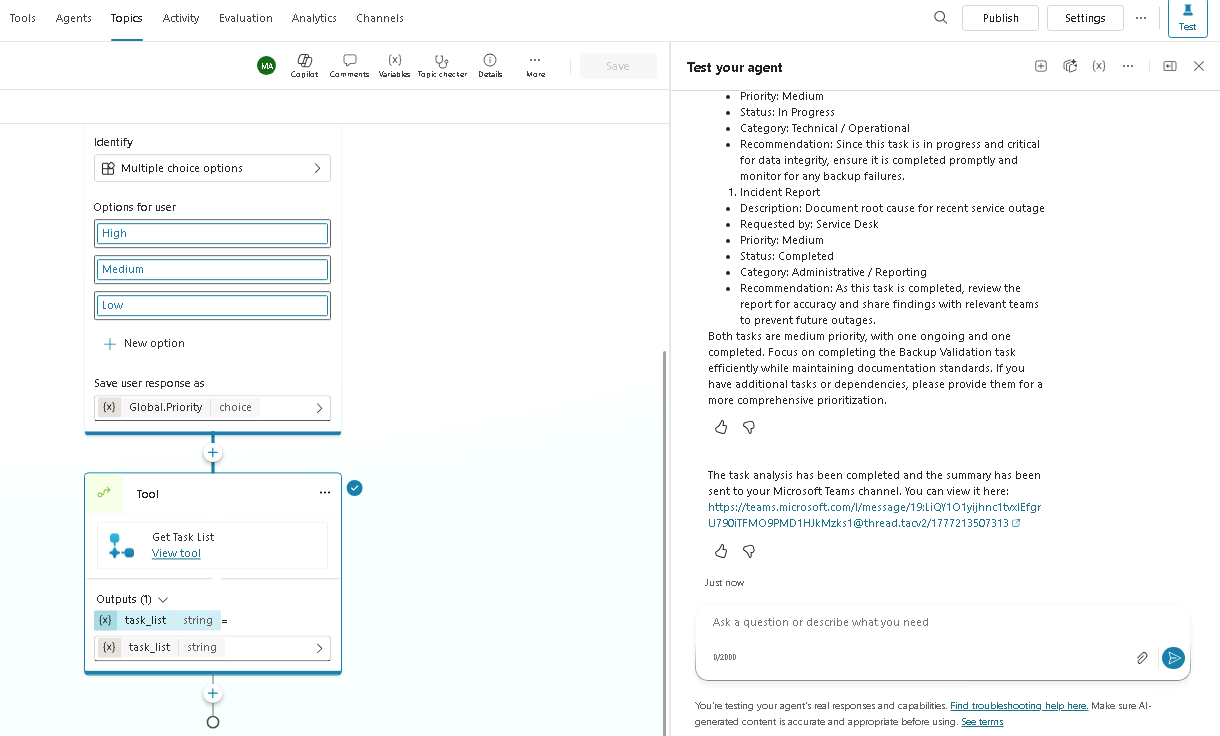
Priority Tasks. -
In the Create a topic to… text box, enter
Ask the user to choose a priority from a list containing High, Medium, and Low. -
Select Create.
-
Select the Priority variable in the bottom of the question node to open Variables properties.
-
Under Usage select Global (any topic can access).

-
Select Save.
Task 3.4 - Add workflow as a tool
-
Select Agents from the left navigation pane.
-
Open the Task Analysis agent.
-
Select the Tools tab.
-
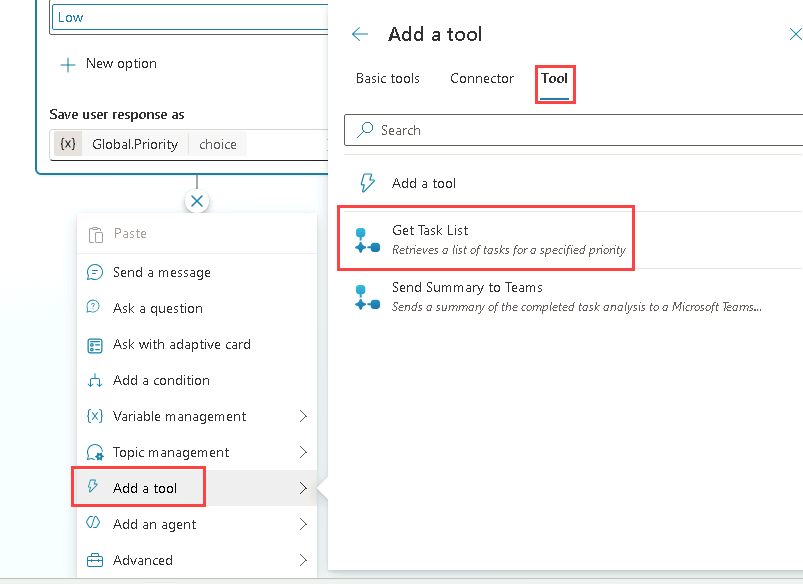
Select + Add a tool.
-
In the Add tool dialog, select the Workflows filter.
-
Select the Get Task List workflow.
-
Select Add and configure.
-
In the Details section, for Description enter
Retrieves a list of tasks for a specified priority. -
Expand Additional details and select or enter the following:
- When this tool may be used: Only when referenced by topics or agents
- Ask the end user before running: No
- Credentials to use: End user credentials
- Description:
Please sign in to retrieve tasks
-
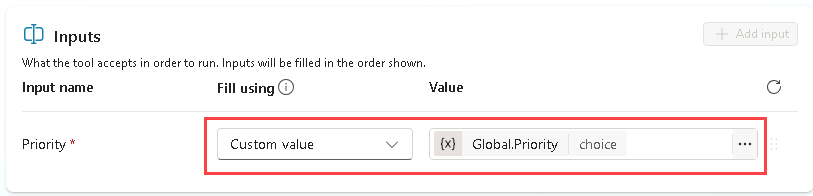
In the Inputs section, for Fill using select Custom value and select the Priority global variable.
-
In the Completion section, for After running, select Write the response with generative AI.
-
Select Save.
Task 3.5 - Add workflow tool to the topic
-
Select the Topics tab.
-
Select the Priority Tasks topic.
-
Under the Question node, select the + icon, select Add a tool, select the Tool tab, and then select the Get Task List tool.
-
Select Save.
Task 3.6 - Update agent instructions with the topic
-
Select the Overview tab.
-
In the Instructions section, select Edit.
-
Under the ## Skills in the agent instructions, add the following to the final step:
Use theand type/and select the Priority Tasks topic and then enter ` to get the task list.` -
Select Save.
Task 3.7 - Test the workflow tools
-
Select the Test icon in the upper-right of the page to open the testing pane.
-
In the Test pane, select the ellipses (…) next to the variables {x} icon, and toggle Show activity map when testing to Off and Track between topics to On.
-
At the top of the Test pane, select the Start new test session icon +.
-
When the Conversation Start message appears, your agent will start a conversation. In response, let’s try to trigger the topic that you’ve created:
Analyze the task list -
The Priority Tasks topic will be shown.
-
Select Medium.
-
If prompted to connect to Excel Online (Business), select Allow.
-
The test pane should contain two tasks.
-
In a new browser tab, navigate to
https://teams.cloud.microsoft/and sign in if prompted. -
Navigate to the Team and channel you selected earlier and review the two tasks posted to the channel.
Summary
In this lab, you created workflow tools that are called by the agent using generative AI and from a topic.