Manage knowledge in Copilot Studio agents
Scenario
In this exercise, you will:
- Create a Dataverse table
- Create an agent
- Upload a file to use as a knowledge source
- Add a public website as a knowledge source
- Add the Dataverse table as a knowledge source
- Configure generative orchestration settings
- Configure the Create generative answers node
- Publish the agent to Microsoft Teams
This exercise will take approximately 60 minutes to complete.
What you will learn
- How to add knowledge sources to an agent
- How to configure generative orchestration and generative answers behavior
High-level lab steps
- Create a Dataverse table using Copilot
- Create an agent using Copilot
- Add knowledge sources
- Configure generative AI
- Publish the agent
Prerequisites
- Have a Microsoft Entra ID account
- Have a Copilot Studio license or have signed up for a free trial.
- Have access to a Power Platform environment and a solution where you can create agents and related assets.
- You can use:
- the environment and Lab Exercises solution created in the ILT Setup lab, or
- your own existing environment and solution.
- If you do not already have an environment and solution prepared, complete the steps in the ILT Setup lab before continuing.
[!IMPORTANT] You may notice a new Copilot Studio experience that is currently in preview. These labs use the current Copilot Studio interface, so some steps and screenshots may not match the preview experience. To follow the lab instructions successfully, use the current Copilot Studio UI throughout these exercises.
Key concept: Agent components and behavior
When generative orchestration is enabled, the agent can use instructions, knowledge, topics, and tools to generate responses dynamically. Multiple types of knowledge sources can be used to ground an agent, and several settings influence how generative responses are generated.
Exercise 1 - Create a table in Dataverse
In this exercise, you will create a Dataverse table that will be used as a knowledge source by an agent.
Task 1.1 – Create a table for expense claims
-
In a web browser, navigate to Power Apps Maker portal at
https://make.powerapps.com/and sign in if prompted. Skip any welcome messages. -
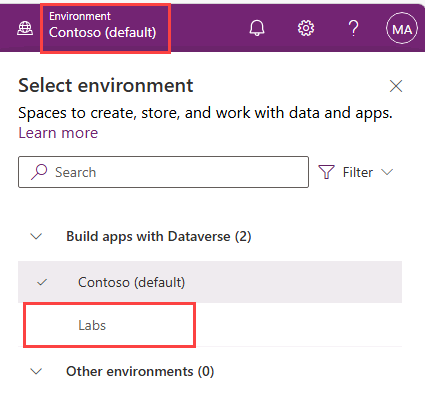
At the top of the page, verify that you are working in the environment you want to use for this exercise.
-
In the left-hand navigation in the Maker portal, select Tables.

-
Select the Get started with Copilot tile.
-
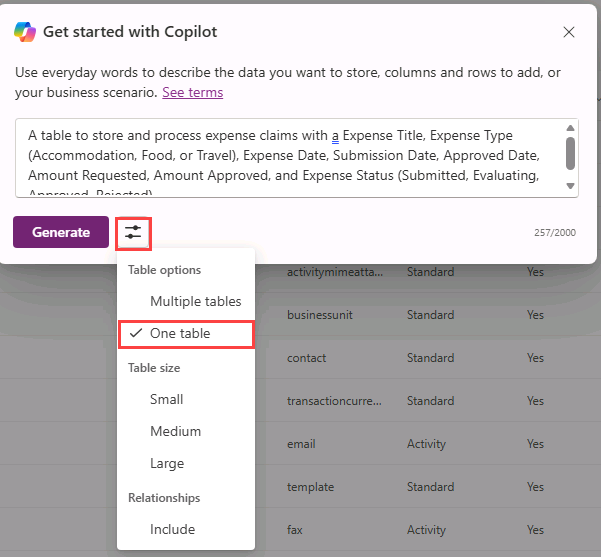
In the Get started with Copilot dialog, select the Table options icon, and select One table.
-
In the Describe the tables you want Copilot to build text box, enter the following prompt:
A table to store and process expense claims with an Expense Title, Expense Type (Accommodation, Meals, Entertainment or Travel), Expense Date, Submission Date, Approved Date, Amount Requested, Amount Approved, and Expense Status (Submitted, Evaluating, Approved, Rejected). -
Select Generate.
[!NOTE] The generated table schema may vary slightly from the screenshot shown in this lab. Minor differences in column naming or formatting are expected.
-
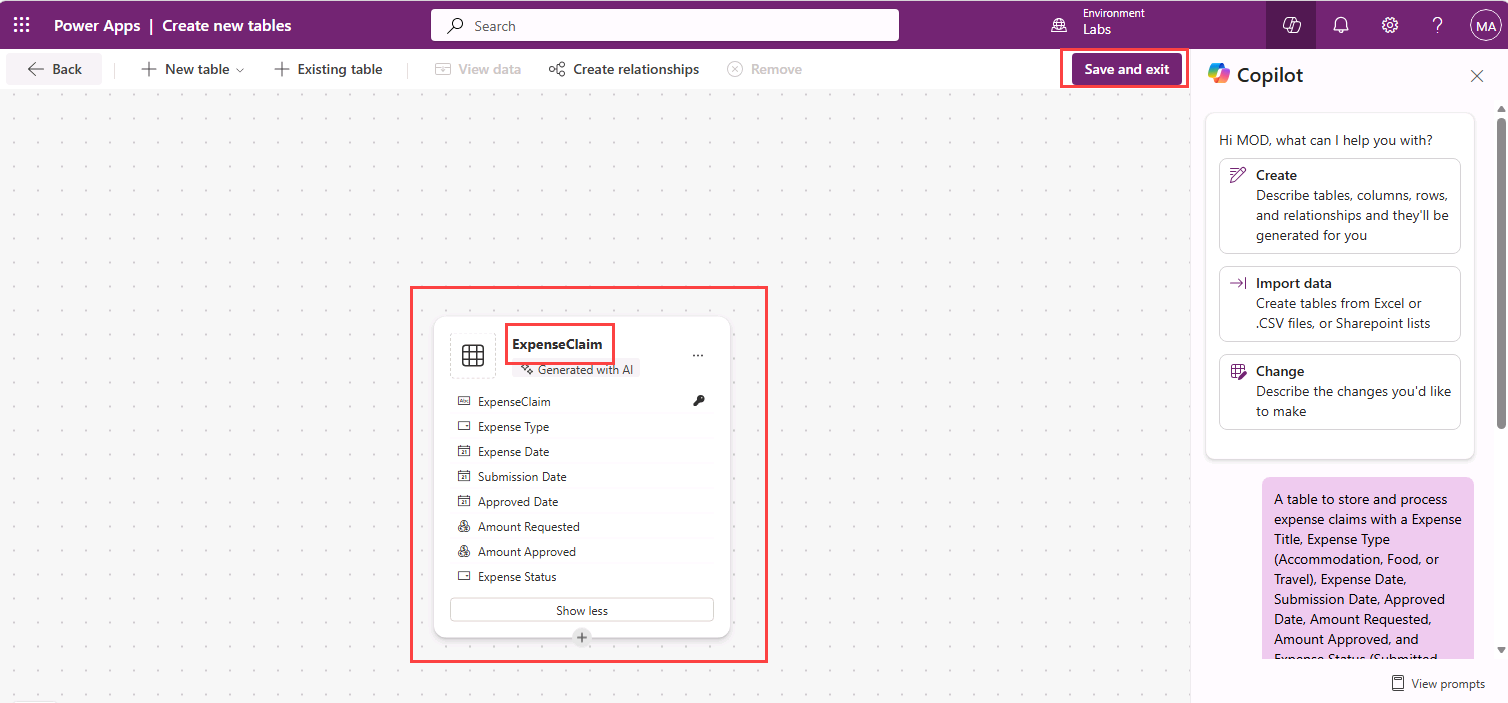
A table will be created. Make a note of the name of the table.
-
Select Save and exit and select Save and exit again.
Exercise 2 - Create an agent
In this exercise, you will create a new agent using natural language to answer questions about expense policies in a fictional corporation.
Task 2.1 – Create an agent for expense claims
-
Navigate to the Copilot Studio home page
https://copilotstudio.microsoft.com/. -
At the top of the page, verify that you are working in the environment you want to use for this exercise.
-
Select Agents in the left-hand navigation.
-
In the bottom-left of the Start building by describing what your agent needs to do text box, select the Agent Settings icon, which is displayed as a Cog image.

-
Leave English (United States) set as the primary language for the agent.
-
In the Solution drop-down, select Lab Exercises or another solution you want to use for this exercise.
-
Enter
expenseagentfor the Schema name. -
Select Update.
-
In the Start building by describing what your agent needs to do text box, enter the following prompt:
You are an agent that helps employees with expense claims including questions around expense policy and procedures. -
Select the Send icon.
Once your agent has been provisioned, you may proceed with configuring your agent.
Exercise 3 - Ground the agent with knowledge
In this exercise, you will add knowledge sources to the agent to ground the agent.
Task 3.1 – Add a document as a knowledge source
-
Open a new browser tab and navigate to
https://github.com/MicrosoftLearning/mslearn-copilotstudio/raw/main/expenses/Expenses_Policy.docxto download the expenses policy document locally. This document contains details of the expenses policy for the fictional corporation. -
Return to the Copilot Studio browser tab with the agent you created in Exercise 3.
-
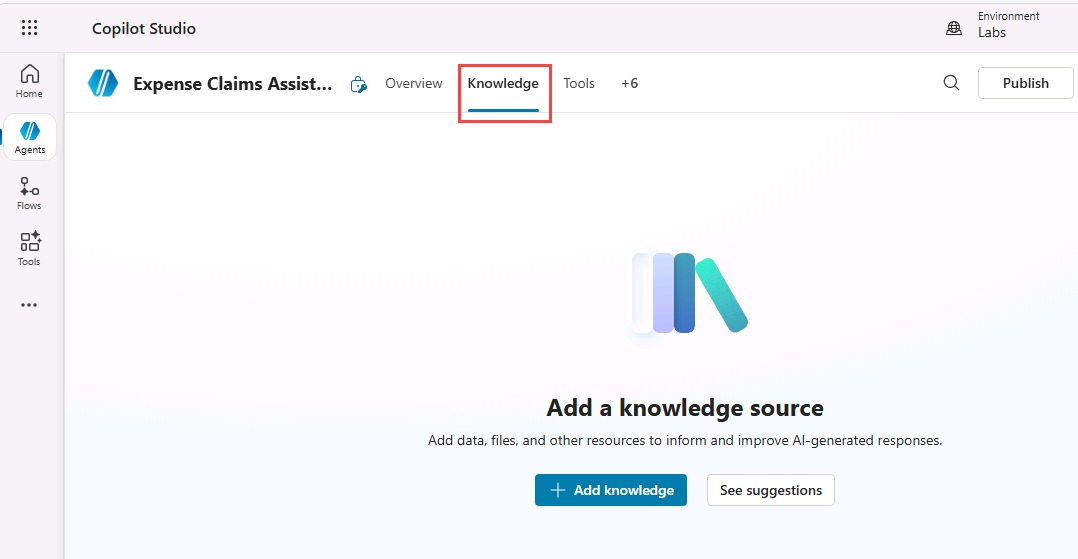
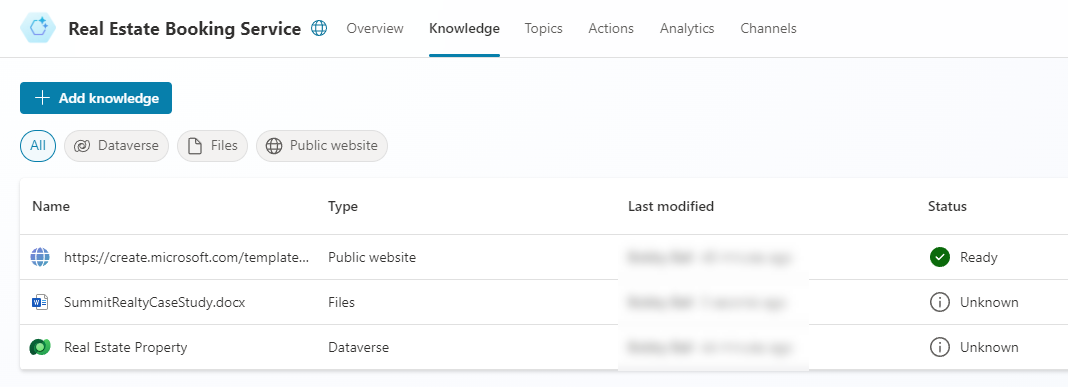
Select the Knowledge tab to verify the knowledge sources defined in your agent (currently there should be none).
-
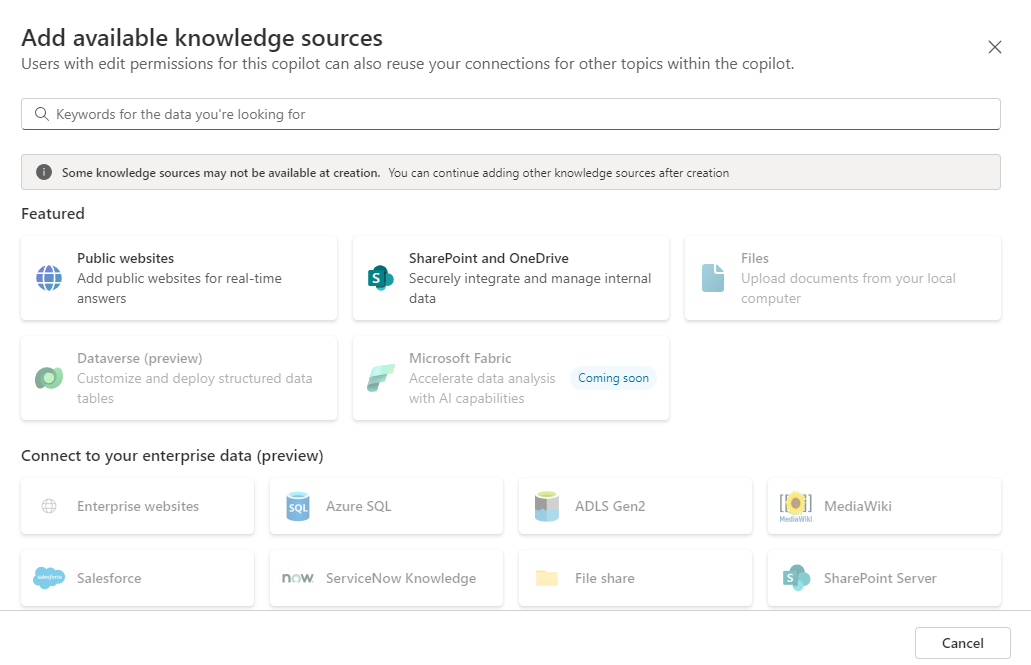
Select + Add knowledge, and note the multiple types of knowledge source that you can add to your agent.
-
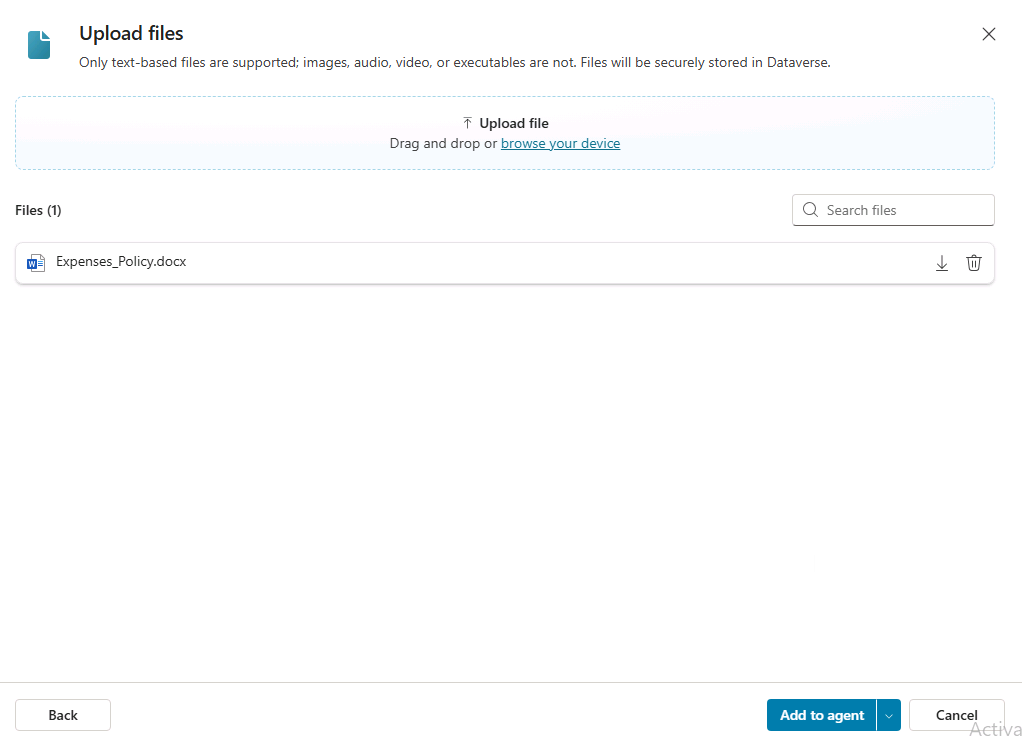
In the Upload file section, use select to browse to upload the expense policy document you downloaded previously and select Add to agent.
[!NOTE] After uploading the file, Copilot Studio begins indexing. This may take 10 minutes or longer, so you will check back after the next exercise.
Task 3.2 – Add a public website as a knowledge source
-
In the Copilot Studio agent, select the Knowledge tab.
-
Select + Add knowledge.
-
Select Public websites.
-
In the Public website link text box, enter
https://www.irs.gov/publications/p463. This official government public website has details on reimbursement of travel expenses that could be useful for your agent. -
Select Add.
-
For Name, enter
Travel, Gift, and Car Expenses | Internal Revenue Service. -
For Description, enter
This knowledge source contains information on reimbursement of travel expenses.. -
Select Add to agent.
[!NOTE] Public website indexing may take several minutes. If responses are incomplete, wait a few minutes and test the agent again.
Task 3.3 – Add a Dataverse table as a knowledge source
-
In the Copilot Studio agent, select the Knowledge tab.
-
Select + Add knowledge.
-
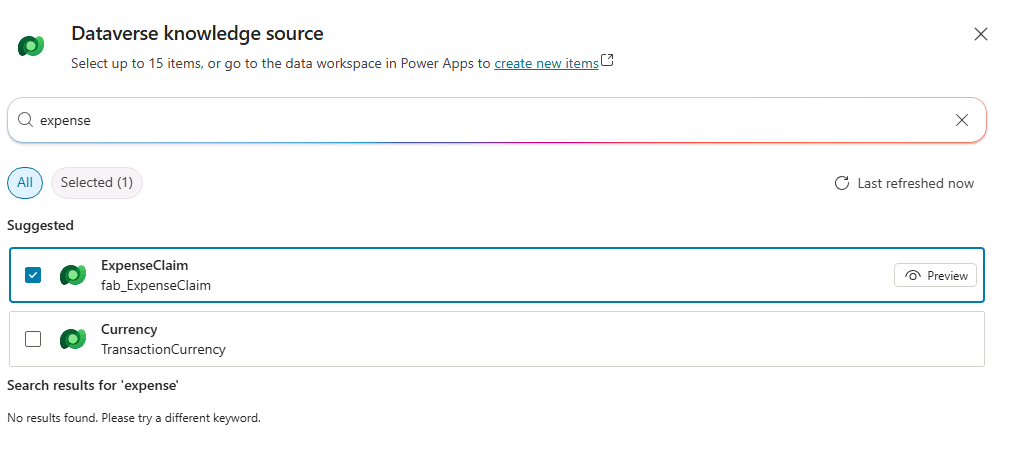
Select Dataverse.
-
Search for and select the Expenses table you created in Exercise 2
-
Select Add to agent.
Task 3.4 – Configure the Dataverse knowledge source
-
In the Copilot Studio agent, select the Knowledge tab.
-
Select the ellipses (⋮) for the Dataverse table and select Edit.
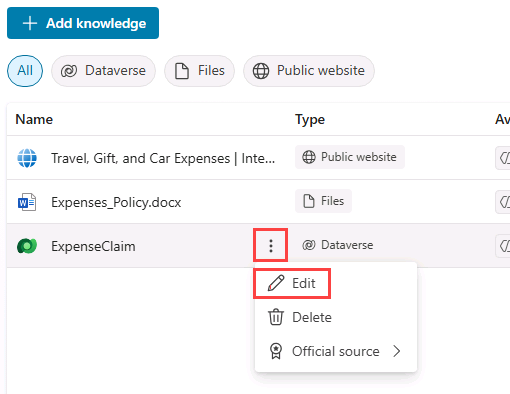
-
In the Details tab, for Name, enter
Expense Claims data. -
Select the Synonyms tab.
-
In the Expense Type row, select + Add synonyms.
-
Enter
Expense labeland select Add. -
Enter
Expense categoryand select Add.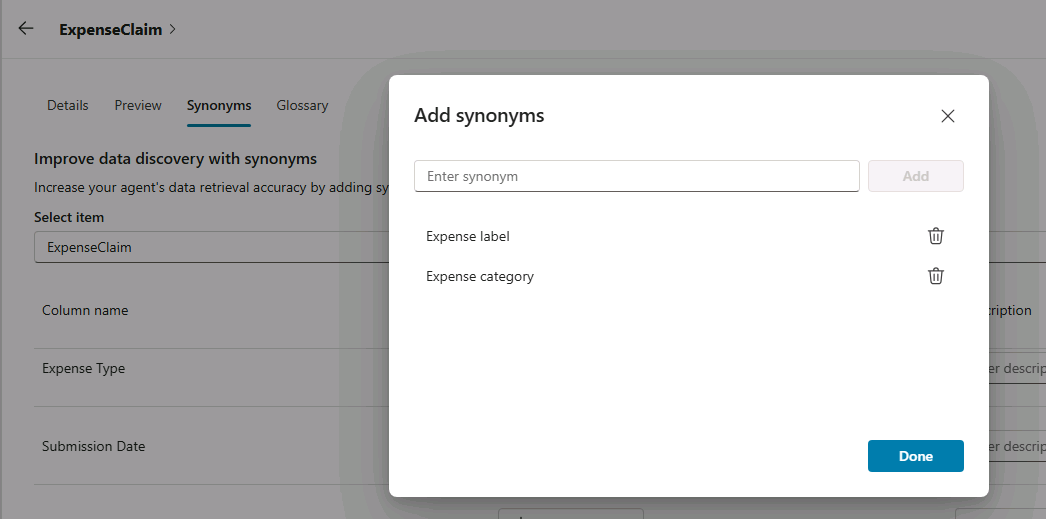
-
Select Done.
-
Select the Glossary tab.
-
For Enter term, enter
Incidental expenses. -
For Enter description, enter
Minor, necessary business costs that arise in addition to a primary expense such as tips or fees.. -
Select Save.
Task 3.5 – Check in on your file indexing
Check whether the uploaded file has completed indexing. If indexing is still in progress, wait a few minutes and refresh the page before continuing.
-
Select the Knowledge tab.
-
Check on the Status of your file upload. If it is still In progress, refresh every few minutes until it is Ready.
Task 3.6 - Test grounding
-
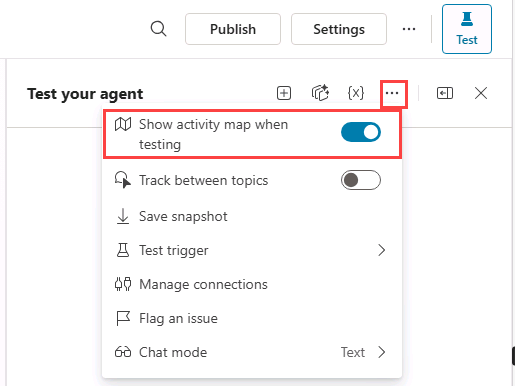
Select the Test icon in the upper-right of the page to open the testing pane.
-
In the Test pane, select the ellipses (…) next to the variables {x} icon, and toggle Show activity map when testing to On and Track between topics to Off.
-
At the top of the Test pane, select the Start new test session icon +.
-
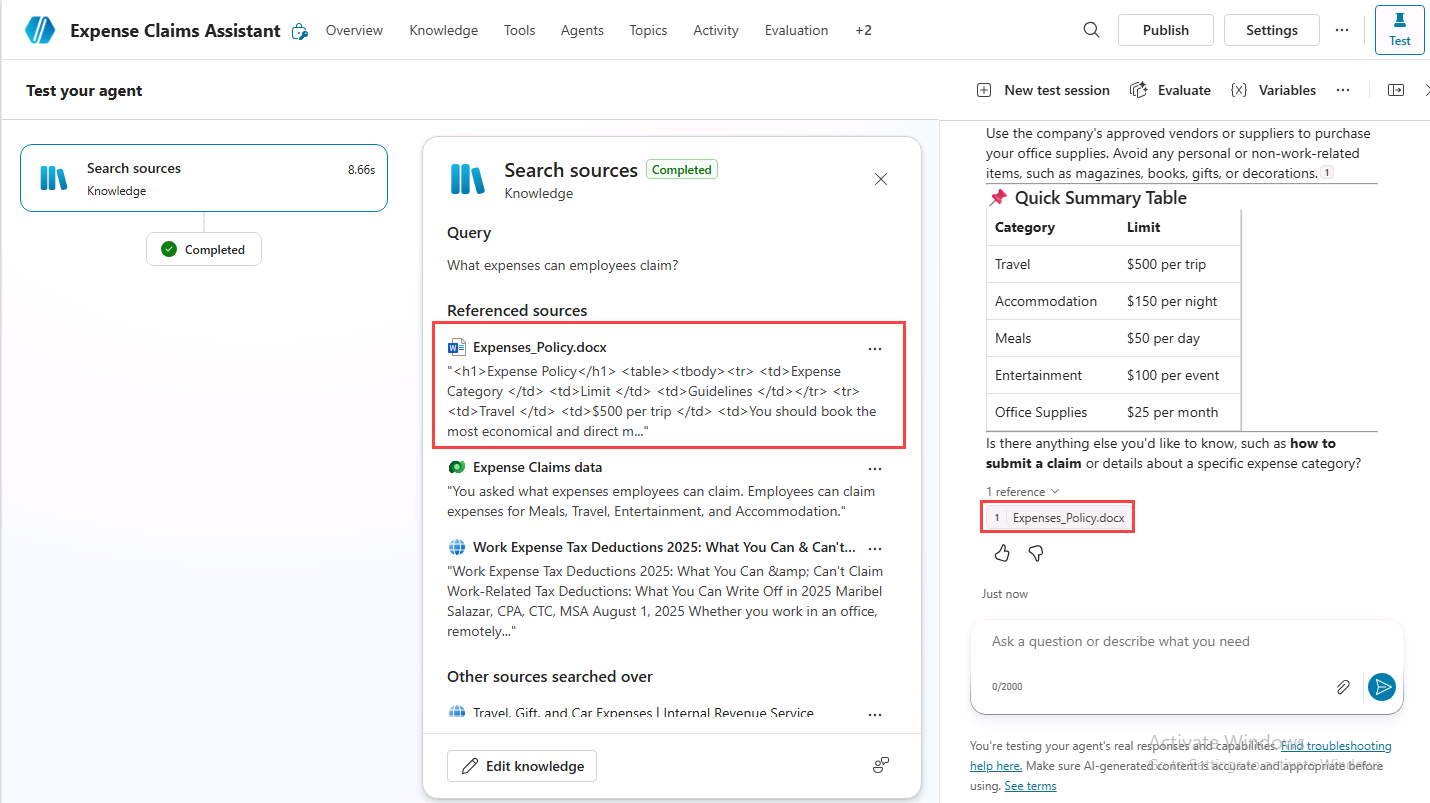
Enter the following prompt:
What can I claim for expenses? -
The response should be grounded using the uploaded expense policy document and may also reference other configured knowledge sources.
-
At the top of the Test pane, select the Start new test session icon +.
-
Enter the following prompt:
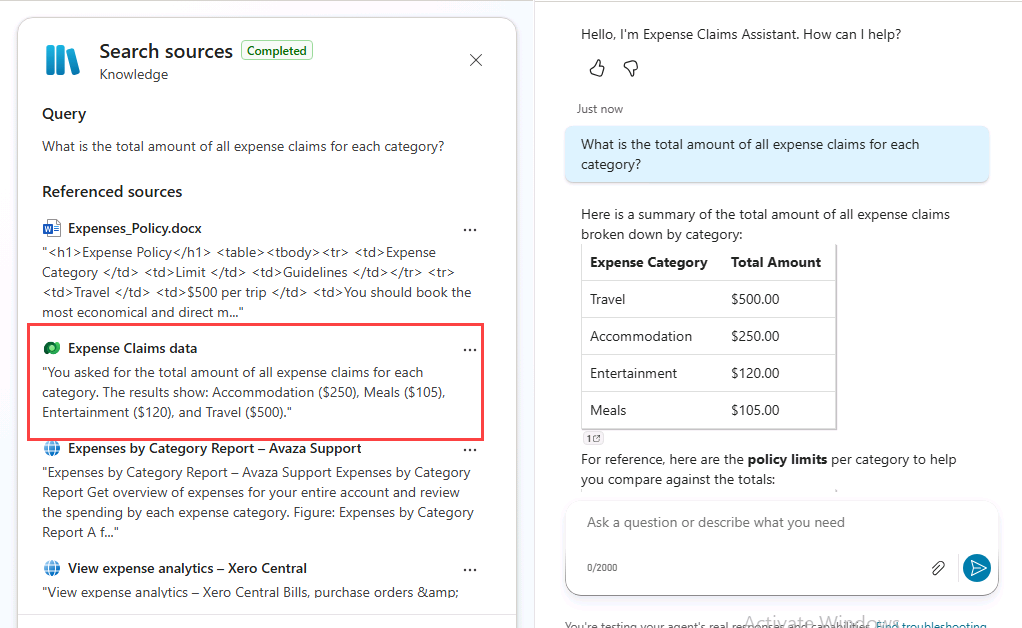
What is the total amount of all expense claims for each category? -
The agent should search all the knowledge sources and generate a response using the Dataverse table.
-
At the top of the Test pane, select the Start new test session icon +.
-
Enter the following prompt:
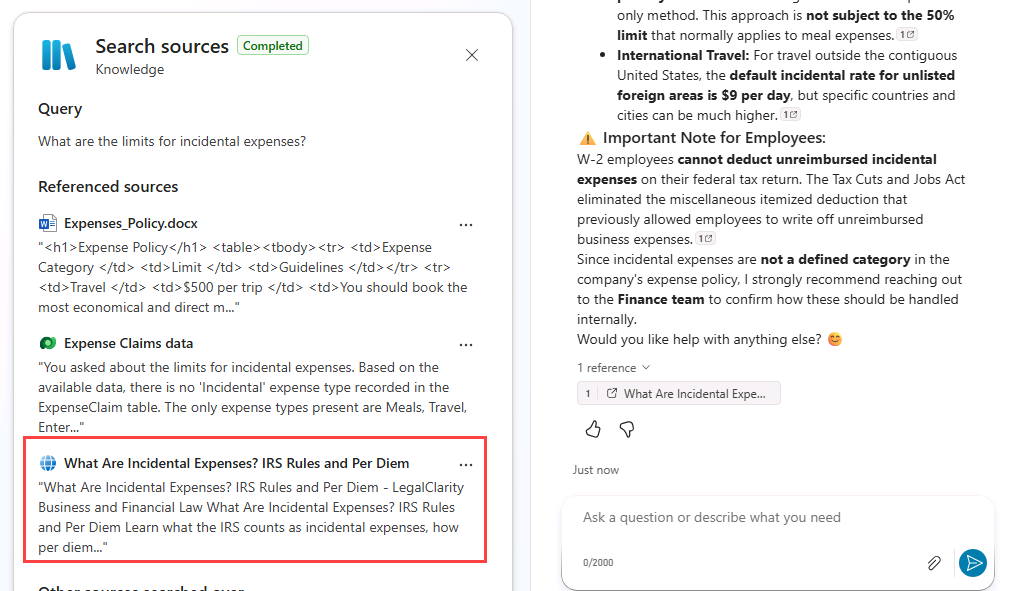
What is the standard deduction for incidental expenses? -
The agent should search all the knowledge sources and generate a response using the public website.
Exercise 4 - Generative AI settings
In this exercise you will configure generative AI for the agent and for the generative answers node.
Task 4.1 – Configure agent knowledge settings
-
In the upper-right of the agent page, select the Settings button.
-
Note that Orchestration is set to Yes - Responses will be dynamic, using available tools and knowledge as appropriate.
-
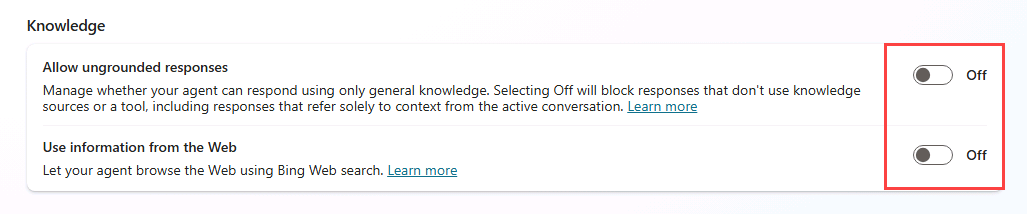
In the Knowledge section, set Allow ungrounded responses to Off.
-
In the Knowledge section, set Use information from the Web to Off.
-
Select Save
-
In the upper-right of the Settings page, select X to close settings.
-
Test the agent using the prompts from the previous exercise. The file and Dataverse knowledge sources will be used but the public website will not be used when generating a response.
Task 4.2 – Configure generative answers node
-
Select the Topics tab.
-
Filter by System topics.
-
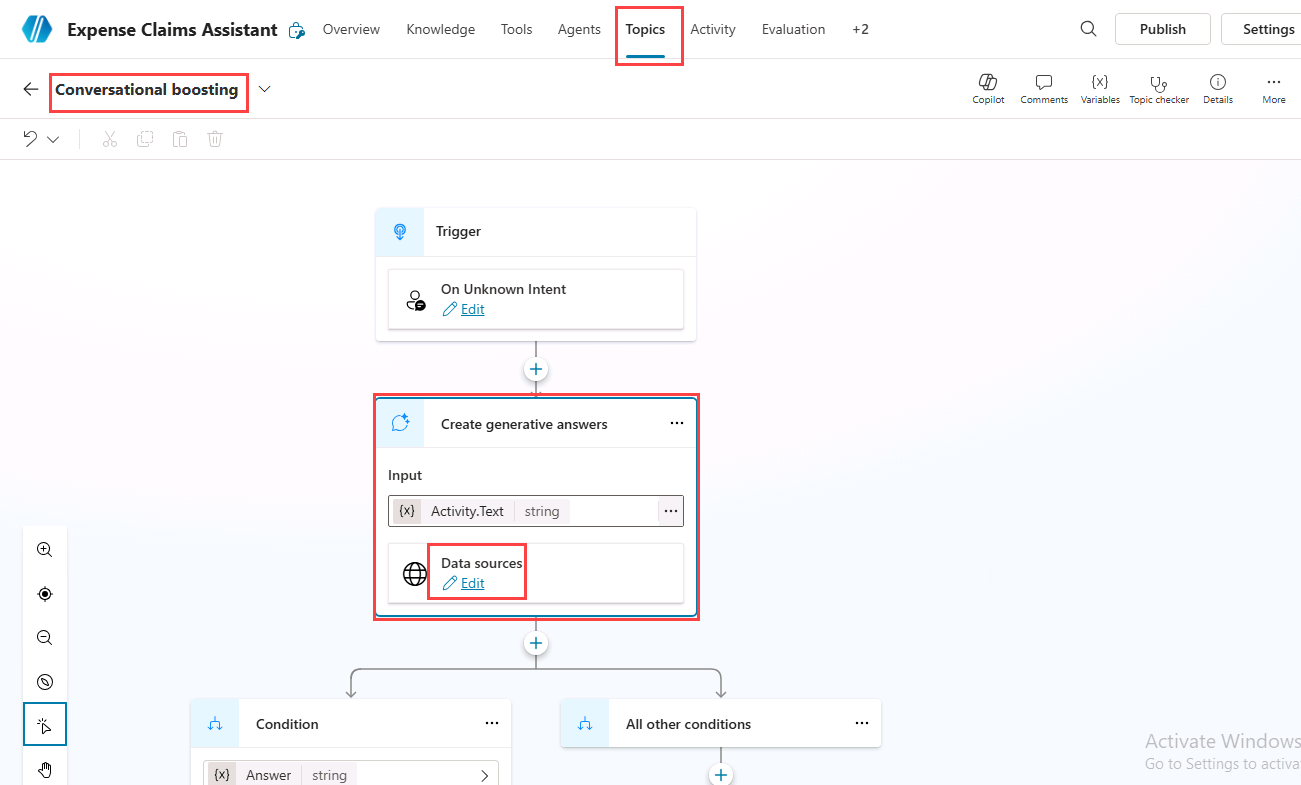
Open the Conversational boosting topic.
-
If a Boost your conversations with copilots dialog appears, select Done.
-
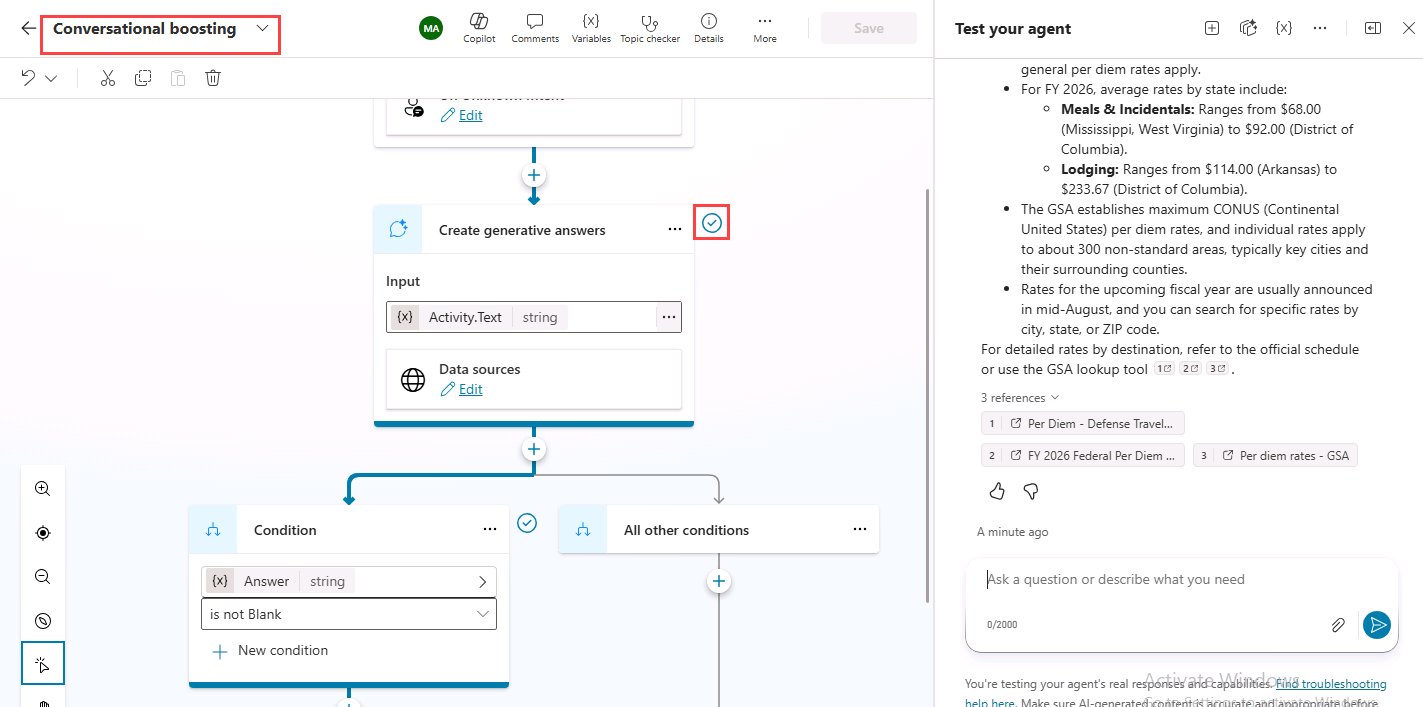
Select the Create generative answers node.
-
Select Edit for Data sources.
-
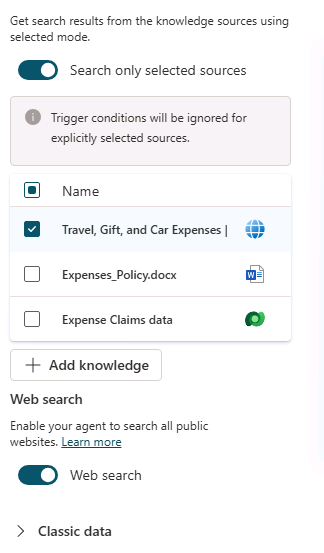
Select and enable Search only selected sources.
-
Select the Public website knowledge source.
-
Select and enable Web search. When enabled, Web search allows generative answers to supplement configured knowledge sources with public web information.
-
Select Save.
-
Select the Overview tab.
-
Select the Test icon in the upper-right of the page to open the testing pane.
-
In the Test pane, select the ellipses (…) next to the variables {x} icon, and toggle Show activity map when testing to Off and Track between topics to On.
-
At the top of the Test pane, select the Start new test session icon +.
-
Enter the following prompt:
What is the federal per diem rate? -
The knowledge sources will not provide an answer but the agent will use generative answers to search the web to generate a response.
Task 4.3 – Fallback topic
-
Select the Topics tab.
-
Filter by System topics.
-
Open the Conversational boosting topic.
-
Select the Create generative answers node.
-
Select Edit for Data sources.
-
Disable Web search.
-
Select Save.
-
Select the Overview tab.
-
Select the Test icon in the upper-right of the page to open the testing pane.
-
In the Test pane, select the ellipses (…) next to the variables {x} icon and verify that Show activity map when testing is set to Off and Track between topics is set to On.
-
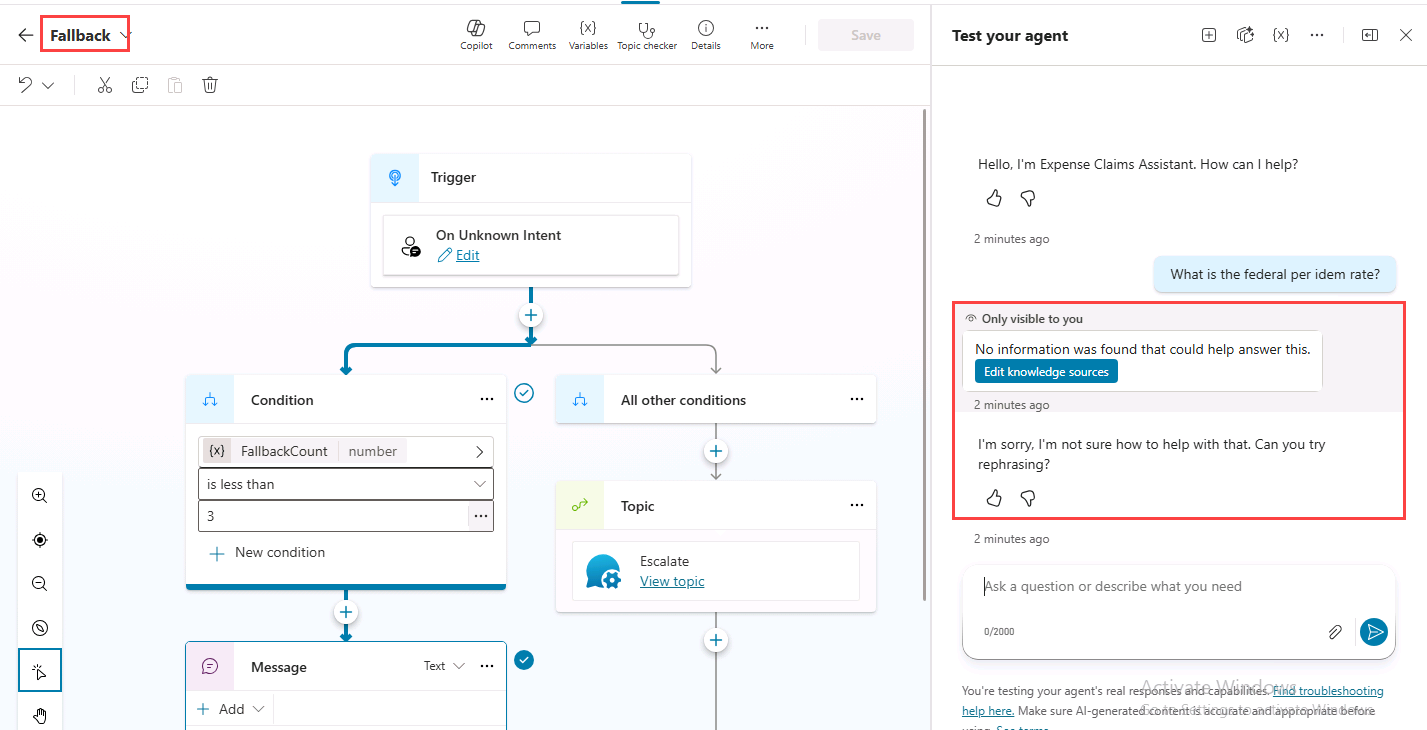
At the top of the Test pane, select the Start new test session icon +.
-
Enter the following prompt:
What is the federal per diem rate? -
The knowledge sources and generative answers will not provide an answer. If no suitable grounded or generative response is available, the conversation may route to the Fallback topic.
Exercise 5 - Publish the agent to Microsoft Teams
In this exercise, you will publish the agent to Microsoft Teams, first ensuring that Microsoft Entra ID authentication is enabled.
Task 5.1 - Microsoft Entra ID authentication
-
In the upper-right of the agent page, select the Settings button.
-
In the left-hand side of the Settings page, select Security.
-
Select Authentication.
-
If not already selected, select Authenticate with Microsoft.
-
Select Save and select Save again.
-
In the upper-right of the Settings page, select X to close settings.
Task 5.2 - Publish the agent
- On the agent page, select Publish and select Publish again to confirm.
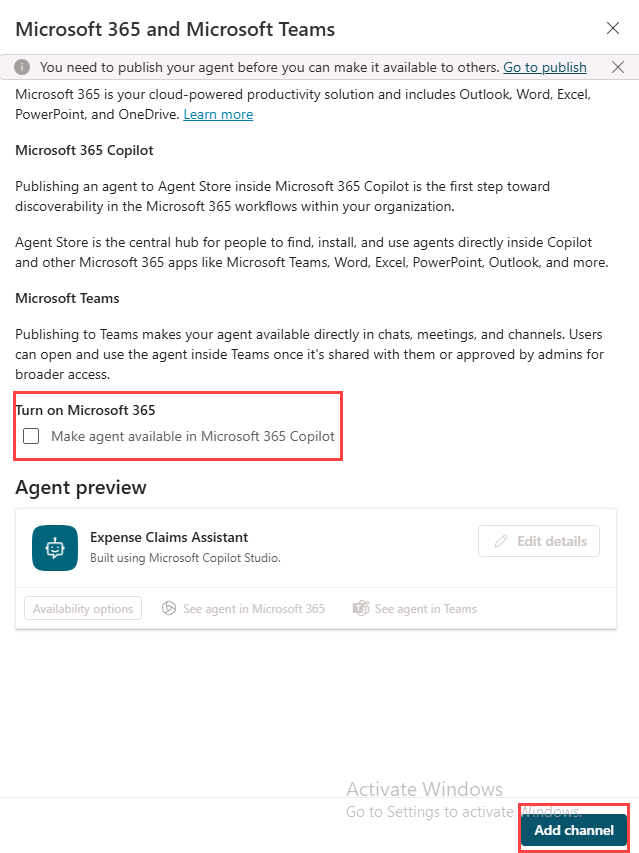
Task 5.3 - Microsoft Teams channel
[!NOTE] Publishing to Teams in this lab is intended for testing and learning purposes. Production deployments may require additional governance, security, and app approval processes.
-
Select the Channels tab.
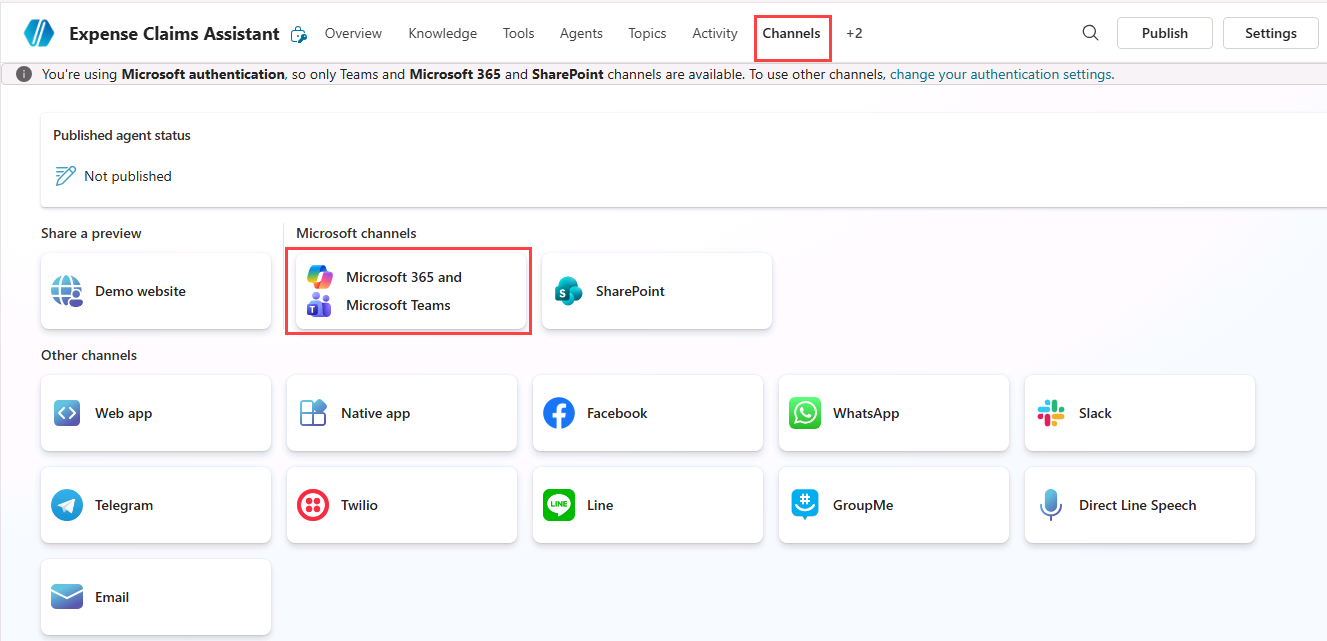
-
Select the Microsoft 365 and Microsoft Teams tile.
-
Deselect Make agent available in Microsoft 365 Copilot.
-
Select Add channel.
-
Select See agent in Teams.
-
Select Cancel in the dialog box for This site is trying to open Microsoft Teams (work or school).
-
In the pop-up, select Cancel and select Use the web app instead.
-
Select Add to add the agent to Teams.
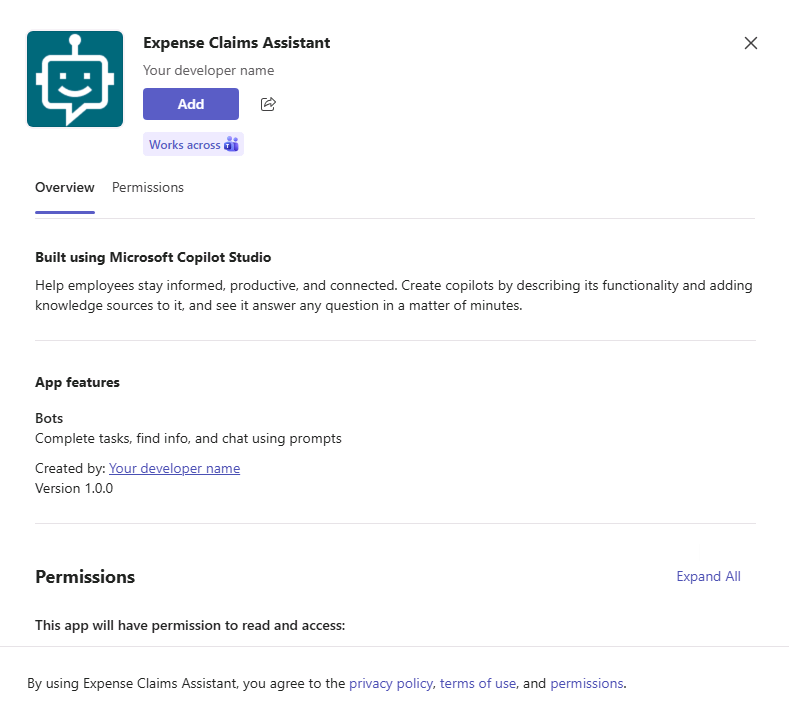
-
Select Open and wait for the agent to load in Teams.
-
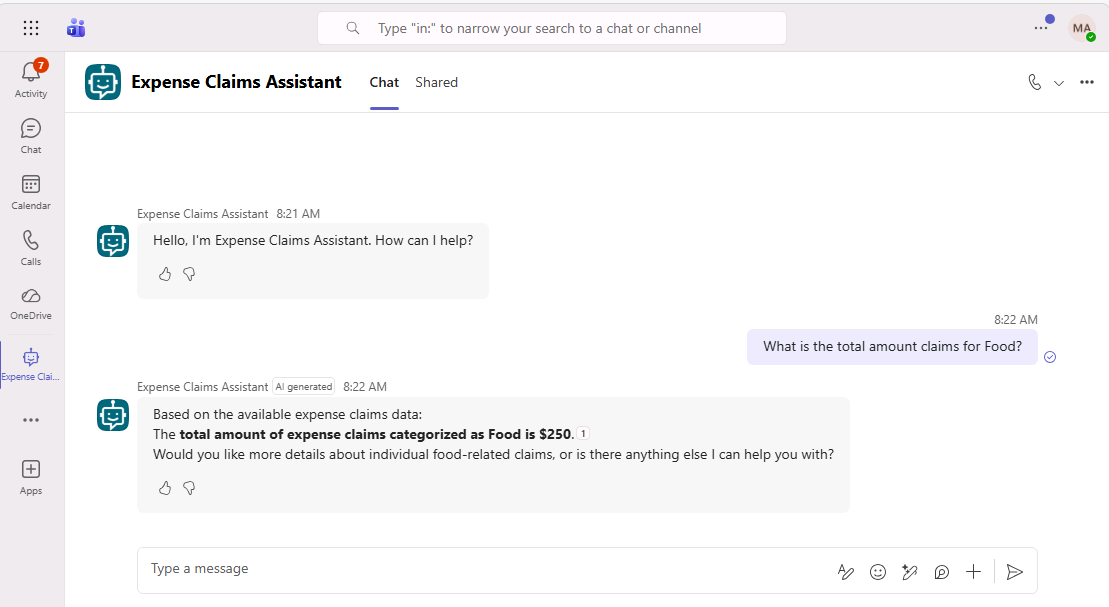
Test the published agent in Microsoft Teams.
Summary
In this lab, you added knowledge sources to an agent and explored how generative AI settings affect when and how the knowledge sources are used to generate responses to prompts.