Build an initial agent
Scenario
In this exercise, you will:
- Create and name an agent
- Define how the agent should behave using instructions
- Add a public website as a knowledge source
This exercise will take approximately 15 minutes to complete.
What you will learn
- How to create an agent using natural language
- How agent instructions influence generative behavior
- How Generative AI answers work with configured knowledge
High-level lab steps
- Create a new agent
- Define agent behavior using instructions
- Add Generative AI knowledge sources
Prerequisites
- Must have completed Lab: Import Dataverse solution
Exercise 1 - Create agent
In this exercise, you will access the Microsoft Copilot Studio portal, select the appropriate environment, and create a new agent.
Task 1.1 – Create an agent in the Bookings solution
-
In a new browser tab, navigate to
https://copilotstudio.microsoft.com. -
Make sure that you are in the appropriate environment.
-
Select Agents in the left navigation.
-
Select the arrow next to Create blank agent > Agent Settings.
-
In the Name text box, enter
Real Estate Booking Service -
Validate that the Solution is defaulted to Bookings.
-
Enter
labagentfor Schema Name. -
Select Confirm and create.
Your agent will begin setting up. Once provisioned, you may proceed with configuring your agent.
Task 1.2 – Configure agent details and instructions
-
In the Details section, select Edit
-
In the Description text box, enter
Create bookings for real estate properties -
Select Save.
-
In the Instructions section, select Edit
-
Update the instructions to:
You are a real estate booking assistant. Help users with questions related to real estate properties and booking showings by using the knowledge and data that are available to you. When responding: Use the information provided through your configured knowledge sources whenever possible. If a user’s request is unclear or missing required details, ask a follow‑up question to gather the information you need. If you do not have enough information to answer confidently, do not guess. Instead, explain what information is missing or guide the user to provide it. Keep responses clear, helpful, and focused on assisting the user with booking‑related tasks. -
Save the instructions.
Note: Agent instructions guide how the agent should behave, but they do not strictly enforce behavior. In later labs, you will learn how to make this behavior predictable by using topics, generative answers with restricted knowledge sources, and fallback configuration
-
In the right Test your agent pane, enter
How do I make a booking?and view the response.
Leave this window open.
Exercise 2 - Add Generative AI answers
In this exercise, you will add knowledge that the agent can use to generate responses.
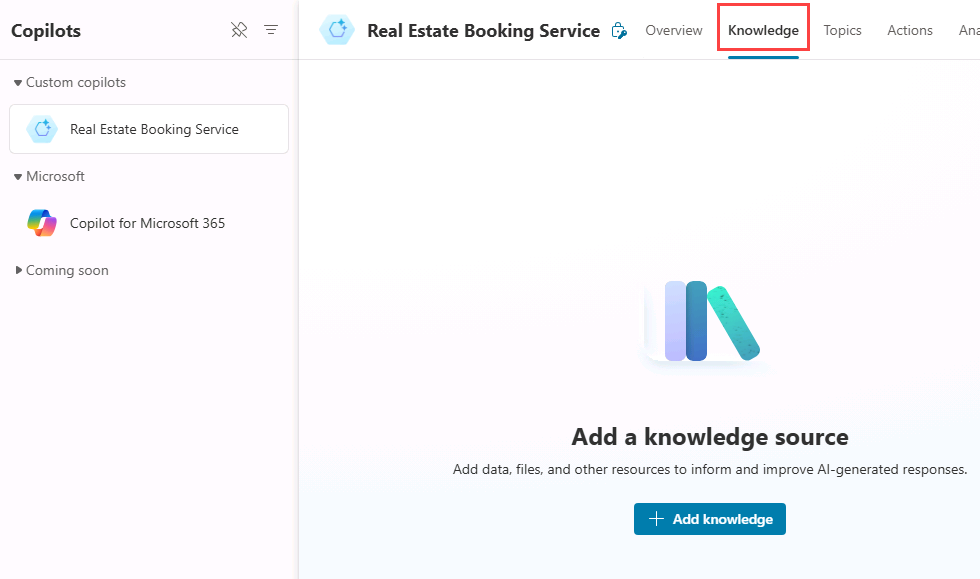
Task 2.1 - Add a knowledge source
-
Select the Knowledge tab.
-
Select + Add knowledge.
-
Select Public websites
-
In the Public website link text box, enter
https://www.realtor.com/marketing/resources. This public website has real estate marketing tips that could be useful for your agent. -
Select Add.
-
Select Add to agent.
Task 2.1 - Test Generative AI responses
-
Select the Overview tab.
-
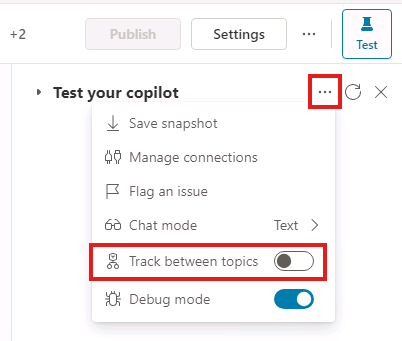
Select the ellipses … menu at the top of the Test your agent pane.
-
Enable Track between topics.
-
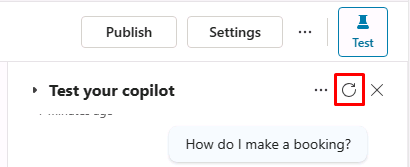
At the top of the Test your agent pane, select the Start new test session icon.
-
In the text box, enter
How do I boost real estate promotion?View your response.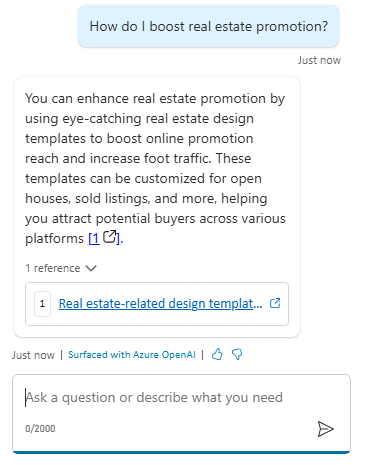
Summary
In this lab, you created an agent and defined its expected behavior using instructions. You also added a public website as a knowledge source and tested your agent with questions that the knowledge source could help answer. While these instructions guide generative responses, later labs will show how to enforce predictable behavior using topics, entities, tools, and fallback configuration