Manage topics in Copilot Studio agents
Scenario
In this exercise, you will:
- Create an agent
- Manage existing topics
- Create and edit topics using Copilot
- Configure variable scope
- Create a topic manually
- Create and edit nodes
- Test the agent
This exercise will take approximately 45 minutes to complete.
What you will learn
- How topics complement generative AI responses
- When topics are used to enforce structured conversations
- How to create and refine topics using natural language
- How to use variables
High-level lab steps
- Create an agent using Copilot
- Review and disable unnecessary topics
- Create a topic using Copilot
- Edit topic content using natural language
- Test topic behavior
Prerequisites
- Have a Microsoft Entra ID account
- Have a Copilot Studio license or have signed up for a free trial.
- Have access to a Power Platform environment and a solution where you can create agents and related assets.
- You can use:
- the environment and Lab Exercises solution created in the ILT Setup lab, or
- your own existing environment and solution.
- If you do not already have an environment and solution prepared, complete the steps in the ILT Setup lab before continuing.
[!IMPORTANT] You may notice a new Copilot Studio experience that is currently in preview. These labs use the current Copilot Studio interface, so some steps and screenshots may not match the preview experience. To follow the lab instructions successfully, use the current Copilot Studio UI throughout these exercises.
Key concept: Agent components and behavior
When generative orchestration is enabled, the agent can use instructions, knowledge, topics, and tools to generate responses dynamically.
Topics are especially useful when you need to:
- Collect required information step by step
- Control the order of questions
- Store responses in variables
- Ensure predictable outcomes
Exercise 1 - Create an agent
In this exercise, you will create a new agent using natural language to answer questions about government benefits.
Task 1.1 – Create an agent to review insurance claims
-
In the Copilot Studio home page
https://copilotstudio.microsoft.com/, verify that you are in the environment that you want to use for this exercise. -
Select Agents in the left-hand navigation.
-
In the bottom-left of the Start building by describing what your agent needs to do text box, select the Agent Settings icon, which is displayed as a Cog image.

-
Leave English (United States) set as the primary language for the agent.
-
In the Solution drop-down, select Lab Exercises or another solution you want to use for this exercise.
-
Enter
insuranceagentfor the Schema name. -
Select Update.
-
In the Start building by describing what your agent needs to do text box, Enter the following prompt:
You are an agent that assists with reviewing insurance claims including damage assessment details and repair estimates. -
Select the Send icon.
Once your agent has been provisioned, you may proceed with configuring your agent.
Exercise 2 - Manage topics
In this exercise, you will disable the Escalate system topic as the agent will not have human representatives to hand-off to. Disabling unused system topics helps reduce ambiguity when generative orchestration determines how to respond.
Task 2.1 – Disable topics
-
Select the Topics tab.
-
Select the System filter.
-
Locate the Escalate topic.
-
Toggle Enabled to Off for the Escalate topic.
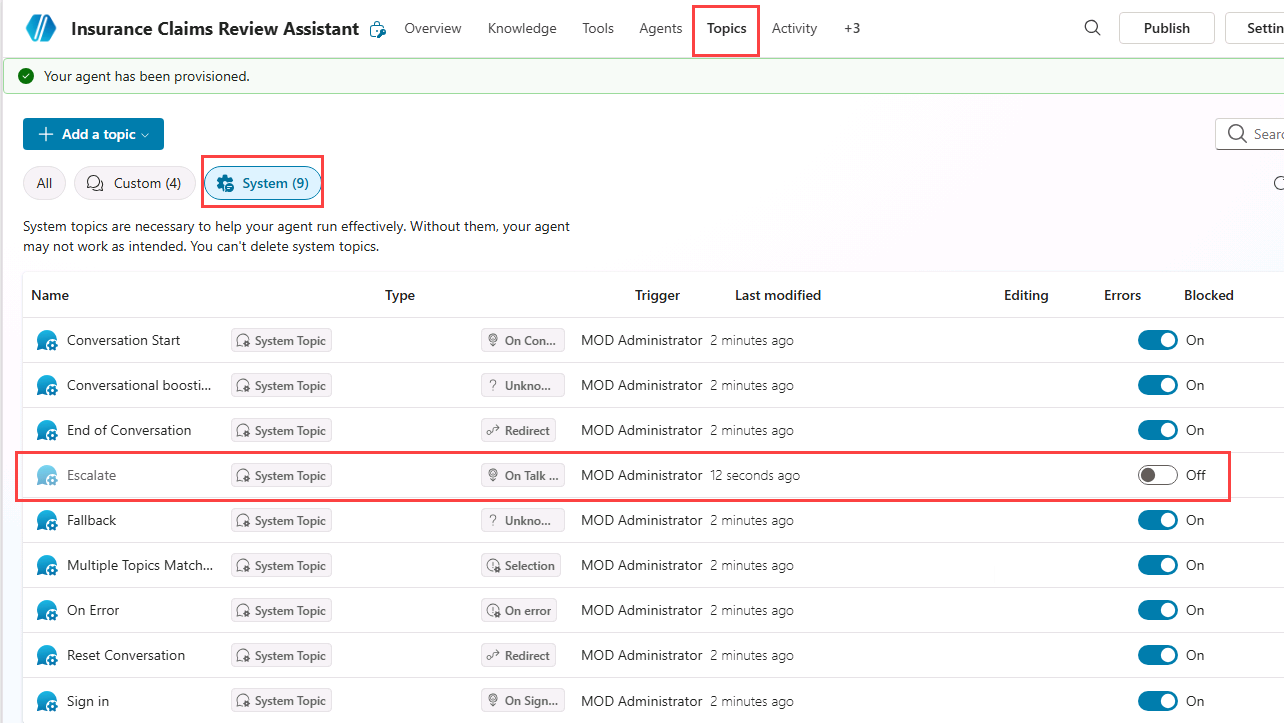
Disabling unused topics helps reduce ambiguity when multiple topics or generative responses could handle the same request.
Exercise 3 - Create a topic with natural language
In this exercise, you will use Copilot to create a topic from a description. This allows generative AI to draft the initial structure, which you can then refine.
Task 3.1 – Add a topic from description
-
Select + Add a topic and select Add from description with Copilot. A new dialog appears.
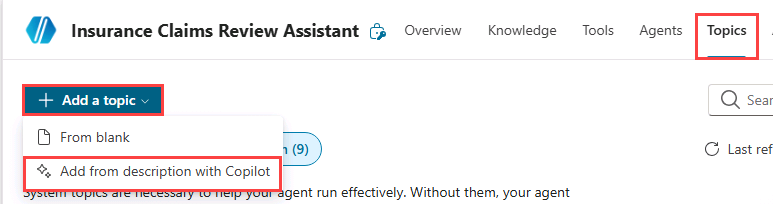
-
In the Name your topic text box, enter
Customer Details. -
In the Create a topic to… text box, enter
Ask the customer for their name and email address. -
Select Create.
-
Select Save.
Task 3.2 – Edit nodes using natural language
-
If the Test your agent panel is open, close the panel.
-
If the Edit with Copilot panel is not shown on the right side of the Customer Details pane, select the Copilot icon in the upper part of the authoring canvas.

-
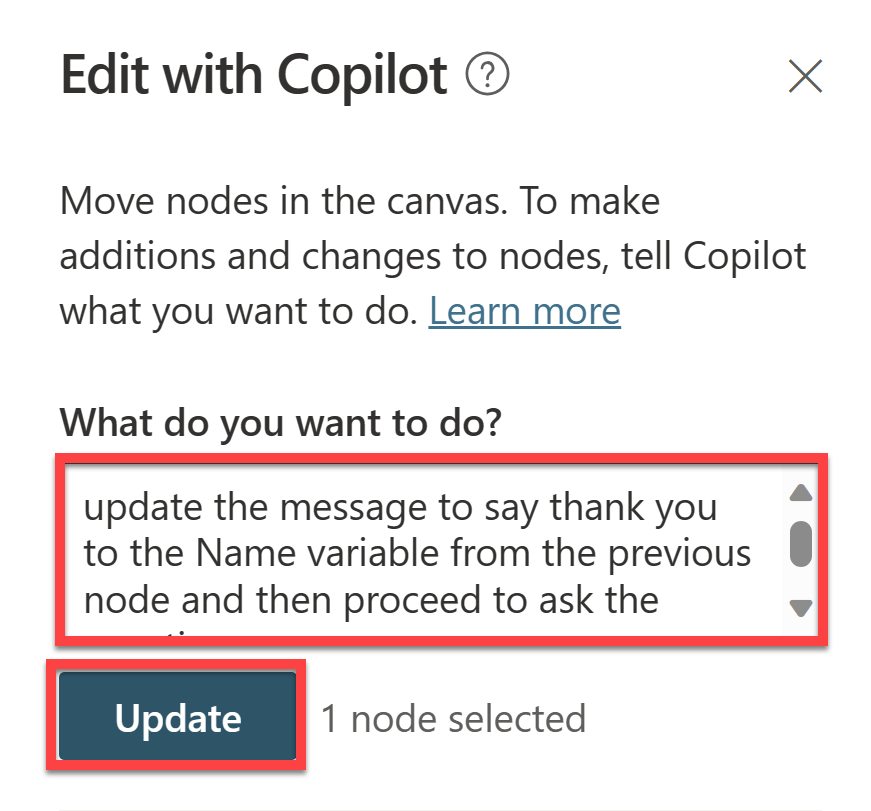
Select the second Question node What is your email address?
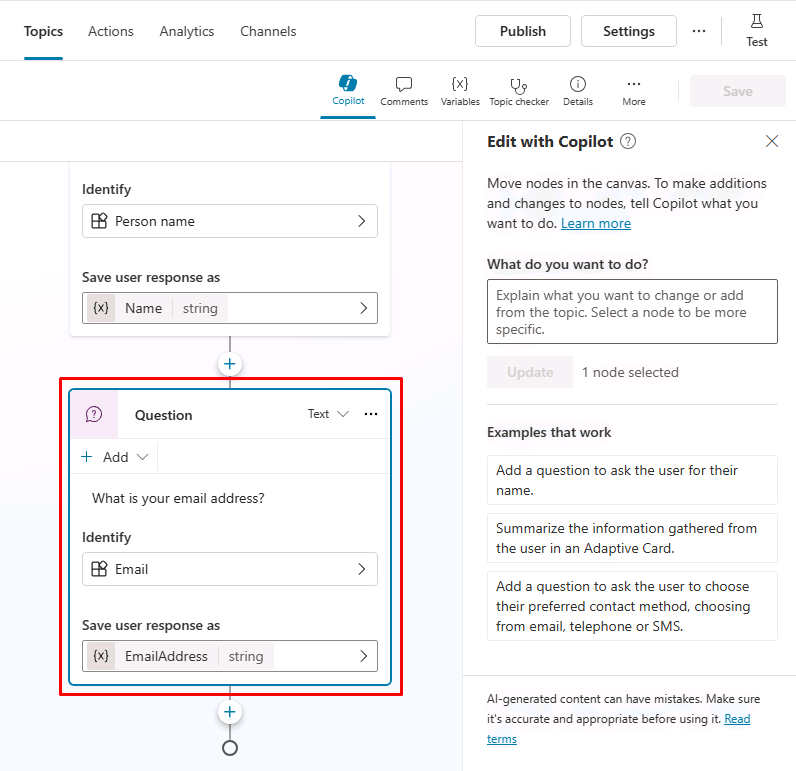
-
In the Edit with Copilot panel, in the What do you want to do? field, enter the following text:
Change "What is your email address?" to say thank you to the Name variable from the previous node and then proceed to ask the email address question. -
Select Update.
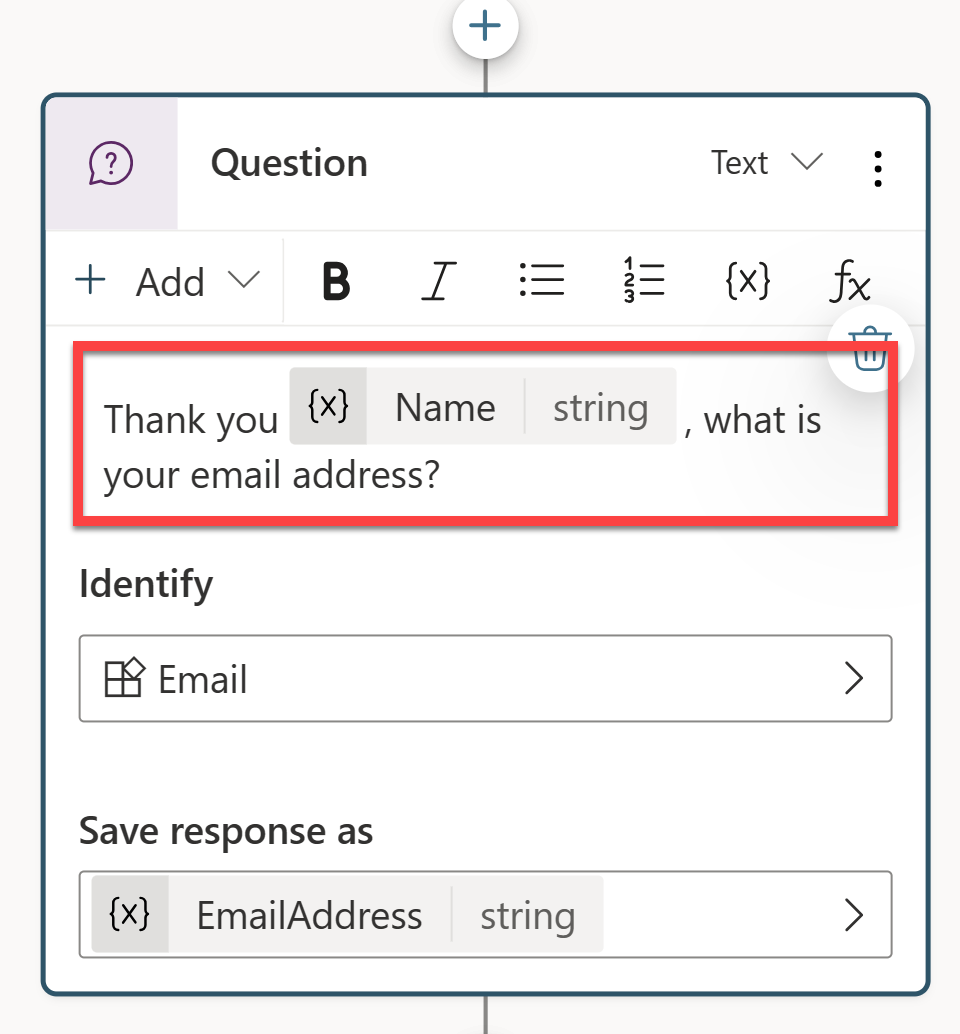
[!NOTE] The updated message should reference the Name variable collected in the previous question node and should look similar to the screenshot. If Edit with Copilot did not update the question node correctly, select Undo, and retry with a different prompt.
-
Select Save.
Task 3.3 – Add an adaptive card node using natural language
In addition to modifying existing nodes, you can use Copilot to add new ones.
-
Select an empty area on the authoring canvas so no node is selected.
-
In the Edit with Copilot panel, in the What do you want to do? field, enter the following text:
Summarize the information collected in an adaptive card -
Select Update.
A message node with an Adaptive Card is added to the end of the topic.
-
Select the Media box in the Adaptive Card. The Adaptive Card properties should appear on the right of the page.
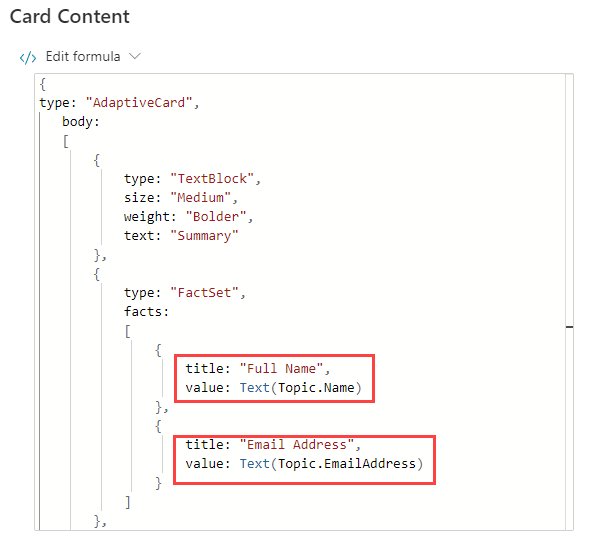
Your Adaptive Card formula should look similar to the one above. If your Adaptive Card differs significantly, you can replace it with this formula:
{
type: "AdaptiveCard",
    body:
    [
        {
            type: "TextBlock",
            size: "Medium",
            weight: "Bolder",
            text: "Summary"
        },
        {
            type: "FactSet",
            facts:
            [
                {
                    title: "Full Name",
                    value: Text(Topic.Name)
                },
                {
                    title: "Email Address",
                    value: Text(Topic.EmailAddress)
                }
            ]
        },
        {
            type: "TextBlock",
            text: "Thank you for providing the information."
        }
    ]
}
Task 3.4 – Add a question node using natural language
-
Make sure that no node is selected by selecting the empty space in the authoring canvas.
-
Select the Copilot icon to reopen the Edit with Copilot pane.
-
In the What do you want to do? field, enter the following text:
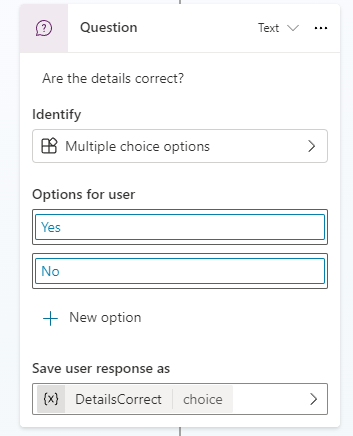
Add a new multiple choice question to prompt the user if the details are correct with two options Yes or No -
Select Update.
-
A new question node is added to the end of the topic with options for the user to select.
-
Select Save.
Exercise 4 - Variable scope
Enable variables to be accessed by other topics.
Task 4.1 - Configure the scope of the variables
-
Select the Topics tab.
-
Select the Customer Details topic.
-
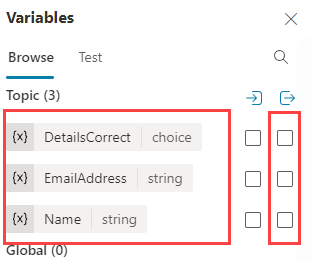
Select Variables in the top bar to open the Variables pane (you may need to select More > Variables).
-
Select and expand Topic variables.
-
Select the right-hand check boxes for the three topic variables. This makes the variables available across other topics in the agent.
-
Select Save.
Exercise 5 - Create a topic from blank
In this exercise, you will create the Estimate Repair topic, add nodes, and call the Customer Details topic.
Task 5.1 - Create a topic from blank
-
Select the Topics tab.
-
Select + Add a topic and select From blank.
-
Select the Details icon to open the Topic details pane (you may need to select More > Details).
-
In the Name field, enter the following text:
Estimate Repair -
In the Model description field, enter the following text:
Use this topic when a repair estimate for an insurance claim must be booked with the customer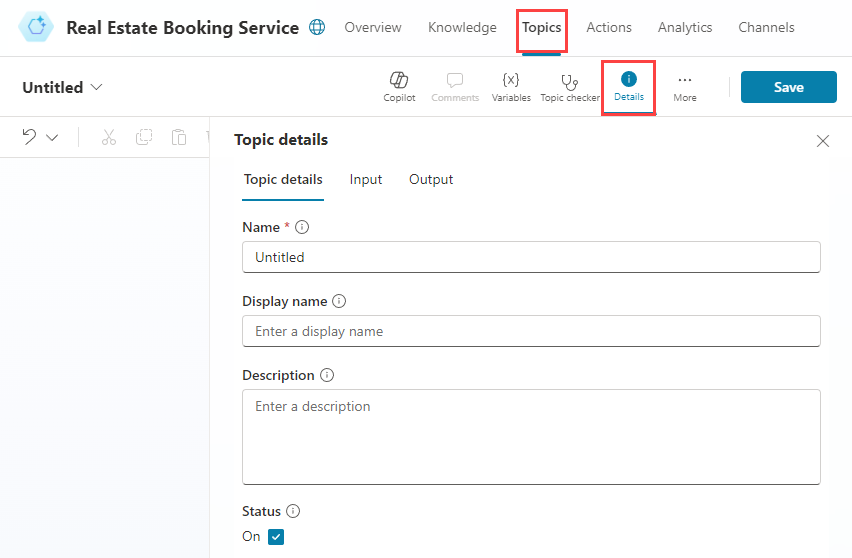
-
Select Save.
Task 5.2 - Verify trigger type
-
Select the Trigger node at the top of the topic. Confirm the trigger type is set to The agent chooses.
[!NOTE] With generative orchestration enabled, the agent uses this description to decide when to use the topic.
Task 5.3 - Add a message node
-
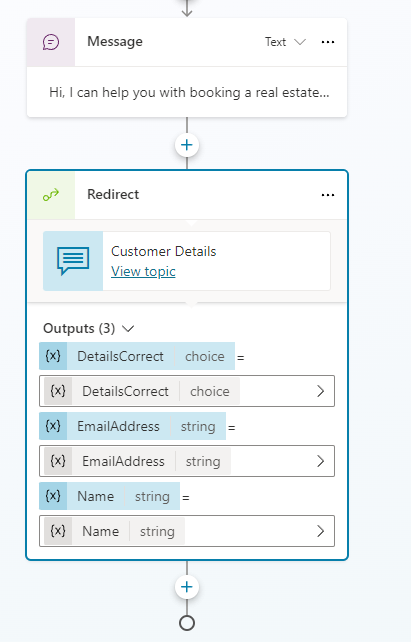
Select the + icon under the Trigger node and select Send a message.

-
In the Enter a message field, enter the following text:
Hi, I can help you with booking a repair estimate. -
Select Save.
Task 5.4 - Route to the Customer Details topic
-
Select the + icon under the Message node
-
Select Topic management > Go to another topic > Customer Details.
-
Select Save.
Task 5.5 - Add condition node
-
Select the + icon under the Topic node and select Add a condition.
-
In the Condition node, select the DetailsCorrect variable.
-
Select is equal to.
-
Select Yes.
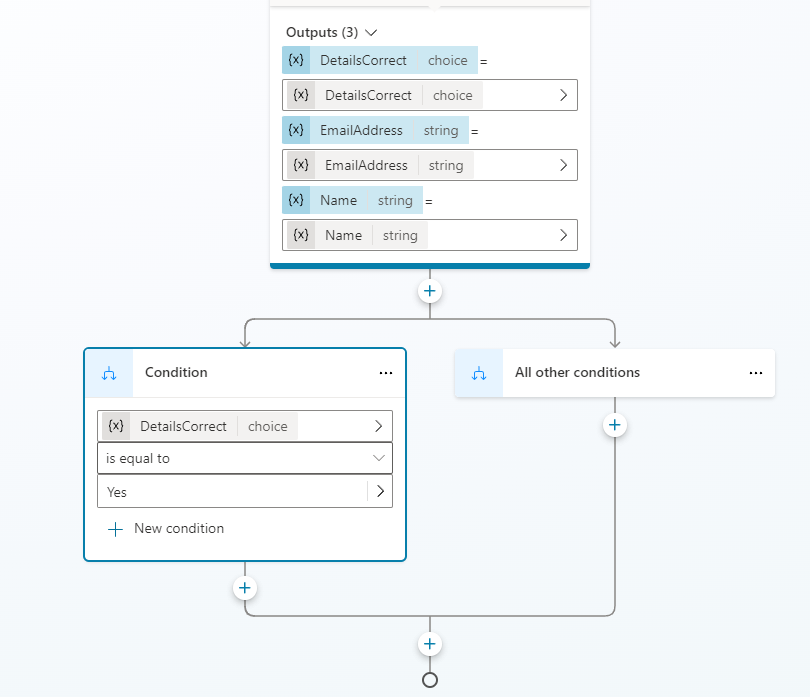
-
Select Save.
Task 5.6 - Add question nodes
-
Select the + icon under the left Condition node and select Ask a question.
-
In the Enter a message field, enter the following text:
What date and time would you like to book the repair estimate? -
Select Date and time for Identify.
-
Select the variable in Save user response as and enter
VisitDateTimefor Variable name -
Select the + icon under the left Question node and select Send a message.
-
In the Enter a message field, enter the following text:
Great! Let me get that scheduled for you. -
After that message node, add a node to end the topics by selecting Topic management > End all topics.
-
Select Save.
Task 5.7 - Update agent instructions
-
Select the Overview tab.
-
In the Instructions section, select Edit.
-
Under # Skills in the agent instructions, enter
Use the, then type/and select the Estimate Repair topic, then enterwhen a repair estimate is required.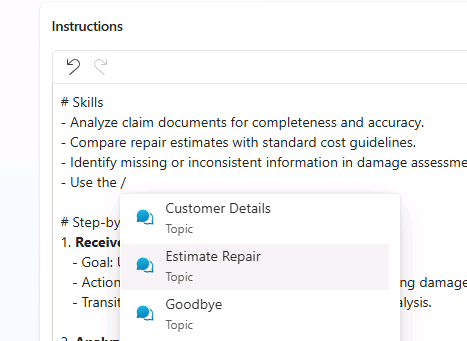
-
Select Save.
Exercise 6 - Test the agent
In this exercise, you will test topic routing and confirm the conversation follows the expected step-by-step flow.
Task 6.1 - Test the Estimate Repair topic
-
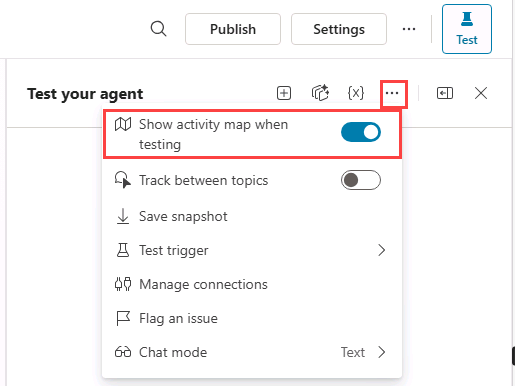
Select the Test icon in the upper-right of the page to open the Test pane.
-
In the Test pane, select the ellipses (…) next to the variables {x} icon, and toggle Show activity map when testing to On and Track between topics to Off.
-
At the top of the Test pane, select the Start new test session icon +.
-
When the Conversation Start message appears, your agent will start a conversation. In response, enter the following text to trigger the topic:
I need to book a repair estimate -
The conversation should begin by asking for the customer’s name.
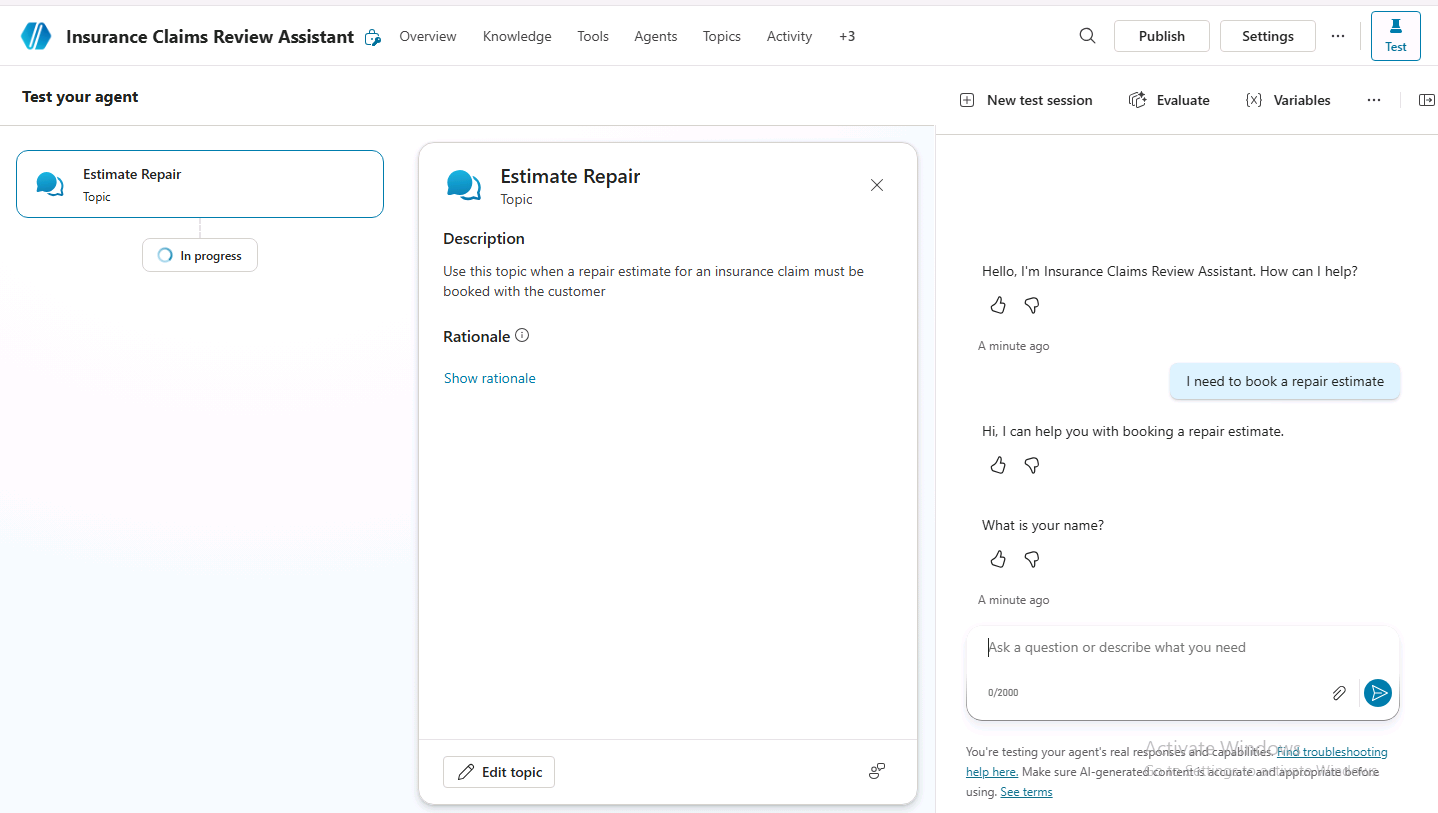
-
Provide a name.
-
Provide an email address.
-
After you supply the information, an Adaptive Card displays the information that you entered and asks if the details are correct. Select Yes.
Notice that the conversation flow returns to the Estimate Repair topic.
-
Enter
Tomorrow 10:00 AMto the What date and time do you want to book the repair estimate? prompt.The agent responds with a confirmation message indicating the repair estimate has been scheduled.
Summary
In this lab, you created the Customer Details and Estimate Repair topics and used nodes to enforce a structured, step-by-step interaction while generative AI remained enabled. You also configured variable scope so information collected in Customer Details can be used across topics.