Create an Azure Function with Visual Studio Code
In this exercise, you learn how to create a C# function that responds to HTTP requests. After creating and testing the code locally in Visual Studio Code, you deploy and test the function in Azure.
Tasks performed in this exercise:
- Create your local project
- Run the function locally
- Deploy and execute the function in Azure
- Clean up resources
This exercise takes approximately 15 minutes to complete.
Before you start
To complete the exercise, you need:
-
An Azure subscription. If you don't already have one, you can sign up for one.
-
Visual Studio Code on one of the supported platforms.
-
.NET 8 is the target framework.
-
C# Dev Kit for Visual Studio Code.
-
Azure Functions extension for Visual Studio Code.
-
Azure Functions Core Tools version 4.x. Run the following commands in a terminal to install Azure Functions Core Tools on your system. Visit Azure Function Core Tools on GitHub for installation instructions on other platforms.
winget uninstall Microsoft.Azure.FunctionsCoreTools
winget install Microsoft.Azure.FunctionsCoreTools
If you encounter any errors installing Azure Function Core Tools, search for a solution based on the error code. Then retry the winget install command in the previous step.
Create your local project
In this section, you use Visual Studio Code to create a local Azure Functions project in C#. Later in this exercise, you publish your function code to Azure.
-
In Visual Studio Code, press F1 to open the command palette and search for and run the command Azure Functions: Create New Project....
-
Select the directory location for your project workspace and choose Select. You should either create a new folder or choose an empty folder for the project workspace. Don't choose a project folder that is already part of a workspace.
-
Provide the following information at the prompts:
Prompt Action Select the folder that will contain your function project Select Browse... to select a folder for your app. Select a language Select C#. Select a .NET runtime Select .NET 8.0 Isolated Select a template for your project's first function Select HTTP trigger.1 Provide a function name Enter HttpExample.Provide a namespace Enter My.Function.Authorization level Select Anonymous, which enables anyone to call your function endpoint. 1 Depending on your VS Code settings, you might need to use the Change template filter option to see the full list of templates.
-
When prompted to Select how you would like to open your project select Open in current window.
-
Visual Studio Code uses the provided information and generates an Azure Functions project with an HTTP trigger. You can view the local project files in the Explorer.
Note: If VS Code displays a popup with the title Do you trust the authors of the files in this folder?, select the Yes, I trust the authors button.
Run the function locally
Visual Studio Code integrates with Azure Functions Core tools to let you run this project on your local development computer before you publish to Azure.
-
Make sure the terminal is open in Visual Studio Code. You can open the terminal by selecting Terminal and then New Terminal in the menu bar.
-
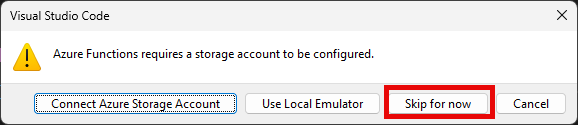
Press F5 to start the function app project in the debugger. If you are prompted to choose a storage account select Skip for now.
-
Output from Core Tools is displayed in the Terminal panel. You can see the URL endpoint of your HTTP-triggered function running locally.

-
With Core Tools running, open the Azure extension. In the Workspace section of the extension, expand Local Project > Functions. Right-click the HttpExample function and select Execute Function Now....

-
In Enter request body you see the request message body value of
{ "name": "Azure" }. Press Enter to send this request message to your function. When the function executes locally and returns a response, a notification is raised in Visual Studio Code.Select the notification bell icon to view the notification. Information about the function execution is shown in Terminal panel.
-
Press Shift + F5 to stop Core Tools and disconnect the debugger.
After verifying that the function runs correctly on your local computer, it's time to use Visual Studio Code to publish the project directly to Azure.
Deploy and execute the function in Azure
In this section you create an Azure Function App resource and deploy the function to the resource.
Sign in to Azure
Before you can publish your app, you must sign in to Azure. If you already signed in, go to the next section.
-
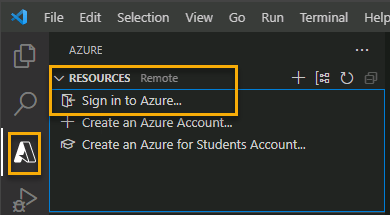
If you aren't already signed in, choose the Azure icon in the Activity bar, then in the Azure: Resources area, choose Sign in to Azure....
-
When prompted in the browser, choose your Azure account and sign in using your Azure account credentials.
-
After successfully signing in, you can close the new browser window. The subscriptions that belong to your Azure account are displayed in the Side bar.
Create resources in Azure
In this section, you create the Azure resources you need to deploy your local function app.
-
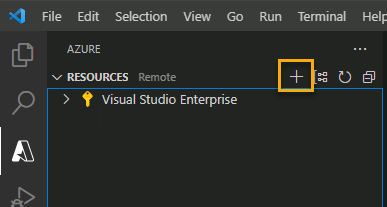
Choose the Azure icon in the Activity bar, then in the Resources area select the Create resource... button.
-
Provide the following information at the prompts:
Prompt Action Select a resource to create Select Create Function App in Azure... Select subscription Select the subscription to use. You won't see this if you only have one subscription. Enter a globally unique name for the function app Type a name that is valid in a URL path, for example myfunctionapp. The name you type is validated to make sure that it's unique.Select a location for new resources For better performance, select a region near you. Select a runtime stack Select .NET 8.0 Isolated. Select resource authentication type Select Secrets The extension shows the status of individual resources as they're being created in the AZURE area of the terminal window.
-
When completed, the following Azure resources are created in your subscription, using names based on your function app name:
- A resource group, which is a logical container for related resources.
- A standard Azure Storage account, which maintains state and other information about your projects.
- A Flex consumption plan, which defines the underlying host for your serverless function app.
- A function app, which provides the environment for executing your function code. A function app lets you group functions as a logical unit for easier management, deployment, and sharing of resources within the same hosting plan.
- An Application Insights instance connected to the function app, which tracks usage of your serverless function.
Deploy the project to Azure
! Important: Publishing to an existing function overwrites any previous deployments.
-
In the command palette, search for and run the command Azure Functions: Deploy to Function App....
-
Select the subscription you used when creating the resources.
-
Select the function app you created. When prompted about overwriting previous deployments, select Deploy to deploy your function code to the new function app resource.
-
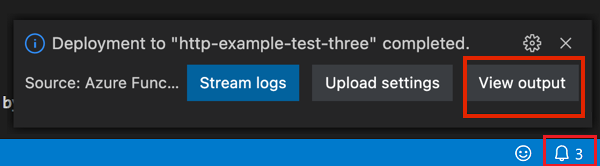
After deployment completes, select View Output to view the details of the deployment results. If you miss the notification, select the notification bell icon in the lower right corner to see it again.
Run the function in Azure
-
Back in the Resources area in the side bar, expand your subscription, your new function app, and Functions. Right-click the HttpExample function and choose Execute Function Now....
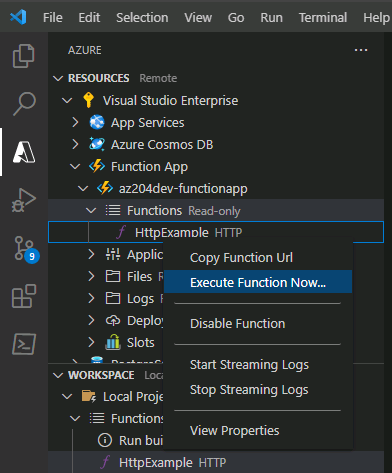
-
In Enter request body you see the request message body value of
{ "name": "Azure" }. Press Enter to send this request message to your function. -
When the function executes in Azure and returns a response, a notification is raised in Visual Studio Code. select the notification bell icon to view the notification.
Clean up resources
Now that you finished the exercise, you should delete the cloud resources you created to avoid unnecessary resource usage.
- In your browser navigate to the Azure portal https://portal.azure.com; signing in with your Azure credentials if prompted.
- Navigate to the resource group you created and view the contents of the resources used in this exercise.
- On the toolbar, select Delete resource group.
- Enter the resource group name and confirm that you want to delete it.
CAUTION: Deleting a resource group deletes all resources contained within it. If you chose an existing resource group for this exercise, any existing resources outside the scope of this exercise will also be deleted.