Create resources in Azure Cosmos DB for NoSQL using .NET
In this exercise, you create an Azure Cosmos DB account and build a .NET console application that uses the Microsoft Azure Cosmos DB SDK to create a database, container, and sample item. You learn how to configure authentication, perform database operations programmatically, and verify your results in the Azure portal.
Tasks performed in this exercise:
- Create an Azure Cosmos DB account
- Create a console app that creates a database, container, and an item
- Run the console app and verify results
This exercise takes approximately 30 minutes to complete.
Create an Azure Cosmos DB account
In this section of the exercise you create a resource group and Azure Cosmos DB account. You also record the endpoint, and access key for the account.
-
In your browser navigate to the Azure portal https://portal.azure.com; signing in with your Azure credentials if prompted.
-
Use the [>_] button to the right of the search bar at the top of the page to create a new cloud shell in the Azure portal, selecting a Bash environment. The cloud shell provides a command line interface in a pane at the bottom of the Azure portal. If you are prompted to select a storage account to persist your files, select No storage account required, your subscription, and then select Apply.
Note: If you have previously created a cloud shell that uses a PowerShell environment, switch it to Bash.
-
In the cloud shell toolbar, in the Settings menu, select Go to Classic version (this is required to use the code editor).
-
Create a resource group for the resources needed for this exercise.. If you already have a resource group you want to use, proceed to the next step. Replace myResourceGroup with a name you want to use for the resource group. You can replace eastus with a region near you if needed.
az group create --location eastus --name myResourceGroup -
Many of the commands require unique names and use the same parameters. Creating some variables will reduce the changes needed to the commands that create resources. Run the following commands to create the needed variables. Replace myResourceGroup with the name you're using for this exercise.
resourceGroup=myResourceGroup accountName=cosmosexercise$RANDOM -
Run the following commands to create the Azure Cosmos DB account, each account name must be unique.
az cosmosdb create --name $accountName \ --resource-group $resourceGroup -
Run the following command to retrieve the documentEndpoint for the Azure Cosmos DB account. Record the endpoint from the command results, it's needed later in the exercise.
az cosmosdb show --name $accountName \ --resource-group $resourceGroup \ --query "documentEndpoint" --output tsv -
Retrieve the primary key for the account with the following command. Record the primary key from the command results, it's needed later in the exercise.
az cosmosdb keys list --name $accountName \
    --resource-group $resourceGroup \
    --query "primaryMasterKey" --output tsv
Create data resources and an item with a .NET console application
Now that the needed resources are deployed to Azure the next step is to set up the console application. The following steps are performed in the cloud shell.
Tip: Resize the cloud shell to display more information, and code, by dragging the top border. You can also use the minimize and maximize buttons to switch between the cloud shell and the main portal interface.
-
Create a folder for the project and change in to the folder.
mkdir cosmosdb cd cosmosdb -
Create the .NET console app.
dotnet new console
Configure the console application
-
Run the following commands to add the Microsoft.Azure.Cosmos, Newtonsoft.Json, and dotenv.net packages to the project.
dotnet add package Microsoft.Azure.Cosmos --version 3.* dotnet add package Newtonsoft.Json --version 13.* dotnet add package dotenv.net -
Run the following command to create the .env file to hold the secrets, and then open it in the code editor.
touch .env code .env -
Add the following code to the .env file. Replace YOUR_DOCUMENT_ENDPOINT and YOUR_ACCOUNT_KEY with the values you recorded earlier.
DOCUMENT_ENDPOINT="YOUR_DOCUMENT_ENDPOINT" ACCOUNT_KEY="YOUR_ACCOUNT_KEY" -
Press ctrl+s to save the file, then ctrl+q to exit the editor.
Now it's time to replace the template code in the Program.cs file using the editor in the cloud shell.
Add the starting code for the project
-
Run the following command in the cloud shell to begin editing the application.
code Program.cs -
Replace any existing code with the following code snippet.
The code provides the overall structure of the app. Review the comments in the code to get an understanding of how it works. To complete the application, you add code in specified areas later in the exercise.
using Microsoft.Azure.Cosmos;
using dotenv.net;

string databaseName = "myDatabase"; // Name of the database to create or use
string containerName = "myContainer"; // Name of the container to create or use

// Load environment variables from .env file
DotEnv.Load();
var envVars = DotEnv.Read();
string cosmosDbAccountUrl = envVars["DOCUMENT_ENDPOINT"];
string accountKey = envVars["ACCOUNT_KEY"];

if (string.IsNullOrEmpty(cosmosDbAccountUrl) || string.IsNullOrEmpty(accountKey))
{
    Console.WriteLine("Please set the DOCUMENT_ENDPOINT and ACCOUNT_KEY environment variables.");
    return;
}

// CREATE THE COSMOS DB CLIENT USING THE ACCOUNT URL AND KEY


try
{
    // CREATE A DATABASE IF IT DOESN'T ALREADY EXIST


    // CREATE A CONTAINER WITH A SPECIFIED PARTITION KEY


    // DEFINE A TYPED ITEM (PRODUCT) TO ADD TO THE CONTAINER


    // ADD THE ITEM TO THE CONTAINER


}
catch (CosmosException ex)
{
    // Handle Cosmos DB-specific exceptions
    // Log the status code and error message for debugging
    Console.WriteLine($"Cosmos DB Error: {ex.StatusCode} - {ex.Message}");
}
catch (Exception ex)
{
    // Handle general exceptions
    // Log the error message for debugging
    Console.WriteLine($"Error: {ex.Message}");
}

// This class represents a product in the Cosmos DB container
public class Product
{
    public string? id { get; set; }
    public string? name { get; set; }
    public string? description { get; set; }
}
Next, you add code in specified areas of the projects to create the: client, database, container, and add a sample item to the container.
Add code to create the client and perform operations
-
Add the following code in the space after the // CREATE THE COSMOS DB CLIENT USING THE ACCOUNT URL AND KEY comment. This code defines the client used to connect to your Azure Cosmos DB account.
CosmosClient client = new(
    accountEndpoint: cosmosDbAccountUrl,
    authKeyOrResourceToken: accountKey
);
Note: It's a best practice to use the DefaultAzureCredential from the Azure Identity library. This can require some additional configuration requirements in Azure depending on how your subscription is set up.
-
Add the following code in the space after the // CREATE A DATABASE IF IT DOESN'T ALREADY EXIST comment.
Database database = await client.CreateDatabaseIfNotExistsAsync(databaseName); Console.WriteLine($"Created or retrieved database: {database.Id}"); -
Add the following code in the space after the // CREATE A CONTAINER WITH A SPECIFIED PARTITION KEY comment.
Container container = await database.CreateContainerIfNotExistsAsync( id: containerName, partitionKeyPath: "/id" ); Console.WriteLine($"Created or retrieved container: {container.Id}"); -
Add the following code in the space after the // DEFINE A TYPED ITEM (PRODUCT) TO ADD TO THE CONTAINER comment. This defines the item that's added to the container.
Product newItem = new Product { id = Guid.NewGuid().ToString(), // Generate a unique ID for the product name = "Sample Item", description = "This is a sample item in my Azure Cosmos DB exercise." }; -
Add the following code in the space after the // ADD THE ITEM TO THE CONTAINER comment.
ItemResponse<Product> createResponse = await container.CreateItemAsync( item: newItem, partitionKey: new PartitionKey(newItem.id) ); Console.WriteLine($"Created item with ID: {createResponse.Resource.id}"); Console.WriteLine($"Request charge: {createResponse.RequestCharge} RUs"); -
Now that the code is complete, save your progress use ctrl + s to save the file, and ctrl + q to exit the editor.
-
Run the following command in the cloud shell to test for any errors in the project. If you do see errors, open the Program.cs file in the editor and check for missing code or pasting errors.
dotnet build
Now that the project is finished it's time to run the application and verify the results in the Azure portal.
Run the application and verify results
-
Run the
dotnet runcommand if in the cloud shell. The output should be something similar to the following example.Created or retrieved database: myDatabase Created or retrieved container: myContainer Created item: c549c3fa-054d-40db-a42b-c05deabbc4a6 Request charge: 6.29 RUs -
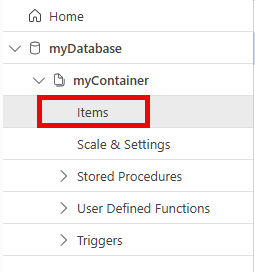
In the Azure portal, navigate to the Azure Cosmos DB resource you created earlier. Select Data Explorer in the left navigation. In Data Explorer, select myDatabase and then expand myContainer. You can view the item you created by selecting Items.
Clean up resources
Now that you finished the exercise, you should delete the cloud resources you created to avoid unnecessary resource usage.
- In your browser navigate to the Azure portal https://portal.azure.com; signing in with your Azure credentials if prompted.
- Navigate to the resource group you created and view the contents of the resources used in this exercise.
- On the toolbar, select Delete resource group.
- Enter the resource group name and confirm that you want to delete it.
CAUTION: Deleting a resource group deletes all resources contained within it. If you chose an existing resource group for this exercise, any existing resources outside the scope of this exercise will also be deleted.