Swap deployment slots in Azure App Service
In this exercise, you deploy a static HTML website to Azure App Service, create a staging deployment slot, make changes to the code and deploy them to the staging slot, and then swap the staging and production slots to promote the changes to production. You learn how to use deployment slots for safe application updates and blue-green deployments.
Tasks performed in this exercise:
- Download and deploy the sample app to Azure App Service.
- Create a staging deployment slot.
- Make a change to the sample app and deploy it to the staging slot.
- Swap the staging and default production slots to move the changes to the production slot.
This exercise takes approximately 30 minutes to complete.
Download and deploy the sample app
In this section you download the sample app and set variables to make the commands easier to enter, and then create an Azure App Service resource and deploy a static HTML site using Azure CLI commands.
-
In your browser navigate to the Azure portal https://portal.azure.com; signing in with your Azure credentials if prompted.
-
Use the [>_] button to the right of the search bar at the top of the page to create a new cloud shell in the Azure portal, selecting a Bash environment. The cloud shell provides a command line interface in a pane at the bottom of the Azure portal. If you are prompted to select a storage account to persist your files, select No storage account required, your subscription, and then select Apply.
Note: If you have previously created a cloud shell that uses a PowerShell environment, switch it to Bash.
-
In the cloud shell toolbar, in the Settings menu, select Go to Classic version (this is required to use the code editor).
-
Run the following git command to clone the sample app repository.
git clone https://github.com/Azure-Samples/html-docs-hello-world.git -
Set variables to hold the resource group and app names by running the following commands. You can replace the rg-mywebapp value for resourceGroup if you have a resource group you want to use. Make note of the value of the appName that is displayed after the commands run, you'll need it later in this exercise.
resourceGroup=rg-mywebapp appName=mywebapp$RANDOM echo $appName -
Navigate to the directory that contains the sample code and run the az webapp up command. Note: This command might take a few minutes to run.
cd html-docs-hello-world

az webapp up -g $resourceGroup -n $appName --sku P0V3 --html
Now that your deployment has finished it's time to view the web app.
Note: You might need to run az login, or az login --use-device-code in the cloud shell for the az webapp up command to work.
-
In the Azure portal navigate to the web app you deployed. You can enter the name you noted earlier in the Search resources, services, and docs (G + /) search bar, and select the resource from the list.
-
Select the link to your web app located in the Default domain field in the Essentials section. The link will open the site in a new tab.
Deploy updated code to a deployment slot
In this section you create a deployment slot, modify the HTML in the app, and deploy the updated code to the new deployment slot.
Create a deployment slot
-
Return to the tab with the Azure portal and cloud shell.
-
Enter the following command in the cloud shell to create a deployment slot named staging.
az webapp deployment slot create -n $appName -g $resourceGroup --slot staging -
Wait for the command to finish, and then select Deployment > Deployment slots in the left menu to view the deployment slots for your web app. Note the name of the new slot contains -staging appended to name of your web app
Update code and deploy to the staging slot
-
In the cloud shell, type code index.html to open the editor. Locate the <h1> heading tag, and change Azure App Service - Sample Static HTML Site to Azure App Service Staging Slot - or to anything else that you'd like.
-
Use the commands ctrl-s to save, and ctrl-q to exit.
-
In the cloud shell run the following command to create a zip file of the updated project. A zip, or a web application resource (WAR), file is needed for the next step.
zip -r stagingcode.zip . -
Run the following command in the cloud shell to deploy your updates to the staging slot.
az webapp deploy -g $resourceGroup -n $appName --src-path ./stagingcode.zip --slot staging -
Select Deployment > Deployment slots in the left menu of your web app, and then select the staging slot you created earlier.
-
Select the link in the Default domain field in the Essentials section. The link will open the web site for the staging slot in a new tab.
Swap the staging and production slots
You can perform a swap in the Azure portal with the Swap option in the toolbar. The Swap option will appear in the toolbar if you select Overview or Deployment > Deployment slots in the left menu of your web app.
-
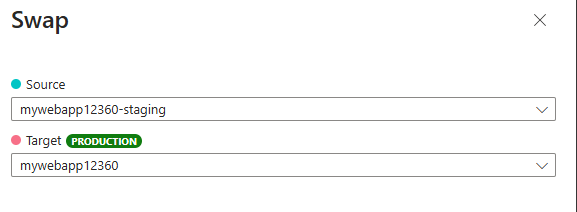
In the Azure portal, select Swap in the toolbar to open the Swap panel.
-
Review the settings in the swap panel. The Source should show the -staging slot, and the Target should show the default production slot.
-
Select Start Swap and wait for the operation to complete. You can track completion in the Notifications panel that you can open by selecting the bell icon at the top of the portal.
-
To verify the swap navigate to the web app you deployed. Enter the web app name you created earlier (for example, mywebapp12360) in the Search resources, services, and docs (G + /) search bar, and then select the resource from the list.
-
Select the link to your web app located in the Default domain field in the Essentials section. The link will open the site (production slot) in a new tab.
-
Verify your changes, you may need to refresh the page for them to appear.
Clean up resources
Now that you finished the exercise, you should delete the cloud resources you created to avoid unnecessary resource usage.
- In your browser navigate to the Azure portal https://portal.azure.com; signing in with your Azure credentials if prompted.
- Navigate to the resource group you created and view the contents of the resources used in this exercise.
- On the toolbar, select Delete resource group.
- Enter the resource group name and confirm that you want to delete it.
CAUTION: Deleting a resource group deletes all resources contained within it. If you chose an existing resource group for this exercise, any existing resources outside the scope of this exercise will also be deleted.