Retrieve user profile information with the Microsoft Graph SDK
In this exercise, you create a .NET app to authenticate with Microsoft Entra ID and request an access token, then call the Microsoft Graph API to retrieve and display your user profile information. You learn how to configure permissions and interact with Microsoft Graph from your application.
Tasks performed in this exercise:
- Register an application with the Microsoft identity platform
- Create a .NET console application that implements interactive authentication, and uses the GraphServiceClient class to retrieve user profile information.
This exercise takes approximately 15 minutes to complete.
Before you start
To complete the exercise, you need:
-
An Azure subscription. If you don't already have one, you can sign up for one.
-
Visual Studio Code on one of the supported platforms.
-
.NET 8 or greater.
-
C# Dev Kit for Visual Studio Code.
Register a new application
-
In your browser navigate to the Azure portal https://portal.azure.com; signing in with your Azure credentials if prompted.
-
In the portal, search for and select App registrations.
-
Select + New registration, and when the Register an application page appears, enter your application's registration information:
Field Value Name Enter myGraphApplicationSupported account types Select Accounts in this organizational directory only Redirect URI (optional) Select Public client/native (mobile & desktop) and enter http://localhostin the box to the right. -
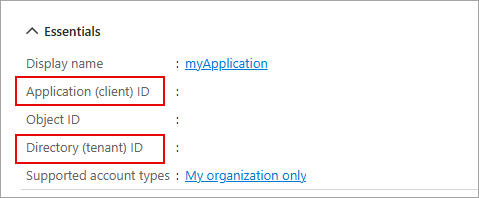
Select Register. Microsoft Entra ID assigns a unique application (client) ID to your app, and you're taken to your application's Overview page.
-
In the Essentials section of the Overview page record the Application (client) ID and the Directory (tenant) ID. The information is needed for the application.
Create a .NET console app to send and receive messages
Now that the needed resources are deployed to Azure the next step is to set up the console application. The following steps are performed in your local environment.
-
Create a folder named graphapp, or a name of your choosing, for the project.
-
Launch Visual Studio Code and select File > Open folder... and select the project folder.
-
Select View > Terminal to open a terminal.
-
Run the following command in the VS Code terminal to create the .NET console application.
dotnet new console -
Run the following commands to add the Azure.Identity, Microsoft.Graph, and the dotenv.net packages to the project.
dotnet add package Azure.Identity
dotnet add package Microsoft.Graph
dotnet add package dotenv.net
Configure the console application
In this section you create, and edit, a .env file to hold the secrets you recorded earlier.
-
Select File > New file... and create a file named .env in the project folder.
-
Open the .env file and add the following code. Replace YOUR_CLIENT_ID, and YOUR_TENANT_ID with the values you recorded earlier.
CLIENT_ID="YOUR_CLIENT_ID" TENANT_ID="YOUR_TENANT_ID" -
Press ctrl+s to save the file.
Add the starter code for the project
-
Open the Program.cs file and replace any existing contents with the following code. Be sure to review the comments in the code.
using Microsoft.Graph; using Azure.Identity; using dotenv.net; // Load environment variables from .env file (if present) DotEnv.Load(); var envVars = DotEnv.Read(); // Read Azure AD app registration values from environment string clientId = envVars["CLIENT_ID"]; string tenantId = envVars["TENANT_ID"]; // Validate that required environment variables are set if (string.IsNullOrEmpty(clientId) || string.IsNullOrEmpty(tenantId)) { Console.WriteLine("Please set CLIENT_ID and TENANT_ID environment variables."); return; } // ADD CODE TO DEFINE SCOPE AND CONFIGURE AUTHENTICATION // ADD CODE TO CREATE GRAPH CLIENT AND RETRIEVE USER PROFILE -
Press ctrl+s to save your changes.
Add code to complete the application
-
Locate the // ADD CODE TO DEFINE SCOPE AND CONFIGURE AUTHENTICATION comment and add the following code directly after the comment. Be sure to review the comments in the code.
// Define the Microsoft Graph permission scopes required by this app var scopes = new[] { "User.Read" }; // Configure interactive browser authentication for the user var options = new InteractiveBrowserCredentialOptions { ClientId = clientId, // Azure AD app client ID TenantId = tenantId, // Azure AD tenant ID RedirectUri = new Uri("http://localhost") // Redirect URI for auth flow }; var credential = new InteractiveBrowserCredential(options); -
Locate the // ADD CODE TO CREATE GRAPH CLIENT AND RETRIEVE USER PROFILE comment and add the following code directly after the comment. Be sure to review the comments in the code.
// Create a Microsoft Graph client using the credential var graphClient = new GraphServiceClient(credential); // Retrieve and display the user's profile information Console.WriteLine("Retrieving user profile..."); await GetUserProfile(graphClient); // Function to get and print the signed-in user's profile async Task GetUserProfile(GraphServiceClient graphClient) { try { // Call Microsoft Graph /me endpoint to get user info var me = await graphClient.Me.GetAsync(); Console.WriteLine($"Display Name: {me?.DisplayName}"); Console.WriteLine($"Principal Name: {me?.UserPrincipalName}"); Console.WriteLine($"User Id: {me?.Id}"); } catch (Exception ex) { // Print any errors encountered during the call Console.WriteLine($"Error retrieving profile: {ex.Message}"); } } -
Press ctrl+s to save the file.
Run the application
Now that the app is complete it's time to run it.
-
Start the application by running the following command:
dotnet run -
The app opens the default browser prompting you to select the account you want to authenticate with. If there are multiple accounts listed select the one associated with the tenant used in the app.
-
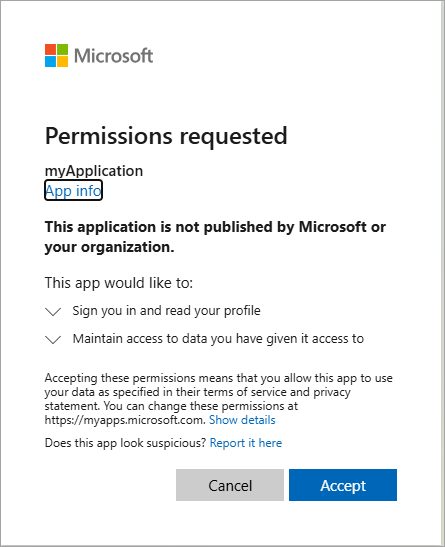
If this is the first time you've authenticated to the registered app you receive a Permissions requested notification asking you to approve the app to sign you in and read your profile, and maintain access to data you have given it access to. Select Accept.
-
You should see the results similar to the example below in the console.
Retrieving user profile... Display Name: <Your account display name> Principal Name: <Your principal name> User Id: 9f5... -
Start the application a second time and notice you no longer receive the Permissions requested notification. The permission you granted earlier was cached.
Clean up resources
Now that you finished the exercise, you should delete the cloud resources you created to avoid unnecessary resource usage.
- In your browser navigate to the Azure portal https://portal.azure.com; signing in with your Azure credentials if prompted.
- Navigate to the resource group you created and view the contents of the resources used in this exercise.
- On the toolbar, select Delete resource group.
- Enter the resource group name and confirm that you want to delete it.
CAUTION: Deleting a resource group deletes all resources contained within it. If you chose an existing resource group for this exercise, any existing resources outside the scope of this exercise will also be deleted.