Run a pipeline with components
In this exercise, you will build a pipeline with components. The pipeline will be submitted with the CLI (v2). First, you’ll run a pipeline. Next, you’ll create components in the Azure Machine Learning workspace so that they can be reused. Finally, you’ll create a pipeline with the Designer in the Azure Machine Learning Studio to experience how you can reuse components to create new pipelines.
Prerequisites
Before you continue, complete the Create an Azure Machine Learning Workspace and assets with the CLI (v2) lab to set up your Azure Machine Learning environment.
You’ll run all commands in this lab from the Azure Cloud Shell.
- Open the Cloud Shell by navigating to http://shell.azure.com and signing in with your Microsoft account.
- The repo https://github.com/MicrosoftLearning/mslearn-aml-cli should be cloned. You can explore the repo and its contents by using the
code .command in the Cloud Shell. - If your compute instance is stopped. Start the instance again by using the following command. Change
to your compute instance name before running the code: az ml compute start --name "<your-compute-instance-name>"
Run a pipeline
You can train a model by running a job that refers to one training script. To train a model as part of a pipeline, you can use Azure Machine Learning to run multiple scripts. The configuration of the pipeline is defined in a YAML file.
In this exercise, you’ll start by preprocessing the data and training a Decision Tree model. To explore the pipeline job definition job.yml navigate to mslearn-aml-cli/Allfiles/Labs/05/job.yml. The dataset used is the diabetes-data dataset registered to the Azure Machine Learning workspace in the set-up.
-
Run the following command in the Cloud Shell to open the files of the cloned repo.
code . - Navigate to mslearn-aml-cli/Allfiles/Labs/05/ and open job.yml by selecting the file.
- Change the compute value: replace
<your-compute-instance-name>with the name of your compute instance. -
Run the job by using the following command:
az ml job create --file ./mslearn-aml-cli/Allfiles/Labs/05/job.yml - Open another tab in your browser and open the Azure Machine Learning Studio. Go to the Experiments page and locate the diabetes-pipeline-example experiment. Open the run to monitor the job. Refresh the view if necessary. Once completed, you can explore the details of the job and of each component by expanding the Child runs.
Create components
To reuse the pipeline’s components, you can create the component in the Azure Machine Learning workspace. In addition to the components that were part of the pipeline you’ve just ran, you’ll create another new component you haven’t used before. You’ll use the new component in the next part.
-
Each component is created separately. Run the following code to create the components:
az ml component create --file ./mslearn-aml-cli/Allfiles/Labs/05/summary-stats.yml az ml component create --file ./mslearn-aml-cli/Allfiles/Labs/05/fix-missing-data.yml az ml component create --file ./mslearn-aml-cli/Allfiles/Labs/05/normalize-data.yml az ml component create --file ./mslearn-aml-cli/Allfiles/Labs/05/train-decision-tree.yml az ml component create --file ./mslearn-aml-cli/Allfiles/Labs/05/train-logistic-regression.yml -
Navigate to the Components page in the Azure Machine Learning Studio. All created components should show in the list here.
Create a new pipeline with the Designer
You can reuse the components by creating a pipeline with the Designer. You can recreate the same pipeline, or change the algorithm you use to train a model by replacing the component used to train the model.
- Navigate to the Designer page in the Azure Machine Learning Studio.
- Select the Custom tab at the top of the page.
- Create a new empty pipeline using custom components.
- Rename the pipeline to Train-Diabetes-Classifier.
- In the left menu, select the Data tab.
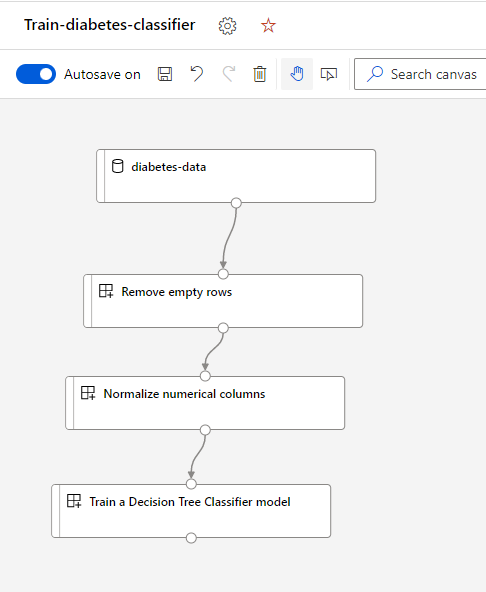
- Drag and drop the diabetes-data component to the canvas.
- In the left menu, select the Component tab.
- Drag and drop the Remove Empty Rows component on to the canvas, below the diabetes-data. Connect the output of the data to the input of the new component.
- Drag and drop the Normalize numerical columns component on to the canvas, below the Remove empty rows. Connect the output of the previous component to the input of the new component.
-
Drag and drop the Train a Decision Tree Classifier Model component on to the canvas, below the Normalize numerical columns. Connect the output of the previous component to the input of the new component. Your pipeline should look like this:
- Select Configure & Submit to setup the pipeline job.
- On the Basics page create a new experiment, name it diabetes-designer-pipeline and select Next.
- On the Inputs & outputs page select Next.
- On the Runtime settings page set the default compute target to use the compute instance you created and select Next.
- On the Review + Submit page select Submit and wait for the job to complete.
Update the pipeline with the Designer
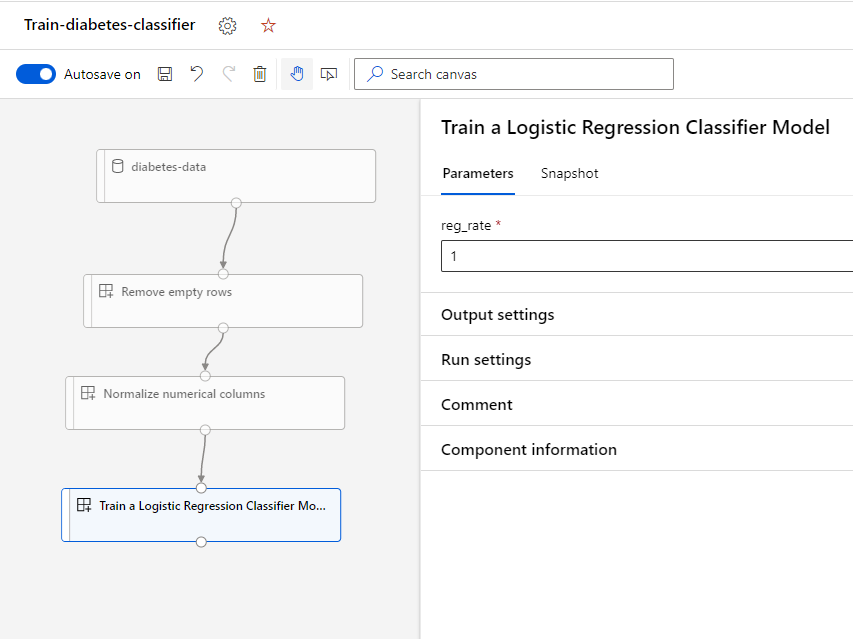
You have now trained the model with a similar pipeline as before (only omitting the calculation of the summary statistics). You can change the algorithm you use to train the model by replacing the last component:
- Remove the Train a Decision Tree Classifier Model component from the pipeline.
-
Drag and drop the Train a Logistic Regression Classifier Model component on to the canvas, below the Remove empty rows. Connect the output of the previous component to the input of the new component.
The new model training component expects a numeric input, namely the regularization rate.
- Select the Train a Logistic Regression Model component and enter 1 for the regularization_rate. Your pipeline should look like this:
- Submit the pipeline. Select the existing experiment named diabetes-designer-pipeline. Once completed, you can review the metrics and compare it with the previous pipeline to see if the model’s performance has improved.
Clean up resources
When you’re finished exploring Azure Machine Learning, shut down the compute instance to avoid unnecessary charges in your Azure subscription.
You can stop a compute instance with the following command. Change "testdev-vm" to the name of your compute instance if necessary.
az ml compute stop --name "testdev-vm" --no-wait
Note: Stopping your compute ensures your subscription won’t be charged for compute resources. You will however be charged a small amount for data storage as long as the Azure Machine Learning workspace exists in your subscription. If you have finished exploring Azure Machine Learning, you can delete the Azure Machine Learning workspace and associated resources. However, if you plan to complete any other labs in this series, you will need to repeat the set-up to create the workspace and prepare the environment first.
To completely delete the Azure Machine Learning workspace, you can use the following command in the CLI:
az ml workspace delete