Important As of fall 2023, new Personalizer resources can no longer be created. Only use this repo for reference if you have an existing Personalizer resource.
In this exercise, you’ll use Azure AI Personalizer with notebooks in Visual Studio Code to simulate a learning loop.
Create an Azure AI Personalizer resource using the Azure portal
-
In the Azure portal, search for Azure AI services. Then select Create under Personalizer in the results list.
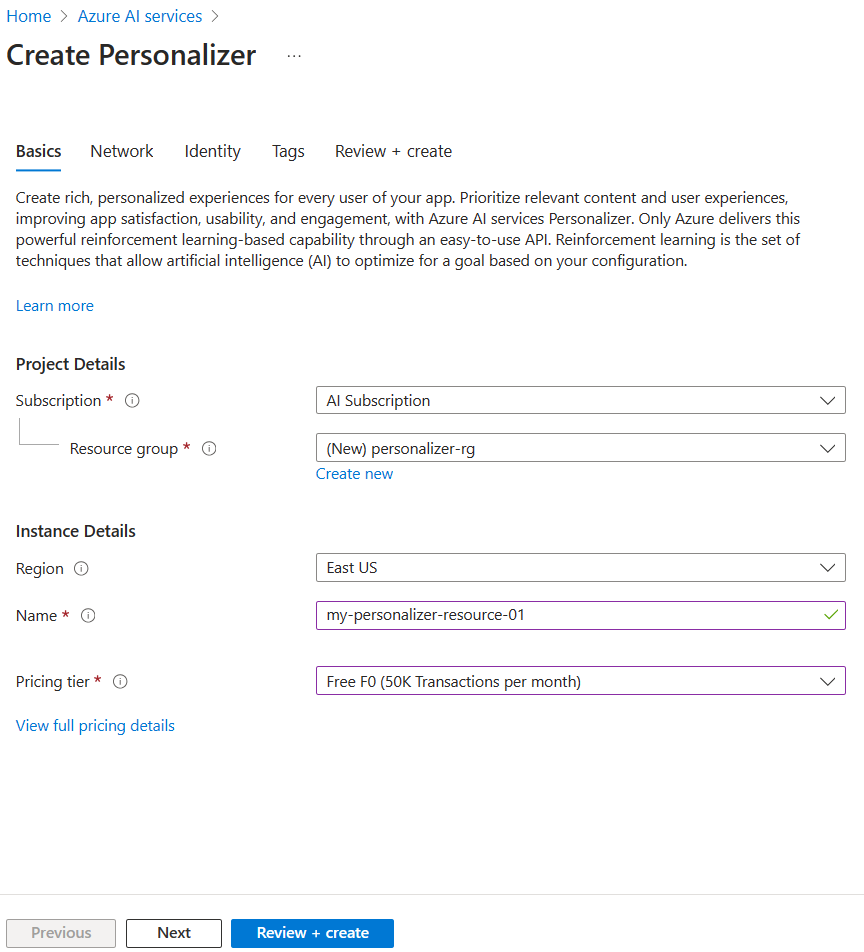
- Select your subscription, enter a resource group name, and name for your resource. For pricing tier, choose Free F0.
- Select Review + create to review your choices, then select Create create your resource.
-
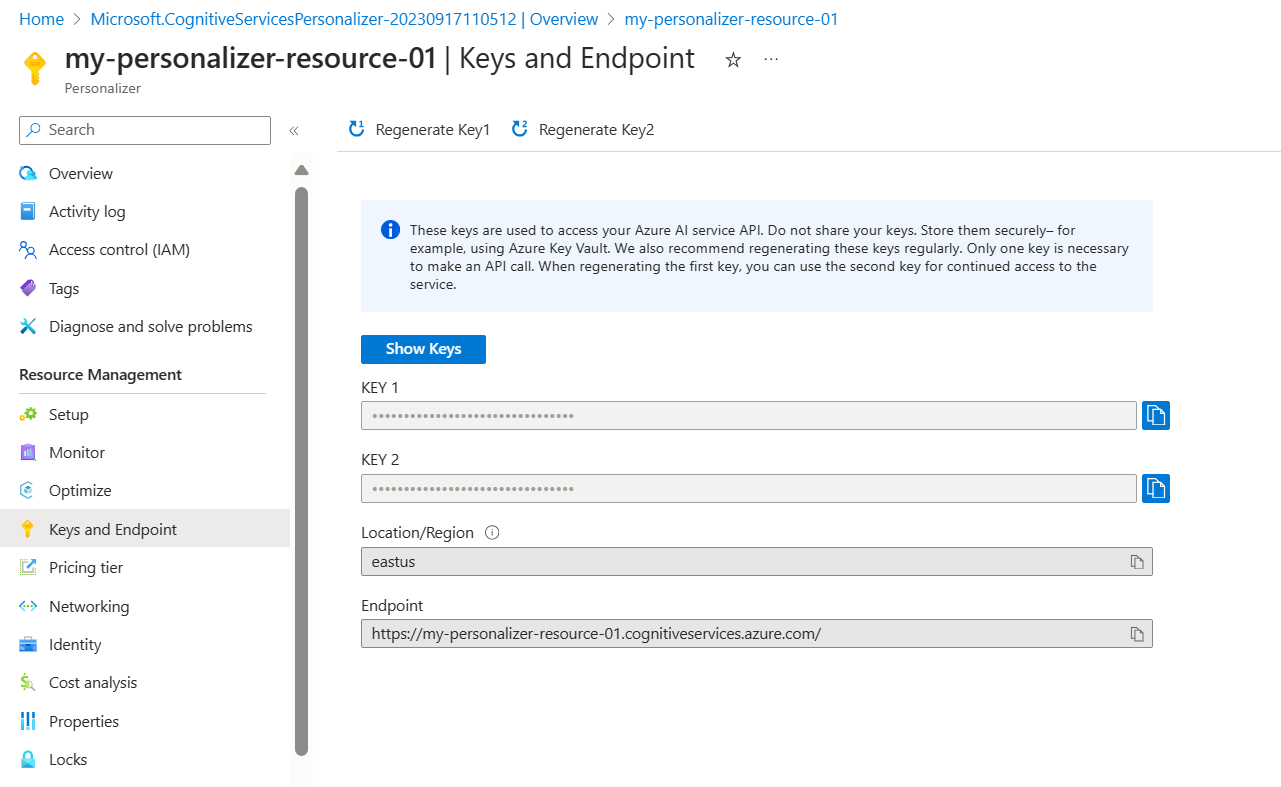
Go to your newly created Azure AI Personalizer resource, then in the Keys and Endpoint pane, copy and paste the Key and Endpoint somewhere safe for use later:
- Select Setup in the navigation pane, and then set the Reward wait time to 10 minutes (if not already set), and set the Model update frequency to 15 seconds.
- Select Save.
Set up notebook
- In your Visual Studio Code editor, press Ctrl+Shift+P and select Create: New Jupyter Notebook.
- Save the file and name it my-notebook on your device.
-
Now you need to install the required extensions. Select Select Kernel in the top right of the notebook. Then select Install/Enable suggested extensions.
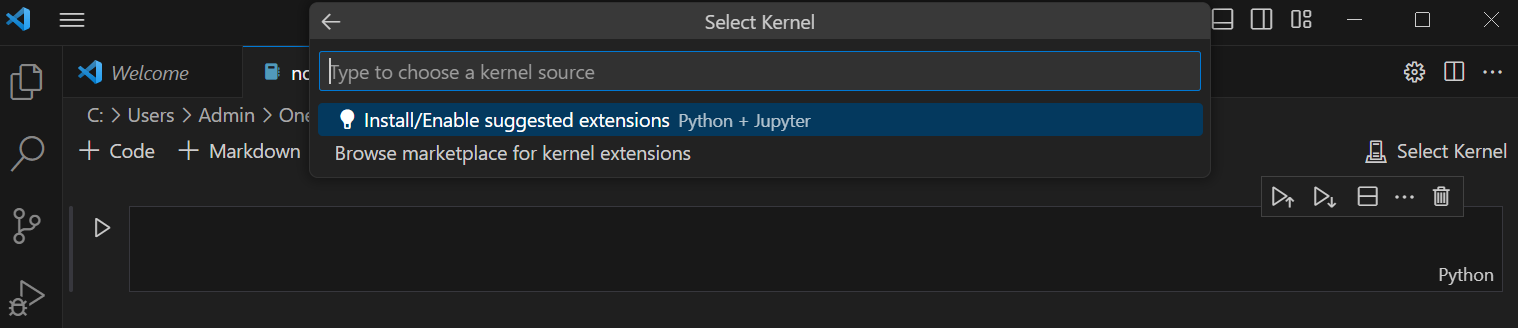
[!NOTE] If you’ve already done this before, you won’t see this option and can skip this step.
- Wait for the extensions to be installed, then select Python environments… in the dropdown that appears.
- Then select the top recommended environment.
Prepare data
For the purpose of this exercise, we’ll create a list of users and a list coffee products that we can use as the base data for our Azure AI Personalizer.
-
Copy the following JSON code into an empty file and save that file as
users.jsonin the same folder as your notebook file.{ "Alice": { "Sunny": { "Morning": "Cold brew", "Afternoon": "Iced mocha", "Evening": "Cold brew" }, "Rainy": { "Morning": "Latte", "Afternoon": "Cappucino", "Evening": "Latte" }, "Snowy": { "Morning": "Cappucino", "Afternoon": "Cappucino", "Evening": "Cappucino" } }, "Bob": { "Sunny": { "Morning": "Cappucino", "Afternoon": "Iced mocha", "Evening": "Cold brew" }, "Rainy": { "Morning": "Latte", "Afternoon": "Latte", "Evening": "Latte" }, "Snowy": { "Morning": "Iced mocha", "Afternoon": "Iced mocha", "Evening": "Iced mocha" } }, "Cathy": { "Sunny": { "Morning": "Latte", "Afternoon": "Cold brew", "Evening": "Cappucino" }, "Rainy": { "Morning": "Cappucino", "Afternoon": "Latte", "Evening": "Iced mocha" }, "Snowy": { "Morning": "Cold brew", "Afternoon": "Iced mocha", "Evening": "Cappucino" } }, "Dave": { "Sunny": { "Morning": "Iced mocha", "Afternoon": "Iced mocha", "Evening": "Iced mocha" }, "Rainy": { "Morning": "Latte", "Afternoon": "Latte", "Evening": "Latte" }, "Snowy": { "Morning": "Cappucino", "Afternoon": "Cappucino", "Evening": "Cappucino" } } } -
Next, copy the following code and save it to a file called
coffee.json:[ { "id": "Cappucino", "features": [ { "type": "hot", "origin": "kenya", "organic": "yes", "roast": "dark" } ] }, { "id": "Cold brew", "features": [ { "type": "cold", "origin": "brazil", "organic": "yes", "roast": "light" } ] }, { "id": "Iced mocha", "features": [ { "type": "cold", "origin": "ethiopia", "organic": "no", "roast": "light" } ] }, { "id": "Latte", "features": [ { "type": "hot", "origin": "brazil", "organic": "no", "roast": "dark" } ] } ] -
Copy and paste the following code into a file and save it as
example-rankrequest.json:{ "contextFeatures": [], "actions": [], "excludedActions": [], "eventId": "", "deferActivation": false }
Set your endpoint and key
-
At the top of your notebook, add the following code to include the required modules:
import json import matplotlib.pyplot as plt import random import requests import time import uuid import datetime -
Select the cell, then select the run button to the left of the cell:
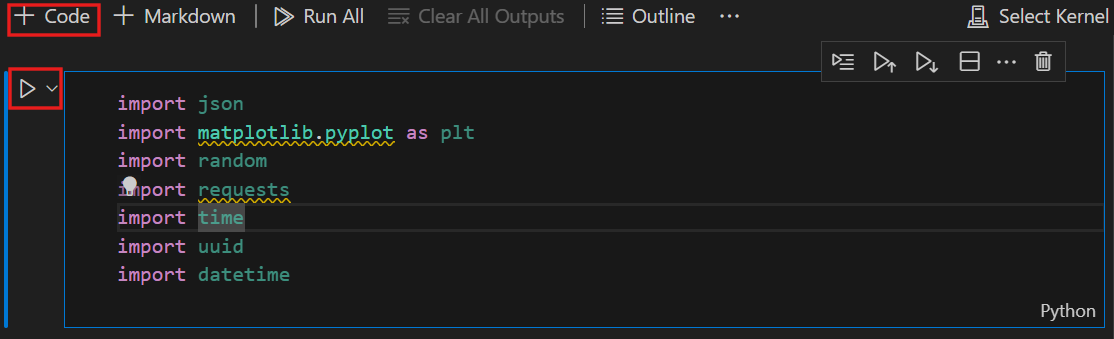
[!NOTE] Make to you select the run button each time you populate a new cell. If you’re prompted to install the ipykernel package, select Install.
-
Select + Code at the top of your notebook to create a new code cell. Then add the following code:
# Replace 'personalization_base_url' and 'resource_key' with your valid endpoint values. personalization_base_url = "<your-endpoint>" resource_key = "<your-resource-key>" -
Replace personalization_base_url value with your copied endpoint, and resource_key value with your key.
Track iterations
-
Next, you create the code helps to take note of start and end times of iterative functions you will use later. Add the following code to a new cell:
# Print out current datetime def currentDateTime(): currentDT = datetime.datetime.now() print (str(currentDT)) # ititialize variable for model's last modified date modelLastModified = "" def get_last_updated(currentModifiedDate): print('-----checking model') # get model properties response = requests.get(personalization_model_properties_url, headers = headers, params = None) print(response) print(response.json()) # get lastModifiedTime lastModifiedTime = json.dumps(response.json()["lastModifiedTime"]) if (currentModifiedDate != lastModifiedTime): currentModifiedDate = lastModifiedTime print(f'-----model updated: {lastModifiedTime}') -
Don’t forget to run your new cell once you’ve added your new code.
Get policy and service configuration
-
Next, you’ll need to validate the service state by getting the policy and service configuration. To do this, add the following code to a new cell:
def get_service_settings(): print('-----checking service settings') # get learning policy response = requests.get(personalization_model_policy_url, headers = headers, params = None) print(response) print(response.json()) # get service settings response = requests.get(personalization_service_configuration_url, headers = headers, params = None) print(response) print(response.json()) -
Make sure to run your new code cell.
The code consists of a function that makes two calls to the service API. When the function is called, it returns the service values using the response.
Set up URLs for calls and read JSON files
Now you’ll add code to:
- build the URLs used in REST calls
- set the security header using your Personalizer resource key
- set the random seed for the Rank event ID
- read in the JSON data files
- call get_last_updated method - learning policy has been removed in example output
- call get_service_settings method
-
To do this, add the following code to a new cell and run it:
# build URLs personalization_rank_url = personalization_base_url + "personalizer/v1.0/rank" personalization_reward_url = personalization_base_url + "personalizer/v1.0/events/" #add "{eventId}/reward" personalization_model_properties_url = personalization_base_url + "personalizer/v1.0/model/properties" personalization_model_policy_url = personalization_base_url + "personalizer/v1.0/configurations/policy" personalization_service_configuration_url = personalization_base_url + "personalizer/v1.0/configurations/service" headers = {'Ocp-Apim-Subscription-Key' : resource_key, 'Content-Type': 'application/json'} # context users = "users.json" # action features coffee = "coffee.json" # empty JSON for Rank request requestpath = "example-rankrequest.json" # initialize random random.seed(time.time()) userpref = None rankactionsjsonobj = None actionfeaturesobj = None with open(users) as handle: userpref = json.loads(handle.read()) with open(coffee) as handle: actionfeaturesobj = json.loads(handle.read()) with open(requestpath) as handle: rankactionsjsonobj = json.loads(handle.read()) get_last_updated(modelLastModified) get_service_settings() print(f'User count {len(userpref)}') print(f'Coffee count {len(actionfeaturesobj)}') -
The call should return a response similar to the following:
-----checking model <Response [200]> {'creationTime': '2023-09-22T14:58:45+00:00', 'lastModifiedTime': '2023-09-22T14:58:45+00:00'} -----model updated: "2023-09-22T14:58:45+00:00" -----checking service settings <Response [200]> {'name': '917554355a3347a1af3d2935d521426a', 'arguments': '--cb_explore_adf --epsilon 0.20000000298023224 --power_t 0 -l 0.001 --cb_type mtr -q ::'} <Response [200]> {'rewardWaitTime': 'PT10M', 'defaultReward': 0.0, 'rewardAggregation': 'earliest', 'explorationPercentage': 0.2, 'modelExportFrequency': 'PT15S', 'logRetentionDays': 90, 'lastConfigurationEditDate': '2021-01-01T00:00:00', 'learningMode': 'Online'} User count 4 Coffee count 4 -
The response code should be
<Response [200]>to indicate a successful call. The rewardWaitTime should show as 10 minutes and modelExportFrequency should be 15 seconds.
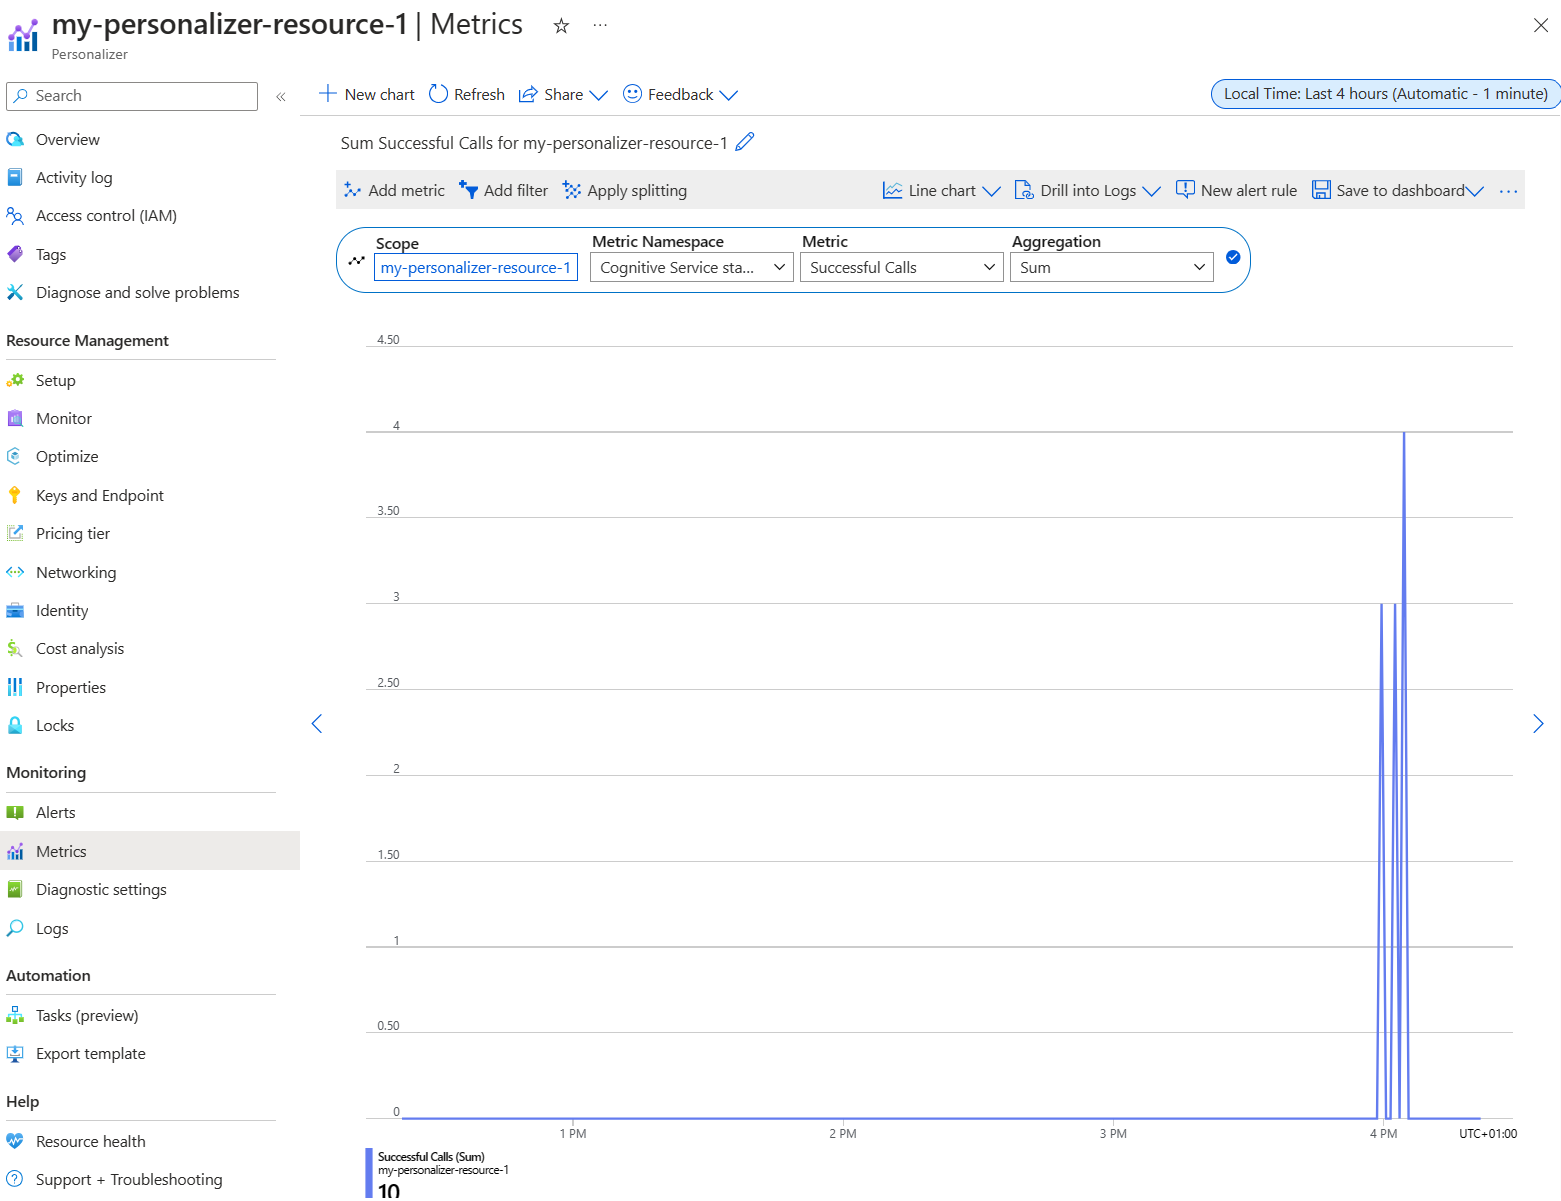
Set up a chart in the Azure portal
Your code makes requests to the API. To get a good metric your requests, you can create a metric chart in the Azure portal:
-
In the Azure portal, go to your Azure AI Personalizer resource.
-
Select Metrics under Monitoring in the navigation pane.
-
The Scope and Metric namespace are already set for you. You only need to select the Metric of Successful calls and the Aggregation of Sum.
-
Change the time filter to the last four hours.
Create unique event IDs
Next, you add code to generate a unique ID for each rank API call. You use this ID to identify the rank and reward call information for the requests.
-
To do this, create a new code cell in your notebook and add the following:
def add_event_id(rankjsonobj): eventid = uuid.uuid4().hex rankjsonobj["eventId"] = eventid return eventid -
Remember to run your new code cell.
[!NOTE] In a real scenario, you’d set this to something like the transaction ID for a purchase.
Get a user, the time of day and the weather
Now can you add a function to:
- Select a unique user, time of day, and weather combination.
- Add those selected items to a JSON object that will be sent to the Rank API via a call.
To do this, add the following code to a new cell and run it:
def add_random_user_and_contextfeatures(namesoption, weatheropt, timeofdayopt, rankjsonobj):
    name = namesoption[random.randint(0,3)]
    weather = weatheropt[random.randint(0,2)]
    timeofday = timeofdayopt[random.randint(0,2)]
    rankjsonobj['contextFeatures'] = [{'timeofday': timeofday, 'weather': weather, 'name': name}]
    return [name, weather, timeofday]
Add coffee data
Next, you create a function to get the entire list of coffee products to a JSON object that you then send to the Rank API.
To do this, you add the following code to a new cell and run it:
def add_action_features(rankjsonobj):
    rankjsonobj["actions"] = actionfeaturesobj
Compare predictions with known user preference
You can then create a function to compare a user’s preference for a particular coffee, taking into consideration details such as weather and time of day, with what Azure AI Personalizer suggests.
-
To do this, create a new cell, add the following code, and run it:
def get_reward_from_simulated_data(name, weather, timeofday, prediction): if(userpref[name][weather][timeofday] == str(prediction)): return 1 return 0 -
This function is intended to run after every time the Rank API is called. If the suggestion matches, a score of
1is returned in the response. If doesn’t match, then0will be returned.
Create a loop with calls to the Rank and Reward APIs
The previous cells are used to set up your notebook for the loop. You’ll now configure your loop. The loop covers the main body of work in your notebook. It gets a random user, gets the coffee list, and send them both to the Rank API. It compares the prediction from Azure AI Personalizer with that user’s known perferences, and then sends the reward back again to Azure AI Personalizer.
To create your loop, add the following code to a new cell and run it:
def iterations(n, modelCheck, jsonFormat):

    i = 1

    # default reward value - assumes failed prediction
    reward = 0

    # Print out dateTime
    currentDateTime()

    # collect results to aggregate in graph
    total = 0
    rewards = []
    count = []

    # default list of user, weather, time of day
    namesopt = ['Alice', 'Bob', 'Cathy', 'Dave']
    weatheropt = ['Sunny', 'Rainy', 'Snowy']
    timeofdayopt = ['Morning', 'Afternoon', 'Evening']


    while(i <= n):

        # create unique id to associate with an event
        eventid = add_event_id(jsonFormat)

        # generate a random sample
        [name, weather, timeofday] = add_random_user_and_contextfeatures(namesopt, weatheropt, timeofdayopt, jsonFormat)

        # add action features to rank
        add_action_features(jsonFormat)

        # show JSON to send to Rank
        print('To: ', jsonFormat)

        # choose an action - get prediction from Personalizer
        response = requests.post(personalization_rank_url, headers = headers, params = None, json = jsonFormat)

        # show Rank prediction
        print ('From: ',response.json())

        # compare personalization service recommendation with the simulated data to generate a reward value
        prediction = json.dumps(response.json()["rewardActionId"]).replace('"','')
        reward = get_reward_from_simulated_data(name, weather, timeofday, prediction)*10

        # show result for iteration
        print(f'   {i} {currentDateTime()} {name} {weather} {timeofday} {prediction} {reward}')

        # send the reward to the service
        response = requests.post(personalization_reward_url + eventid + "/reward", headers = headers, params= None, json = { "value" : reward })

        # for every N rank requests, compute total correct  total
        total =  total + reward

        # every N iteration, get last updated model date and time
        if(i % modelCheck == 0):

            print("**** 10% of loop found")

            get_last_updated(modelLastModified)

        # aggregate so chart is easier to read
        if(i % 10 == 0):
            rewards.append( total)
            count.append(i)
            total = 0

        i = i + 1

    # Print out dateTime
    currentDateTime()

    return [count, rewards]
Here’s an example of the JSON structure that the function sends to the Rank API:
{
    'contextFeatures':[
      {
          'timeofday':'Evening',
          'weather':'Snowy',
          'name':'Alice'
      }
    ],
    'actions':[
      {
          'id':'Cappucino',
          'features':[
            {
                'type':'hot',
                'origin':'kenya',
                'organic':'yes',
                'roast':'dark'
            }
          ]
      }
        ...rest of the coffee list
    ],
    'excludedActions':[

    ],
    'eventId':'b5c4ef3e8c434f358382b04be8963f62',
    'deferActivation':False
}
The Rank API will respond with a response structured like this:
{
    'ranking': [
        {'id': 'Latte', 'probability': 0.85 },
        {'id': 'Iced mocha', 'probability': 0.05 },
        {'id': 'Cappucino', 'probability': 0.05 },
        {'id': 'Cold brew', 'probability': 0.05 }
    ],
    'eventId': '5001bcfe3bb542a1a238e6d18d57f2d2',
    'rewardActionId': 'Latte'
}
Each loop iteration will display the randomly selected user, weather, and time of day, and the appropriately determined reward:
1 Alice Rainy Morning Latte 1
A reward of 1 means your Azure AI Personalizer resource has selected the correct coffee type for this particular combination of user, weather, and time of day.
Run the loop and view chart results
Azure AI Personalizer needs a few thousand calls to the Rank API and the Reward API to create a model. You’ll run your loop for a set number of iterations.
-
To do this, create a new code cell, add the following code and run it:
# max iterations num_requests = 150 # check last mod date N% of time - currently 10% lastModCheck = int(num_requests * .10) jsonTemplate = rankactionsjsonobj # main iterations [count, rewards] = iterations(num_requests, lastModCheck, jsonTemplate) - Refresh your metrics chart in the Azure portal every so often to see the total calls to the service.
-
This event can run for a while. Don’t close your notebook until it has finished. When the loop as made around 20,000 calls - a rank and reward call for each iteration of the loop - the loop will finish.
-
Next, you create a chart in your notebook to plot the batches of rank events, and how many correct recommendations were made for each batch. To do this, add the following code in a new cell and run it:
def createChart(x, y): plt.plot(x, y) plt.xlabel("Batch of rank events") plt.ylabel("Correct recommendations per batch") plt.show() createChart(count,rewards) -
Your notebook will create a chart:
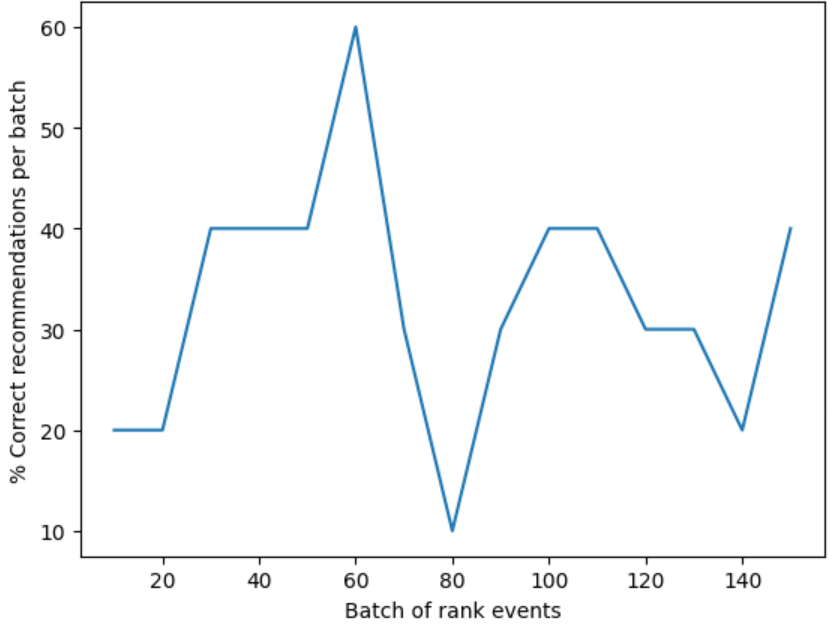
Tip: Ideally, once testing has finished, your loop should on average make correct recommendations at a rate of 100 percent minus the exploration value (which is 20% by default), so 80% is your target rate here. A way to get to this is to increase the iterations to at least 10,000.
The chart displays how successful your model is based on the default learning policy. This chart shows that the learning policy can be improved. You can do this by changing the policy after running evaluations.
Run an offline evaluation
[!NOTE] This section in this exercise is optional because it can only be carried out after you have made at least 50,000 calls to your Azure AI Personalizer resource. But you can come back to this section if at some point you’ve hit 50,000 calls against your resource.
You can run an offline evaluation to find a better learning policy for an Azure AI Personalizer resource with at least 50,000 calls.
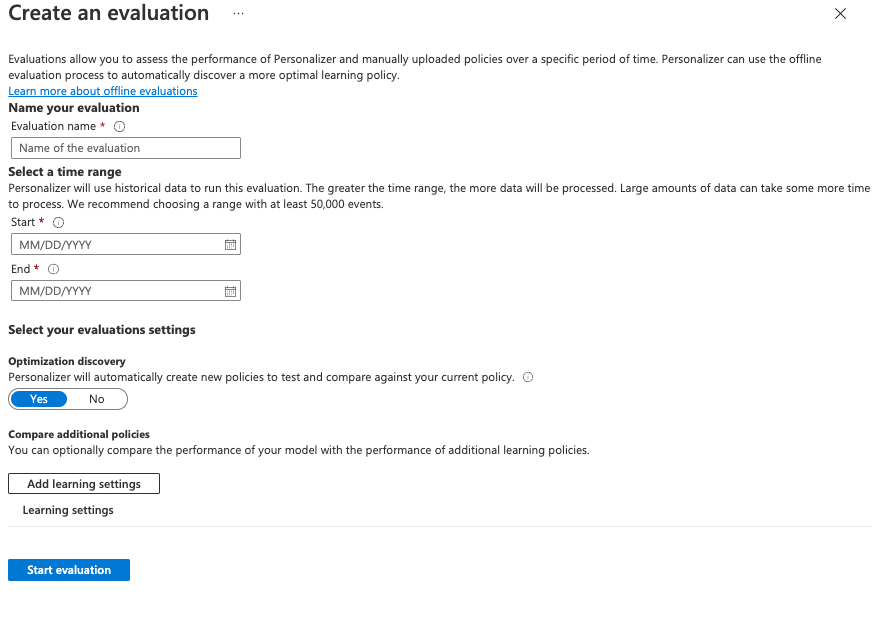
- In the Azure portal, go to your Azure AI Personalizer resource’s Optimize pane and select Create evaluation.
-
Provide an evaluation name, and select a start and end date range for your loop evaluation. Your date range should include only the days you are focusing on for your evaluation:
-
Select Start evaluation to begin your evaluation.
-
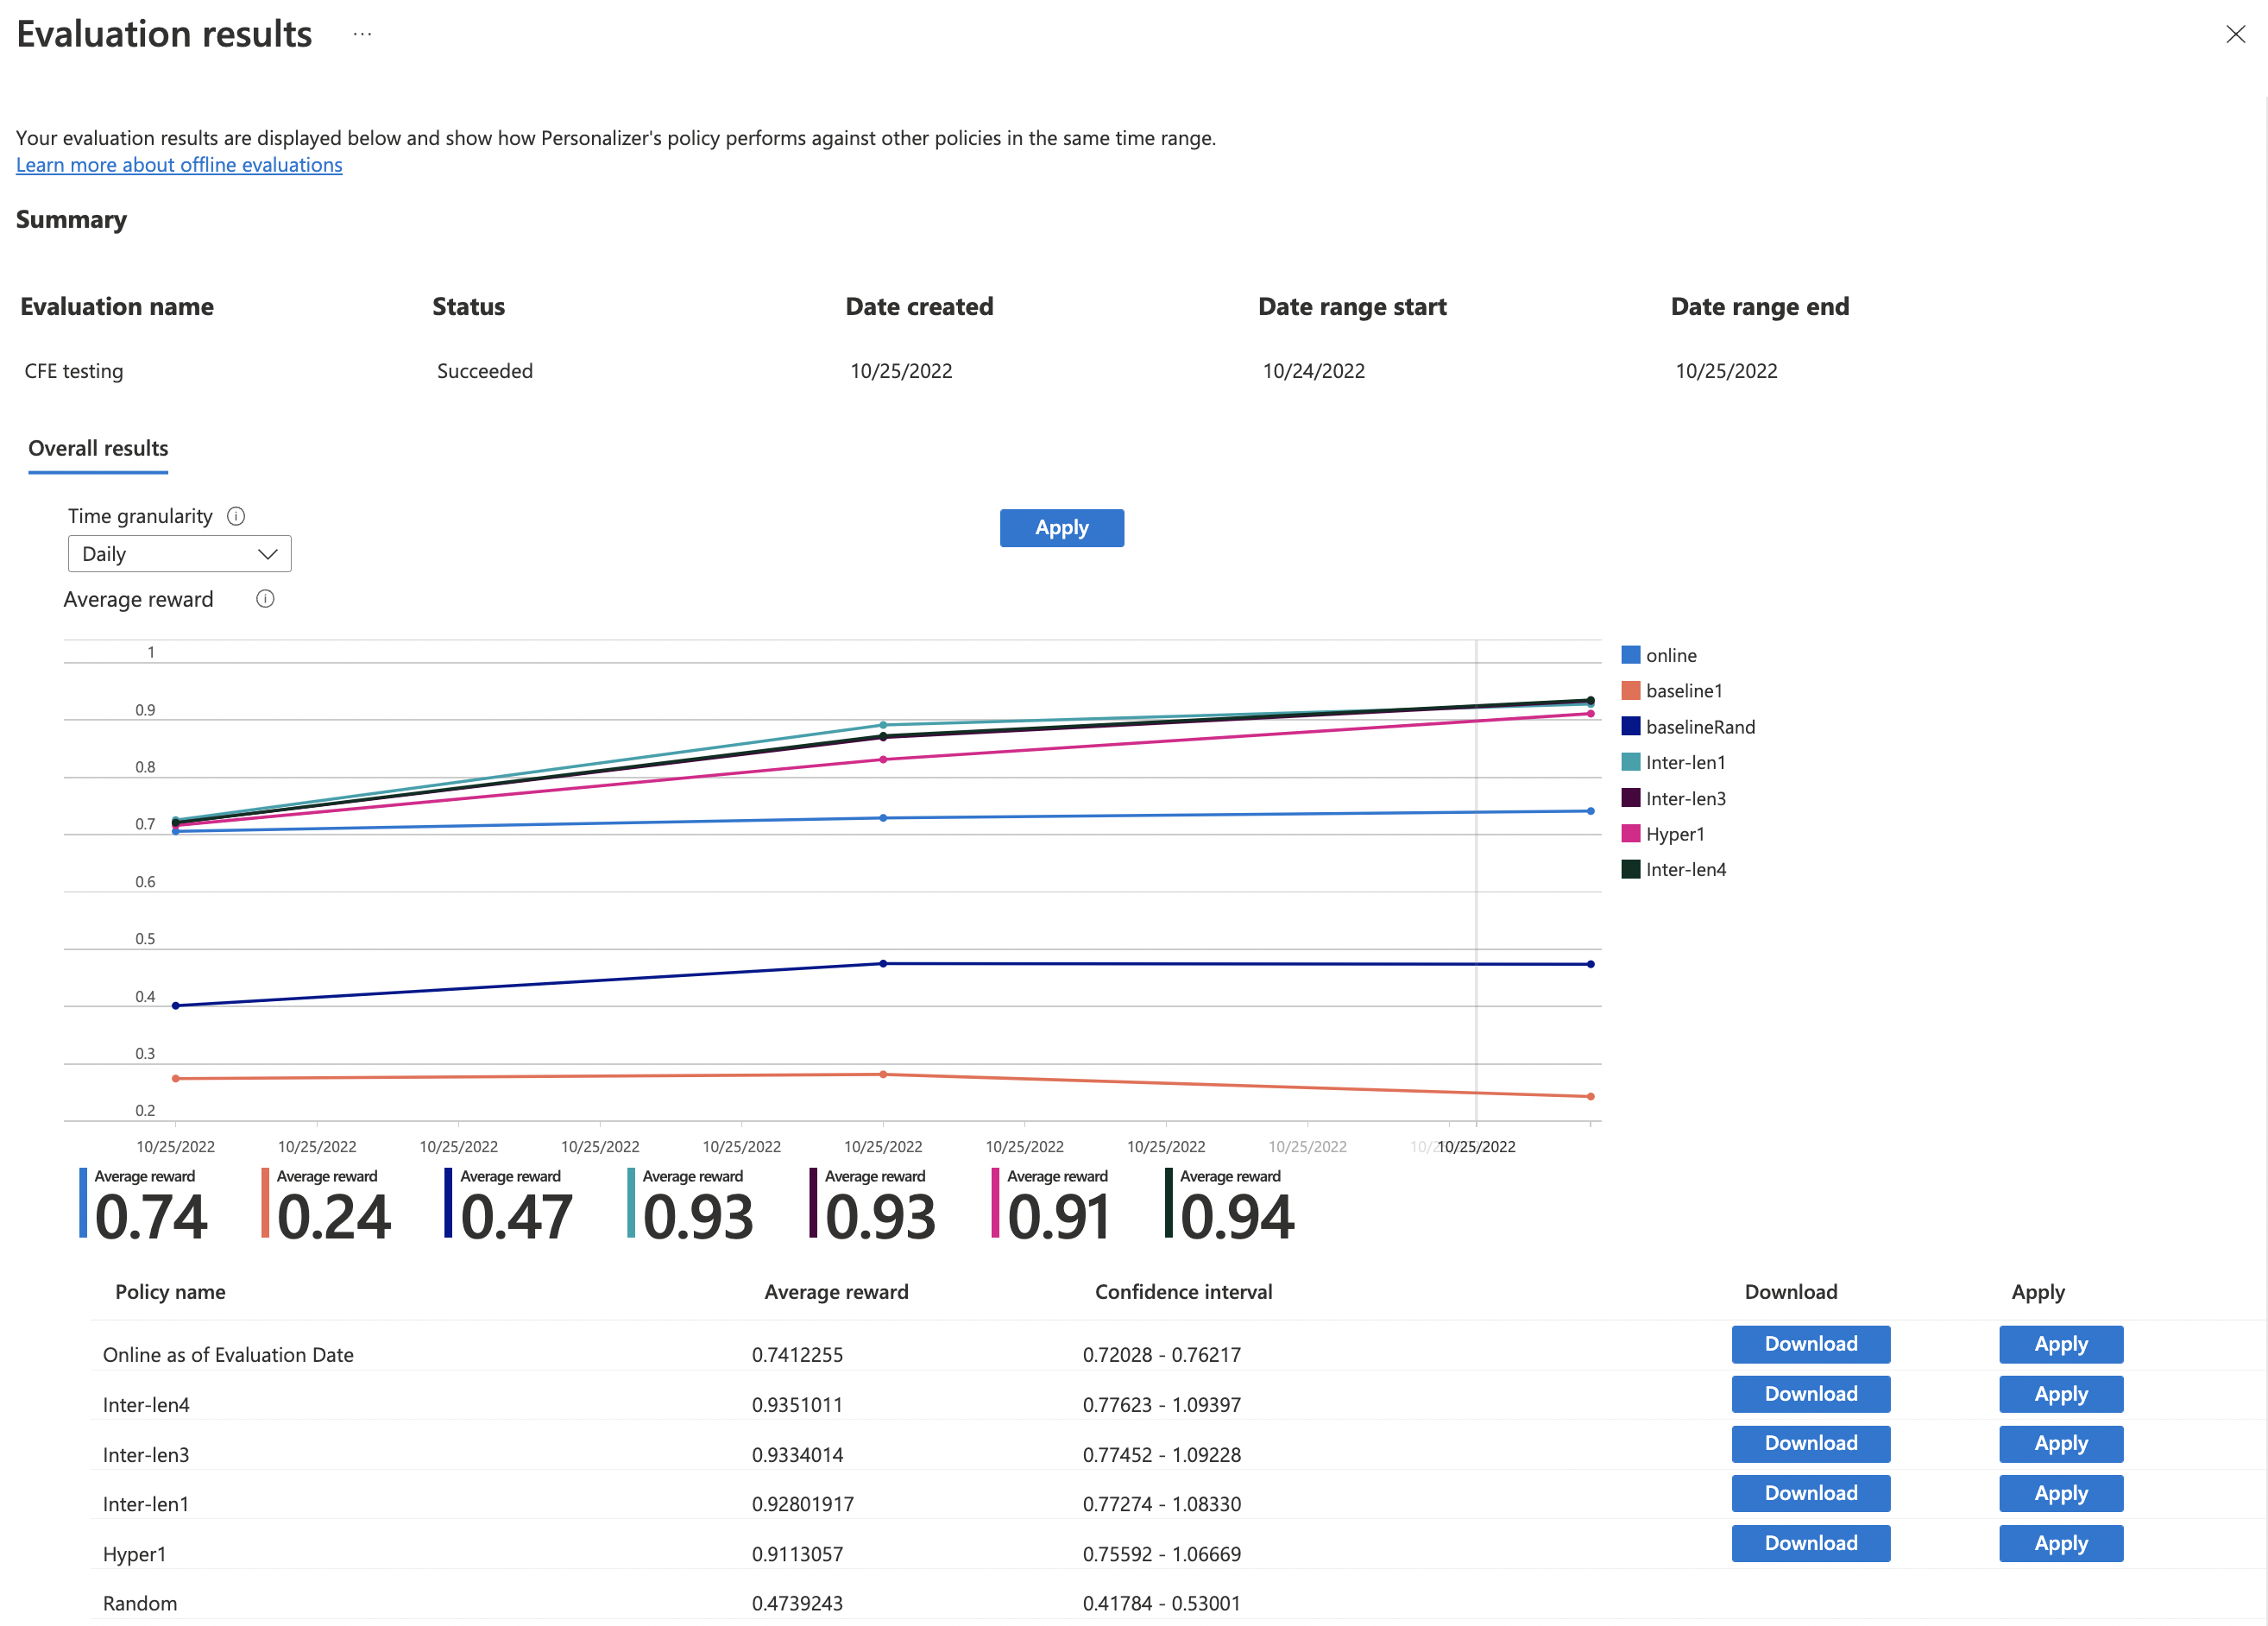
When your evaluation has completed, select it from the list of evaluations on the Optimize pane. Then review the performance of your learning policies based on details like their average reward, confidence intervals, and more:
-
You’ll see a few policies including:
- Online - Your Azure AI Personalizer’s current policy.
- Baseline1 - Your app’s baseline policy
- BaselineRand - A policy of taking actions at random.
- Inter-len# or Hyper# - Policies created by Optimization discovery.
- Select Apply on the policy that improves the model best.
Clean up resources
If you’re not using the Azure resources created in this lab for other training modules, you can delete them to avoid incurring further charges.
-
Open the Azure portal at
https://portal.azure.com, and in the top search bar, search for the resources you created in this lab. -
On the resource page, select Delete and follow the instructions to delete the resource. Alternatively, you can delete the entire resource group to clean up all resources at the same time.