Create a knowledge mining solution
In this exercise, you use AI Search to index a set of documents maintained by Margie’s Travel, a fictional travel agency. The indexing process involves using AI skills to extract key information to make them searchable.
While this exercise is based on Python, you can develop similar applications using multiple language-specific SDKs; including:
- Azure AI Search client library for Python
- Azure AI Search client library for Microsoft .NET
- Azure AI Search client library for JavaScript
This exercise takes approximately 40 minutes.
Create Azure resources
The solution you will create for Margie’s Travel requires multiple resources in your Azure subscription. In this exercise, you’ll create them directly in the Azure portal. You could also create them by using a script, or an ARM or BICEP template; or you could create an Azure AI Foundry project that includes an Azure AI Search resource.
Important: Your Azure resources should be created in the same location!
Create an Azure AI Search resource
- In a web browser, open the Azure portal at
https://portal.azure.com, and sign in using your Azure credentials. - Select the +Create a resource button, search for
Azure AI Search, and create an Azure AI Search resource with the following settings:- Subscription: Your Azure subscription
- Resource group: Create or select a resource group
- Service name: A valid name for your search resource
- Location: Any available location
- Pricing tier: Free
- Wait for deployment to complete, and then go to the deployed resource.
- Review the Overview page on the blade for your Azure AI Search resource in the Azure portal. Here, you can use a visual interface to create, test, manage, and monitor the various components of a search solution; including data sources, indexes, indexers, and skillsets.
Create a storage account
- Return to the home page, and then create a Storage account resource with the following settings:
- Subscription: Your Azure subscription
- Resource group: The same resource group as your Azure AI Search resource
- Storage account name: A valid name for your storage resource
- Region: The same region as your Azure AI Search resource
- Primary service: Azure Blob Storage or Azure Data Lake Storage Gen 2
- Performance: Standard
- Redundancy: Locally-redundant storage (LRS)
-
Wait for deployment to complete, and then go to the deployed resource.
Tip: Keep the storage account portal page open - you will use it in the next procedure.
Upload documents to Azure Storage
Your knowledge mining solution will extract information from travel brochure documents in an Azure Storage blob container.
- In a new browser tab, download documents.zip from
https://github.com/microsoftlearning/mslearn-ai-information-extraction/raw/main/Labfiles/knowledge/documents.zipand save it in a local folder. - Extract the downloaded documents.zip file and view the travel brochure files it contains. You’ll extract and index information from these files.
- In the browser tab containing the Azure portal page for your storage account, in the navigation pane on the left, select Storage browser.
-
In the storage browser, select Blob containers.
Currently, your storage account should contain only the default $logs container.
- In the toolbar, select + Container and create a new container with the following settings:
- Name:
documents - Anonymous access level: Private (no anonymous access)*
Note: *Unless you enabled the option to allow anonymous container access when creating your storage account, you won’t be able to select any other setting!
- Name:
-
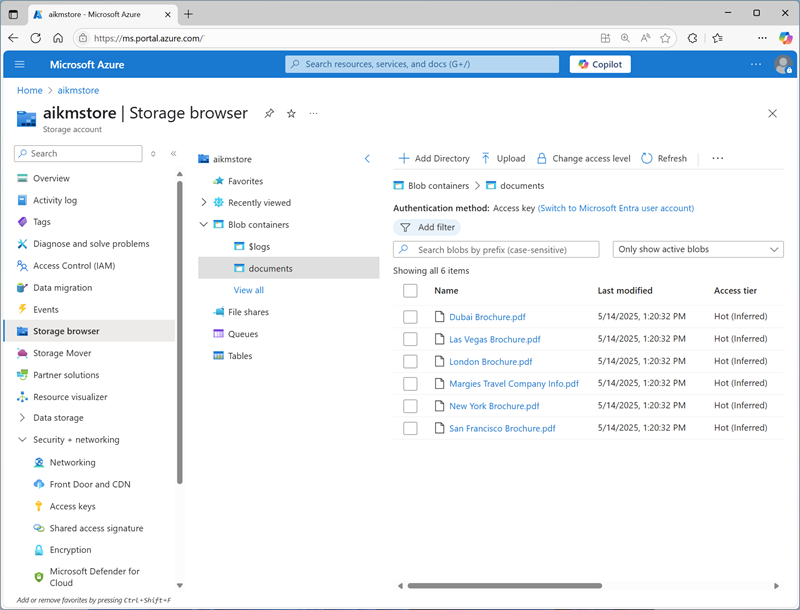
Select the documents container to open it, and then use the Upload toolbar button to upload the .pdf files you extracted from documents.zip previously into the root of the container, as shown here:
Create and run an indexer
Now that you have the documents in place, you can create an indexer to extract information from them.
- In the Azure portal, browse to your Azure AI Search resource. Then, on its Overview page, select Import data.
- On the Connect to your data page, in the Data Source list, select Azure Blob Storage.
-
Select keyword search. Then complete the data store details with the following values:
- On Connect to your data form set the following:
- Storage account: Your recently created storage account
- Blob container: Select the documents container.
- Leave the remaining options as their default values, and then select Next.
- On Apply AI enrichments set the following:
- Select Extract phrases.
- Select Extract entities, select the settings icon, ensure only Persons and Locations are selected, and then select Save.
- Select Extract text from images, select the settings icon, ensure Generate tags and Categorize content are selected, and then select Save.
- If it isn’t already selected, choose the free Foundry Tools resource option, and then select Next.
Note: The free Azure AI Services enrichment for Azure AI Search can be used to index a maximum of 20 documents. In a production solution, you should create and attach an Azure AI Services resource.
- On Preview mappings set the following configuration:
- The fields are already mapped based on the options you selected in the previous step.
- Review the following fields and ensure that they’re configured as shown in the following table. To update a field, select it and then select Configure field. Leave all other fields with their default settings.
Target index field name Retrievable Filterable Sortable Facetable Searchable metadata_storage_size ✔ ✔ ✔ metadata_storage_last_modified ✔ ✔ ✔ title ✔ ✔ ✔ ✔ locations ✔ ✔ ✔ persons ✔ ✔ ✔ keyPhrases ✔ ✔ ✔ - Double-check your selections carefully.
- Select Next.
- On Advanced settings set the following:
- Ensure Enable semantic ranker is selected.
- If it isn’t already selected, set Schedule to Once.
- Select Next.
- On Review and create set Objects name prefix to
margies-indexand then select Create. - You may close the success notification.
- In the navigation pane on the left, under Search management, view the Indexers page. The margies-index-indexer should appear. Wait a few minutes, and click ↻ Refresh until the Status indicates Success.
Search the index
Now that you have an index, you can search it.
- Return to the Overview page for your Azure AI Search resource, and on the toolbar, select Search explorer.
-
In Search explorer, in the Query string box, enter
*(a single asterisk), and then select Search.This query retrieves all documents in the index in JSON format. Examine the results and note the fields for each document, which contain document content, metadata, and enriched data extracted by the cognitive skills you selected.
-
In the View menu, select JSON view and note that the JSON request for the search is shown, like this:
{ "search": "*", "count": true } -
The results include a @odata.count field at the top of the results that indicates the number of documents returned by the search.
-
Modify the JSON request to include the select parameter as shown here:
 {
   "search": "*",
   "count": true,
   "select": "title,locations"
 }
This time the results include only the file name and any locations mentioned in the document content. The file name is in the **title** field. The **locations** field was generated by an AI skill. -
Now try the following query string:
 {
   "search": "New York",
   "count": true,
   "select": "title,keyPhrases"
 }
This search finds documents that mention “New York” in any of the searchable fields, and returns the file name and key phrases in the document.
-
Let’s try one more query:
 {
     "search": "New York",
     "count": true,
     "select": "title,keyPhrases",
     "filter": "metadata_storage_size lt 380000"
 }
This query returns the filename and key phrases for any documents mentioning “New York” that are smaller than 380,000 bytes in size.
Create a search client application
Now that you have a useful index, you can use it from a client application. You can do this by consuming the REST interface, submitting requests and receiving responses in JSON format over HTTP; or you can use the software development kit (SDK) for your preferred programming language. In this exercise, we’ll use the SDK.
Note: You can choose to use the SDK for either C# or Python. In the steps below, perform the actions appropriate for your preferred language.
Get the endpoint and keys for your search resource
-
In the Azure portal, close the search explorer page and return to the Overview page for your Azure AI Search resource.
Note the Url value, which should be similar to https://your_resource_name.search.windows.net. This is the endpoint for your search resource.
-
In the navigation pane on the left, expand Settings and view the Keys page.
Note that there are two admin keys, and a single query key. An admin key is used to create and manage search resources; a query key is used by client applications that only need to perform search queries.
You will need the endpoint and query key for your client application.
Note: Azure AI Search creates one default query key for the service. In the Azure portal, this default query key can appear with a blank name. This is expected behavior.
Prepare to use the Azure AI Search SDK
-
Use the [>_] button to the right of the search bar at the top of the Azure portal to create a new Cloud Shell in the Azure portal, selecting a PowerShell environment with no storage in your subscription.
The cloud shell provides a command-line interface in a pane at the bottom of the Azure portal. You can resize or maximize this pane to make it easier to work in. Initially, you’ll need to see both the cloud shell and the Azure portal (so you can find and copy the endpoint and key you’ll need).
-
In the cloud shell toolbar, in the Settings menu, select Go to Classic version (this is required to use the code editor).
Ensure you've switched to the classic version of the cloud shell before continuing.
-
In the cloud shell pane, enter the following commands to clone the GitHub repo containing the code files for this exercise (type the command, or copy it to the clipboard and then right-click in the command line and paste as plain text):
rm -r mslearn-ai-info -f git clone https://github.com/microsoftlearning/mslearn-ai-information-extraction mslearn-ai-infoTip: As you enter commands into the cloudshell, the output may take up a large amount of the screen buffer. You can clear the screen by entering the
clscommand to make it easier to focus on each task. -
After the repo has been cloned, navigate to the folder containing the application code files:
cd mslearn-ai-info/Labfiles/knowledge/python ls -a -l -
Install the Azure AI Search SDK and Azure identity packages by running the following commands:
python -m venv labenv ./labenv/bin/Activate.ps1 pip install -r requirements.txt azure-identity azure-search-documents==11.5.1 -
Run the following command to edit the configuration file for your app:
code .envThe configuation file is opened in a code editor.
-
Edit the configuration file to replace the following placeholder values:
- your_search_endpoint (replace with the endpoint for your Azure AI Search resource)
- your_query_key (replace with the query key for your Azure AI Search resource)
- your_index_name (replace with the name of your index, which should be
margies-index)
-
When you’ve updated the placeholders, use the CTRL+S command to save the file and then use the CTRL+Q command to close it.
Tip: Now that you’ve copied the endpoint and key from the Azure portal, you might want to maximize the cloud shell pane to make it easier to work in.
-
Run the following command to open the code file for your app:
code search-app.pyThe code file is opened in a code editor.
-
Review the code, and note that it performs the following actions:
- Retrieves the configuration settings for your Azure AI Search resource and index from the configuration file you edited.
- Creates a SearchClient with the endpoint, key, and index name to connect to your search service.
- Prompts the user for a search query (until they enter “quit”)
- Searches the index using the query, returning the following fields (ordered by title):
- title
- locations
- persons
- keyPhrases
- Parses the search results that are returned to display the fields returned for each document in the result set.
- Close the code editor pane (CTRL+Q), keeping the cloud shell command line console pane open
-
Enter the following command to run the app:
python search-app.py - When prompted, enter a query such as
Londonand view the results. - Try another query, such as
flights. - When you’re finished testing the app, enter
quitto close it. - Close the Cloud shell, returning to the Azure portal.
Note about knowledge store
Knowledge store steps are excluded from this version of the exercise.
The current Import data keyword search flow in the Azure portal doesn’t create a knowledge store for this scenario, and the multimodal alternative hasn’t been adopted for this exercise.
Clean-up
Now that you’ve completed the exercise, delete all the resources you no longer need. Delete the Azure resources:
- In the Azure portal, select Resource groups.
- Select the resource group you don’t need, then select Delete resource group.
More information
To learn more about Azure AI Search, see the Azure AI Search documentation.