Extract information from multimodal content
In this exercise, you use Azure Content Understanding to extract information from a variety of content types; including an invoice, an image of a slide containing charts, an audio recording of a voice message, and a video recording of a conference call.
This exercise takes approximately 40 minutes.
Create a Microsoft Foundry resource and project
The features we’re going to use in this exercise require a Microsoft Foundry resource and project.
- In a web browser, open the Microsoft Foundry portal at
https://ai.azure.comand sign in using your Azure credentials. Close any tips or quick start panes that are opened the first time you sign in. - Make sure the New Foundry toggle is on so that you’re using Foundry (new).
- If you aren’t prompted to create a new project automatically, select the project name in the upper-left corner, and then select Create new project.
- Give your project a name and expand Advanced options to specify the following settings:
- Project name: Provide a valid name for your project
- Foundry resource: Use the default
- Region: Choose one of the following supported regions:*
- Australia East
- East US
- East US 2
- Japan East
- North Europe
- South Central US
- Southeast Asia
- Sweden Central
- UK South
- West Europe
- West US
- West US 3
- Subscription: Your Azure subscription
- Resource group: Create or select a resource group
*Azure Content Understanding is available in selected regions. See the region support documentation for the latest availability.
- Select Create and wait for your project to be created.
Download content
The content you’re going to analyze is in a .zip archive. Download it and extract it in a local folder.
- In a new browser tab, download content.zip from
https://github.com/microsoftlearning/mslearn-ai-information-extraction/raw/main/Labfiles/content/content.zipand save it in a local folder. - Extract the downloaded content.zip file and view the files it contains. You’ll use these files to explore Content Understanding analyzers in this exercise.
Note: If you’re only interested in exploring analysis of a specific modality (documents, images, video, or audio), you can skip to the relevant task below. For the best experience, go through each task to learn how to extract information from different types of content.
Try prebuilt analyzers in Microsoft Foundry
Azure Content Understanding includes prebuilt Read and Layout analyzers that can extract text and structural elements from documents without requiring any custom configuration. These prebuilt analyzers are available directly in the Foundry (new) portal as AI Services models.
Use the Layout analyzer in the playground
- In the Microsoft Foundry portal, make sure the New Foundry toggle is on.
- Select Build in the upper-right menu, then select Deployments in the left pane.
- Select the AI Services tab to view the prebuilt models provided by Foundry Tools.
-
Find and select Azure Content Understanding - Layout.
This opens the Layout analyzer playground page, where you can test the layout model on sample data or your own files.
-
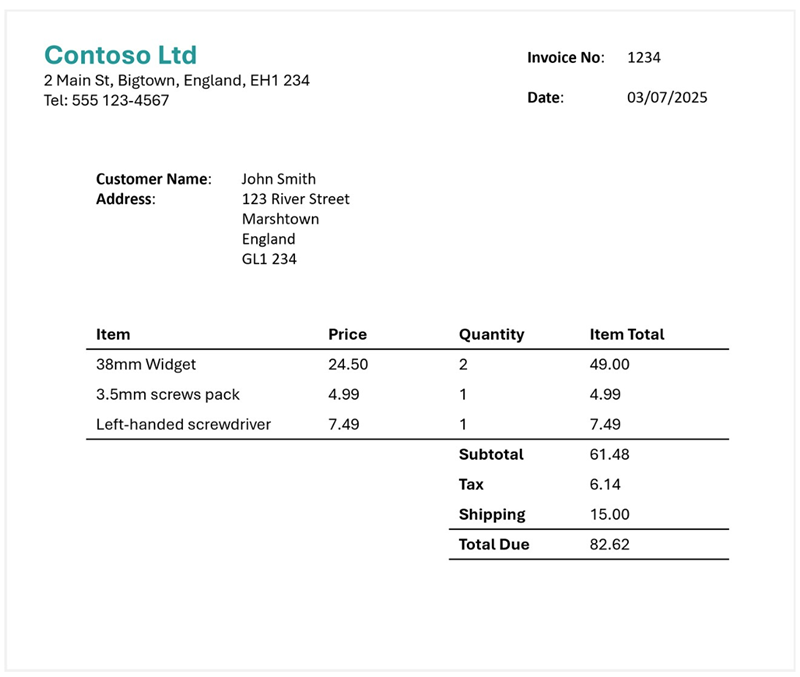
In the playground, use the option to upload your own data and upload the invoice-1234.pdf file from the folder where you extracted content files. This file contains the following invoice:
- Run the analyzer and wait for analysis to complete.
-
Review the results. You can view the extracted content either as formatted output or as raw JSON data. Notice that the Layout analyzer extracts text, tables, and structural elements such as paragraphs and sections from the document.
Note: The prebuilt Read and Layout analyzers extract content from documents without requiring a generative AI model. Read extracts text elements (words, paragraphs, formulas, and barcodes), while Layout additionally extracts tables, figures, document structure, hyperlinks, and annotations. These analyzers are useful for general-purpose content extraction, but they don’t extract specific custom fields such as invoice amounts or vendor names.
- Optionally, go back to the AI Services tab and try Azure Content Understanding - Read with the same file to compare the results. Notice that Read extracts text without layout analysis.
Set up Content Understanding Studio for custom analyzers
To extract specific fields from your content (such as invoice amounts, caller names, or meeting participants), you need to build custom analyzers. Custom analyzers are created in Content Understanding Studio, a separate web-based tool for building and testing analyzers with custom schemas.
- In a new browser tab, open Content Understanding Studio at
https://contentunderstanding.ai.azure.com. - If prompted, sign in with the same Azure credentials you used for the Foundry portal.
- On the Settings page (or if redirected to set up your resource), select the + Add resource button.
-
Select the Foundry resource you created earlier, and select Next > Save.
Tip: Make sure that the Enable autodeployment for required models if no defaults are available checkbox is selected. This ensures your resource is set up with the required
GPT-4.1,GPT-4.1-mini, andtext-embedding-3-largemodels that custom analyzers need. - After your resource is connected, you’re ready to create custom analyzers. Select Content Understanding in the top navigation to go to the home page.
Extract information from invoice documents
You are going to build a custom Azure Content Understanding analyzer that can extract specific fields from invoices. You’ll create a project in Content Understanding Studio, define a schema based on a sample invoice, and then build a reusable analyzer.
Create a storage account
Content Understanding Studio requires an Azure Blob Storage account to store the data used for building custom analyzers. You need to create one in the same resource group as your Foundry resource.
- In a new browser tab, open the Azure portal at
https://portal.azure.comand sign in with your Azure credentials. - Select + Create a resource, search for
Storage account, and create a new Storage account resource with the following settings:- Subscription: Your Azure subscription
- Resource group: The same resource group as your Foundry resource
- Storage account name: Enter a globally unique name
- Region: The same region as your Foundry resource
- Preferred storage type: Azure Blob Storage or Azure Data Lake Storage Gen 2
- Performance: Standard
- Redundancy: Locally-redundant storage (LRS)
- Select Review + create, and then Create. Wait for deployment to complete.
Define a schema for invoice analysis
- In Content Understanding Studio, select the Get started button in the custom projects section, and select Create.
- Select Extract content and fields with a custom schema, then create a project with the following settings:
- Project name:
Invoice analysis - Description:
Extract data from an invoice - Advanced settings
- Connected resource: Confirm your Foundry resource is selected
- Connect storage account: Select the storage account you just created
- Blob container: Create a new container named
content-understanding
- Project name:
-
Wait for the project to be created.
Tip: If an error accessing storage occurs, wait a minute and try again. Permissions for a new resource may take a few minutes to propagate.
-
Upload the invoice-1234.pdf file from the folder where you extracted content files.
Content Understanding classifies your data and recommends analyzer templates based on the uploaded content.
-
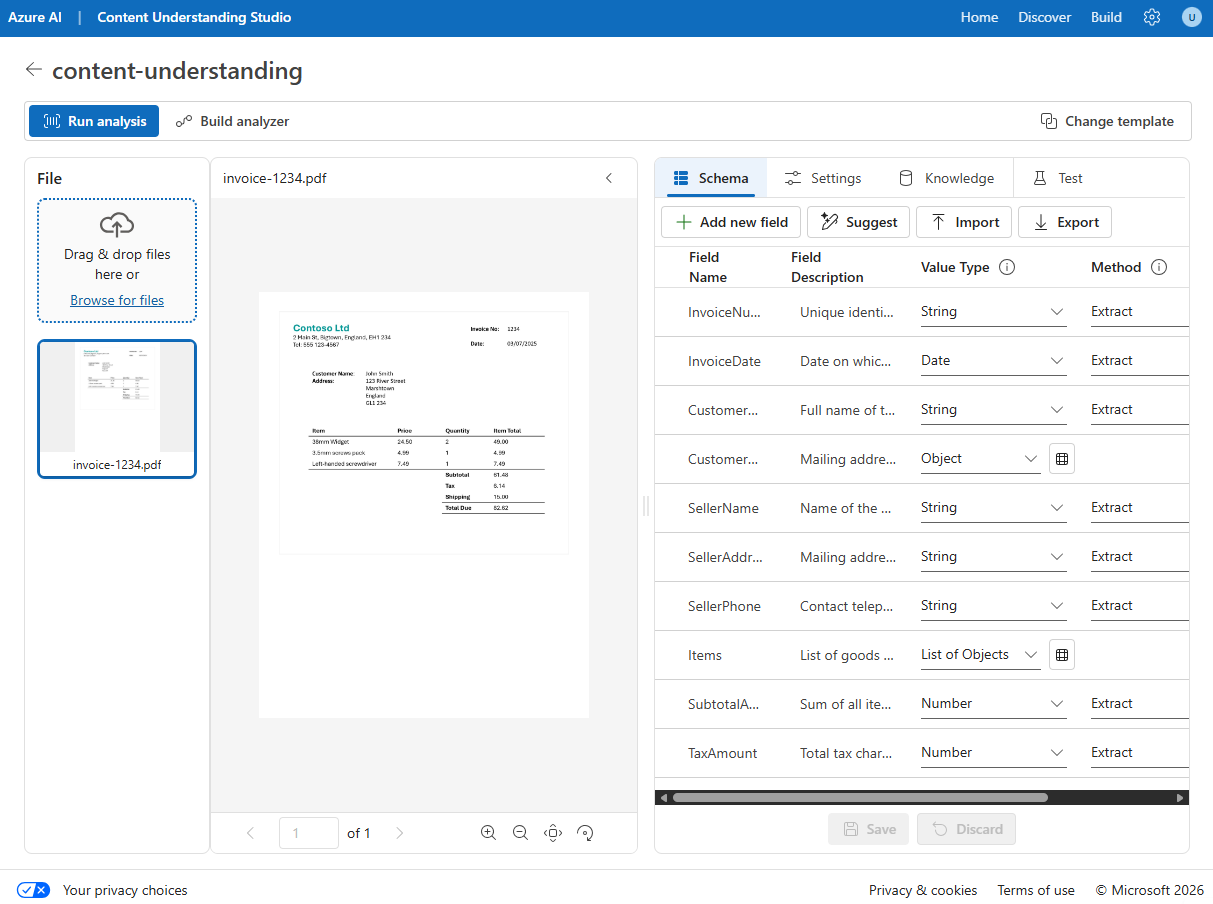
In the Choose a template window, select the Invoice template and select Save.
The Invoice template includes common fields that are found in invoices. You can use the schema editor to delete any of the suggested fields that you don’t need, and add any custom fields that you do.
- In the list of suggested fields, select BillingAddress. This field is not needed for the invoice format you have uploaded, so use the Delete field (🗑) icon that appears at the end in the selected field row to delete it.
- In the top bar of the schema tab, select Suggest. This will look at the sample invoice and suggest which fields should be a part of your schema. Expand the Items field to see which subfields are suggested. Adding those fields will replace your existing schema, so be careful in your projects if you’ve edited a schema. Select Save.
-
Use + Add new field button to add the following field, selecting Save (✓) for each new field:
Field name Field description Value type Method TotalQuantityTotal number of items on the invoiceString Auto -
Verify that your completed schema looks like this, and select Save.
-
Select the Test tab, then select Run analysis to test your schema. Wait for analysis to complete.
-
Review the analysis results, which should look similar to this:
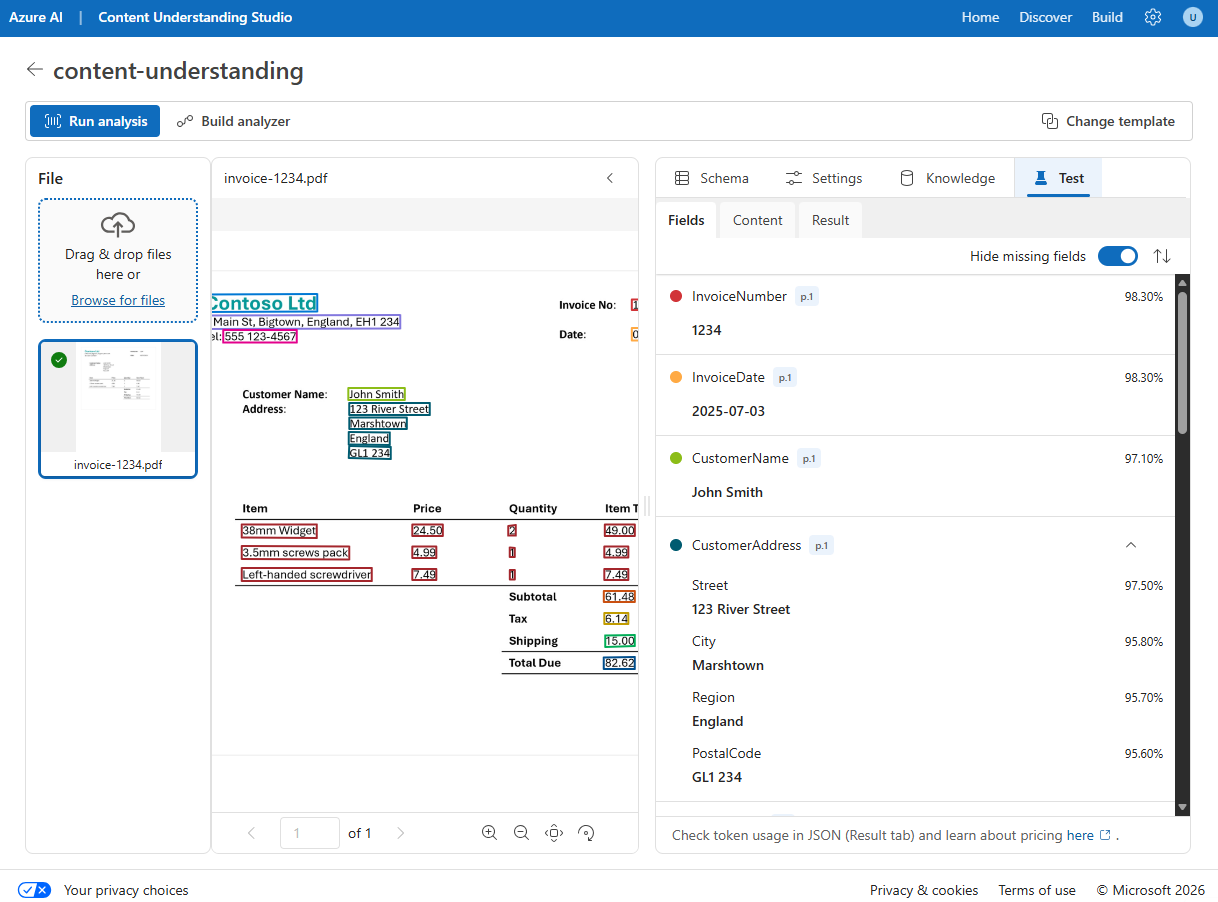
- View the details of the fields that were identified in the Fields pane.
Build and test an analyzer for invoices
Now that you have defined a schema to extract fields from invoices, you can build an analyzer to use with similar documents.
- Select the Build analyzer button at the top, and build a new analyzer with the following properties (typed exactly as shown here):
- Name:
invoiceanalyzer - Description:
Invoice analyzer
- Name:
- When the analyzer has been built, select Jump to analyzer list to view all built analyzers, then select the invoiceanalyzer link. The fields defined in the analyzer’s schema will be displayed.
- In the invoiceanalyzer page, select the Test tab.
-
Upload invoice-1235.pdf from the folder where you extracted the content files, and run the analysis to extract field data from the invoice.
The invoice being analyzed looks like this:

- Review the Fields pane, and verify that the analyzer extracted the correct fields from the test invoice.
- Review the Results pane to see the JSON response that the analyzer would return to a client application.
- Close the invoiceanalyzer page to return to the analyzer list.
Extract information from a slide image
You are going to build a custom Azure Content Understanding analyzer that can extract information from a slide containing charts.
Define a schema for image analysis
- In Project list tab, select Create and select Extract content and fields with a custom schema, then create a project with the following settings:
- Project name:
Slide analysis - Description:
Extract data from an image of a slide - Advanced settings: Verify the settings are the same as the last project
- Project name:
-
Wait for the project to be created.
-
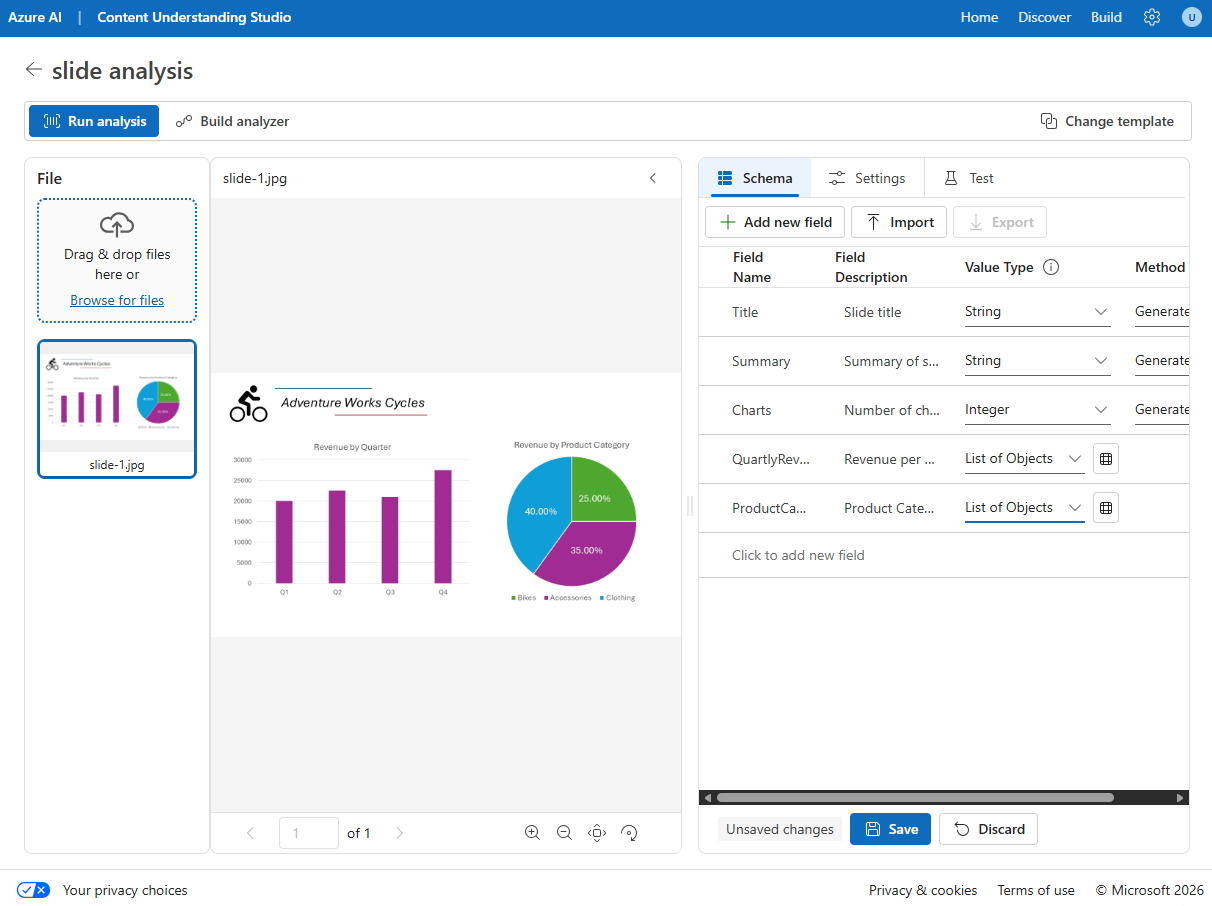
Upload the slide-1.jpg file from the folder where you extracted content files. Then select the Image analysis template and select Save.
The Image analysis template doesn’t include any predefined fields. You must define fields to describe the information you want to extract.
-
Use the + Add new field button to add the following fields, selecting Save changes (✓) for each new field:
Field name Field description Value type Method TitleSlide titleString Generate SummarySummary of the slideString Generate ChartsNumber of charts on the slideInteger Generate -
Use + Add new field button to add a new field named
QuarterlyRevenuewith the descriptionRevenue per quarterwith the value type List of objects. Then, select the table icon next to the value type dropdown. In the new page for the table subfields that opens, add the following subfields:Field name Field description Value type Method QuarterWhich quarter?String Generate RevenueRevenue for the quarterNumber Generate -
Select Back to return to the top level of your schema, and use + Add new field button to add a new field named
ProductCategorieswith the descriptionProduct categorieswith the value type List of objects. Then, select the table icon next to the value type to open a new page for the table subfields, add the following subfields:Field name Field description Value type Method ProductCategoryProduct category nameString Generate RevenuePercentagePercentage of revenueNumber Generate -
Select Back to return to the top level of your schema, and verify that it looks like this. Then select Save.
- Select the Test tab, then Run analysis and wait for analysis to complete.
-
Review the analysis results, which should look similar to this:
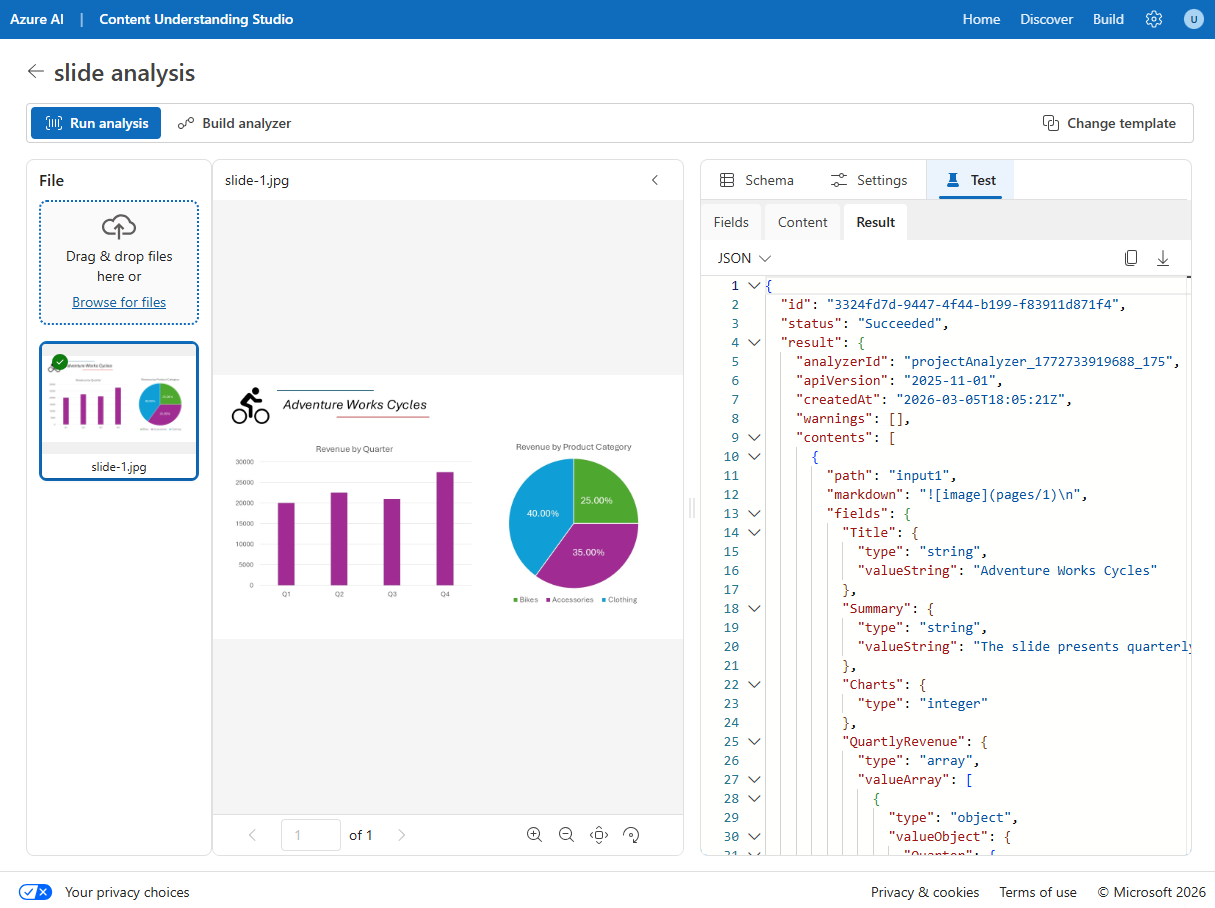
- View the details of the fields that were identified in the Fields pane, expanding the QuarterlyRevenue and ProductCategories fields to see the subfield values.
Build and test an analyzer
Now that you have defined a schema to extract fields from slides, you can build an analyzer to use with similar slide images.
- Select the Build analyzer button at the top, and build a new analyzer with the following properties (typed exactly as shown here):
- Name:
slideanalyzer - Description:
Slide image analyzer
- Name:
- When the analyzer has been built, select Jump to analyzer list, then select the slideanalyzer link. The fields defined in the analyzer’s schema will be displayed.
- In the slideanalyzer page, select the Test tab.
- Use the + Upload test files button to upload slide-2.jpg from the folder where you extracted the content files, and run the analysis to extract field data from the image.
-
Review the Fields pane, and verify that the analyzer extracted the correct fields from the slide image.
Note: Slide 2 doesn’t include a breakdown by product category, so the product category revenue data is not found.
- Review the Results pane to see the JSON response that the analyzer would return to a client application.
- Close the slideanalyzer page.
Extract information from a voicemail audio recording
You are going to build a custom Azure Content Understanding analyzer that can extract information from an audio recording of a voicemail message.
Define a schema for audio analysis
- In Project list tab, select Create and select Extract content and fields with a custom schema, then create a project with the following settings:
- Project name:
Voicemail analysis - Description:
Extract data from a voicemail recording - Advanced settings: Verify the settings are the same as the last project
- Project name:
-
Wait for the project to be created.
- Upload the call-1.mp3 file from the folder where you extracted content files. Then select the Audio analysis template and select Save.
-
In the Content pane on the right, select Get transcription preview to see a transcription of the recorded message.
The Audio analysis template doesn’t include any predefined fields. You must define fields to describe the information you want to extract.
-
Use + Add new field button to add the following fields, selecting Save (✓) for each new field:
Field name Field description Value type Method CallerPerson who left the messageString Generate SummarySummary of the messageString Generate ActionsRequested actionsString Generate CallbackNumberTelephone number to return the callString Generate AlternativeContactsAlternative contact detailsList of Strings Generate -
Select Run analysis and wait for analysis to complete.
Audio analysis can take some time. While you’re waiting, you can play the audio file below:
Note: This audio was generated using AI.
- Review the analysis results and view the details of the fields that were identified in the Fields pane, expanding the AlternativeContacts field to see the listed values.
Build and test an analyzer
Now that you have defined a schema to extract fields from voice messages, you can build an analyzer to use with similar audio recordings.
- Select the Build analyzer button at the top, and build a new analyzer with the following properties (typed exactly as shown here):
- Name:
voicemailanalyzer - Description:
Voicemail audio analyzer
- Name:
- When the analyzer has been built, select Jump to analyzer list, then select the voicemailanalyzer link. The fields defined in the analyzer’s schema will be displayed.
- In the voicemailanalyzer page, select the Test tab.
-
Use the + Upload test files button to upload call-2.mp3 from the folder where you extracted the content files, and run the analysis to extract field data from the audio file.
Audio analysis can take some time. While you’re waiting, you can play the audio file below:
Note: This audio was generated using AI.
- Review the Fields pane, and verify that the analyzer extracted the correct fields from the voice message.
- Review the Results pane to see the JSON response that the analyzer would return to a client application.
- Close the voicemail-analyzer page.
Extract information from a video conference recording
You are going to build a custom Azure Content Understanding analyzer that can extract information from a video recording of a conference call.
Define a schema for video analysis
- In Content Understanding Studio, select Create project on the home page (or use the navigation to return to the home page first).
- Select Extract content and fields with a custom schema, then create a project with the following settings:
- Project name:
Conference call video analysis - Description:
Extract data from a video conference recording
- Project name:
-
Wait for the project to be created.
- Upload the meeting-1.mp4 file from the folder where you extracted content files. Then select the Video analysis template and select Create.
-
In the Content pane on the right, select Get transcription preview to see a transcription of the recorded meeting.
The Video analysis template extracts data for each segment. It doesn’t include any predefined fields. You must define fields to describe the information you want to extract.
-
Use + Add new field button to add the following fields, selecting Save (✓) for each new field:
Field name Field description Value type Method SummarySummary of the discussionString Generate ParticipantsCount of meeting participantsInteger Generate ParticipantNamesNames of meeting participantsList of Strings Generate SharedSlidesDescriptions of any PowerPoint slides presentedList of Strings Generate AssignedActionsTasks assigned to participantsList of Objects Generate -
When you enter the AssignedActions field, in the table of subfields, create the following subfields:
Field name Field description Value type Method TaskDescription of the taskString Generate AssignedToWho the task is assigned toString Generate -
Select Back to return to the top level of your schema, and verify that it looks like this. Then select Save.
-
Select Run analysis and wait for analysis to complete.
Video analysis can take some time. While you’re waiting, you can view the video below:
Note: This video was generated using AI.
-
When analysis is complete, review the results.
- In the Fields pane, view the extracted data.
Build and test an analyzer
Now that you have defined a schema to extract fields from conference call recordings, you can build an analyzer to use with similar videos.
- Select the Build analyzer button at the top, and build a new analyzer with the following properties (typed exactly as shown here):
- Name:
meetinganalyzer - Description:
Meeting video analyzer
- Name:
- Wait for the new analyzer to be ready (use the Refresh button to check).
- When the analyzer has been built, select Jump to analyzer list, then select the meetinganalyzer link. The fields defined in the analyzer’s schema will be displayed.
- In the meetinganalyzer page, select the Test tab.
-
Use the + Upload test files button to upload meeting-2.mp4 from the folder where you extracted the content files, and run the analysis to extract field data from the video file.
Video analysis can take some time. While you’re waiting, you can view the video below:
Note: This video was generated using AI.
- Review the Fields pane, and view the fields that the analyzer extracted for each shot in the conference call video.
- Review the Results pane to see the JSON response that the analyzer would return to a client application.
- Close the meetinganalyzer page.
Clean up
If you’ve finished working with the Content Understanding service, you should delete the resources you have created in this exercise to avoid incurring unnecessary Azure costs.
- In the Azure portal, delete the resource group you created for this exercise.