Detect faces in Vision Studio
Vision solutions often require AI to be able to detect human faces. Suppose the fictitious retail company Northwind Traders wants to locate where customers are standing in a store to best assist them. One way to accomplish this is to determine if there are any faces in the images, and if so, to return the bounding box coordinates that show their location.
To test the face detection capabilities of the Azure AI Face service, you will use Azure Vision Studio. This is a UI-based platform that lets you explore Azure AI Vision features without needing to write any code.
Create an Azure AI services resource
You can use Azure AI Face service with an Azure AI services multi-service resource. If you haven’t already done so, create an Azure AI services resource in your Azure subscription.
-
In another browser tab, open the Azure portal at https://portal.azure.com, signing in with the Microsoft account associated with your Azure subscription.
- Click the +Create a resource button and search for Azure AI services. Select create an Azure AI services plan. You will be taken to a page to create an Azure AI services resource. Configure it with the following settings:
- Subscription: Your Azure subscription.
- Resource group: Select or create a resource group with a unique name.
- Region: Select the closest geographical region. If in eastern US, use “East US 2”.
- Name: Enter a unique name.
- Pricing tier: Standard S0.
- By checking this box I acknowledge that I have read and understood all the terms below: Selected.
- Select Review + create then Create and wait for deployment to complete.
Connect your Azure AI service resource to Vision Studio
Next, connect the Azure AI services resource you provisioned above to Vision Studio.
-
In another browser tab, navigate to Vision Studio at https://portal.vision.cognitive.azure.com.
-
Sign in with your account and making sure you are using the same directory as the one where you have created your Azure AI services resource.
-
On the Vision Studio home page, select View all resources under the Getting started with Vision heading.

-
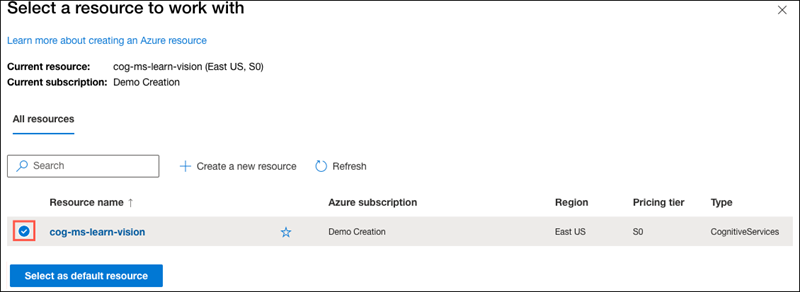
On the Select a resource to work with page, hover your mouse cursor over the resource you created above in the list and then check the box to the left of the resource name, then select Select as default resource.
Note : If your resource is not listed, you may need to Refresh the page.

-
Close the settings page by selecting the “x” at the top right of the screen.
Detect faces in the Vision Studio
-
In a web browser, navigate to Vision Studio at https://portal.vision.cognitive.azure.com.
-
On the Getting started with Vision landing page, select the Face tab and then select the Detect Faces in an image tile.
-
Under the Try It Out subheading, acknowledge the resource usage policy by reading and checking the box.
-
Select each of the sample images and observe the face detection data that is returned.
-
Now let’s try with some of our own images. Select https://aka.ms/mslearn-detect-faces to download detect-faces.zip. Then open the folder on your computer.
-
Locate the file named store-camera-1.jpg; which contains the following image:

-
Upload store-camera-1.jpg and review the face detection details that are returned.
-
Locate the file named store-camera-2.jpg; which contains the following image:

-
Upload store-camera-2.jpg and review the face detection details that are returned.
-
Locate the file named store-camera-3.jpg; which contains the following image:

-
Upload store-camera-3.jpg and review the face detection details that are returned. Notice how Azure AI Face did not detect the face that is obscured.
In this exercise you have explored how Azure AI services can detect faces in images. If you have time, feel free to try the sample images or some of your own images.
Clean up
If you don’t intend to do more exercises, delete any resources that you no longer need. This avoids accruing any unnecessary costs.
- Open the Azure portal at https://portal.azure.com and select the resource group that contains the resource you created.
- Select the resource and select Delete and then Yes to confirm. The resource is then deleted.
Learn more
To learn more about what you can do with this service, see the Azure AI Face service page.