Get started with information extraction in Microsoft Foundry
In this exercise, you’ll use Azure Content Understanding in Foundry, Microsoft’s platform for creating intelligent applications.
Azure Content Understanding is a Foundry service that uses AI models to turn unstructured, multimodal content (documents, images, video, audio) into structured, usable outputs like JSON. It processes content by extracting, classifying, and generating fields with confidence scores and source grounding.
This exercise takes approximately 25 minutes.
Create a Microsoft Foundry project
-
In a web browser, open Microsoft Foundry at
https://ai.azure.comto start building; signing in using your Azure credentials. - If it isn’t already enabled, in the tool bar the top of the page, enable the New Foundry option. Then, if prompted, create a new project with a unique name; expanding the Advanced options area to specify the following settings for your project:
- Foundry resource: Enter a valid name for your AI Foundry resource.
- Subscription: Your Azure subscription
- Resource group: Create or select a resource group
- Region: Select West US, Sweden Central, Australia East, or any of the regions in this list
Note: Depending on your permissions in the Azure subscription, you may need to clear the option to set up recommended resources.
-
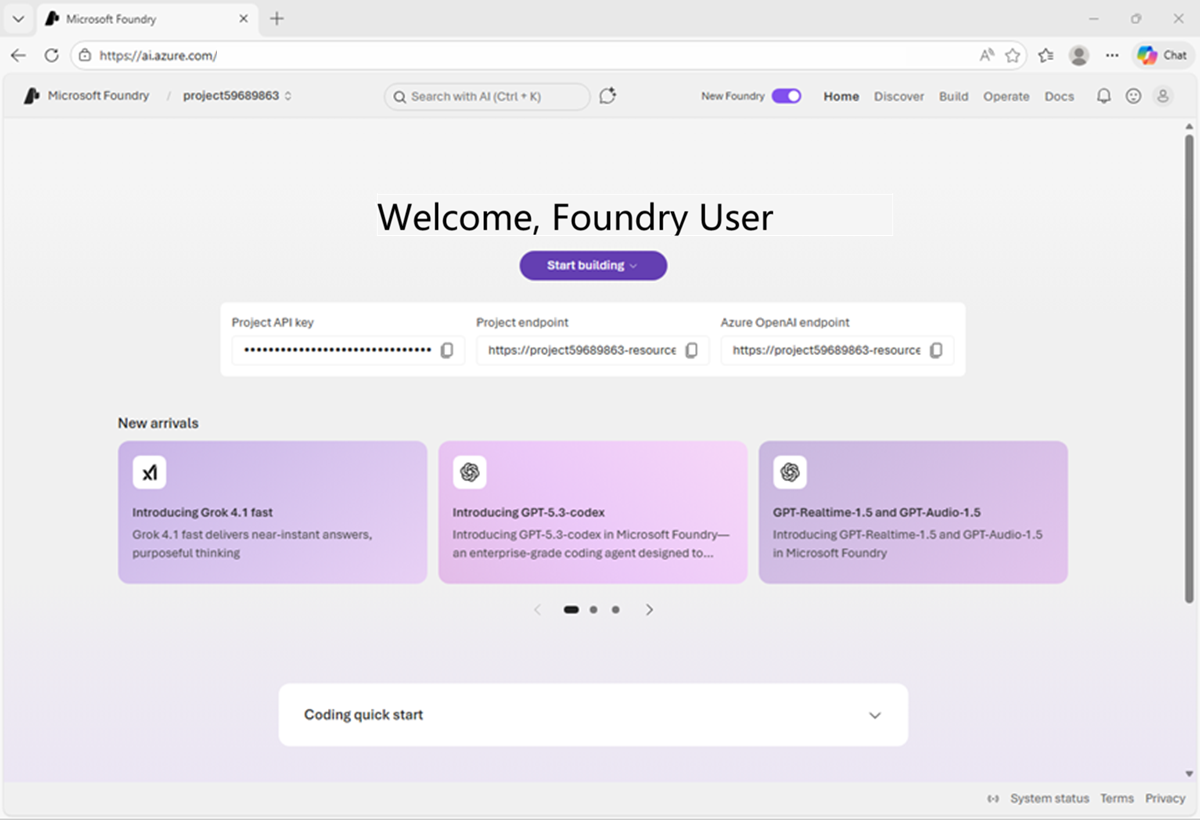
Wait for your project to be created. It may take a few minutes. After creating a project in the new Foundry portal, it should take you to a list of your projects (note: you may need to refresh the page to see your newly created project). Select the project you just created to open a page similar to the following image:
Tip: Close any suggestions or tips that may appear on the home page.
Use Content Understanding to extract information from documents
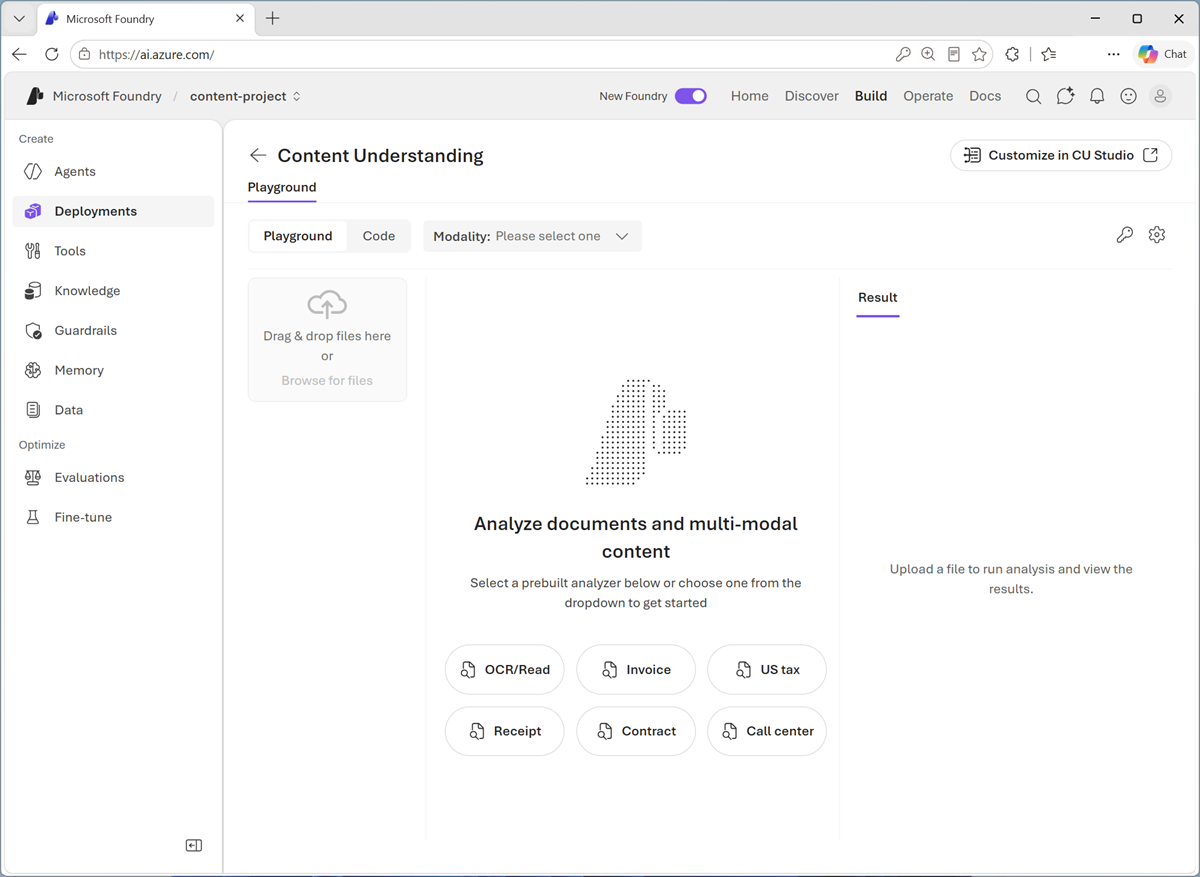
- In the Foundry portal, navigate to the tool bar at the top of the screen and select Build.
- On the Build page, in the menu on the left-side of the screen (which you may need to expand), select Deployments. Then, at the top of the Deployments page, select AI Services.
-
Select Content Understanding to open the Content Understanding tool playground.
-
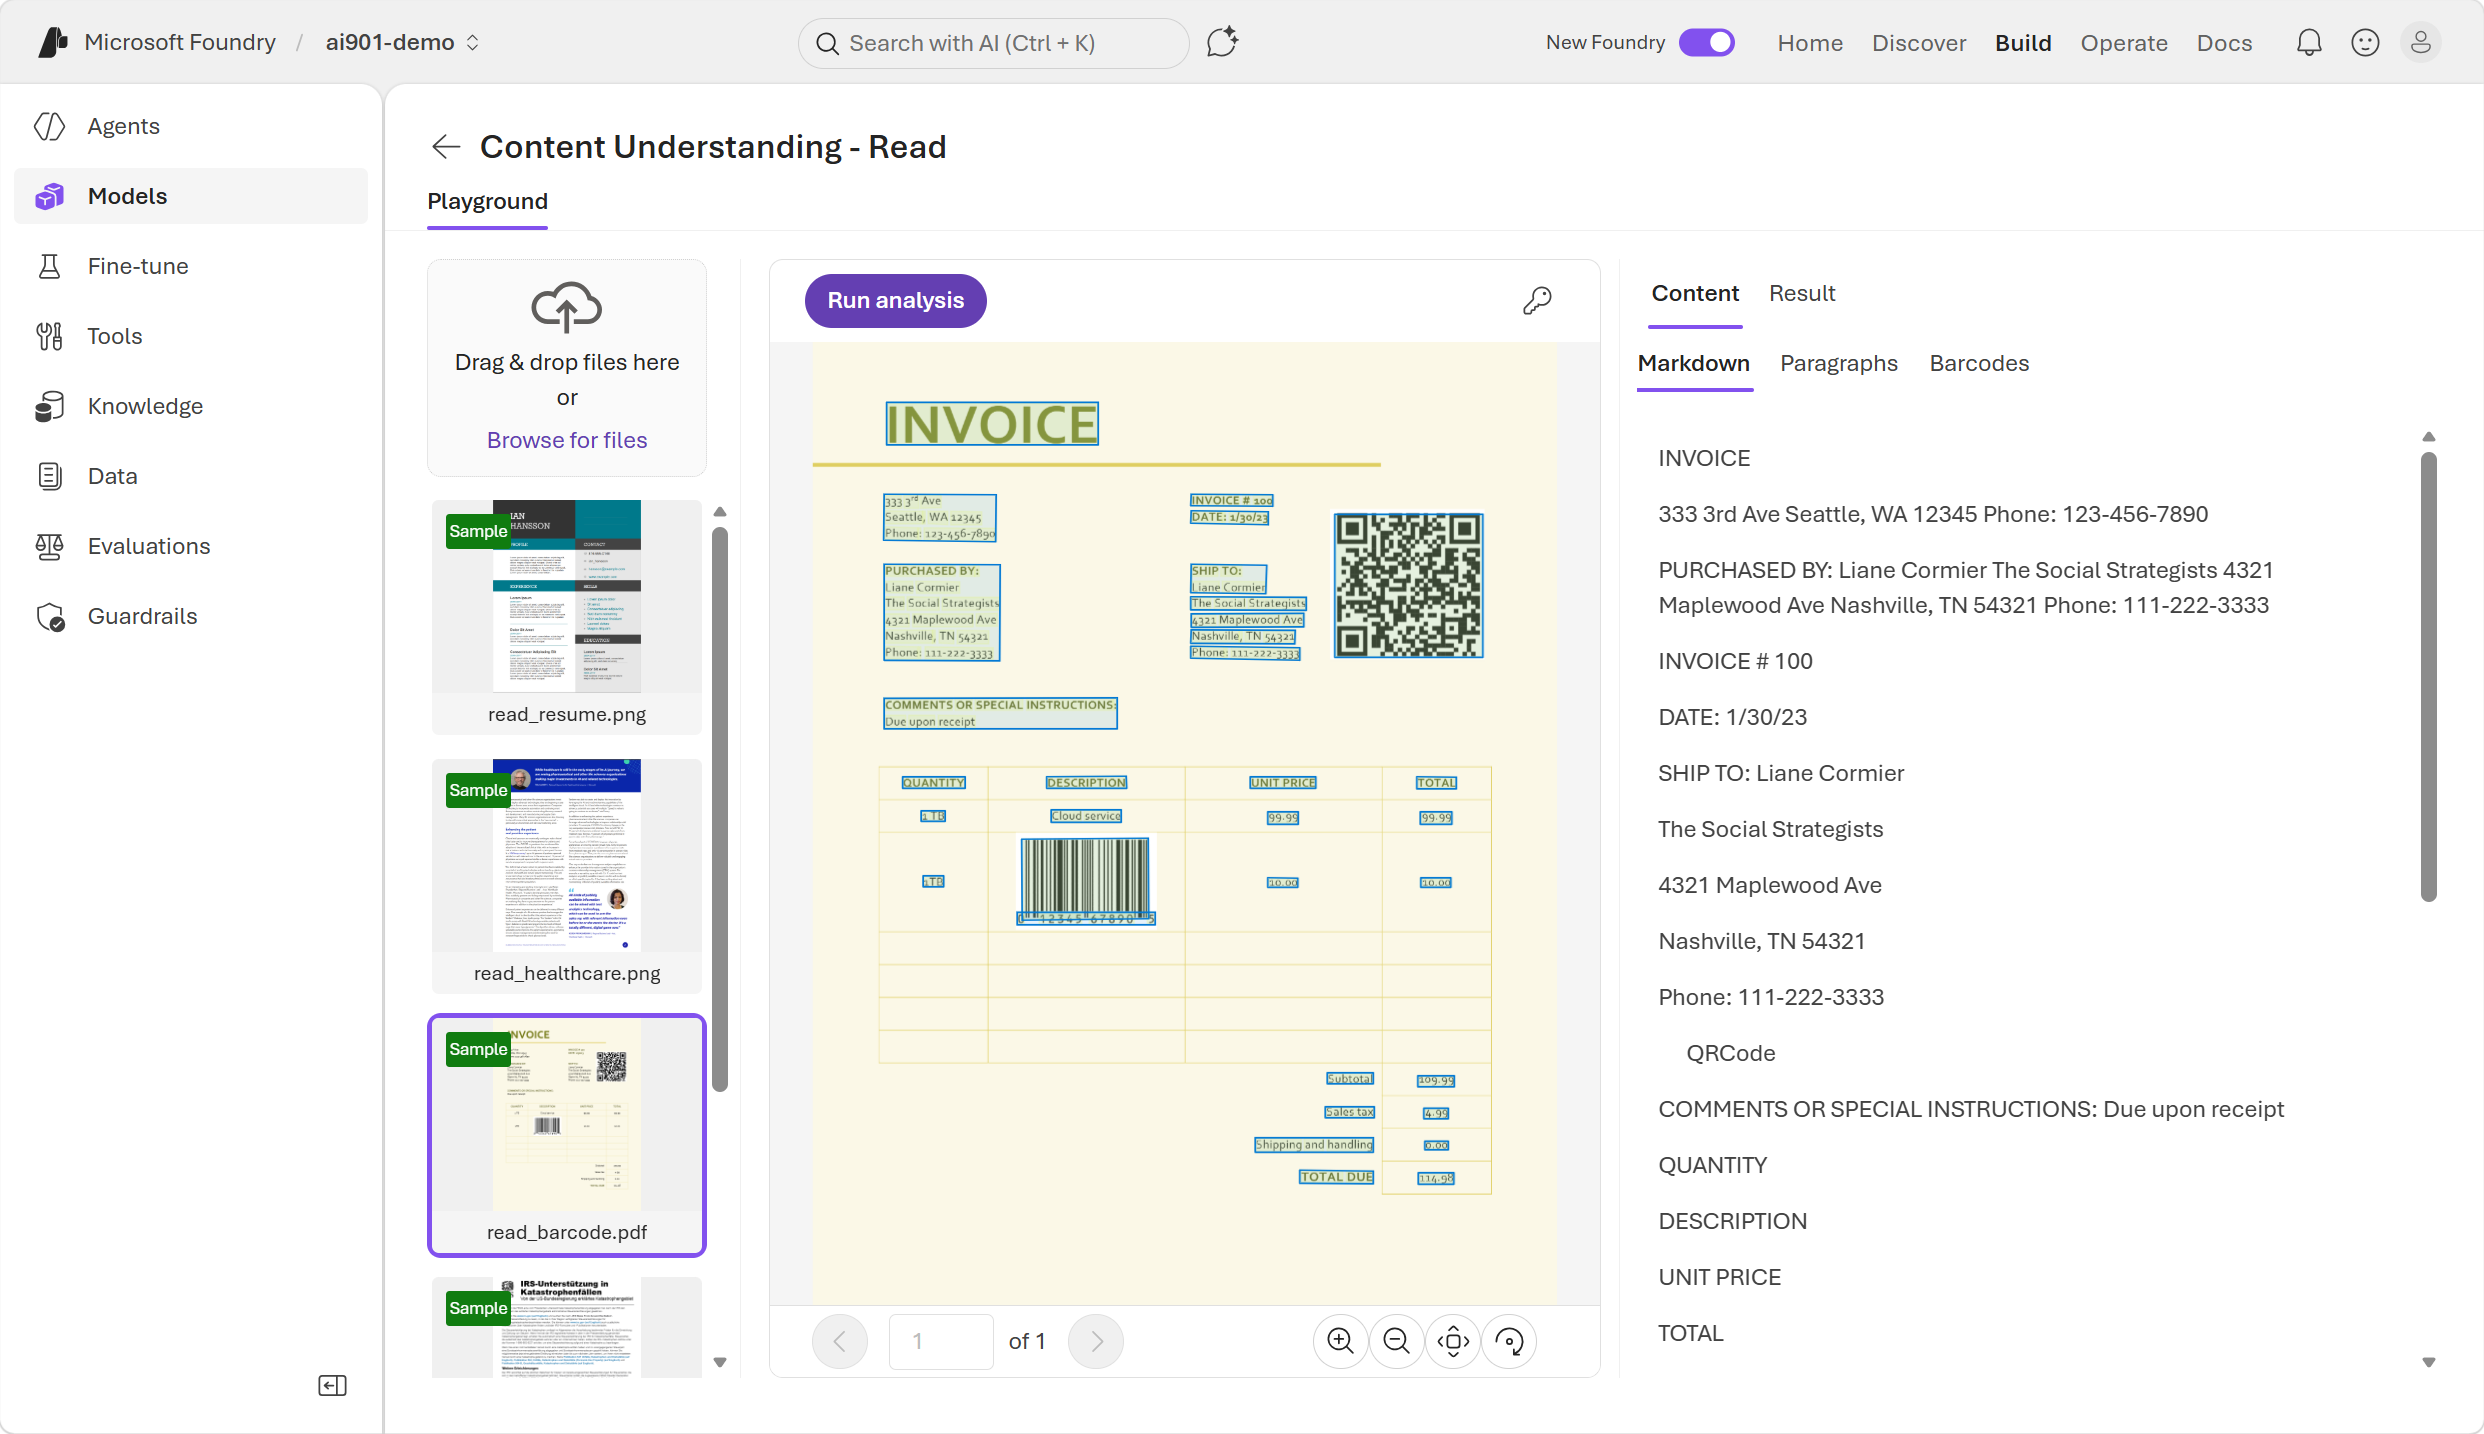
Select OCR/Read, and ensure that Document is selected in the Modality list, and OCR/Read is selected in the list of analyzers.
-
Select any sample, and use the Run analysis button to extract information from the document. When analysis is complete, view the results.
-
In the pane on the right, review the Markdown, Paragraphs, and Result tabs to see the data that has been read from the document by the analyzer.
The OCR/Read analyzer extracts text from documents. However, sometimes it may be useful to extract additional information about the layout of the text in the document.
-
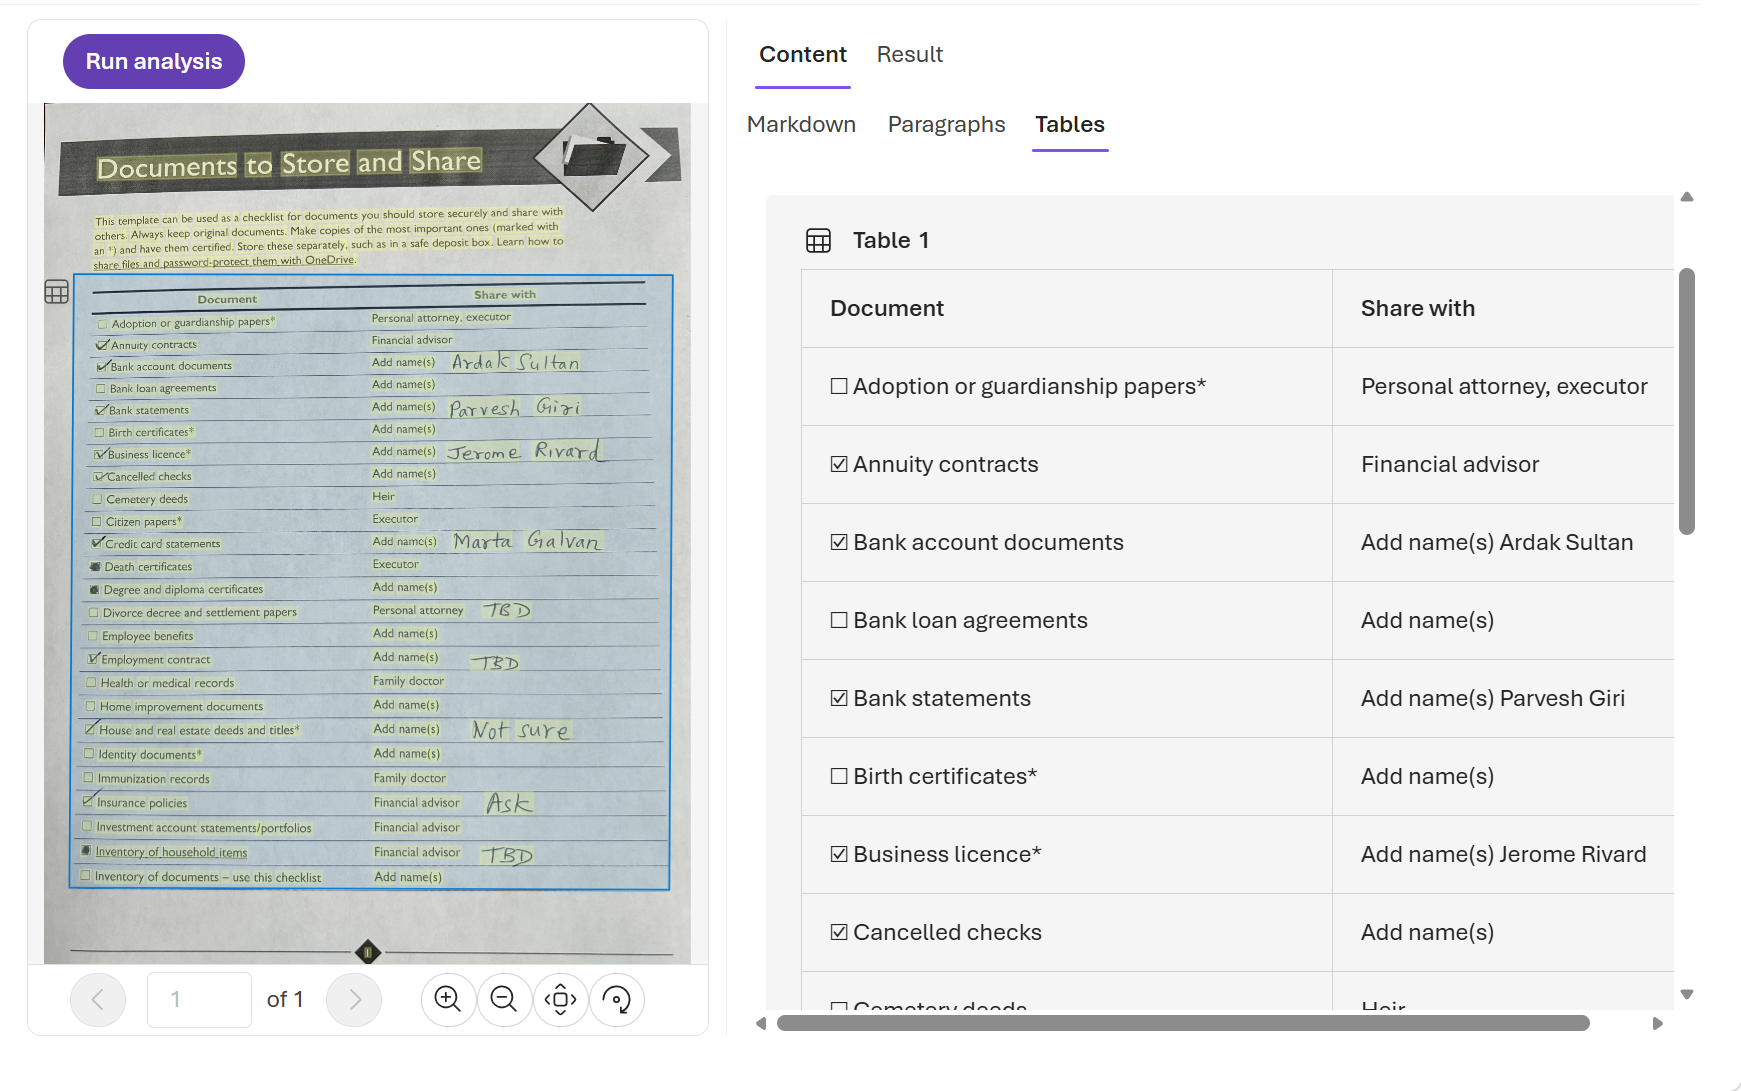
In the list of analyzers, select Layout. Then select any of the available samples and use the Run analysis button to extract information from it. When analysis is complete, view the results.
-
In the pane on the right, review the Markdown, Paragraphs, Tables, and Result tabs to see the ways in which the layout of the data in the document has been interpreted by the analyzer.
Extacting the text and page layout is useful when the documents need to scan have a consistent, well-defined structure. In many cases though, you need to be able to identify which text values map to which data fields; so a more specific analyzer is needed.
-
In the list of analyzer types, select Procurement, and then select the Receipt analyzer.
Tip: Field extraction requires a custom model, so you may be prompted to deploy models during this process. Click Cancel when this happens.
Do not run analysis - we’ll review the pre-prepared analysis results.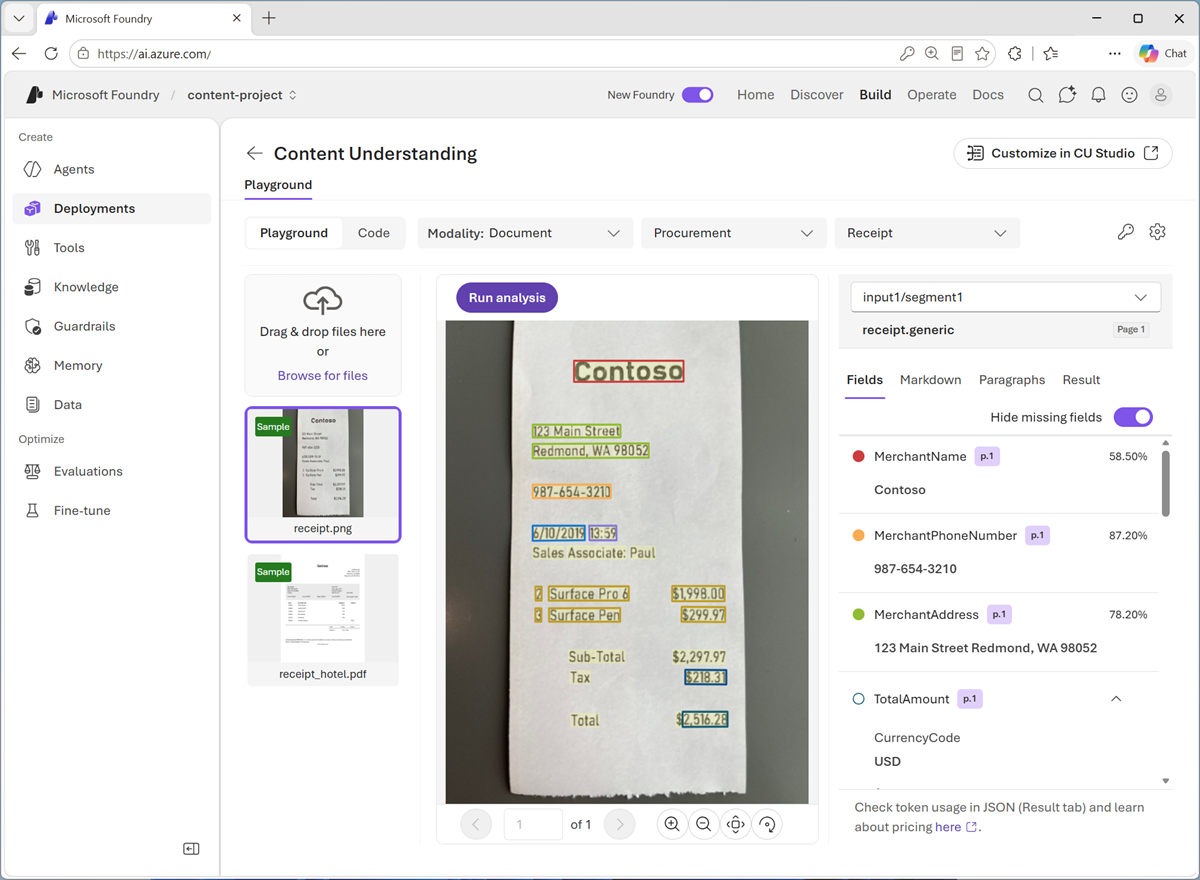
-
In the pane on the right, review the Fields, Markdown, Paragraphs, and Result tabs to see the data extracted from the document by the analyzer.
The Fields tab displays a user-friendly version of the information from the raw JSON in the Results tab, which is how a client application would receive the results of analysis.
Understand how to extract content with the Python SDK
As a developer, you can also use code to extract meaning from content. The Foundry playground provides various code samples to get you started with information extraction with Azure Content Understanding.
-
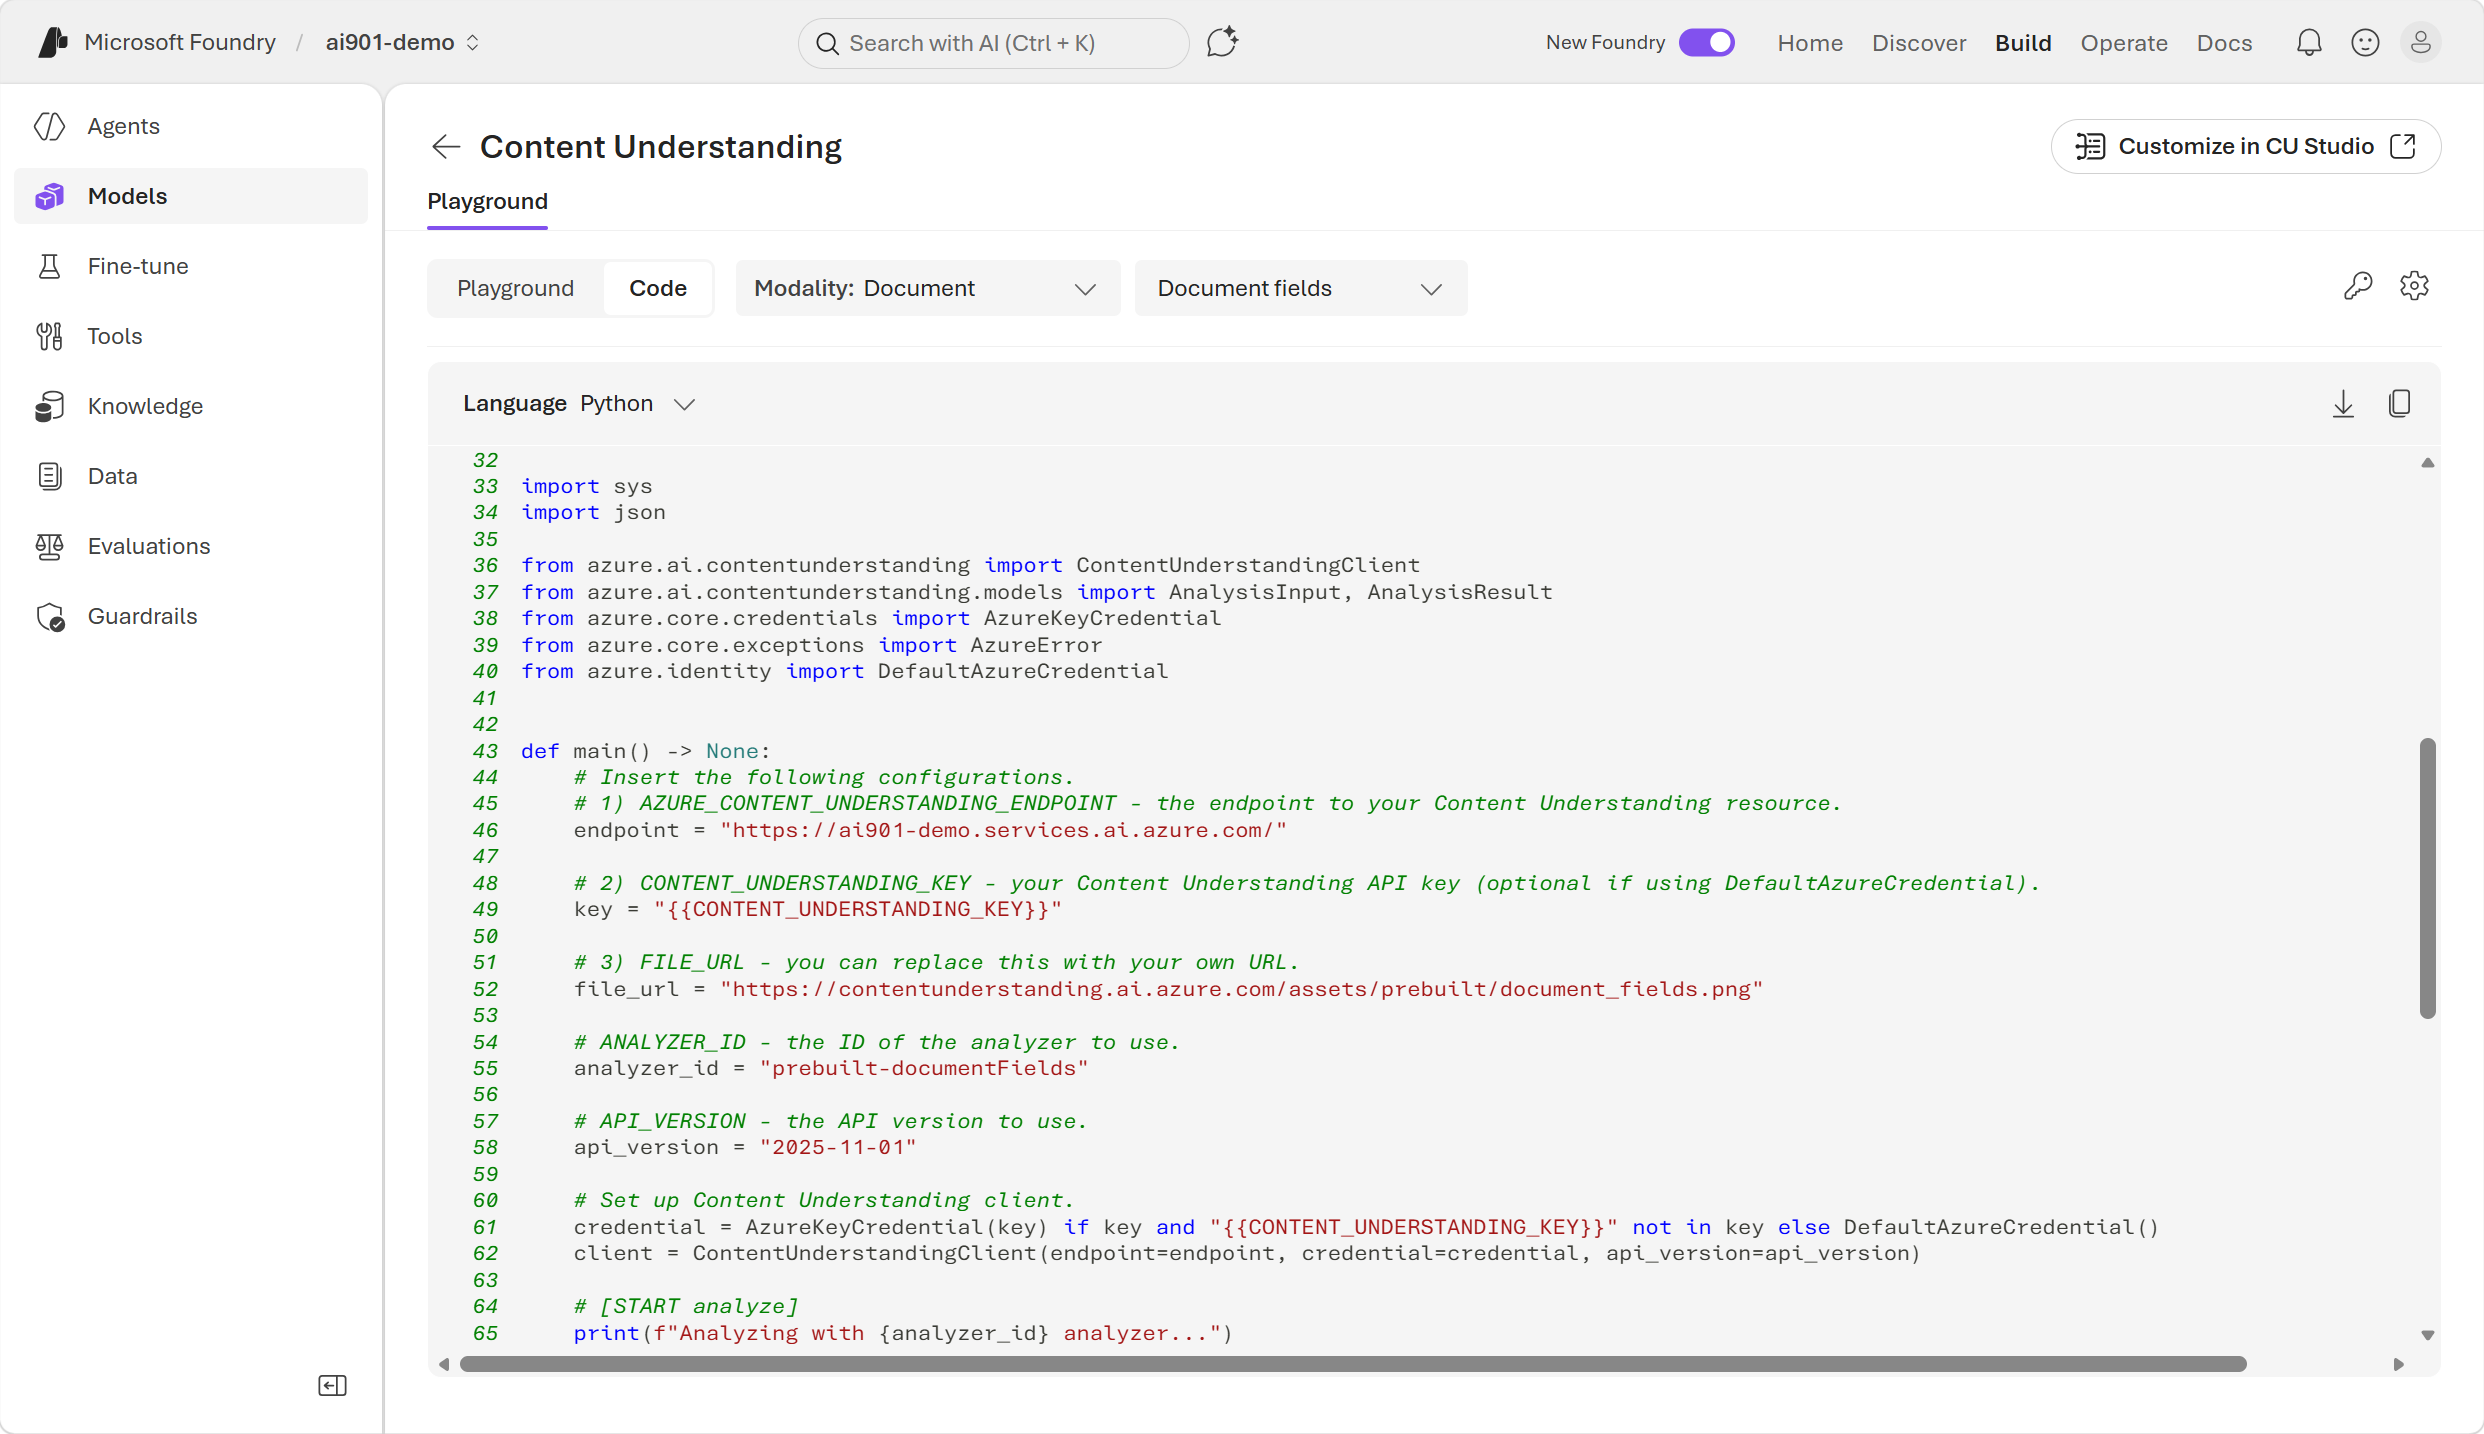
Let’s take a closer look at the Python code for document layout analysis. In the Content Understanding playground, while viewing the results of the Receipt analyzer, select the Code tab. The following code is provided:
 import sys
 import json

 from azure.ai.contentunderstanding import ContentUnderstandingClient
 from azure.ai.contentunderstanding.models import AnalysisInput, AnalysisResult
 from azure.core.credentials import AzureKeyCredential
 from azure.core.exceptions import AzureError
 from azure.identity import DefaultAzureCredential

 def main() -> None:
     # Insert the following configurations.
     # 1) AZURE_CONTENT_UNDERSTANDING_ENDPOINT - the endpoint to your Content Understanding resource.
     endpoint = "<https://content-project-resource.services.ai.azure.com/>"

     # 2) CONTENT_UNDERSTANDING_KEY - your Content Understanding API key (optional if using DefaultAzureCredential).
     key = ""

     # 3) FILE_URL - you can replace this with your own URL.
     file_url = ""

     # ANALYZER_ID - the ID of the analyzer to use.
     analyzer_id = "prebuilt-receipt"

     # API_VERSION - the API version to use.
     api_version = "2025-11-01"

     # Set up Content Understanding client.
     credential = AzureKeyCredential(key) if key and "" not in key else DefaultAzureCredential()
     client = ContentUnderstandingClient(endpoint=endpoint, credential=credential, api_version=api_version)

     # [START analyze]
     print(f"Analyzing with {analyzer_id} analyzer...")
     print(f"  File URL: {file_url}\n")

     try:
         poller = client.begin_analyze(
             analyzer_id=analyzer_id,
             inputs=[AnalysisInput(url=file_url)],
         )
         result: AnalysisResult = poller.result()
     except AzureError as err:
         print(f"[Azure Error]: {err.message}")
         sys.exit(1)
     except Exception as ex:
         print(f"[Unexpected Error]: {ex}")
         sys.exit(1)
     # [END analyze]

     # [START output_result]
     print("=" * 50)
     print("Analysis result:")
     print("=" * 50 + "\n")

     max_display_lines = 50
     result_str = json.dumps(result.as_dict(), indent=2)
     ret_lines = result_str.splitlines()

     if len(ret_lines) > max_display_lines:
         print("\n".join(ret_lines[:max_display_lines]))
         print(f"\n {len(ret_lines) - max_display_lines} more lines to be displayed...\n")
     else:
         print(result_str)
     # [END output_result]

 if **name** == "**main**":
     main()
The code connects to the Content Understanding tool in your Foundry resource, and submits a document file to the prebuilt-receipt analyzer. The analyzer runs asynchronously, and returns the results of the analysis in the JSON format you saw in the Result tab.
Summary
In this exercise, you explored Azure Content Understanding in Foundry and learned how it transforms unstructured content into structured, usable data. You tried out three analyzers, each building on the previous one in capability:
- Read: Extracts raw text from documents without interpreting structure or meaning.
- Layout: Goes a step further by capturing structure and hierarchy.
- Receipt: A document -specific analyzer that uses a combination of capabilities to extract text values and map them to data fields.
You also learned how developers can integrate Content Understanding into applications using the Python SDK, which enables programmatic analysis of documents outside the Foundry playground.
Ask Anton
If you have questions about some of the topics covered in this exercise, Ask Anton is a generative AI-based agent that you can ask about AI concepts and Microsoft Foundry. Open the app at https://aka.ms/azk-anton and use the Configure button to enter your Foundry project and model details.
Ask Anton is not a supported Microsoft product or a component of Microsoft Learn or AI Skills Navigator. Just an example of an AI agent for you to explore as you learn about what’s possible with AI.
If you do check out Ask Anton, we’d love you to tell us about your experience!
Clean up
If you’ve finished working with the Content Understanding service, you should delete the resources you have created in this exercise to avoid incurring unnecessary Azure costs.
- In the Azure portal, delete the resource group you created in this exercise.