Extract Data from Forms
Suppose a company currently requires employees to manually purchase order sheets and enter the data into a database. They would like you to utilize AI services to improve the data entry process. You decide to build a machine learning model that will read the form and produce structured data that can be used to automatically update a database.
Azure AI Document Intelligence is an Azure AI service that enables users to build automated data processing software. This software can extract text, key/value pairs, and tables from form documents using optical character recognition (OCR). Azure AI Document Intelligence has pre-built models for recognizing invoices, receipts, and business cards. The service also provides the capability to train custom models. In this exercise, we will focus on building custom models.
Create a Azure AI Document Intelligence resource
To use the Azure AI Document Intelligence service, you need a Azure AI Document Intelligence or Azure AI Services resource in your Azure subscription. You’ll use the Azure portal to create a resource.
- In a browser tab, open the Azure portal at
https://portal.azure.com, signing in with the Microsoft account associated with your Azure subscription. - On the Azure portal home page, navigate to the top search box and type Document Intelligence and then press Enter.
- On the Document Intelligence page, select Create.
- On the Create Document Intelligence page, use the following to configure your resource:
- Subscription: Your Azure subscription.
- Resource group: Select or create a resource group with a unique name such as DocIntelligenceResources.
- Region: select a region near you.
- Name: Enter a globally unique name.
- Pricing tier: select Free F0 (if you don’t have a Free tier available, select Standard S0).
- Then select Review + create, and Create. Wait while Azure creates the Azure AI Document Intelligence resource.
- When the deployment is complete, select Go to resource to view the resource’s Overview page.
Prepare to develop an app in Cloud Shell
You’ll develop your text translation app using Cloud Shell. The code files for your app have been provided in a GitHub repo.
Tip: If you have already cloned the mslearn-ai-document-intelligence repo, you can skip this task. Otherwise, follow these steps to clone it to your development environment.
-
In the Azure Portal, use the [>_] button to the right of the search bar at the top of the page to create a new Cloud Shell in the Azure portal, selecting a PowerShell environment. The cloud shell provides a command line interface in a pane at the bottom of the Azure portal.
Note: If you have previously created a cloud shell that uses a Bash environment, switch it to PowerShell.
-
In the cloud shell toolbar, in the Settings menu, select Go to Classic version (this is required to use the code editor).
Tip: As you paste commands into the cloudshell, the ouput may take up a large amount of the screen buffer. You can clear the screen by entering the
clscommand to make it easier to focus on each task. -
In the PowerShell pane, enter the following commands to clone the GitHub repo for this exercise:
rm -r mslearn-ai-document-intelligence -f git clone https://github.com/microsoftlearning/mslearn-ai-document-intelligence mslearn-ai-document-intelligence -
After the repo has been cloned, navigate to the folder containing the application code files:
cd mslearn-ai-document-intelligence/Labfiles/02-custom-document-intelligence
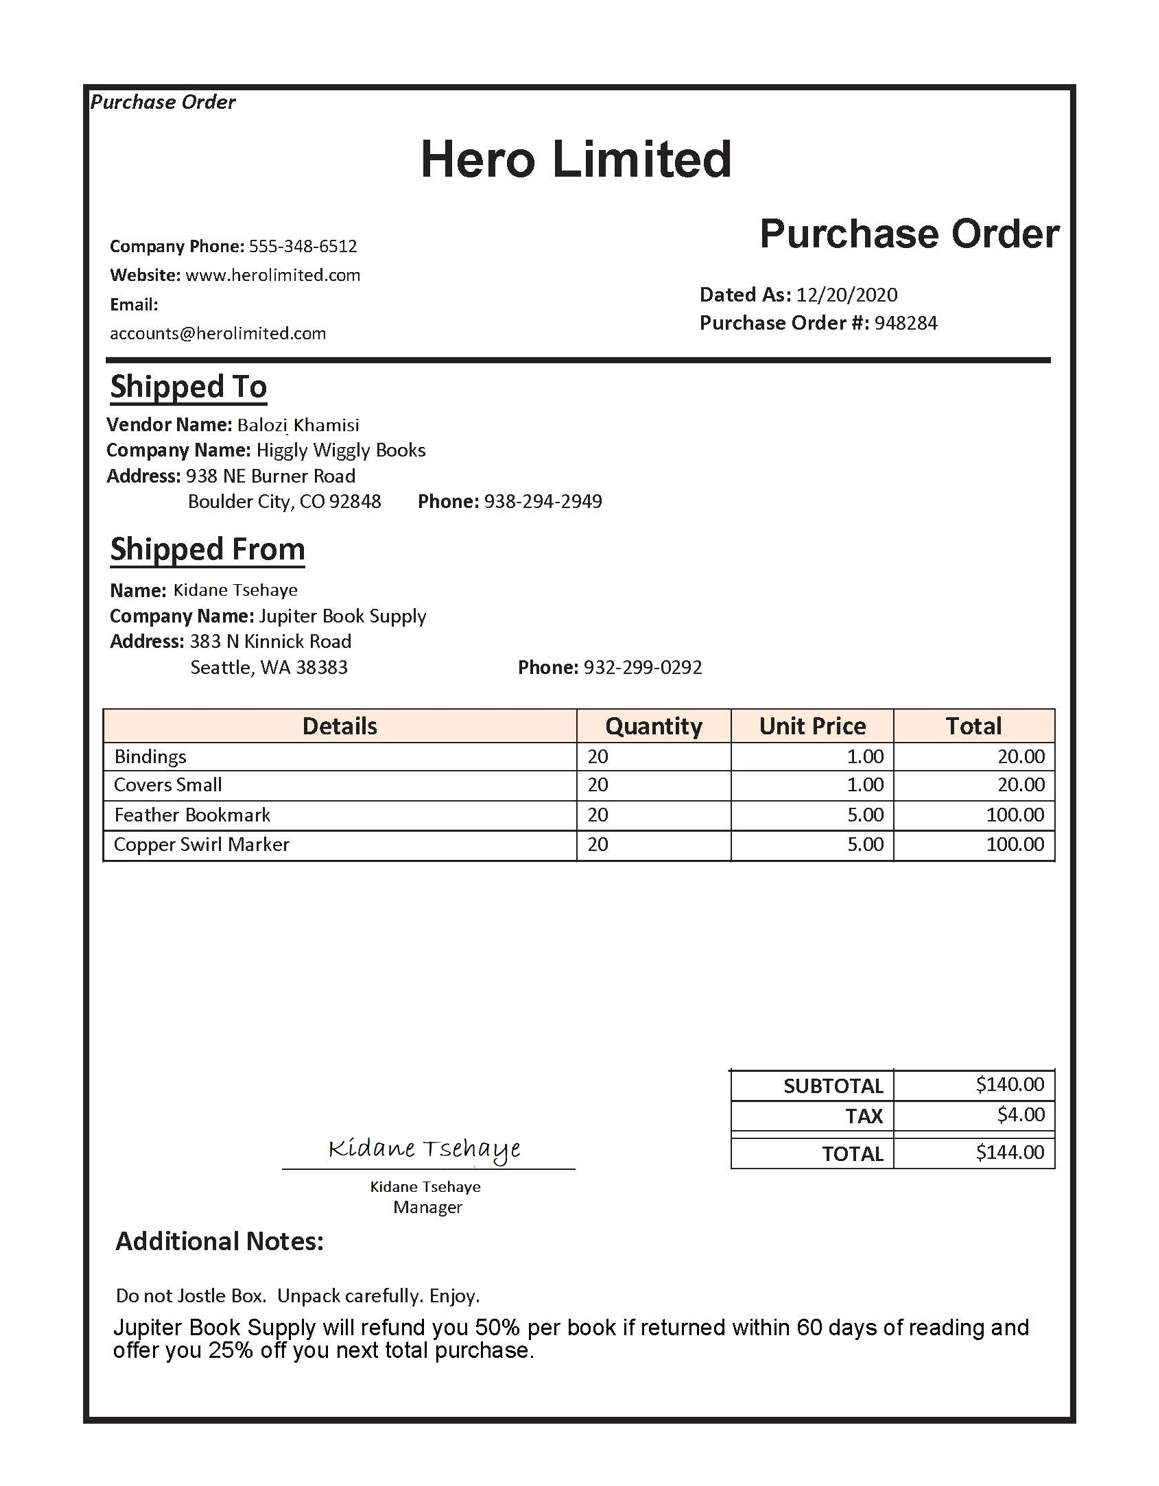
Gather documents for training
You’ll use the sample forms such as this one to train a test a model:
-
In the command line, run
ls ./sample-formsto list the content in the sample-forms folder. Notice there are files ending in .json and .jpg in the folder.You will use the .jpg files to train your model.
The .json files have been generated for you and contain label information. The files will be uploaded into your blob storage container alongside the forms.
-
Return to the Azure portal and navigate to your resource’s Overview page if you’re not already there. Under the Essentials section, view the Resource group in which you created the Document Intelligence resource.
-
On the Overview page for your resource group, note the Subscription ID and Location. You will need these values, along with your resource group name in subsequent steps.
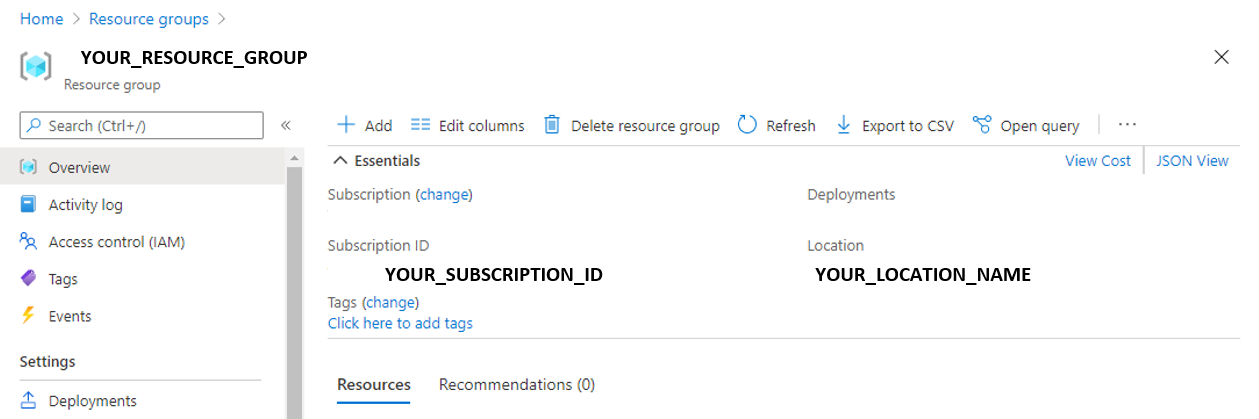
-
In the command line, run the following command to list the Azure locations.
az account list-locations -o table -
In the output, find the Name value that corresponds with the location of your resource group (for example, for East US the corresponding name is eastus).
Important: Record the Name value and use it in Step 11.
-
Run the command
code setup.shto open setup.sh in a code editor. You will use this script to run the Azure command line interface (CLI) commands required to create the other Azure resources you need. - In the setup.sh script, review the commands. The program will:
- Create a storage account in your Azure resource group
- Upload files from your local sampleforms folder to a container called sampleforms in the storage account
- Print a Shared Access Signature URI
-
Modify the subscription_id, resource_group, and location variable declarations with the appropriate values for the subscription, resource group, and location name where you deployed the Document Intelligence resource.
Leave the expiry_date variable as it is for the exercise. This variable is used when generating the Shared Access Signature (SAS) URI. In practice, you will want to set an appropriate expiry date for your SAS. You can learn more about SAS here.
-
After you’ve replaced the placeholders, within the code editor, use the CTRL+S command or Right-click > Save to save your changes and then use the CTRL+Q command or Right-click > Quit to close the code editor while keeping the cloud shell command line open.
-
Enter the following commands to make the script executable and to run it:
chmod +x ./setup.sh ./setup.sh -
When the script completes, review the displayed output.
- In the Azure portal, refresh your resource group and verify that it contains the Azure Storage account just created. Open the storage account and in the pane on the left, select Storage browser. Then in Storage Browser, expand Blob containers and select the sampleforms container to verify that the files have been uploaded from your local 02-custom-document-intelligence/sample-forms folder.
Train the model using Document Intelligence Studio
Now you will train the model using the files uploaded to the storage account.
- In your browser, navigate to the Document Intelligence Studio at
https://documentintelligence.ai.azure.com/studio. - Scroll down to the Custom models section and select the Custom extraction model tile.
- If you are asked to sign into your account, use your Azure credentials.
- If you are asked which Azure AI Document Intelligence resource to use, select the subscription and resource name you used when you created the Azure AI Document Intelligence resource.
-
Under My Projects, select Create a project. Use the following configurations:
- Project name: Enter a unique name.
- Select Continue.
- Configure service resource: Select the subscription, resource group, and document intelligence resource you created previously in this lab. Check the Set as default box. Keep the default API version.
- Select Continue.
- Connect training data source: Select the subscription, resource group, and storage account that was created by the setup script. Check the Set as default box. Select the
sampleformsblob container, and leave the folder path blank.- Select Continue.
- Select Create project
- Project name: Enter a unique name.
- Once your project is created, on the top right of the screen, select Train to train your model. Use the following configurations:
- Model ID: Provide a globally unique name (you’ll need the model ID name in the next step).
- Build Mode: Template.
- Select Go to Models.
- Training can take some time. You’ll see a notification when it’s complete.
Test your custom Document Intelligence model
- Return to the Azure Portal. In the command line, run
cd C-Sharporcd Pythondepending on your language preference. Each folder contains the language-specific files for an app into which you’re you’re going to integrate Azure OpenAI functionality. -
In the command line, install the Document Intelligence package by running the appropriate command for your language preference:
C#:
dotnet add package Azure.AI.FormRecognizer --version 4.1.0Python:
pip install dotenv azure-ai-formrecognizer==3.3.3 -
Using the
lscommand, you can view the contents of the C-Sharp or Python folder. Note that it contains a file for configuration settings:- C#: appsettings.json
- Python: .env
-
Enter the following command to edit the configuration file that has been provided:
C#
code appsettings.jsonPython
code .env - Edit the configuration file with the following values:
- Your Document Intelligence endpoint.
- Your Document Intelligence key.
- The Model ID generated you provided when training your model. You can find this on the Models page of the Document Intelligence Studio. Save your changes and close the code editor.
-
Open the code file for your client application (
code Program.csfor C#,code test-model.pyfor Python) and review the code it contains, particularly that the image in the URL refers to the file in this GitHub repo on the web. Close the file without making any changes. -
In the command line, and enter the following command to run the program:
C#
 dotnet build
 dotnet run
Python
python test-model.py - View the output and observe how the output for the model provides field names like
MerchantandCompanyPhoneNumber.
Clean up
If you’re done with your Azure resource, remember to delete the resource in the Azure portal to avoid further charges.
More information
For more information about the Document Intelligence service, see the Document Intelligence documentation.