Extend agents with Model Context Protocol (MCP) tools
In this exercise, you’ll use the Foundry Toolkit for VS Code extension to create an agent that can use Model Context Protocol (MCP) server tools to access external data sources and APIs. The agent will be able to retrieve up-to-date information and interact with custom services through MCP tools.
This exercise should take approximately 60 minutes to complete.
Note: Some of the technologies used in this exercise are in preview or in active development. You may experience some unexpected behavior, warnings, or errors.
Prerequisites
Before starting this exercise, ensure you have:
- Visual Studio Code installed on your local machine
- An active Azure subscription
- Python 3.13 or later installed
- Git installed on your local machine
* Python 3.13 is available, but some dependencies are not yet compiled for that release. The lab has been successfully tested with Python 3.12.
Create a Foundry project with the Foundry Toolkit for VS Code extension
As a developer, you may spend some time working in the Foundry portal; but you’re also likely to spend a lot of time in Visual Studio Code. The Foundry Toolkit for VS Code extension provides a convenient way to work with Foundry project resources without leaving the development environment.
-
Open Visual Studio Code.
-
Select Extensions from the left pane (or press Ctrl+Shift+X).
-
Search the extensions marketplace for the
Foundry Toolkitextension from Microsoft and select Install.Note: The extension is currently listed as Foundry Toolkit, but some VS Code labels, commands, or older screenshots may still refer to AI Toolkit. In this lab, treat those names as referring to the same extension experience.
-
After installing the extension, select its icon in the sidebar to open the Foundry Toolkit view.
You should be prompted to sign in to your Azure account if you haven’t already.
-
Select Create Project under Microsoft Foundry Resources.
If a default project is already active, the project name will appear under My Resources. You can create a new project by right-clicking on the active project and selecting Switch Default Project in Azure Resources.
-
Select your Azure subscription and resource group, then enter a name for your Foundry project to create a new project for this exercise.
When the deployment is complete, you should see the project appear in the Foundry Toolkit pane as the default project.
Deploy a model
At the core of any generative AI project, there’s at least one generative AI model. In this task, you’ll deploy a model from the Model Catalog to use with your agent.
-
When the “Project deployed successfully” popup appears, select the Deploy a new model button. This opens the Model Catalog.
Tip: You can also access the Model Catalog by selecting the + icon next to Models in the Resources section, or by pressing F1 and running the command Foundry Toolkit: Show model catalog.
-
In the Model Catalog, locate the gpt-5 model (you can use the search bar to find it quickly).
-
Select Deploy next to the gpt-5 model.
- Configure the deployment settings:
- Deployment name: Enter a name like “gpt-5”
- Deployment type: Select Global Standard (or Standard if Global Standard is not available)
- Model version: Leave as default
- Tokens per minute: Raise the Tokens per Minute limit to 150000 or higher.
-
Select Deploy to Microsoft Foundry in the bottom-left corner.
-
Wait for the deployment to complete. Your deployed model will appear under the Models section in the Resources view.
-
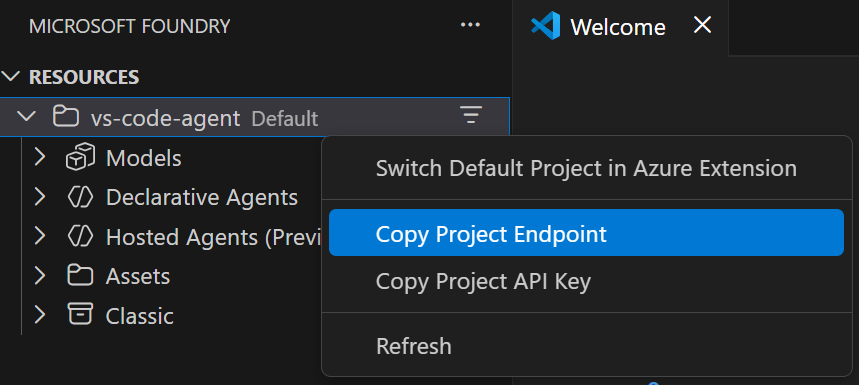
Right-click the name of the project deployment and select Copy Project Endpoint. You’ll need this URL to connect your agent to the Foundry project in the next steps.
Clone the starter code repository
For this exercise, you’ll use starter code that will help you connect to your Foundry project and create an agent that uses MCP server tools.
-
In VS Code, open the Command Palette (Ctrl+Shift+P or View > Command Palette).
-
Type Git: Clone and select it from the list.
-
Enter the repository URL:
https://github.com/MicrosoftLearning/mslearn-ai-agents.git -
Choose a location on your local machine to clone the repository.
-
When prompted, select Open to open the cloned repository in VS Code.
-
Once the repository opens, select File > Open Folder and navigate to
mslearn-ai-agents/Labfiles/03-mcp-integration, then choose Select Folder. -
In the Explorer pane, expand the Python folder to view the code files for this exercise.
-
Right-click on the requirements.txt file and select Open in Integrated Terminal.
-
In the terminal, enter the following command to install the required Python packages in a virtual environment:
python -m venv labenv .\labenv\Scripts\Activate.ps1 pip install -r requirements.txt -
Open the .env file, replace the your_project_endpoint placeholder with the endpoint for your project (copied from the project deployment resource in the Foundry Toolkit extension) and ensure that the MODEL_DEPLOYMENT_NAME variable is set to your model deployment name. Use Ctrl+S to save the file after making these changes.
Now you’re ready to create an AI agent that uses MCP server tools to access external data sources and APIs.
Connect an Azure AI Agent to a remote MCP server
In this task, you’ll connect to a remote MCP server, prepare the AI agent, and run a user prompt.
-
Open the agent.py file in the code editor.
Tip: As you add code, be sure to maintain the correct indentation. Use the comment indentation levels as a guide.
-
Find the comment Add references and add the following code to import the classes:
# Add references from azure.identity import DefaultAzureCredential from azure.ai.projects import AIProjectClient from azure.ai.projects.models import PromptAgentDefinition, MCPTool from openai.types.responses.response_input_param import McpApprovalResponse, ResponseInputParam -
Find the comment Connect to the agents client and add the following code to connect to the Azure AI project using the current Azure credentials.
# Connect to the agents client with ( DefaultAzureCredential() as credential, AIProjectClient(endpoint=project_endpoint, credential=credential) as project_client, project_client.get_openai_client() as openai_client, ): -
Under the comment Initialize agent MCP tool, add the following code:
# Initialize agent MCP tool
mcp_tool = MCPTool(
    server_label="api-specs",
    server_url="https://learn.microsoft.com/api/mcp",
    require_approval="always",
)
This code will connect to the Microsoft Learn Docs remote MCP server. This is a cloud-hosted service that enables clients to access trusted and up-to-date information directly from Microsoft’s official documentation.
-
Under the comment Create a new agent with the MCP tool and add the following code:
# Create a new agent with the MCP tool
agent = project_client.agents.create_version(
    agent_name="MyAgent",
    definition=PromptAgentDefinition(
        model=model_deployment,
        instructions="You are a helpful agent that can use MCP tools to assist users. Use the available MCP tools to answer questions and perform tasks.",
        tools=[mcp_tool],
    ),
)
print(f"Agent created (id: {agent.id}, name: {agent.name}, version: {agent.version})")
In this code, you provide instructions for the agent and provide it with the MCP tool definitions.
-
Find the comment Create a conversation thread and add the following code:
# Create a conversation thread conversation = openai_client.conversations.create() print(f"Created conversation (id: {conversation.id})") -
Find the comment Send initial request that will trigger the MCP tool and add the following code:
# Send initial request that will trigger the MCP tool response = openai_client.responses.create( conversation=conversation.id, input="Give me the Azure CLI commands to create an Azure Container App with a managed identity.", extra_body={"agent_reference": {"name": agent.name, "type": "agent_reference"}}, ) -
Find the comment Process any MCP approval requests that were generated and add the following code:
# Process any MCP approval requests that were generated
# The agent may issue several tool calls, each needing its own approval,
# so we loop until there are none left.
while True:
    # Collect any MCP approval requests from the latest response
    input_list: ResponseInputParam = []
    for item in response.output:
        if item.type == "mcp_approval_request":
            if item.server_label == "api-specs" and item.id:
                # Automatically approve the MCP request to allow the agent to proceed
                input_list.append(
                    McpApprovalResponse(
                        type="mcp_approval_response",
                        approve=True,
                        approval_request_id=item.id,
                    )
                )

    # No more approvals needed -> the agent has produced its final response
    if not input_list:
        break

    # Send the approval response back and retrieve the next response
    response = openai_client.responses.create(
        input=input_list,
        previous_response_id=response.id,
        extra_body={"agent_reference": {"name": agent.name, "type": "agent_reference"}},
    )

print(f"\nAgent response: {response.output_text}")
This code listens for any MCP approval requests in the agent’s response and automatically approves them.
-
Find the comment Clean up resources by deleting the agent version and add the following code:
# Clean up resources by deleting the agent version project_client.agents.delete_version(agent_name=agent.name, agent_version=agent.version) print("Agent deleted") -
Save the code file (CTRL+S) when you’re finished.
Test the connection to the remote MCP server
Now you’re ready to run the application and see how the agent uses the MCP tool to retrieve information from the Microsoft Learn Docs remote MCP server.
-
In the integrated terminal, enter the following command to run the application:
az loginpython agent.py -
Wait for the agent to process the prompt, using the MCP server to find a suitable tool to retrieve the requested information. You should see some output similar to the following:
 Agent created (id: MyAgent:2, name: MyAgent, version: 2)
 Created conversation (id: conv_086911ecabcbc05700BBHIeNRoPSO5tKPHiXRkgHuStYzy27BS)

 Agent response: Here are Azure CLI commands to create an Azure Container App with a managed identity:

 **1. For a System-assigned Managed Identity**
 ```sh
 az containerapp create \
 --name <CONTAINERAPP_NAME> \
 --resource-group <RESOURCE_GROUP> \
 --environment <CONTAINERAPPS_ENVIRONMENT> \
 --image <CONTAINER_IMAGE> \
 --identity 'system'
[continued…]
Agent deleted
```
Notice that the agent was able to invoke the MCP tool to automatically fulfill the request.
-
You can update the input in the request to ask for different information. In each case, the agent will attempt to find technical documentation by using the MCP tool.
Create an MCP server with custom tools
In addition to connecting to remote MCP servers, you can also create your own custom MCP server tools and connect them to your agent. A Model Context Protocol (MCP) Server is a component that hosts callable tools. These tools are Python functions that can be exposed to AI agents. When tools are annotated with @mcp.tool(), they become discoverable to the client, allowing an AI agent to call them autonomously during a conversation or task. In this task, you’ll add tools that will allow an agent to perform inventory inquiries and recommendations.
-
Open the server.py file in the code editor.
In this code file, you’ll define the tools the agent can use to simulate a backend service for the retail store. Notice the server setup code at the top of the file. It uses
FastMCPto quickly spin up an MCP server instance named “Inventory”. This server will host the tools you define and make them accessible to the agent during the lab. -
Under the comment Add references, add the following code:
# Add references from fastmcp import FastMCP -
Under the comment Create an MCP server, add the following code to create a new MCP server instance:
# Create an MCP server
mcp = FastMCP(name="Inventory")
This code initializes a new MCP server with the label “Inventory”.
-
Find the comment Add an inventory check mcp tool and add the following decorator above the function definition, which should now look like this:
# Add an inventory check mcp tool
@mcp.tool()
def get_inventory_levels() -> dict:
   # continued...
This dictionary represents a sample inventory. The
@mcp.tool()decorator registers the function as a tool on the MCP server, allowing the LLM to discover your function. -
Find the comment Add a weekly sales mcp tool and add the following decorator above the function definition, which should now look like this:
# Add a weekly sales mcp tool @mcp.tool() def get_weekly_sales() -> dict: # continued... -
Find the comment Run the MCP server and add the following code to start the server:
# Run the MCP server
mcp.run(show_banner=False)
This code starts the MCP server, making your tools available for discovery and use by the agent. Setting
show_banner=Falseprevents the startup banner from being printed to stdout, which would corrupt the MCP stdio protocol. -
Save the file (CTRL+S).
Implement an MCP client to connect to the custom MCP server
An MCP client is the component that connects to the MCP server to discover and call tools. You can think of it as the bridge between the agent and the server-hosted functions, enabling dynamic tool use in response to user prompts.
-
Navigate to the client.py file.
-
Find the comment Add references and add the following code to import the classes:
# Add references from mcp import ClientSession, StdioServerParameters from mcp.client.stdio import stdio_client -
In the connect_to_server method, find the comment Start the MCP server and add the following code:
# Start the MCP server
stdio_transport = await exit_stack.enter_async_context(stdio_client(server_params))
stdio, write = stdio_transport
In a standard production setup, the server would run separately from the client. But for the sake of this lab, the client is responsible for starting the server using standard input/output transport. This creates a lightweight communication channel between the two components and simplifies the local development setup.
-
Find the comment Create an MCP client session and add the following code:
# Create an MCP client session
session = await exit_stack.enter_async_context(ClientSession(stdio, write))
await session.initialize()
This creates a new client session using the input and output streams from the previous step. Calling
session.initializeprepares the session to discover and call tools that are registered on the MCP server. -
Under the comment List available tools, add the following code to verify that the client has connected to the server:
# List available tools
response = await session.list_tools()
tools = response.tools
print("\nConnected to server with tools:", [tool.name for tool in tools])
Now your client session is ready for use with your Azure AI Agent.
Connect the MCP tools to your agent
In this task, you’ll connect the MCP server tools to your agent so that it can call them in response to user prompts.
Tip: As you add code, be sure to maintain the correct indentation. Use the comment indentation levels as a guide.
-
In the chat_loop method, find the comment Build a function for each tool and add the following code:
 # Build a function for each tool
 def make_tool_func(tool_name):
     async def tool_func(**kwargs):
         result = await session.call_tool(tool_name, kwargs)
         return result

     tool_func.__name__ = tool_name
     return tool_func

 # Store the functions in a dictionary for easy access when processing function calls
 functions_dict = {tool.name: make_tool_func(tool.name) for tool in tools}
This code dynamically wraps tools available in the MCP server so that they can be called by the AI agent. Each tool is turned into an async function that the agent can invoke.
-
Find the comment Create FunctionTool definitions for the agent and add the following code:
# Create FunctionTool definitions for the agent mcp_function_tools: FunctionTool = [] for tool in tools: function_tool = FunctionTool( name=tool.name, description=tool.description, parameters={ "type": "object", "properties": {}, "additionalProperties": False, }, strict=True ) mcp_function_tools.append(function_tool) -
Find the comment Create the agent and add the following code:
# Create the agent
agent = project_client.agents.create_version(
    agent_name="inventory-agent",
    definition=PromptAgentDefinition(
        model=model_deployment,
        instructions="""
        You are an inventory assistant. Here are some general guidelines:
        - Recommend restock if item inventory < 10  and weekly sales > 15
        - Recommend clearance if item inventory > 20 and weekly sales < 5
        """,
        tools=mcp_function_tools
    ),
)
With these instructions and tools, the agent is able to invoke the tools to retrieve inventory and sales data, and then use that information to provide helpful responses to the user.
-
Locate the comment Process function calls and add the following code:
# Process function calls
for item in response.output:
    if item.type == "function_call":
        # Retrieve the matching function tool
        function_name = item.name
        kwargs = json.loads(item.arguments)
        required_function = functions_dict.get(function_name)

        # Invoke the function
        output = await required_function(**kwargs)

        # Append the output text
        input_list.append(
           FunctionCallOutput(
              type="function_call_output",
              call_id=item.call_id,
              output=output.content[0].text,
           )
        )
This code listens for any function calls in the agent’s response, invokes the corresponding tool function, and prepares the output to be sent back to the agent.
-
Find the comment Send function call outputs back to the model and retrieve a response and add the following code:
# Send function call outputs back to the model and retrieve a response if input_list: response = openai_client.responses.create( input=input_list, previous_response_id=response.id, extra_body={"agent_reference": {"name": agent.name, "type": "agent_reference"}}, ) print(f"Agent response: {response.output_text}") -
Save the code file (CTRL+S) when you have finished.
Test the custom MCP tools with your agent
-
In the integrated terminal, enter the following command to run the application:
python client.py -
When prompted, enter a prompt such as:
Show me the current inventory levels for all products.Tip: If the app fails because the rate limit is exceeded. Wait a few seconds and try again. If there is insufficient quota available in your subscription, the model may not be able to respond.
You should see some output similar to the following:
 MessageRole.AGENT:
 Agent response: Here are the current inventory levels for all items:

- Moisturizer: 6
- Shampoo: 8
- Body Spray: 28
[continued ...]

Would you like recommendations for restocking or clearance? If so, I can check the weekly sales to advise accordingly.
Notice that the agent was able to call the MCP tools to retrieve inventory and sales data, and then use that information to provide a helpful response to the user.
-
You can continue the conversation if you like. The thread is stateful, so it retains the conversation history - meaning that the agent has the full context for each response.
Try entering prompts such as:
Are there any products that should be restocked?Which products would you recommend for clearance?What are the best sellers this week? -
Enter
quitto exit the application.You can also use
deactivateto exit the Python virtual environment in the terminal.
Clean up
When you’ve finished exploring the Foundry Toolkit for VS Code extension, you should clean up the resources to avoid incurring unnecessary Azure costs.
Delete your model
-
In VS Code, refresh the Azure Resources view.
-
Expand the Models subsection.
-
Right-click on your deployed model and select Delete.
Delete the resource group
-
Open the Azure portal.
-
Navigate to the resource group containing your Microsoft Foundry resources.
-
Select Delete resource group and confirm the deletion.