Develop your first AI agent in Microsoft Foundry

Hi, I’m Anton.
I’ll be here to help you with hints and tips as you work through this lab; in which you’ll use Microsoft Foundry to develop an AI agent that provides information and expertise on the history of computing.
If you want more interactive help, you can chat with me in the Ask Anton app.
https://aka.ms/choose-anton:
- Azure-based: Best experience (requires an Azure subscription and deployment of a model in a Foundry project).
- Browser-based: Use a small language model in your browser (reduced functionality - may be slow or work only in "basic" mode in older/lower-spec devices).
Ask Anton is not a supported Microsoft product or a component of Microsoft Learn or AI Skills Navigator.
This exercise should take approximately 40 minutes to complete.
Note: Many components of Microsoft Foundry, including the Microsoft Foundry portal, are subject to continual development. This reflects the fast-moving nature of artificial intelligence technology. Some elements of your user experience may differ from the images and descriptions in this exercise!
Create an agent in the Microsoft Foundry portal
Microsoft Foundry uses projects to organize models, resources, data, and other assets used to develop an AI solution.
-
In a web browser, open Microsoft Foundry at
https://ai.azure.comand start building; signing in using your Azure credentials. Close any tips or quick start panes that are opened the first time you sign in, and if necessary use the Foundry logo at the top left to navigate to the home page. -
If it is not already enabled, in the tool bar the top of the page, enable the New Foundry option.
A default Foundry project may have already been created for you. If not, you may be prompted to create one.
-
If prompted, create a new project with a unique name; expanding the Advanced options area to specify the following settings for your project:
- Foundry resource: A valid name for your Foundry resource.
- Subscription: Your Azure subscription
- Resource group: Create or select a resource group
- Region: Select any of the AI Foundry recommended regions in this list
Tip: Depending on your permissions in the Azure subscription, you may need to clear the option to set up recommended resources.Wait for your project to be created. It may take a few minutes. Then close any welcome dialogs that are displayed.
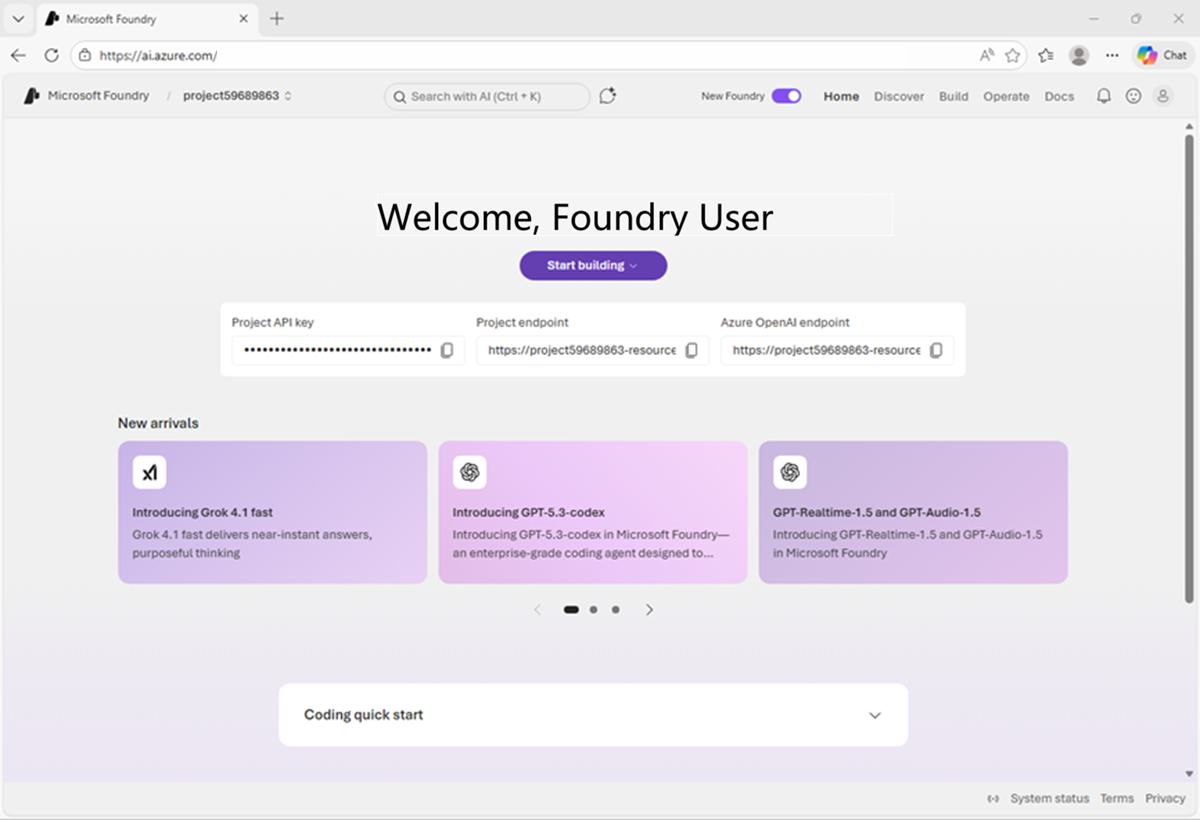
After creating or selecting a project in the new Foundry portal, it should open in a page similar to the following image:
Deploy a model
At the heart of every AI agent, there’s a large language model (LLM). Let’s find one in the Foundry models catalog.
-
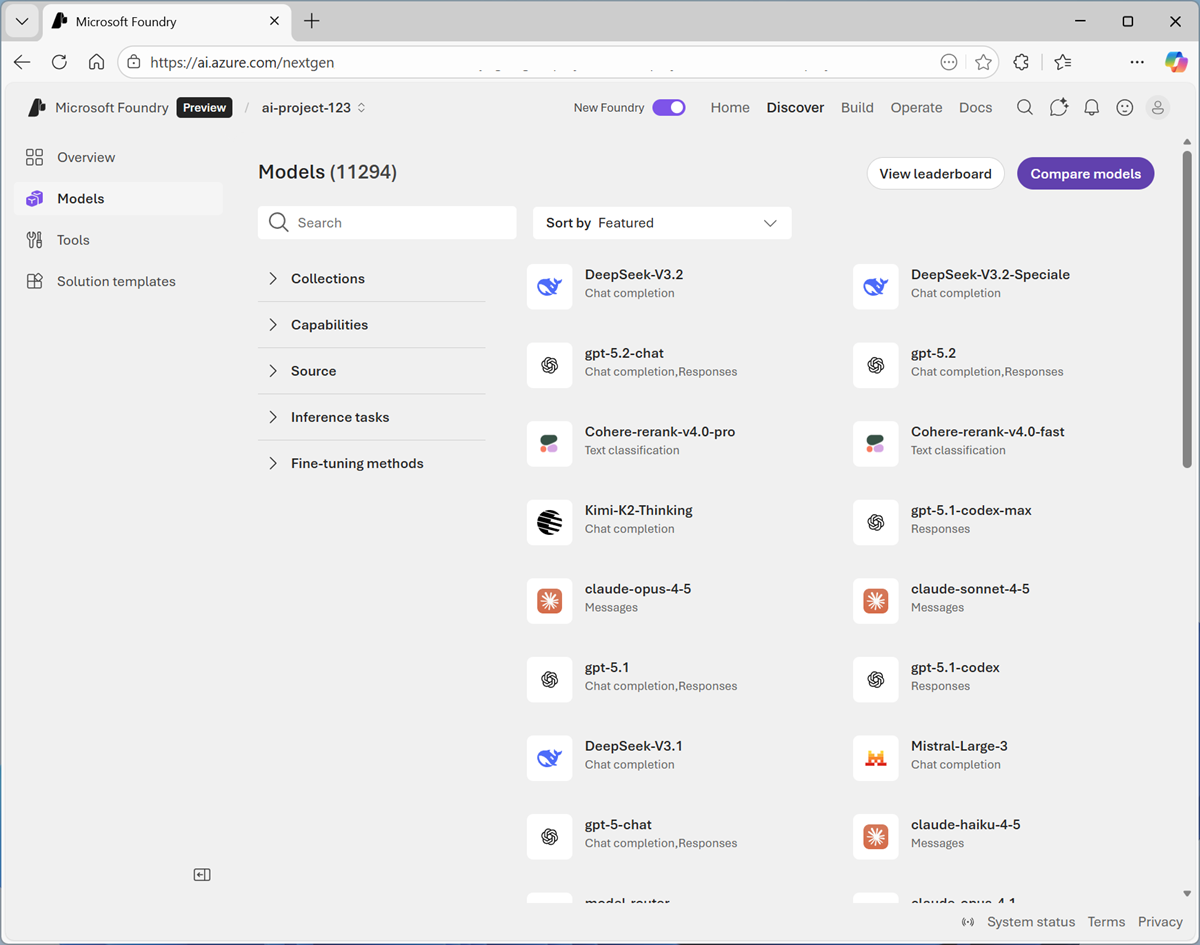
Now you’re ready to explore models. On the Discover page, select the Models tab to view the Microsoft Foundry model catalog.
Microsoft Foundry provides a large collection of models from Microsoft, OpenAI, and other providers, that you can use in your AI apps and agents.
-
Search for and select the
gpt-5-minimodel, and view the page for this model, which describes its features and capabilities.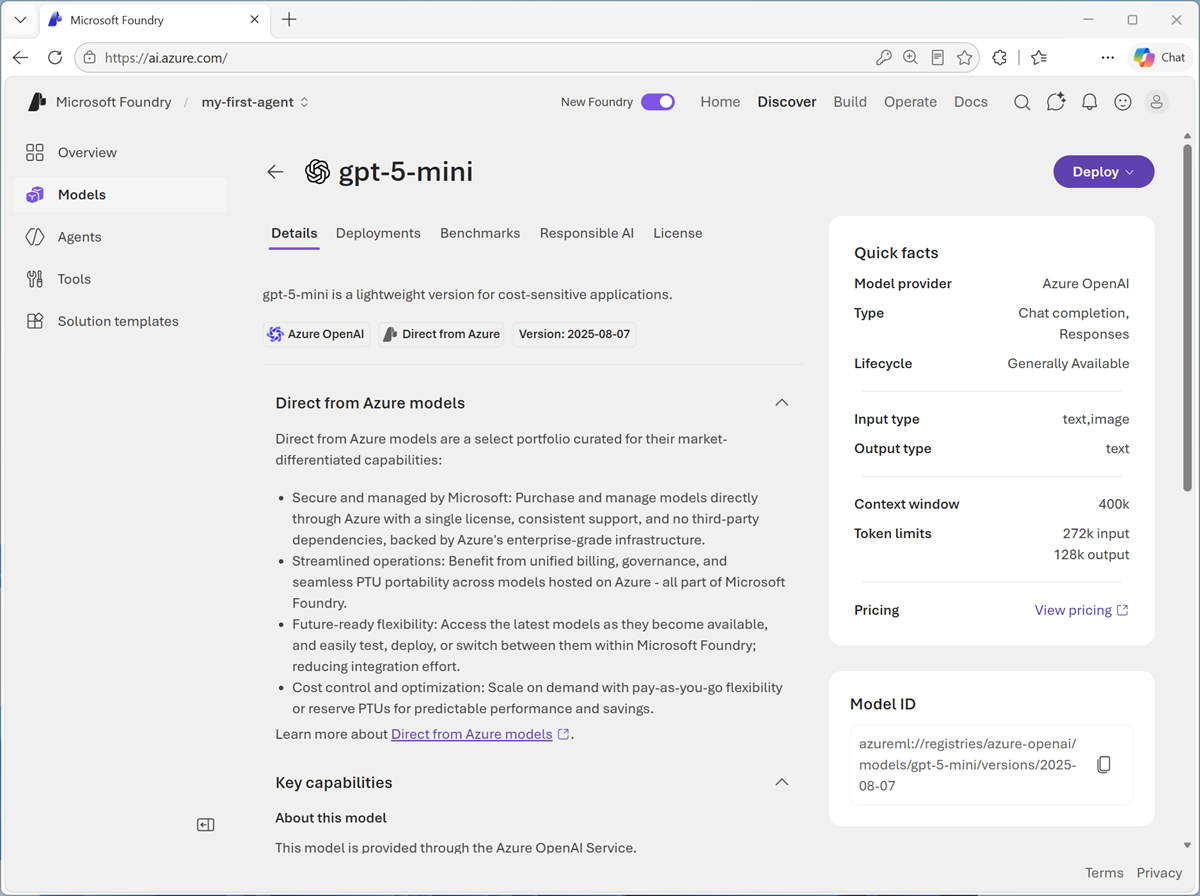
-
Use the Deploy (or Custom Deploy) button to deploy the model using the default settings. Deployment may take a minute or so.
Tip: Model deployments are subject to regional quotas. If you don’t have enough quota to deploy the model in your project’s region, you can use a different gpt chat-capable model - such as gpt-5-nano, or gpt-5.4-mini. Alternatively, you can create a new project in a different region. -
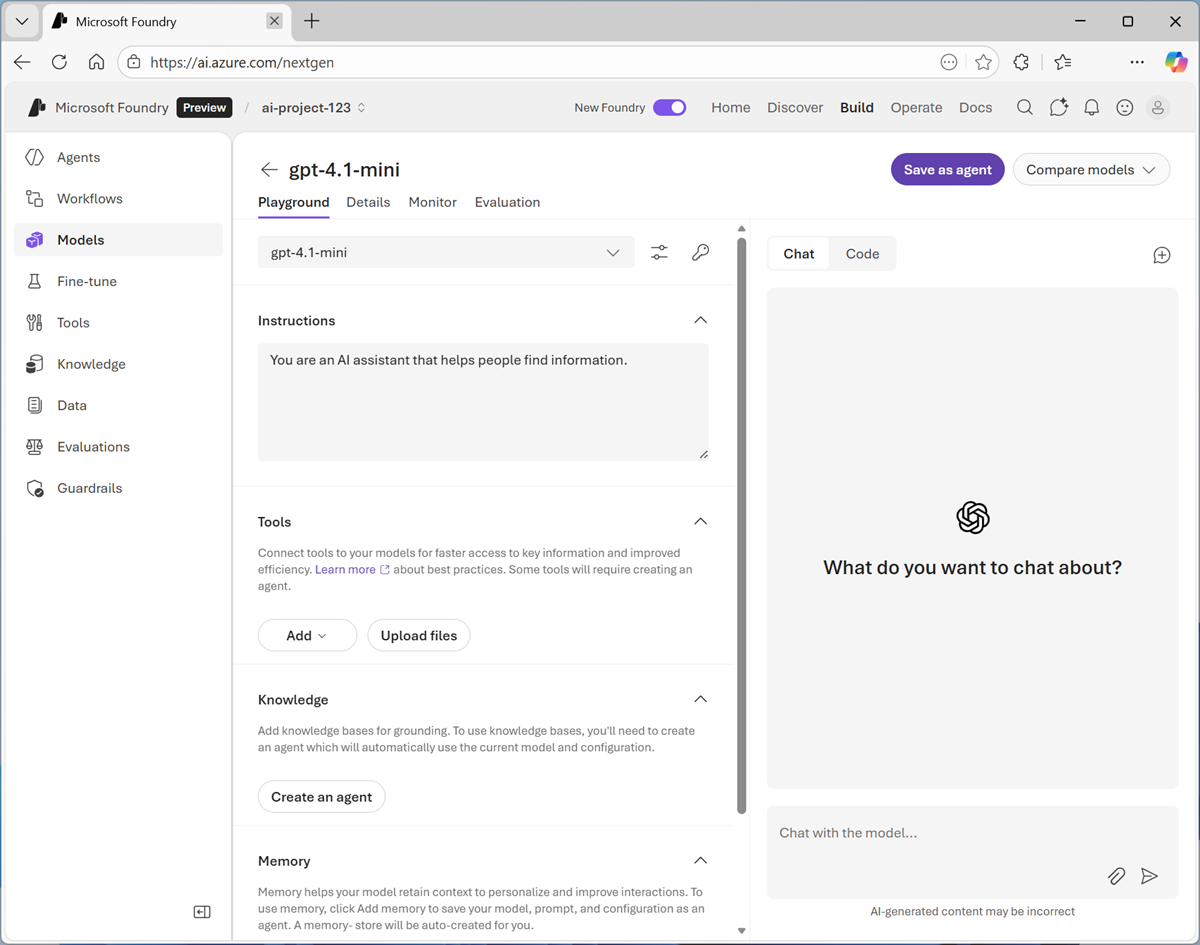
When the model has been deployed, view the model playground page that is opened, in which you can chat with the model.
Chat with the model
You can use the playground to explore the model by chatting with it.
- Use the button at the bottom of the left navigation pane to hide it and give yourself more room to work with.
-
In the Chat pane, enter a prompt such as
Who was Ada Lovelace?, and review the response.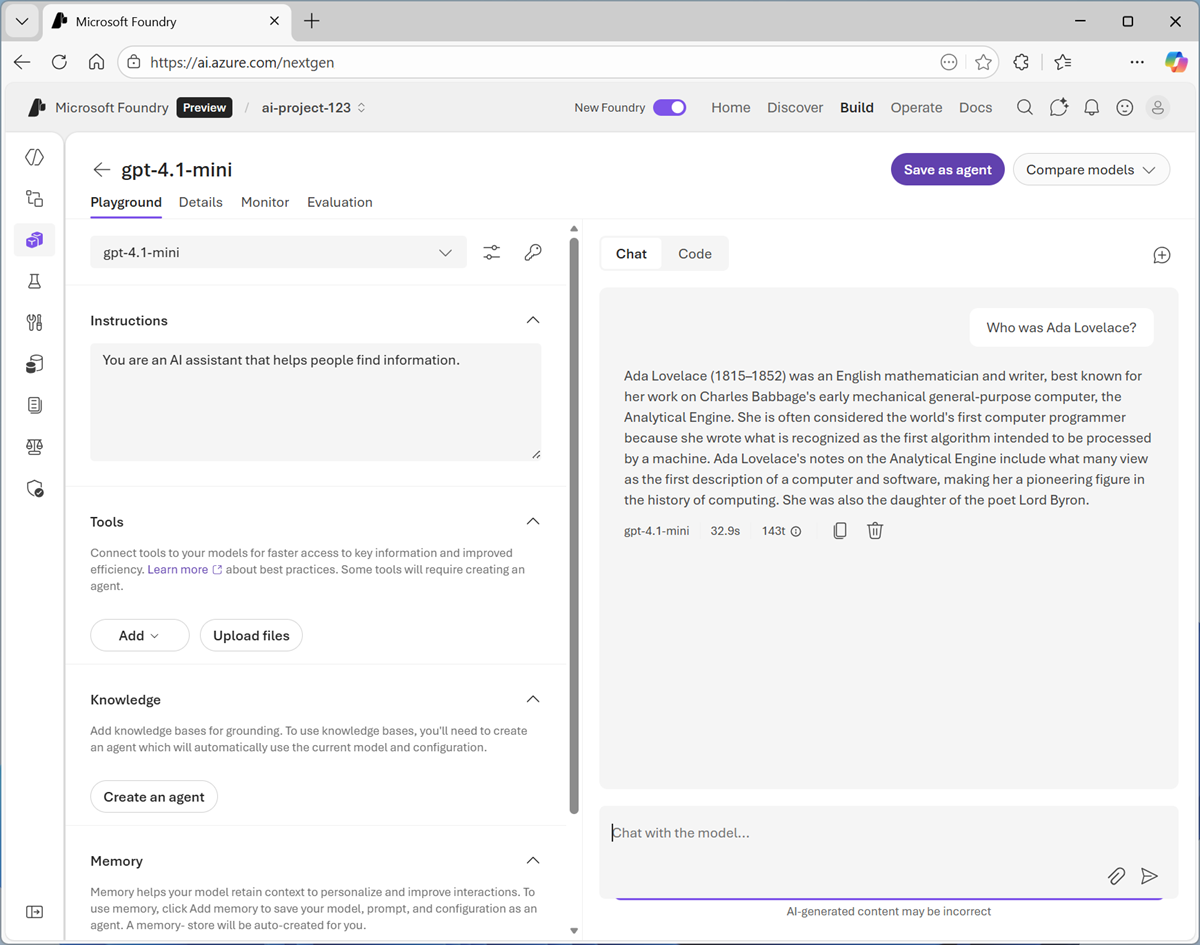
-
Enter a follow-up prompt, such as
Tell me more about her work with Charles Babbage.and review the response.Generative AI chat applications often include the conversation history in the prompt; so the context of the conversation is retained between messages. In this case, “her” is interpreted as referring to Ada Lovelace.
- At the top-right of the chat pane, use the New chat button to restart the conversation. This removes all conversation history.
- Enter a new prompt, such as
Tell me about the ELIZA chatbot.and view the response. - Continue the conversation with prompts such as
How does ELIZA compare with modern LLMs?.
Specify instructions in a system prompt
To support specific use cases, you should use a system prompt to provide the model with instructions that guide its responses. You can use the system prompt to give the model a specific focus or role, and provide guidelines about format, style, and constraints about what the model should and should not include in its responses.
- In the model playground, at the top-right of the chat pane, use the New chat button to restart the conversation and remove the conversation history.
-
In the pane on the left, in the Instructions text area, change the system prompt to:
You are an expert in the history of computing and AI. You only answer questions about significant people and events in the development of computing, and about notable vintage computers. Do not engage in conversations on any topic that is unrelated to computing history. -
Now enter a new user prompt related to computing history, such as
What was Alan Turing's contribution to the development of AI?Review the response, which should provide some history of computing information.
- Try asking an “off-topic” question, such as
What's the capital of Spain?; and view the response.
Add a web_search tool
A model generally answers questions based on the data with which it was trained. While this is useful, that leaves out a lot of current information on the web; which might help the model give more relevant answers. You can use tools to give models access to external data sources and enable them to perform custom tasks. The web_search tool enables the model to search the Web for up-to-date information.
Note: The web_search tool may be enabled for your model by default.
- In the pane on the left, under the instructions, expand the Tools section if it is not already expanded.
- In the Add drop-down list, if it is not already enabled, select Web search. Then confirm the tool is added to the list of tools, and use its {i) icon to read the information about the tool.
-
After adding the web_search tool, in the chat pane, enter the prompt
Find a vintage computer store near Seattle(or your local city!) and review the response.The model should have searched the Web for vintage computer stores near the specific city.
Save the model configuration as an agent
While you can implement generative AI apps using a standalone model, to create a fully agentic AI experience, you need to encapsulate the model, its instructions, and any tool configuration that provides additional functionality, in an agent.
-
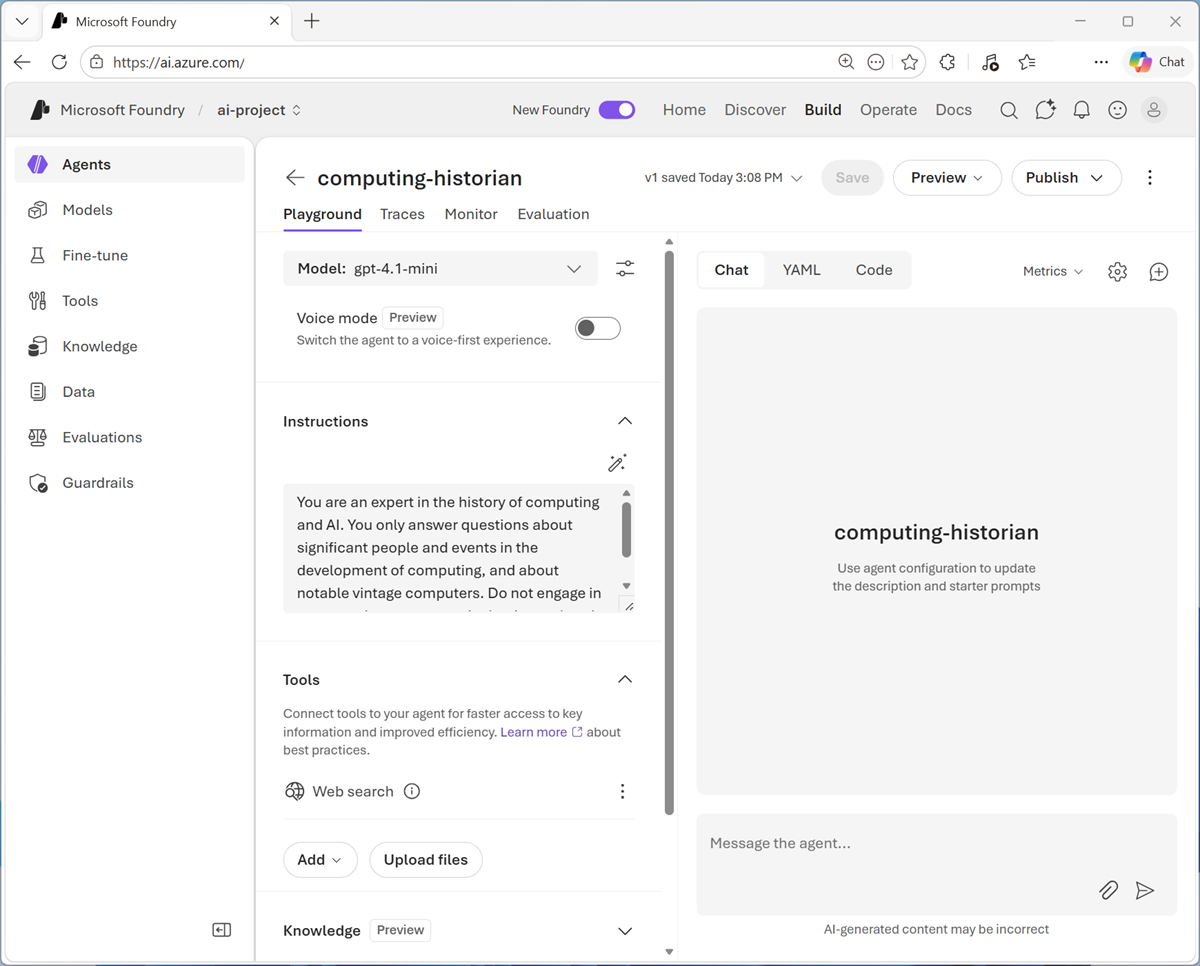
In the model playground, at the top right select Save as agent. Then, when prompted, name your new agent
computing-historian.When the agent is created, it opens in a new playground specifically for working with agents.
-
In the pane on the right, view the YAML tab, which contains the definition for your agent. Note that its definition includes the model, its parameter settings, and the instructions you specified - similar to this:
metadata: logo: Avatar_Default.svg microsoft.voice-live.enabled: "false" object: agent.version id: computing-historian:1 name: computing-historian version: "1" description: "" created_at: 1782917197 definition: kind: prompt model: gpt-5-mini instructions: You are an expert in the history of computing and AI. You only answer questions about significant people and events in the development of computing, and about notable vintage computers. Do not engage in conversations on any topic that is unrelated to computing history. tools: - type: web_search status: active instance_identity: principal_id: c51143c7-2c5e-4d70-a7c1-759539926623 client_id: c51143c7-2c5e-4d70-a7c1-759539926623 blueprint: principal_id: 3a9a2794-b482-42f9-8b52-f7c0f80d2520 client_id: e70779c8-c3ce-49c6-8ca6-8ea5037e9738 blueprint_reference: type: ManagedAgentIdentityBlueprint blueprint_id: computing-historian-13bf1 agent_guid: 13bf1394-7dfe-4c03-94b7-3e81a168d770 -
Switch back to the Chat tab, and enter the prompt
Who are you?The response should indicate that the agent is “aware” of its role as a computing historian.
Preview the agent
Now you have a working agent, you can preview it in a basic web chat application.
-
At the top of the chat pane, in the Publish drop-down list, select Preview web app.
A preview chat interface is opened in a new browser tab.
-
Enter a prompt, such as
What can you tell me about the Altair 8800?and view the response from your agent.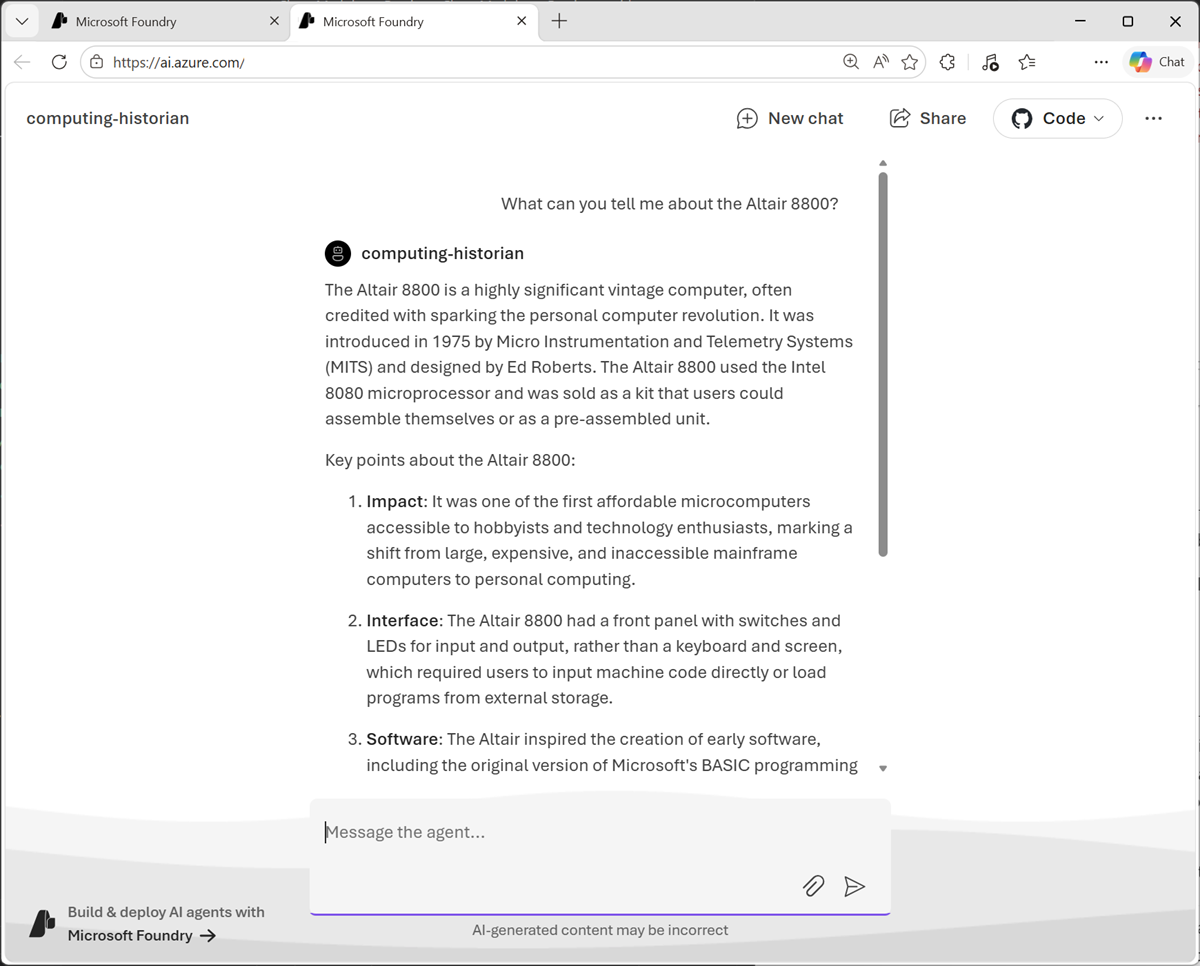
-
When you’ve finished testing the agent, close the tab containing the preview app to return to your agent in the Foundry portal
Develop a client app for the agent
So far you’ve developed and tested your agent within a Foundry project. To take it into production, you need to write code that consumes it from its dedicated endpoint. That means you can move beyond playground testing and start integrating the agent into a real user experience.
- In the computing-historian agent page in the Foundry portal, view the Details tab. In particular, note the Responses protocol endpoint that clients apps can use to call your agent via the OpenAI Responses API. You’ll need this later!
Configure a client application in Visual Studio Code
A partially completed client application for your agent has been provided. You’ll complete this app and test it with your agent endpoint.
-
Start Visual Studio Code.
Tip: If you’re new to Visual Studio Code, you can refer to the documentation athttps://code.visualstudio.com/Docsfor help. - Open the command palette (Ctrl+Shift+P or on the View menu, select Command Palette) and enter the
Git:clonecommand to clone thehttps://github.com/MicrosoftLearning/mslearn-agent-quickstartrepo to a local folder (it doesn’t matter which one). -
After the clone operation is complete, open the folder when prompted.
The folder may open in Restricted mode. If so, select the mode and trust the authors to allow full functionality..
- In the Activity bar on the left edge, view the Extensions pane; and if it is not already installed, search for and install the Python extension.
-
In the Command Palette, use the command
python:select interpreterto create a new Venv environment based on your Python 3.1x installation.
Tip: You can choose to install the workspace dependencies in the requirements.txt file as you create the environment. Don’t worry if you accidentally skip this though; we’ll do it in a later step anyway.Wait for the environment to be created. It may take a while, and some notifications may be displayed during the process.
- In the Activity bar, switch back to the Explorer pane, and navigate to the folder containing the application code files at /computer-history-client. The application files include:
- .env (the application configuration file)
- agent_client.py (the code file for the Python code to interact with your agent)
- app.py (the main code file for a Python Flask-based web application)
- requirements.txt (the Python package dependencies that need to be installed)
-
In the Explorer pane, right-click the agent_client.py file, and select Open in integrated terminal.
Tip: Opening the terminal in Visual Studio Code should automatically activate the Python environment after a few seconds. If you’re using a PowerShell terminal, you may need to enable running scripts on your system (see Set-ExecutionPolicy). If for any reason the Python environment is not activated automatically, you can use this query to search for information on how to activate it in your environment. - Ensure that the terminal is open in the /computer-history-client folder with the prefix (.venv) to indicate that the Python environment you created is active.
-
Install the required Python packages by running the following command:
pip install -r requirements.txt -
In the Explorer pane, in the /computer-history-client folder, select the .env file to open it. Then update the configuration values to replace your_agent_endpoint_url with the Responses API endpoint for your agent (copied from the agent details page in the Foundry portal).
- Save the updated .env file.
Add code to interact with your agent
Now you’re ready to implement the code that will submit prompts to your agent.
- In the Explorer pane, in the /computer-history-client folder, select the agent_client.py file (not app.py) to open it.
-
Review the existing code. You will add code to use the OpenAI Response API to interact with your agent.
Tip: As you add code to the code file, be sure to maintain the correct indentation. -
Find the comment Import Azure Identity and OpenAI client libraries, and add the following code to import the Azure Identity classes required to use Entra ID authentication, and the OpenAI library.
# Import Azure Identity and OpenAI client libraries from azure.identity import DefaultAzureCredential, get_bearer_token_provider from openai import OpenAI -
In the AgentClient class, in the **init** function, note that code has been provided to load the agent endpoint from the environment configuration file. Then find the comment Create OpenAI client authenticated with Azure credentials and add the following code to create an authenticated OpenAI client for your agent:
# Create OpenAI client authenticated with Azure credentials self.client = OpenAI( api_key=get_bearer_token_provider( DefaultAzureCredential(), "https://ai.azure.com/.default" ), base_url=self.agent_endpoint, default_query={"api-version": "v1"} ) -
In the send_message function, note that code to add the user’s prompt to the conversation history has been provided. Then, in the try block, find the comment Send prompt with full conversation history and get response and add the following code to submit the prompt to the agent and get the response.
# Send prompt with full conversation history and get response response = self.client.responses.create( input=self.conversation_history ) assistant_message = response.output_text - Read through the rest of the code, using the comments to understand the technique of tracking user inputs and responses in a conversation history.
- Save the updated agent_client.py file.
Run the client application
Now you’re ready to test the app with your agent.
-
In the terminal, use the following command to sign into Azure.
az login - When prompted, follow the instructions to sign into Azure. Then complete the sign in process in the command line, viewing (and confirming if necessary) the details of the subscription containing your Foundry resource.
-
After you have signed in, enter the following command to run the application:
python app.py -
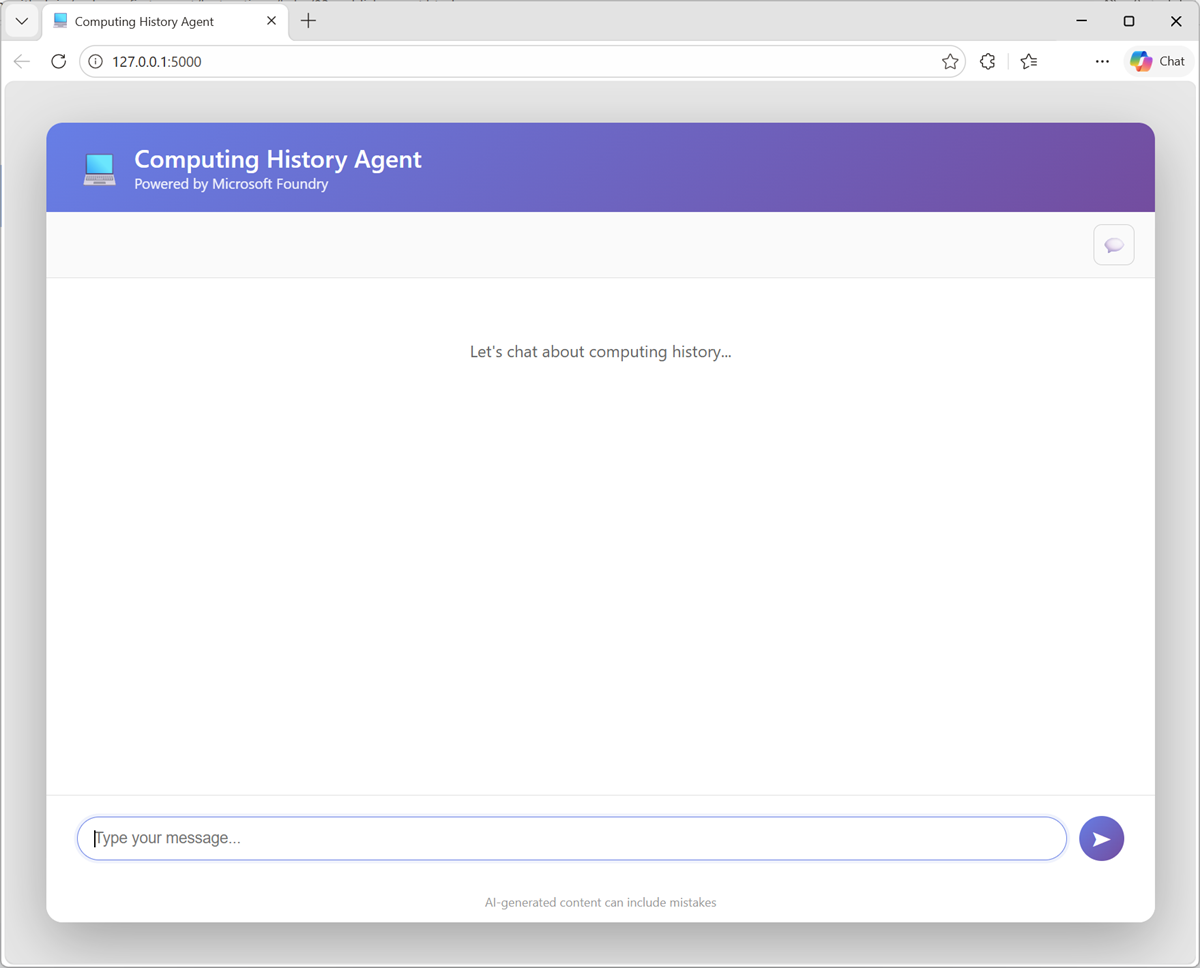
When the Flask application starts, open your browser and navigate to the URL where it is running - for example, http://127.0.0.1:5000 (
http://127.0.0.1:5000).The application web site should look like this:
- Enter a prompt, such as
What was ENIAC?and view the response. - Follow up with a second prompt, such as
How does it compare with COLOSSUS? -
Try more prompts, like
Find the latest news for vintage computer enthusiasts.Your agent should use its knowledge and tools to provide useful information and insights into computing history related topics.
- When you’ve finished testing the app, close the browser, and in Visual Studio, enter CTRL+C in the terminal pane, to stop the local web server.
Use GitHub Copilot to enhance the application
GitHub Copilot provides agentic AI assistance in Visual Studio Code, helping you develop applications more efficiently.
Tip: GitHub Copilot in Visual Studio Code requires that you are signed in using a GitHub account. While agentic assistance is available in all GitHub plans, including free accounts, there are usage limitations.
-
At the bottom of the activity bar on the left, select Accounts and ensure that you are signed into your GitHub account. If not, sign in to use GitHub Copilot and authorize Visual Studio Code.
-
If the chat pane is not already visible on the right, on the toolbar, next to the search box, use the Toggle Chat button to open it.
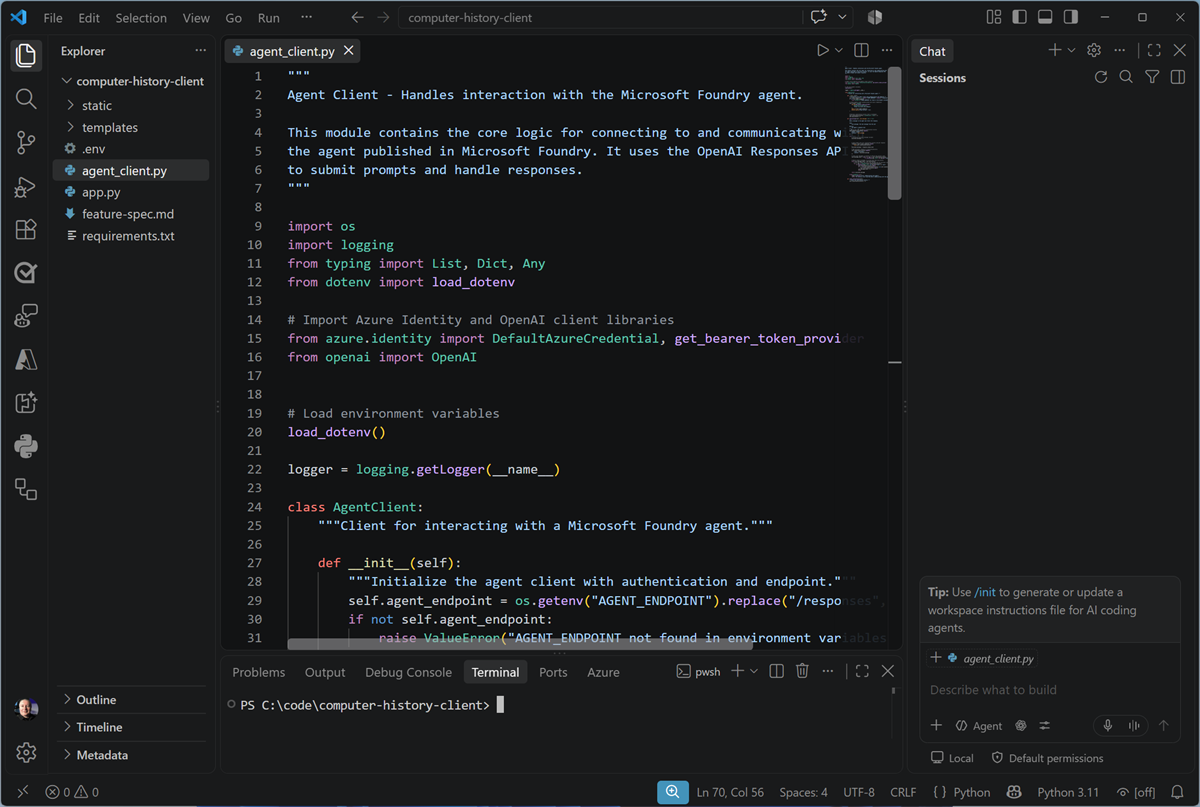
The Chat pane is where you configure and use GitHub Copilot and connected agents to assist you with development tasks. You can select the model that GitHub Copilot uses, configure tools, and add custom agents. We’ll use the default settings in this exercise.
-
In the Explorer pane, in the /computer-history-client folder, select feature-spec.md and read its contents.
This file contains a specification for a new feature that enables users to upload an image and submit it to the agent along with a text-based prompt.
-
With the specification file still open, in the Chat pane, enter the following prompt for GitHub Copilot.
Use the feature spec to add an image identification feature to the computer history client app. -
Enter the prompt, and wait while GitHub Copilot reviews and modifies your code.
The process may take some time, and you may be prompted several times to allow GitHub Copilot to perform actions.
Eventually the changes will be staged, ready for you to test.
-
View the agent-client.py file in Visual Studio code to see the changes made by GitHib Copilot.
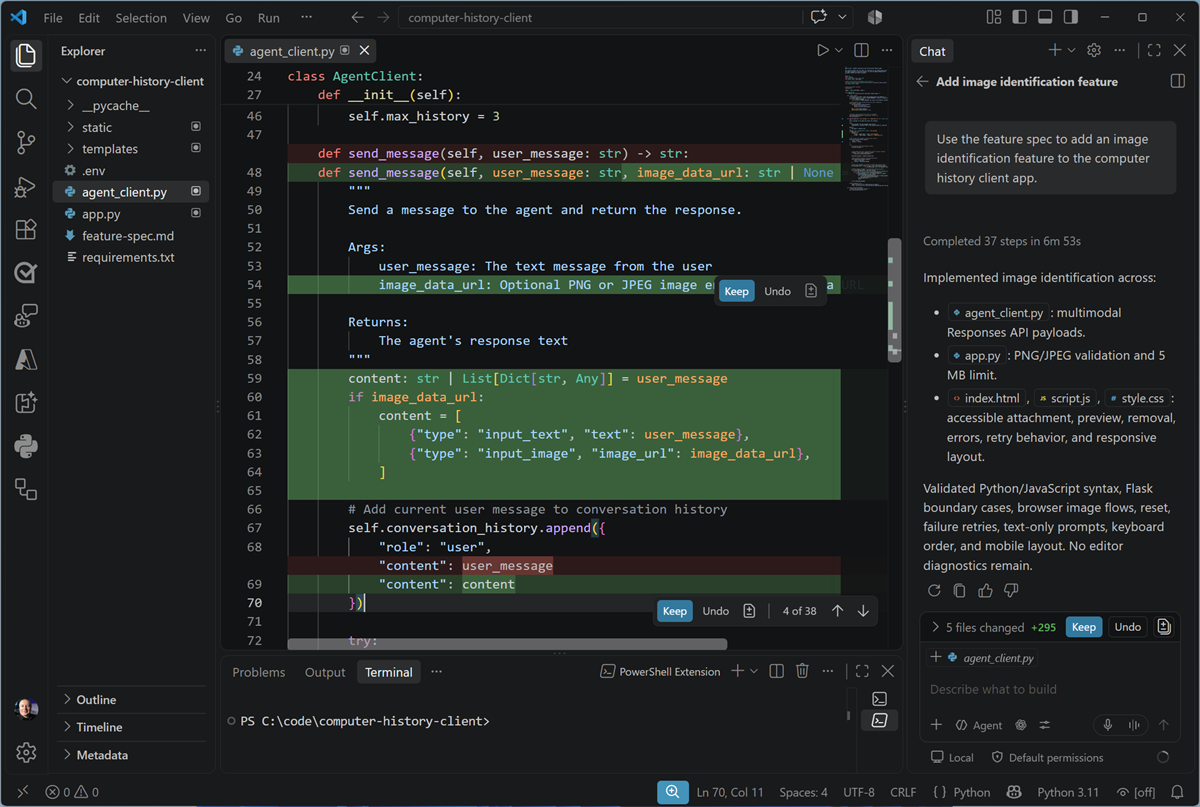
-
With the changes staged, in the terminal, re-run the app (
python app.py), and then open your browser and navigate to the URL where it is running. -
In the revised version of the app, upload one of the images from the /test-images folder (which is in the folder where you cloned the repo); and enter the prompt
What can you tell me about this? -
Review the response, which should provide information about the computer in the image you uploaded.
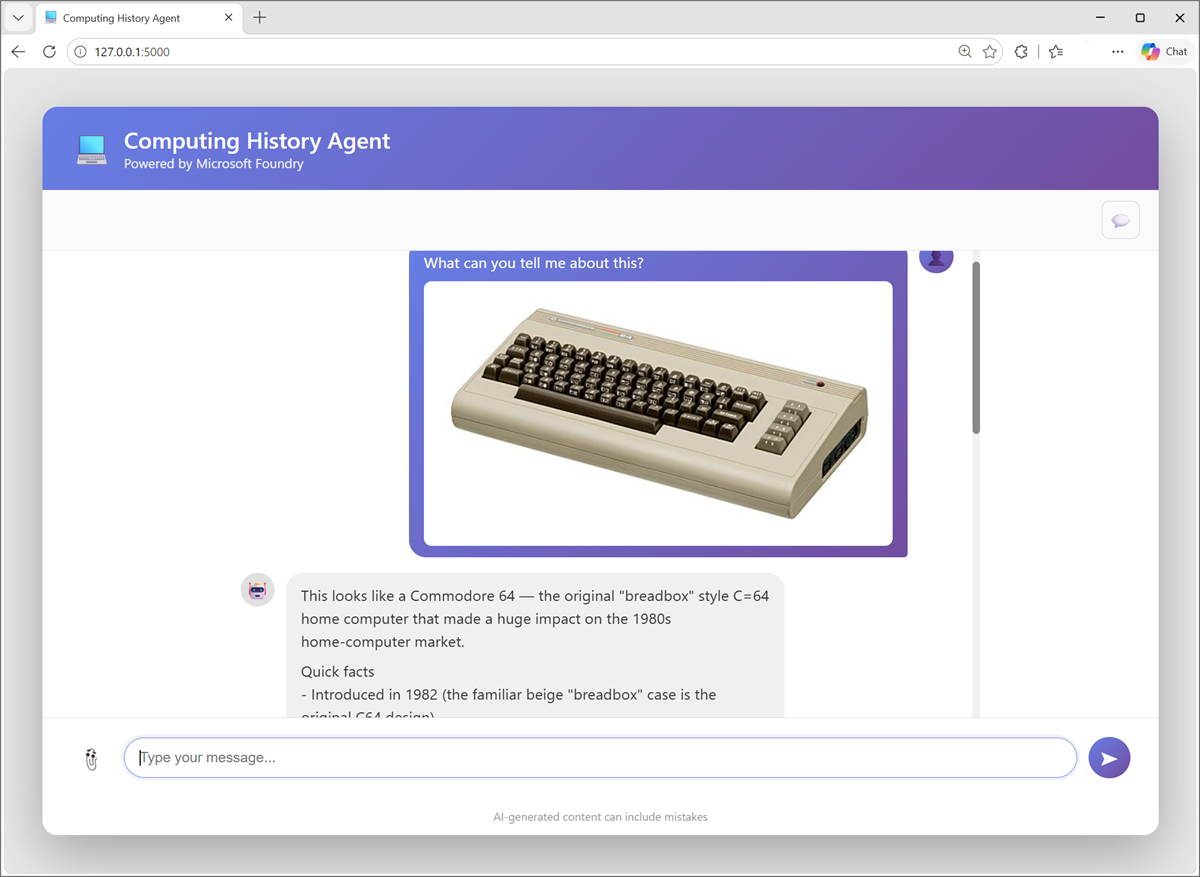
-
Try the other images in the test-images folder with prompts like
What about this?orTell me about this. -
If you’re happy with the code that GitHub Copilot has generated, in Visual Studio Code, use the Keep button in the Chat pane to confirm the changes.
If not, continue the conversation with GitHub Copilot, specifying the changes you would like.
-
When you’ve finished testing the app, close the browser, and in Visual Studio, enter CTRL+C in the terminal pane, to stop the local web server.
Summary
In this exercise, you developed an AI agent using Microsoft Foundry, and then created a client application that uses an agent you developed in Visual Studio Code.
If you have finished exploring Microsoft Foundry, you should delete the Azure resources created in this lab to avoid unnecessary utilization charges.
If you used the Ask Anton app during this lab, we’d love you to tell us about your experience with it!
Next steps
Check out the following training resources to dive deeper into AI app and agent development on Azure: