Deploy an Azure SQL Database from a template
Estimated Time: 15 minutes
You’ve been hired as a Senior Data Engineer to help automate day to day operations of database administration. This automation is to help ensure that the databases for AdventureWorks continue to operate at peak performance and provide methods for alerting based on certain criteria. AdventureWorks uses SQL Server in both Infrastructure as a Service (IaaS) and Platform as a Service (PaaS) offerings.
Explore Azure Resource Manager template
-
In Microsoft Edge, open a new tab and navigate to the following path in a GitHub repository, which contains an ARM template to deploy a SQL Database resource
https://github.com/Azure/azure-quickstart-templates/tree/master/quickstarts/microsoft.sql/sql-database -
Right-click azuredeploy.json, and select Open link in new tab to view the ARM template, which should look similar to this:
{ "$schema": "https://schema.management.azure.com/schemas/2019-04-01/deploymentTemplate.json#", "contentVersion": "1.0.0.0", "parameters": { "serverName": { "type": "string", "defaultValue": "[uniqueString('sql', resourceGroup().id)]", "metadata": { "description": "The name of the SQL logical server." } }, "sqlDBName": { "type": "string", "defaultValue": "SampleDB", "metadata": { "description": "The name of the SQL Database." } }, "location": { "type": "string", "defaultValue": "[resourceGroup().location]", "metadata": { "description": "Location for all resources." } }, "administratorLogin": { "type": "string", "metadata": { "description": "The administrator username of the SQL logical server." } }, "administratorLoginPassword": { "type": "securestring", "metadata": { "description": "The administrator password of the SQL logical server." } } }, "variables": {}, "resources": [ { "type": "Microsoft.Sql/servers", "apiVersion": "2020-02-02-preview", "name": "[parameters('serverName')]", "location": "[parameters('location')]", "properties": { "administratorLogin": "[parameters('administratorLogin')]", "administratorLoginPassword": "[parameters('administratorLoginPassword')]" }, "resources": [ { "type": "databases", "apiVersion": "2020-08-01-preview", "name": "[parameters('sqlDBName')]", "location": "[parameters('location')]", "sku": { "name": "Standard", "tier": "Standard" }, "dependsOn": [ "[resourceId('Microsoft.Sql/servers', concat(parameters('serverName')))]" ] } ] } ] } -
Review and observe the JSON properties.
-
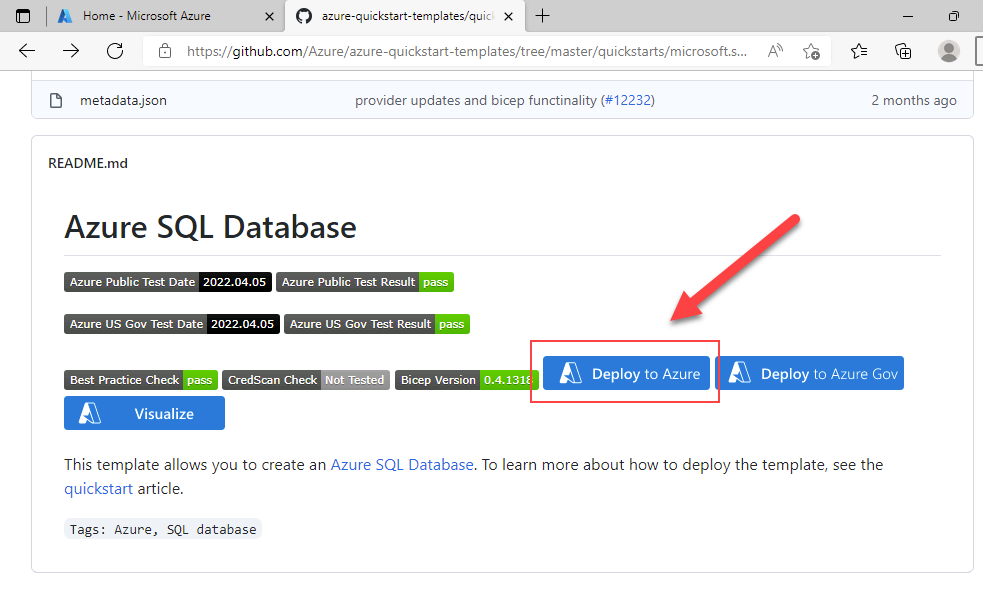
Close the azuredeploy.json tab and return to the tab containing the sql-database GitHub folder. Scroll down and select Deploy to Azure.
-
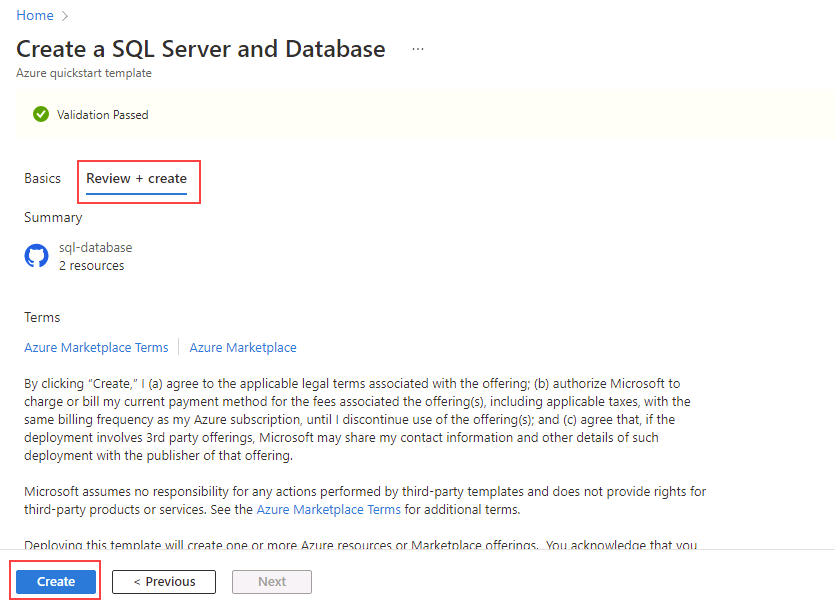
The Create a SQL Server and Database quickstart template page will open on Azure portal, with resource details partially filled in from the ARM template. Complete the blank fields with the information below:
- Resource group: starting with contoso-rg
- Sql Administrator Login: labadmin
- Sql Administrator Login Password: <enter a strong password>
-
Select Review + create, and then select Create. Your deployment will take 5 minutes or so to deploy.
-
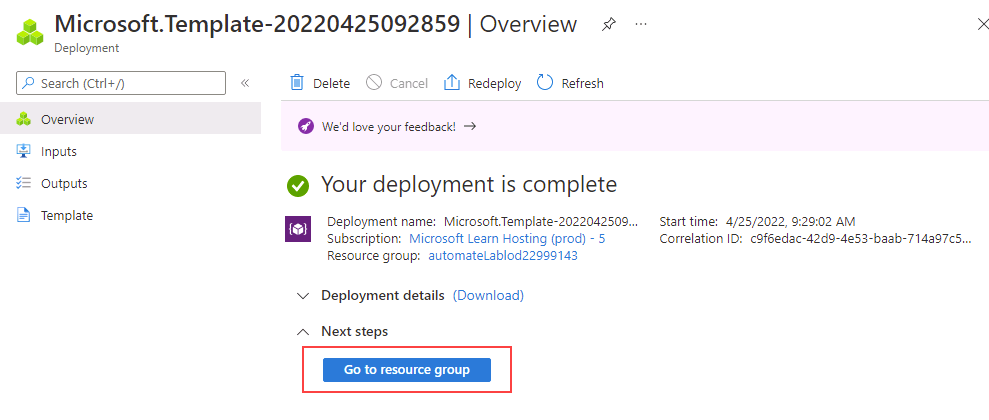
When deployment has completed, select Go to resource group. You’ll be taken to your Azure Resource Group, which contains a randomly named SQL Server resource created by the deployment.
Cleanup Resources
If you are not using the Azure SQL Server for any other purpose, you can clean up the resources you created in this lab.
Delete the Resource Group
If you created a new resource group for this lab, you can delete the resource group to remove all resources created in this lab.
-
In the Azure portal, select Resource groups from the left navigation pane or search for Resource groups in the search bar and select it from the results.
-
Go into the resource group that you created for this lab. The resource group will contain the Azure SQL Server and other resources created in this lab.
-
Select Delete resource group from the top menu.
-
In the Delete resource group dialog, type the name of the resource group to confirm and select Delete.
-
Wait for the resource group to be deleted.
-
Close the Azure portal.
Delete the Lab resources only
If you didn’t create a new resource group for this lab, and want to leave the resource group and its previous resources intact, you can still delete the resources created in this lab.
-
In the Azure portal, select Resource groups from the left navigation pane or search for Resource groups in the search bar and select it from the results.
-
Go into the resource group that you created for this lab. The resource group will contain the Azure SQL Server and other resources created in this lab.
-
Select all the resources prefixed with the SQL Server name you previously specified in the lab.
-
Select Delete from the top menu.
-
In the Delete resources dialog, type delete and select Delete.
-
Select Delete again to confirm the deletion of the resources.
-
Wait for the resources to be deleted.
-
Close the Azure portal.
You have successfully completed this lab.
You’ve just seen how, with a single click on an Azure Resource Manager template link, you can easily create both an Azure SQL server and database.