The company is designing and developing a new app. Developers need to ensure the storage is only accessed using keys and managed identities. The developers would like to use role-based access control. To help with testing, protected immutable storage is needed.
Architecture diagram
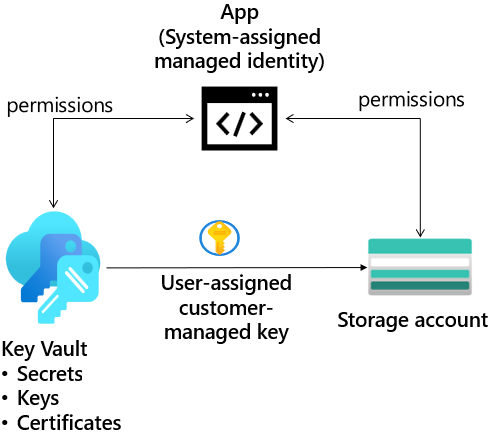
Skilling tasks
- Create the storage account and managed identity.
- Secure access to the storage account with a key vault and key.
- Configure the storage account to use the customer managed key in the key vault
- Configure an time-based retention policy and an encryption scope.
Estimated timing: 30 minutes
Exercise instructions
Create the storage account and managed identity
- Provide a storage account for the web app.
- In the portal, search for and select Storage accounts.
- Select + Create.
- For Resource group select Create new. Give your resource group a name and select OK to save your changes.
- Provide a Storage account name. Ensure the name is unique and meets the naming requirements.
- Move to the Encryption tab.
- Check the box for Enable infrastructure encryption.
- Notice the warning, This option cannot be changed after this storage account is created.
- Select Review + Create.
- Wait for the resource to deploy.
-
Provide a managed identity for the web app to use. Learn more about managed identities.
- Search for and select Managed identities.
- Select Create.
- Select your resource group.
- Give your managed identity a name.
- Select Review and create, and then Create.
-
Assign the correct permissions to the managed identity. The identity only needs to read and list containers and blobs. Learn more about how to assign Azure roles.
- Search for and select your storage account.
- Select the Access Control (IAM) blade.
- Select Add role assignment (center of the page).
- On the Job functions roles page, search for and select the Storage Blob Data Reader role.
- On the Members page, select Managed identity.
- Select Select members, in the Managed identity drop-down select User-assigned managed identity.
- Select the managed identity you created in the previous step.
- Click Select and then Review + assign the role.
- Select Review + assign a second time to add the role assignment.
- Your storage account can now be accessed by a managed identity with the Storage Data Blob Reader permissions.
Secure access to the storage account with a key vault and key
- To create the key vault and key needed for this part of the lab, your user account must have Key Vault Administrator permissions. Learn more about how to provide access to Key Vault keys, certificates, and secrets with an Azure role-based access control
- In the portal, search for and select Resource groups.
- Select your resource group, and then the Access Control (IAM) blade.
- Select Add role assignment (center of the page).
- On the Job functions roles page, search for and select the Key Vault Administrator role.
- On the Members page, select User, group, or service principal.
- Select Select members.
- Search for and select your user account. Your user account is shown in the top right of the portal.
- Click Select and then Review + assign.
- Select Review + assign a second time to add the role assignment.
- You are now ready to continue with the lab.
-
Create a key vault to store the access keys.
- In the portal, search for and select Key vaults.
- Select Create.
- Select your resource group.
- Provide the name for the key vault. The name must be unique.
- Ensure on the Access configuration tab that Azure role-based access control (recommended) is selected.
- Select Review + create.
- Wait for the validation checks to complete and then select Create.
- After the deployment, select Go to resource.
- On the Overview blade ensure both Soft-delete and Purge protection are enabled.
-
Create a customer-managed key in the key vault.
- In your key vault, in the Objects section, select the Keys blade.
- Select Generate/Import and Name the key.
- Take the defaults for the rest of the parameters, and Create the key.
Configure the storage account to use the customer managed key in the key vault
- Before you can complete the next steps, you must assign the Key Vault Crypto Service Encryption User role to the managed identity. Learn more about how to use a system-assigned managed identity to authorize access
- In the portal, search for and select Resource groups.
- Select your resource group, and then the Access Control (IAM) blade.
- Select Add role assignment (center of the page).
- On the Job functions roles page, search for and select the Key Vault Crypto Service Encryption User role.
- On the Members page, select Managed identity.
- Select Select members, in the Managed identity drop-down select User-assigned managed identity.
- Select your managed identity.
- Click Select and then Review + assign.
- Select Review + assign a second time to add the role assignment.
- Configure the storage account to use the customer managed key in your key vault. Learn more about customer managed keys on an existing storage account.
- Return to your the storage account.
- In the Security + networking section, select the Encryption blade.
- Select Customer-managed keys.
- Select a key vault and key. Select your key vault and key.
- Select to confirm your choices.
- Ensure the Identity type is User-assigned.
- Select an identity.
- Select your managed identity then select Add.
- Save your changes.
- If you receive an error that your identity does not have the correct permissions, wait a minute and try again.
Configure an time-based retention policy and an encryption scope.
-
The developers require a storage container where files can’t be modified, even by the administrator. Learn more about blob immutable storage.
- Navigate to your storage account.
- In the Data storage section, select the Containers blade.
- Create a container called hold. Take the defaults. Be sure to Create the container.
- Upload a file to the container.
- In the Settings section, select the Access policy blade.
- In the Immutable blob storage section, select + Add policy.
- For the Policy type, select time-based retention.
- Set the Retention period to 5 days.
- Be sure to Save your changes.
- Try to delete the file in the container.
- Verify you are notified failed to delete blobs due to policy.
-
The developers require an encryption scope that enables infrastructure encryption. Learn more about infrastructure encryption.
- Navigate back to your storage account.
- In the Security + networking blade, select Encryption.
- In the Encryption scopes tab, select Add.
- Give your encryption scope a name.
- The Encryption type is Microsoft-managed key.
- Set Infrastructure encryption to Enable.
- Create the encryption scope.
- Return to your storage account and create a new container.
- Notice on the New container page, there is the Name and Public access level.
- Notice in the Advanced section you can select the Encryption scope you created and apply it to all blobs in the container.
Note: For additional practice complete the Secure and isolate access to Azure resources by using network security groups and service endpoints module. The module has a sandbox where you can get more practice restricting access to storage.
Cleanup your resources
If you are working with your own subscription and have completed these labs, take a minute to delete the lab resources. This will ensure resources are freed up and cost is minimized. The easiest way to delete the lab resources is to delete the lab resource group.
- In the Azure portal, select the resource group, select Delete the resource group, Enter resource group name, and then click Delete.
- If a second Delete confirmation dialog appears, click Delete again.
- Using Azure PowerShell,
Remove-AzResourceGroup -Name resourceGroupName. - Using the CLI,
az group delete --name resourceGroupName.
Extend your learning with Copilot
Copilot can assist you in your learning journey. Copilot can provide basic technical information, high-level steps, pros and cons, troubleshooting help, usage cases, coding examples, and much more. To access Copilot, open an Edge browser and choose Copilot (top right). Take a few minutes to try these prompts.
- What is an Azure managed identity and how can it be used with Azure storage?
- What built-in role-based access control (RBAC) roles are available for managing access to Azure Storage.
- What are customer-managed keys and how are they used for Azure storage?
Learn more with self-paced training
- Secure and isolate access to Azure resources by using network security groups and service endpoints. In this module, you learn to use virtual network service endpoints to control network traffic to and from Azure services.
Key takeaways
- Azure has built-in RBAC roles for Azure storage. These roles include: Storage Account Contributor, Storage Blob Data Owner, and File Data SMB Share Contributor.
- You can use your own encryption key to protect the data in your storage account. When you specify a customer-managed key, that key is used to protect and control access to the key that encrypts your data.
- Immutable storage ensures data can’t be modified or deleted for a user-specified interval. There are two types of immutable policies: time-based and legal hold.
- Infrastructure encryption can be enabled for the entire storage account, or for an encryption scope within an account. Infrastructure encryption is recommended for scenarios where doubly encrypting data is necessary for compliance requirements.