The company website supplies product images, videos, marketing literature, and customer success stories. Customers are located worldwide and demand is rapidly expanding. The content is mission-critical and requires low latency load times. It’s important to keep track of the document versions and to quickly restore documents if they’re deleted.
Architecture diagram
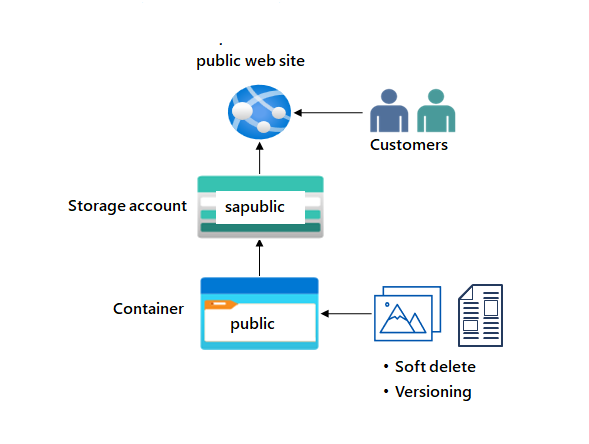
Skilling tasks
- Create a storage account with high availability.
- Ensure the storage account has anonymous public access.
- Create a blob storage container for the website documents.
- Enable soft delete so files can be easily restored.
- Enable blob versioning.
Estimated timing: 20 minutes
Exercise instructions
Create a storage account with high availability.
-
Create a storage account to support the public website.
- In the portal, search for and select
Storage accounts. - Select + Create.
- For resource group select new. Give your resource group a name and select OK.
- Set the Storage account name to
publicwebsite. Make sure the storage account name is unique by adding an identifier. - Take the defaults for other settings.
- Select Review and then Create.
- Wait for the storage account to deploy, and then select Go to resource.
- In the portal, search for and select
-
This storage requires high availability if there’s a regional outage. Additionally, enable read access to the secondary region, Learn more about storage account redundancy.
- In the storage account, in the Data management section, select the Redundancy blade.
- Ensure Read-access Geo-redundant storage is selected.
- Review the primary and secondary location information.
-
Information on the public website should be accessible without requiring customers to login.
- In the storage account, in the Settings section, select the Configuration blade.
- Ensure the Allow blob anonymous access setting is Enabled.
- Be sure to Save your changes.
Create a blob storage container with anonymous read access
- The public website has various images and documents. Create a blob storage container for the content. Learn more about storage containers.
- In your storage account, in the Data storage section, select the Containers blade.
- Select + Container.
- Ensure the Name of the container is
public. - Select Create.
- Customers should be able to view the images without being authenticated. Configure anonymous read access for the public container blobs. Learn more about configuring anonymous public access.
- Select your public container.
- On the Overview blade, select Change access level.
- Ensure the Public access level is Blob (anonymous read access for blobs only).
- Select OK.
Practice uploading files and testing access.
- For testing, upload a file to the public container. The type of file doesn’t matter. A small image or text file is a good choice.
- Ensure you are viewing your container.
- Select Upload.
- Browse to files and select a file. Browse to a file of your choice.
- Select Upload.
- Close the upload window, Refresh the page and ensure your file was uploaded.
- Determine the URL for your uploaded file. Open a browser and test the URL.
- Select your uploaded file.
- On the Overview tab, copy the URL.
- Paste the URL into a new browser tab.
- If you have uploaded an image file it will display in the browser. Other file types should be downloaded.
Configure soft delete
- It’s important that the website documents can be restored if they’re deleted. Configure blob soft delete for 21 days. Learn more about soft delete for blobs.
- Go to the Overview blade of the storage account.
- In the Data management section, select the Data protection blade.
- Ensure the Enable soft delete for blobs is checked.
- Change the Keep deleted blobs for (in days) setting to 21.
- Notice you can also Enable soft delete for containers.
- Don’t forget to Save your changes.
- If something gets deleted, you need to practice using soft delete to restore the files.
- Navigate to your container where you uploaded a file.
- Select the file you uploaded and then select Delete.
- Select Delete to confirm deleting the file.
- On the container Overview page, use the Soft delete dropdown and select Show active and deleted blobs. This control is to the right of the search box.
- Select your deleted file, and use the ellipses on the far right, to Undelete the file.
- Refresh the container and confirm the file has been restored.
Configure blob versioning
- It’s important to keep track of the different website product document versions. Learn more about blob versioning.
- Go to the Overview blade of the storage account.
- In the Data management section, select the Data protection blade.
- Ensure the Enable versioning for blobs checkbox is checked.
- Notice your options to keep all versions or delete versions after.
- Don’t forget to Save your changes.
- As you have time experiment with restoring previous blob versions.
- Upload another version of your container file. This overwrites your existing file.
- Open the blob and select the Versions tab to view the previous file version.
Extend your learning with Copilot
Copilot can assist you in your learning journey. Copilot can provide basic technical information, high-level steps, pros and cons, troubleshooting help, usage cases, coding examples, and much more. To access Copilot, open an Edge browser and choose Copilot (top right). Take a few minutes to try these prompts.
- What is Azure blob storage and when should it be used?
- Compare the different Azure storage redundancy models, highlighting their key features and use cases.
- What are the Azure storage tiers and how can those tiers save money?
Learn more with self-paced training
- Explore Azure Blob storage. In this module, you learn the core features and functionality of Azure Blob storage.
Key takeaways
Congratulations on completing the lab. Here are the main takeaways for this lab.
- Azure Blob Storage is optimized for storing massive amounts of unstructured data. Unstructured data is data that doesn’t adhere to a particular data model or definition, such as text or binary data.
- Blob soft delete protects an individual blob, snapshot, or version from accidental deletes or overwrites by maintaining the deleted data in the system for a specified period of time.
- Blob versioning maintains previous versions of a blob. When blob versioning is enabled, you can restore an earlier version of a blob to recover your data if it’s modified or deleted.
- When a container is configured for anonymous access, any client can read data in that container.