WWL Tenants - Terms of use
If you are being provided with a tenant as a part of an instructor-led training delivery, please note that the tenant is made available for the purpose of supporting the hands-on labs in the instructor-led training.
Tenants should not be shared or used for purposes outside of hands-on labs. The tenant used in this course is a trial tenant and cannot be used or accessed after the class is over and are not eligible for extension.
Tenants must not be converted to a paid subscription. Tenants obtained as a part of this course remain the property of Microsoft Corporation and we reserve the right to obtain access and repossess at any time.
Case investigation with eDiscovery
Contoso suspects that sensitive payment data, including credit card and account numbers, has been mishandled or leaked. As the investigator, your job is to use Microsoft Purview eDiscovery to build a case, search across data sources, identify sensitive content, and apply redactions before producing the results for compliance or legal review.
Your task is to create and manage eDiscovery cases that meet the investigation criteria:
- Create a new eDiscovery case: Set up a case to manage the payment data investigation.
- Run an eDiscovery search: Search across data sources to identify files that may contain payment card or account information.
- Add items to a review set: Commit your search results to a review set for deeper analysis.
- Tag items for review: Apply relevance and redaction tags to organize documents for the case.
- Apply redactions: Use annotation tools to mask sensitive details such as card and account numbers.
-
Export results: Export the redacted and tagged items, along with an item report, for production.
Note: This lab assumes access to an M365 E5 tenant with data to explore to conduct an investigation. You can still walk through this exercise without data, but collections and review sets will yield no results.
Task 1 - Grant permissions for eDiscovery
To export files, you need specific permissions due to the direct access this option grants to user files.
-
In Microsoft Edge, navigate to the Microsoft Purview portal,
https://purview.microsoft.com, and log in. -
Select the Settings from the left navigation pane.
-
On the left navigation pane, expand Roles and scopes and select Role groups.
-
On the Role groups for Microsoft Purview solutions select eDiscovery Manager.
-
On the eDiscovery Manager fly-out page on the right, select Edit.
-
On the Manage eDiscovery Manager page, select Choose users.
-
On the Choose users fly-out page on the right, select the user you will be using to conduct the eDiscovery investigation in the next steps, then select Select.
Note: Ensure you select the user that will be reviewing data and exporting search results.
-
Back on the Manage eDiscovery Manager page, select Next.
-
On the Manage eDiscovery Administrator page, select Next.
-
On the Review the role group and finish page, select Save to add your user to the eDiscovery Manager role group.
-
Once you’ve successfully added the users, select Done on the You successfully updated the role group page.
You have successfully granted the eDiscovery Manager permission.
Task 2 - Create an eDiscovery case
In this task, you create a new eDiscovery case to manage the payment data investigation.
-
In Microsoft Purview, select Solutions > eDiscovery.
-
On the Cases page, select Create case.
-
In the New case dialog window enter:
- Case name:
Payment Data Leak Investigation - Case description:
Investigation into potential exposure of payment card and account data at Contoso.
- Case name:
-
Select Create.
After your case is created, it will take you directly to your new case.
You have successfully created a new eDiscovery case named Payment Data Leak Investigation.
Task 3 - Create an eDiscovery search
In this task, you build a search to find emails and documents that reference sensitive payment data.
-
Select Create a search.
-
In the New search dialog window, enter:
- Search name:
Payment Data Exposure Search - Search description:
Find emails and documents that reference credit cards, debit cards, or account numbers.
- Search name:
-
Select Create.
-
On the Payment Data Exposure Search page, select Add sources.
-
On the Search for source page, Filter your sources for Groups only.
-
Select Add tenant-wide sources, and leave the checkboxes selected for All people and groups and All public folders.
-
Select Save.
-
Back on the Payment Data Exposure Search page, in the Condition builder, add conditions:
- In the first box, set Keywords Equal, then type
credit card. - In the second box, type
debit card. - In the third box, type
account number.
Note: Conditions are treated as OR, so the search returns items that include credit card, debit card, or account number.
- In the first box, set Keywords Equal, then type
-
Select Run query.
-
On the Choose search results page, select Statistics, then check Include query keywords report.
-
Select Run query to start the search.
Note: This process might take about 5 minutes to generate results.
-
When the search finishes, review your results on the Statistics tab. Look at item counts, data volume, and keyword hits.
-
Switch to the Sample tab. Select Generate sample results.
-
On the Generate sample view page, leave the defaults selected, then select Run Query.
Note: This process might take about 5 minutes to generate results.
-
Once the query is complete, review the results.
You successfully ran the search and reviewed results using both the Statistics and Sample views.
Task 4 – Add your search to a review set
In this task, you commit your search results to a review set so they can be analyzed further.
-
From the Payment Data Exposure Search page, select Add to review set.
-
In the Add to review set flyout, select Add to new review set.
- Enter a name:
Payment Data Review Set.
- Enter a name:
-
Under Select items to include, keep Indexed items that match your search query selected.
-
Under Select items in lists and attachments, select List attachments so attached files are included in the review set.
-
Leave all other options at their defaults, then select Add to review set.
Note: This process might take about 5 minutes to generate results.
You successfully created the Payment Data Review Set and added your search results to it.
Task 5 – Review and tag items
In this task, you filter review set items and apply tags to organize them for the investigation.
-
On the Payment Data Review Set page, select Query, then configure:
- First dropdown: Keywords
- Operator: Equals any of
-
Enter keywords:
VisaMaster Card
- Select + Add conditions.
-
Add condition:
- Field: File class
- Operator: Equals any of
- Value:
Document
- Select Run query.
-
Select Save to save this search query. In the Filter name field, enter
Payment data docs. -
From the command bar, select Tag files.
-
In the Tag files flyout, select Create/edit tags.
-
On the Manage tags page, configure:
-
Tag group name:
Relevance- Tag name:
Relevant - Select Add tag, then add
Not relevant
- Tag name:
- Select Add tag group.
- Tag group name:
Review status- Tag name:
Needs redaction
- Tag name:
-
-
Select Save, then Close.
-
In the Tag files flyout, tag the first item as Relevant and the second item as Not relevant.
-
In the review set, find Contoso Purchasing Permissions - Q1.docx from Irvin S dated August 2, 2019.
-
Select the item and tag it Needs redaction.
-
Select Close to close the Tag files flyout.
You successfully tagged relevant, not relevant, and redaction-needed documents.
Task 6 – Apply redactions
In this task, you redact sensitive information from a document in your review set.
-
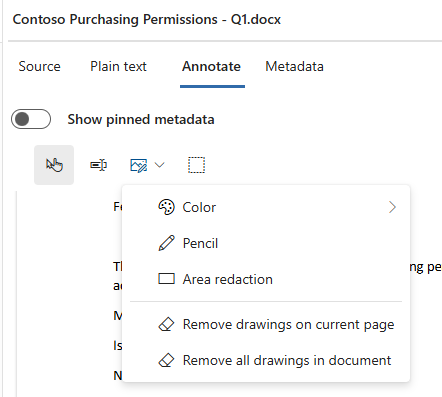
In the Payment Data Review Set, select the Contoso Purchasing Permissions - Q1.docx from Irvin S dated August 2, 2019 item to open the document viewer.
-
In the viewer toolbar, select Annotate.
-
From the annotation tools, select the drop down for Drawing, then select Area redaction.
-
With your cursor, draw a box around the sensitive information in the file, such as:
- Visa card number
- MasterCard number
- Bank account number
-
Repeat as needed until all sensitive data is covered.
-
Close the document viewer.
-
Back on the Payment Data Review Set page, with the Contoso Purchasing Permissions - Q1.docx file selected, select Actions > Commit Redactions To PDF.
Note: Committing redactions saves a redacted PDF to the review set while keeping the original file unchanged.
You successfully applied redactions and committed them to a redacted PDF copy.
Task 7 – Export results
In this task, you export the redacted and tagged items from your review set for production.
-
In the Payment Data Review Set, select the checkboxes next to the items you want to export.
Make sure to include the Contoso Purchasing Permissions - Q1.docx document you redacted.
-
On the command bar, select Actions > Export.
-
In the Export flyout, configure:
- Export name:
PaymentData_Export_2025 - Description:
Export of review set items with redacted versions for Payment Data Leak Investigation.
- Export name:
-
Under Select items to include in your export:
- Choose Selected documents only.
- Leave Expand selected documents to include > Associated family items checked (this ensures attachments are included).
-
Under Export type, select Export items with item report.
- Select the Export redaction checkbox to include the redacted PDFs, and the Export tags checkbox to include tag information.
-
Under Export format, select Create .msg files for messages and leave all other defaults selected.
-
Select Export.
-
Select the Process manager to view the status of the export.
-
Select Refresh in the process manager until the export status is Completed.
-
Once the status is Completed, select the row for your export.
-
In the Export flyout, select all files under Export packages, then Download.
-
Select a location to download your exports, then navigate to the location of your downloaded exports.
-
Explore the items of your zip file.
You created a case, searched for sensitive data, added items to a review set, applied tags and redactions, and exported the redacted results. These are the key steps in conducting an investigation with Microsoft Purview eDiscovery.