WWL Tenants - Terms of use
If you are being provided with a tenant as a part of an instructor-led training delivery, please note that the tenant is made available for the purpose of supporting the hands-on labs in the instructor-led training.
Tenants should not be shared or used for purposes outside of hands-on labs. The tenant used in this course is a trial tenant and cannot be used or accessed after the class is over and are not eligible for extension.
Tenants must not be converted to a paid subscription. Tenants obtained as a part of this course remain the property of Microsoft Corporation and we reserve the right to obtain access and repossess at any time.
Create retention labels
Your task is to create and manage retention labels that meet the required criteria:
- Create retention labels: Set up retention labels for different types of documents and emails.
- Publish retention labels: Make the retention labels available for users to apply.
- Auto-apply retention labels: Configure retention labels to be applied automatically based on specific conditions.
Task 1 – Create retention labels
In this task, you will create retention labels that can be assigned to documents and emails.
- In Microsoft Edge, navigate to the Microsoft Purview portal,
https://purview.microsoft.com, and log in. - Select Solutions > Records Management.
- In the left navigation pane, select File plan.
- On the File plan page select + Create a label.
-
On the Name your retention label page input:
- Name:
Financial Records - Description for users:
Assign this label to financial documents to ensure they are retained for the required period. - Description for admins:
Financial records with retention period.
- Name:
- Select Next.
- On the Define file plan descriptors for this label page, select Next.
-
On the Define label settings page, choose the Retain items forever or for a specific period then select Next.
-
On the Define the period input:
- How long is the period?: 7 Years
- When should the period begin?: When items were created
- Select Next.
- On the Choose what happens during the retention period page select Retain items even if users delete then select Next.
- On the Choose what happens after the retention period page select Deactivate retention settings then select Next.
- On the Review and finish page, select Create label.
- On the Your retention label is created page, select Do Nothing then select Done. The label will be published later in the exercise.
- Back on the File plan page, select + Create a label to create another retention label.
-
On the Name your retention label page enter:
- Name:
HR Records - Description for users:
This label is auto-applied to HR records with a retention period of five years. - Description for admins:
Auto-applied retention label for HR records.
- Name:
- Select Next.
- On the Define file plan descriptors for this label page, select Next.
- On the Define label settings page, choose the Retain items forever or for a specific period then select Next.
-
On the Define the period input:
- How long is the period?: 5 Years
- When should the period begin?: When items were created
- Select Next.
- On the Choose what happens during the retention period select Retain items even if users delete, then select Next.
- On the Choose what happens after the retention period page, select Deactivate retention settings, then select Next.
- On the Review and finish page select Create label.
- On the Your retention label is created page select Do Nothing then select Done.
You have successfully created retention labels for financial records with a seven-year retention period and HR records with a five-year retention period.
Task 2 – Publish retention labels
Following Task 1, you will now publish the retention labels so they are available for users to apply to documents in Exchange emails and SharePoint documents.
- You should still be on the File plan page in the Microsoft Purview portal.
-
Select the check mark next to the Financial Records retention label, then select the Publish labels button.
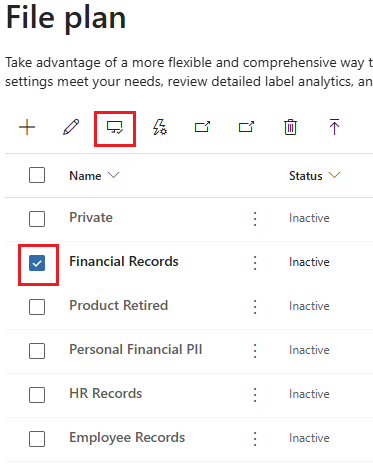
- On the Choose labels to publish page, the Financial Records retention label should be displayed.
- Select Next.
- On the Policy Scope page select Next.
- On the Choose the type of retention policy to create page select Static then select Next.
-
On the Choose where to publish labels page select Let me choose specific locations and enable:
- Exchange mailboxes
- SharePoint classic and communication sites
- OneDrive accounts
- Ensure Microsoft 365 Group mailboxes & sites is set to Off, then select Next.
-
On the Name your policy page enter:
- Name:
Financial Records Retention Label - Description:
Retention label for financial records with a seven-year retention period.
- Name:
- Select Next.
- On the Finish page select Submit.
- On the Your retention label was published page select Done.
You have successfully published the retention label for financial records.
Task 3 - Publish auto-apply retention labels
Following Task 1, you will now auto-apply the HR Records retention label so that information is retained.
-
You should still be in Records Management in the Microsoft Purview portal.
If not, in Microsoft Edge, navigate to the Microsoft Purview portal,
https://purview.microsoft.com, and log in. Select Solutions > Records Management. - On the left navigation pane, expand Policies, then select Label policies.
- Select Auto-apply a label to start the Create auto-labeling policy configuration.
-
On the Let’s get started page, for Name and Description enter the following information:
- Name:
HR Records auto-applied - Description:
HR Records auto-applied retention label, with a retention period of five years for all locations.
- Name:
- Select Next.
- On the Choose the type of content you want to apply this label to page select Apply label to content that contains sensitive info then select Next.
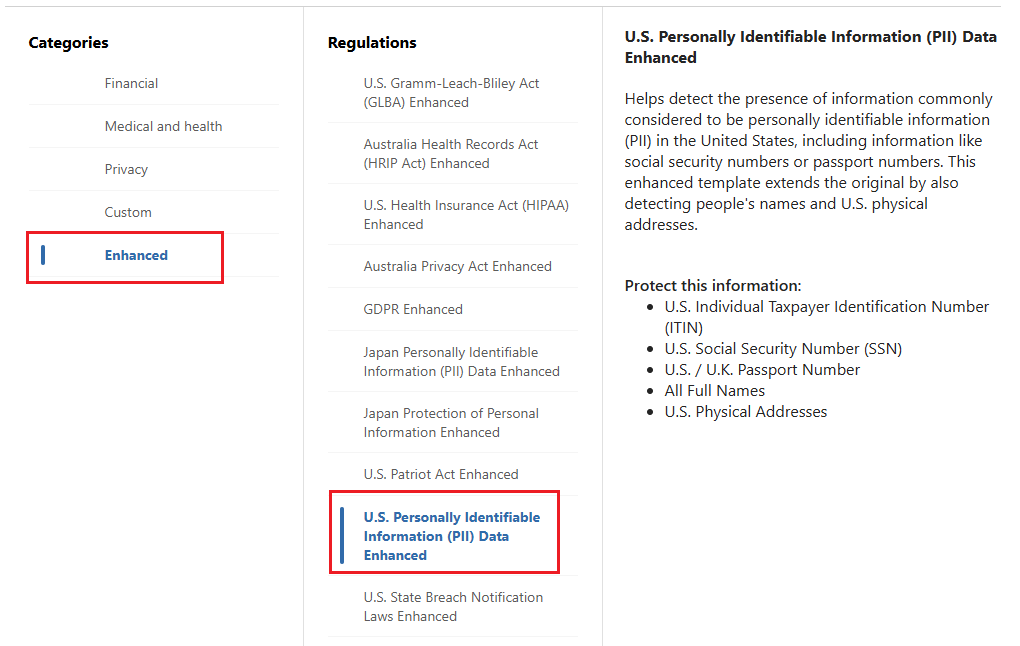
-
On the Content that contains sensitive info page, select the Enhanced category and the U.S. Personally Identifiable Information (PII) Data Enhanced regulation, then select Next.
- On the Define content that contains sensitive info page, leave the defaults selected, then select Next.
- On the Policy Scope page select Next.
- On the Choose the type of retention policy to create page, select Static then select Next.
-
On the Choose locations to apply the policy page, enable the options for:
- Exchange mailboxes
- SharePoint classic and communication sites
- OneDrive accounts
- Microsoft 365 Group mailboxes & sites
- Select Next.
- On the Choose a label to auto-apply page, select Add label.
- On the Choose a label fly-out page on the right, select the checkbox next to HR Records then select Add.
- Back on the Choose a label to auto-apply select Next.
- On the Decide whether to test or run your policy, select Turn on policy then select Next.
- On the Review and finish page, select Submit. When the policy is created, select Done.
You have successfully published a retention label with auto-apply. Over the next seven days, all relevant documents will be automatically labeled with the published label.