Create and publish a sensitivity label
Your task is to create and publish sensitivity labels within your organization that classify and protect sensitive data according to its level of confidentiality and the necessary access controls.
Tasks:
- Enable support for sensitivity labels
- Create a label group
- Create a child label
- Publish labels
- Configure auto-labeling
Task 1 – Enable support for sensitivity labels in SharePoint and OneDrive
In this task, you’ll enable co-authoring for sensitivity labels, which also enables sensitivity labels for files in SharePoint and OneDrive.
-
Open Microsoft Edge, then navigate to
https://purview.microsoft.com. -
In the left navigation, select Settings > Information Protection.
-
On the Information Protection settings ensure you’re on the Co-authoring for files with sensitivity labels tab.
-
Select the checkbox for Turn on co-authoring for files with sensitivity labels.
-
Select Apply at the bottom of the screen.
You have successfully enabled support for sensitivity labels for files in SharePoint and OneDrive.
Task 2 – Create a label group
In this task, you’ll create a label group to organize internal sensitivity labels. Label groups act as containers for related labels, like department or business unit classifications.
-
You should still be signed in to the Microsoft Purview portal as the Compliance Administrator.
-
In Microsoft Edge, navigate to
https://purview.microsoft.com. -
In the Microsoft Purview portal, select Solutions from the left sidebar, then select Information Protection.
-
On the Microsoft Information Protection page, on the left sidebar, select Sensitivity labels.
-
On the Sensitivity labels page select + Create > Label group.
-
The New label group configuration will start. On the Provide basic details for this label group, enter:
- Name:
Internal - Display name:
Internal - Description for users:
Internal sensitivity label. - Description for admins:
Internal sensitivity label group for Contoso.
- Name:
-
Select Next.
-
On the Review your settings and finish page, select Create label group.
-
On the Your label group was created successfully page, select Don’t create a label yet, then select Done.
You’ve created a label group for internal use. This group helps you manage related labels for specific departments or data categories.
Task 3 – Create a child label
Now that you’ve created a label group, you’ll add a child label for HR-related content. This label enforces encryption and content markings to protect HR data from unauthorized access.
-
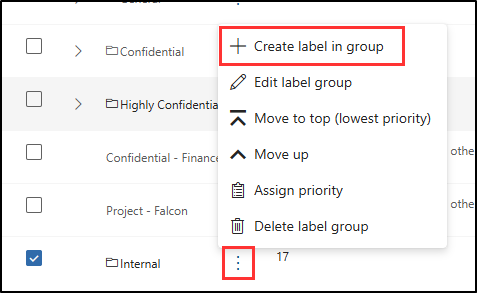
On the Sensitivity labels page, find the Internal sensitivity label group. Select the vertical ellipsis (…) next to it, then select + Create label in group from the dropdown menu.
-
The New sensitivity label wizard will start. On the Provide basic details for this label page enter:
- Name:
Employee data (HR) - Display name:
Employee data (HR) - Description for users:
This HR label is the default label for all specified documents in the HR Department. - Description for admins:
This label is created in consultation with Ms. Jones (Head of the HR department). Contact her if you need to change the label settings.
- Name:
-
Select Next.
-
On the Define the scope for this label page, select Files and Emails. If the checkbox for Meetings is selected, make sure it’s deselected.
-
Select Next.
-
On the Choose protection settings for labeled items page, select the Control access and Apply content marking options, then select Next.
-
On the Access control page, select Configure access control settings.
-
Configure the encryption settings with these options:
- Assign permissions now or let users decide?: Assign permissions now
- User access to content expires: Never
- Allow offline access: Only for a number of days
- Users have offline access to the content for this many days: 15
- Select the Assign permissions link. On the Assign permissions flyout panel, select + Add any authenticated users, then select Save to apply this setting.
-
On the Access control page, select Next.
-
On the Content marking page, select the toggle to enable Content marking.
-
For each of the following marking types, select the checkbox, then select the edit icon to enter the text:
Marking type Text Add a watermark INTERNAL USE ONLYAdd a header Internal DocumentAdd a footer Contoso Confidential -
Select Next.
-
On the Auto-labeling for files and emails page, select Next.
-
On the Define protection settings for groups and sites page, select Next.
-
On the Review your settings and finish page, select Create label.
-
On the Your sensitivity label was created page, select Don’t create a policy yet, then select Done.
You’ve created a child label within the Internal label group. The label applies encryption and content markings to HR documents, making sensitive data easy to identify and protected by policy.
Task 4 – Publish labels
Next, you’ll publish the HR label from the Internal label group so users in the HR department can apply it to their documents.
-
You should still be signed in to the Microsoft Purview portal as the Compliance Administrator.
-
In Microsoft Edge, the Microsoft Purview portal tab should still be open. If not, navigate to
https://purview.microsoft.com> Solutions > Information Protection > Sensitivity labels. -
On the Sensitivity labels page select Publish labels.
-
The publish sensitivity labels configuration will start.
-
On the Choose sensitivity labels to publish page, select the Choose sensitivity labels to publish link.
-
On the Sensitivity labels to publish flyout panel, select the Internal/Employee data (HR) checkbox, then select Add at the bottom of the flyout page.
-
Back on the Choose sensitivity labels to publish page, select Next.
-
On the Assign admin units page, select Next
-
On the Publish to users and groups page, select Next.
-
On the Policy settings page, select Next.
-
On the Default settings for documents select Next.
-
On the Default settings for emails select Next.
-
On the Default settings for meetings and calendar events select Next.
-
On the Default settings for Fabric and Power BI content page, select Next.
-
On the Name your policy page, enter:
-
Name:
Internal HR employee data -
Enter a description for your sensitivity label policy:
This HR label is to be applied to internal HR employee data.
-
-
Select Next.
-
On the Review and finish page, select Submit.
-
On the New policy created page, select Done to finish publishing your label policy.
You’ve published the Internal label group and its HR label so users can apply them to HR documents. It might take up to 24 hours for the policy to propagate across services.
Task 5 – Configure auto-labeling
You’ll now create a child label for financial data and configure it to apply automatically to content containing financial identifiers such as credit card or bank routing numbers.
-
You should still be signed in to the Microsoft Purview portal as the Compliance Administrator.
-
In Microsoft Edge, navigate to
https://purview.microsoft.comand log into the Microsoft Purview portal as the Compliance Administrator. -
In the Microsoft Purview portal, select Solutions > Information Protection > Sensitivity labels.
-
On the Sensitivity labels page, find the Internal sensitivity label. Select the vertical ellipsis (…), then select + Create label in group from the dropdown menu.
-
On the Provide basic details for this label page, enter:
Details Text Name Financial DataDisplay name Financial DataDescription for users This content contains financial data that must be labeled and protected.Description for admins This label is used for content that includes sensitive financial identifiers. -
Select Next.
-
On the Define the scope for this label page, select Files and Emails. If the checkbox for Meetings is selected, make sure it’s deselected.
-
Select Next.
-
On the Choose protection settings for labeled items page, select Next.
-
On the Auto-labeling for files and emails page, set the Auto-labeling for files and emails to enabled.
-
In the Detect content that matches these conditions section, select + Add condition > Content contains.
-
In the Content contains section, select the Add > Sensitive info types.
-
In the Sensitive info types flyout page, search for and select these sensitive info types:
Credit Card NumberABA Routing NumberSWIFT Code
-
Select Add.
-
Back on the Auto-labeling for files and emails page, select Next.
-
On the Define protection settings for groups and sites page, select Next.
-
On the Review your settings and finish page, select Create label.
-
On the Your sensitivity label was created page, select Automatically apply label to sensitive content, then select Done.
-
On the Create auto-labeling policy flyout page, select Review policy.
-
On the Name your auto-labeling policy page, leave the default, then select Next.
-
On the Choose a label to auto-apply page, review to ensure the Internal/Financial Data label is selected, then select Next.
-
On the Assign admin units page, select Next.
-
On the Choose locations where you want to apply the label page, select the options for:
- Exchange email
- SharePoint sites
- OneDrive accounts
-
Select Next.
-
On the Set up common or advanced rules page, leave the default Common rules selected, then select Next.
-
On the Define rules for content in all locations page, expand the rules for Financial Data rule to ensure the expected rules are defined, then select Next.
-
On the Additional settings for email page, select Next.
-
On the Decide if you want to test out the policy now or later page, select Run policy in simulation mode, and select the checkbox for Automatically turn on policy if not modified after 7 days in simulation.
-
Select Next.
-
On the Review and finish page, select Create policy.
-
On the Your auto-labeling policy was created page, select Done.
You’ve organized labels in a group, published them to users, and enabled auto-labeling so sensitive content is protected without relying on users.