WWL Tenants - Terms of use
If you are being provided with a tenant as a part of an instructor-led training delivery, please note that the tenant is made available for the purpose of supporting the hands-on labs in the instructor-led training.
Tenants should not be shared or used for purposes outside of hands-on labs. The tenant used in this course is a trial tenant and cannot be used or accessed after the class is over and are not eligible for extension.
Tenants must not be converted to a paid subscription. Tenants obtained as a part of this course remain the property of Microsoft Corporation and we reserve the right to obtain access and repossess at any time.
Lab 2 – Exercise 1 – Implement and manage DLP policies
Joni Sherman, the newly hired Information Security Administrator at Contoso Ltd., has been asked to configure data loss prevention (DLP) policies to help protect sensitive customer data across Microsoft 365. In this lab, you’ll use Microsoft Purview and Microsoft Defender to create and manage DLP policies that detect and restrict the sharing of sensitive information such as credit card numbers and employee IDs.
Tasks:
- Create a DLP policy in simulation mode
- Modify a DLP policy
- Create a DLP policy in PowerShell
- Activate a policy in simulation mode
- Modify policy priority
- Enable file inspection in Microsoft Defender
- Create a file policy for Microsoft Defender
Estimated time: 60-90 minutes
Task 1 – Create a DLP policy in simulation mode
In this task, you’ll create a DLP policy in simulation mode that targets credit card numbers in Teams messages. The policy will notify users when they attempt to share sensitive content and allow them to override with justification.
-
Log into Client 1 VM (SC-401-CL1) as the SC-401-CL1\admin account.
-
In Microsoft Edge, navigate to
https://purview.microsoft.comand log into the Microsoft Purview portal as Joni Sherman. Sign in asJoniS@WWLxZZZZZZ.onmicrosoft.com(where ZZZZZZ is your unique tenant prefix provided by your lab hosting provider). User account passwords are provided by your lab hosting provider. -
Select Solutions > Data Loss Prevention > Policies.
-
On the Policies page, select + Create policy.
-
On the What info do you want to protect? page, select Enterprise applications & devices, then select Next.
-
On the Start with a template or create a custom policy page, select Custom as the category, then select Custom policy under Regulations.
-
Select Next.
-
On the Name your DLP policy page enter:
- Name:
DLP - Credit Card Protection - Description:
Detect and restrict sharing of credit card numbers in Teams messages.
- Name:
-
Select Next.
-
On the Assign admin units page select Next.
-
On the Choose where to apply the policy page, enable the location for Teams chat and channel messages only. If any other locations are selected, deselect them.
-
Select Next.
-
On the Define policy settings page, select Create or customize advanced DLP rules, then select Next.
-
On the Customize advanced DLP rules page, select + Create rule.
- In the Create rule flyout:
- In the Name field, enter
Credit card information.
- In the Name field, enter
-
Under Conditions, select + Add condition > Content is shared from Microsoft 365.
- In the Content is shared from Microsoft 365 section:
- Select the option for with people outside my organization.
-
Select + Add condition > Content contains.
- In the new Content contains section:
- Select Add > Sensitive info types.
- On the Sensitive info types page, search for and select
Credit Card Number, then select Add.
-
Under Actions, select + Add an action > Restrict access or encrypt the content in Microsoft 365 locations.
- In the Restrict access or encrypt the content section:
- Select Block only people outside your organization.
- Under User notifications:
- Turn on the toggle for Use notifications to inform your users and help educate them on the proper use of sensitive info..
- Select the checkbox for Notify users in Office 365 service with a policy tip.
- Under User overrides:
- Select the checkbox for Allow users to override policy restrictions (Fabric, Exchange, SharePoint, OneDrive, and Teams).
- Select the checkbox for Require a business justification to override.
- Under Incident reports, in the Use this severity level in admin alerts and reports dropdown:
- Select Low.
-
At the bottom of the Create rule flyout panel, select Save.
-
Back on the Customize advanced DLP rules, select Next.
-
On the Policy mode page select Run the policy in simulation mode and select the checkbox for Show policy tips while in simulation mode.
-
Select Next.
-
On the Review and finish page review your settings then select Submit.
- On the New policy created page select Done.
You’ve created a DLP policy that scans Teams content for credit card numbers and allows overrides with business justification.
Task 2 – Modify a DLP policy
In this task, you’ll expand the scope of your existing DLP policy to include Exchange email. This helps ensure consistent protection across additional communication channels.
-
You should still be logged into Client 1 VM (SC-401-CL1) as the SC-401-CL1\admin account, and you should be logged into Microsoft 365 as Joni Sherman.
-
You should still be on the Policies page in Microsoft Purview. If not, open Microsoft Edge and navigate to
https://purview.microsoft.com. Select Solutions > Data Loss Prevention > Policies. -
On the Policies page select the checkbox for the recently created DLP - Credit Card Protection, then select Edit policy to open the policy configuration.
-
On the Name your DLP policy page, edit the description to
Detect and restrict sharing of credit card numbers in Teams and Exchange messages. -
Select Next.
-
On the Assign admin units page select Next.
-
On the Choose where to apply the policy page, select the checkbox for Exchange email to add this location to your DLP policy.
-
Select Next until you reach the Review and finish page.
-
Select Submit on the Review and finish page to apply the change you made to the policy.
-
Once the policy is updated select Done on the Policy updated page.
You’ve successfully updated the policy to scan email along with Teams messages.
Task 3 – Create a DLP policy in PowerShell
In this task, you’ll create a DLP policy using PowerShell to block sharing of employee IDs via email. This approach demonstrates how to define and enforce policy settings through scripting.
-
You should still be logged into Client 1 VM (SC-401-CL1) as the SC-401-CL1\admin account.
-
Open an elevated PowerShell window by right clicking the Start button in the task bar, then select Terminal (Admin).
-
Run the Install Module cmdlet in the terminal window to install the latest Exchange Online PowerShell module version:
Install-Module ExchangeOnlineManagement -
Confirm the Untrusted repository security dialog with Y for Yes and press Enter. This process may take some time to complete.
-
Run the Connect-IPPSSession cmdlet to connect to the Security & Compliance PowerShell:
Connect-IPPSSession -
Sign in as Joni Sherman
JoniS@WWLxZZZZZZ.onmicrosoft.com(where ZZZZZZ is your unique tenant prefix provided by your lab hosting provider) in the Sign in to your account pop-up window. User account passwords are provided by your lab hosting provider. -
Run the New-DlpCompliancePolicy cmdlet to create a DLP policy that scans all Exchange mailboxes:
New-DlpCompliancePolicy -Name "EmployeeID DLP Policy" -Comment "This policy blocks sharing of Employee IDs" -ExchangeLocation All -
Run the New-DlpComplianceRule cmdlet to add a DLP rule to the DLP policy you created in the previous step. This policy uses the Contoso Employee IDs sensitive info type created in a previous exercise:
New-DlpComplianceRule -Name "EmployeeID DLP rule" -Policy "EmployeeID DLP Policy" -BlockAccess $true -ContentContainsSensitiveInformation @{Name="Contoso Employee IDs"} -
Run the Get-DLPComplianceRule cmdlet to review the EmployeeID DLP rule:
Get-DLPComplianceRule -Identity "EmployeeID DLP rule"
You’ve successfully used PowerShell to create a DLP policy that blocks the sharing of employee IDs.
Task 4 – Activate a policy in simulation mode
Now that your DLP policy has been tested in simulation, you’ll activate it to begin enforcing its actions.
-
You should still be logged into Client 1 VM (SC-401-CL1) as the SC-401-CL1\admin account, and you should be logged into Microsoft 365 as Joni Sherman.
-
In Microsoft Edge, navigate to DLP policies by going to
https://purview.microsoft.com> Solutions > Data Loss Prevention then select Policies from the left sidebar. -
On the Policies page select the DLP - Credit Card Protection policy.
-
At the bottom of the flyout on the right, select View simulation.
-
On the simulation page, take a moment to explore:
- The Simulation overview tab, which shows scanning progress, total matches, and scanning status by location.
- The Items for review tab, where any predicted matches will appear once available.
- The Alerts tab, where any alerts triggered in simulation mode would be listed.
-
After exploring the insights in simulation mode, select Turn the policy on then Confirm to activate the DLP policy.
A confirmation flyout will appear indicating that the policy has been published successfully.
The policy is now active and enforcing restrictions on credit card information in Teams and Exchange.
Task 5 – Modify policy priority
When multiple policies exist, their priority determines which one applies first. In this task, you’ll move the employee ID policy to the highest priority.
-
You should still be logged into Client 1 VM (SC-401-CL1) as the SC-401-CL1\admin account, and you should be logged into Microsoft 365 as Joni Sherman.
-
In Microsoft Edge, the Microsoft Purview portal tab should still be open to the Policies page. If not, open Microsoft Edge and navigate to
https://purview.microsoft.com. Select Solutions > Data Loss Prevention > Policies. -
On the Policies page, select the EmployeeID DLP Policy.
-
Select Reprioritize from the top navigation ribbon, then select Move to top (highest priority).
-
In the Data loss prevention window, select Refresh and review the priority in the Order column of the policy table.
You’ve updated policy priority so that the employee ID policy takes precedence over others.
Task 6 – Enable file inspection in Microsoft Defender
Some file policies require access to inspect the contents of protected files. In this task, you’ll grant the necessary permissions to allow Microsoft Defender to scan the contents of OneDrive and SharePoint files for sensitive information.
-
You should still be logged into Client 1 VM (SC-401-CL1) as the SC-401-CL1\admin account and signed in as Joni Sherman.
-
Open Microsoft Edge in an InPrivate window by right clicking Microsoft Edge from the task bar and selecting New InPrivate window.
-
Navigate to Microsoft Defender XDR by going to
https://security.microsoft.com, and sign in as MOD Administrator,admin@WWLxZZZZZZ.onmicrosoft.com(where ZZZZZZ is your unique tenant prefix provided by your lab hosting provider). Admin’s password should be provided by your lab hosting provider. -
On the left sidebar, select System > Settings, then select Cloud Apps.
-
In the left pane within the Cloud apps window, scroll down to the Information Protection section and select Microsoft Information Protection.
-
Under Inspect protected files, select Grant permission to enable file inspection.
-
Follow the prompt to allow the required permissions in Microsoft Entra ID, then you should see file inspection is Active in Microsoft Defender for Cloud Apps.
-
Close the InPrivate window.
File inspection is now enabled in Defender, allowing file policies to scan for sensitive content.
Task 7 – Create a file policy for Microsoft Defender
In this task, you’ll create a file policy in Microsoft Defender that identifies and quarantines files containing credit card numbers in OneDrive and SharePoint.
-
You should still be logged into Client 1 VM (SC-401-CL1) as the SC-401-CL1\admin account.
-
Return to the Microsoft Edge window where you’re signed in as Joni Sherman. Refresh the tab to ensure the new permissions are active.
-
In the Microsoft Defender portal, in the left navigation, select Cloud apps > Policies then select Policy management.
-
On the Policies page, select + Create policy, then select File policy.
-
On the Create file policy page, configure:
- Policy name:
Credit card information for files - Policy severity: Low
- Category: DLP
- Description:
Protect credit card numbers from being shared in files. - In the Files matching all of the following section:
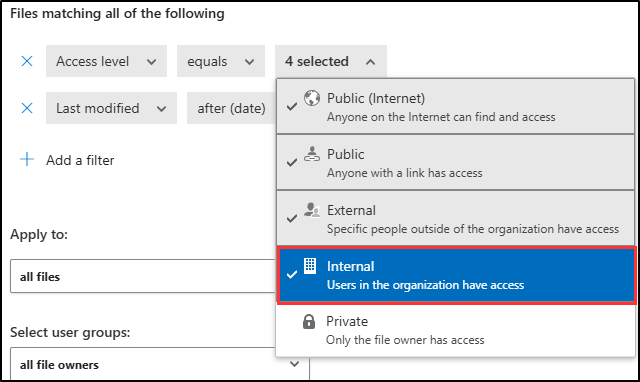
- For the first filter, configure the dropdowns to: Access level equals Public (Internet), External, Public, and add Internal
-
For the second filter, configure the dropdowns to: Last modified after (date) and use today’s date
- In the Inspection method dropdown menu, select Data Classification Service.
- In the Choose inspection type… dropdown menu, select Sensitive information type….
- On the Select a sensitive information type dialog, search for then select the checkbox for
Credit Card Number.- Select Done in the top right of the Select a sensitive information type dialog.
- Under Governance actions, expand Microsoft OneDrive for Business:
- Select the checkbox for Put in user quarantine
- Repeat the same process for Microsoft SharePoint Online
- Select the checkbox for Put in user quarantine
- Policy name:
-
Select Create at the bottom of the page to create the file policy.
You’ve successfully created a file policy that detects and quarantines files with sensitive credit card data.