Lab 3 - Exercise 2 - Implement retention labels
In this exercise, you will assume the role of Joni Sherman, a System Administrator for Contoso Ltd., based in Sudbury, England. The company is focused on adhering to strict compliance and data retention standards, particularly concerning financial records. To ensure these records are managed systematically and efficiently, you will implement a file plan that includes creating and applying retention labels for critical documents, such as Value Added Tax (VAT) returns and credit card receipts. This will help Contoso Ltd. meet both legal and internal compliance requirements.
Tasks:
- Create retention labels with file plan
- Publish retention labels
- Publish auto-apply retention labels
- Apply retention labels in Outlook
- Apply retention labels in SharePoint
- Apply retention labels in OneDrive
Task 1 – Create retention labels with file plan
In this task, you'll create retention labels for VAT returns and supporting documents, as well as for credit card receipts. These labels will be part of a comprehensive file plan to manage and secure these documents according to the company's compliance requirements.
-
Log into Client 1 VM (SC-400-CL1) as the SC-400-cl1\admin account.
-
In Microsoft Edge, navigate to
https://purview.microsoft.comand log into the Microsoft Purview portal as Joni ShermanJoniS@WWLxZZZZZZ.onmicrosoft.com(where ZZZZZZ is your unique tenant ID provided by your lab hosting provider). Joni's password was set in a previous exercise. -
In the Microsoft Purview portal, on the left sidebar, select Solutions, then select Records Management.
-
On the Records Management page, in the left sidebar select File plan.
-
On the File plan page, select + Create a label.
-
On the Name your retention label page enter:
- Name:
VAT Returns and Supporting Documents - Description for users:
Assign this label to VAT Documents to ensure they are retained for the legal period of seven years. - Description for admins:
VAT returns with seven-year retention.
- Name:
-
Select Next.
-
On the Define file plan descriptors for this label page enter:
- Reference ID:
VAT-001 - Business function/department: Select Choose next to this field. In the Business function/department flyout panel select Finance, then select Choose at the bottom of the panel.
- Category: Select Choose next to this field. In the Category flyout panel, select + Create new category. In the Category field, enter
Financial records, then select Add at the bottom of the panel. - Sub category: Leave this field blank.
- Authority type: Select Choose next to this field. In the Authority type flyout panel, select Regulatory, then select Choose at the bottom of the panel.
- Provision/citation: Select Choose next to this field. In the Provision/citation flyout panel, select Sarbanes-Oxley Act of 2002, then select Choose at the bottom of the panel.
- Reference ID:
-
Back on the Define file plan descriptors for this label page, select Next.
-
On the Define label settings page, select Retain items forever or for a specific period, then select Next.
-
On the Define the period page, ensure these values are set for the retention period configuration input:
- How long is the period?: 7 Years
- When should the period begin?: When items were created
-
Select Next.
-
On the Choose what happens during the retention period page, select Retain items even if users delete, then select Next.
-
On the Choose what happens after the retention period page select Deactivate retention settings then select Next.
-
On the Review and finish page select Create label.
-
On the Your retention label is created page select the option to Do Nothing then select Done. The label will be published in a later task.
-
Back on the File plan page, select + Create a label to create another retention label.
-
On the Name your retention label enter:
- Name:
Credit Card Receipts - Description for users:
This label is auto applied to Credit card receipts with a retention period of three years. - Description for admins:
Auto applied retention label for Credit card receipts with three-year retention.
- Name:
-
Select Next.
-
On the Define file plan descriptors for this label page enter:
- Reference ID:
CC-002 - Business function/department: Select Choose next to this field. In the Business function/department flyout panel select Sales, then select Choose at the bottom of the panel.
- Category: Select Choose next to this field. In the Category flyout panel select Financial records, then select Choose at the bottom of the panel.
- Sub category: Select Choose next to this field. In the Sub category flyout panel, select + Create new subcategory. In the Sub category field, enter
Receipts, then select Add at the bottom of the panel. - Authority type: Select Choose next to this field. In the Authority type flyout panel, select Business, then select Choose at the bottom of the panel.
- Provision/citation: Select Choose next to this field. In the Provision/citation flyout panel, select Truth in Lending Act, then select Choose at the bottom of the panel.
- Reference ID:
-
Back on the Define file plan descriptors for this label page, select Next.
-
On the Define label settings page select Retain items forever or for a specific period then select Next.
-
On the Define the period page, ensure these values are set for the retention period configuration input:
- Retain items for: Select the dropdown list and select Custom. Enter 3 for Years.
- Start the retention period based on: When items were created.
-
Select Next.
-
On the Choose what happens during the retention period page, select Retain items even if users delete, then select Next.
-
On the Choose what happens after the retention period page select Deactivate retention settings then select Next.
-
On the Review and finish page select Create label.
-
On the Your retention label is created page select Do Nothing then select Done.
You have successfully created retention labels for VAT returns with a seven-year retention period and for Credit Card receipts with a three-year retention period.
Task 2 – Publish retention labels
Now, you will publish the VAT returns retention label, making it available for finance users to apply to relevant documents in Exchange emails and SharePoint sites.
-
You should still be logged into Client 1 VM (SC-400-CL1) as the SC-400-cl1\admin account, and you should be logged into Microsoft 365 as Joni Sherman.
-
You should still be on the File plan page in Records Management. If not, navigate to
https://purview.microsoft.com, and select Solutions from the left sidebar, then select Records Management. Select File plan from the Records Management page. -
Select the VAT Returns and Supporting Documents label that was created previously.
-
Select the Publish labels button (
 ) to start the configuration to publish this retention label.
 -
On the Choose labels to publish page, verify the VAT Returns and Supporting Documents label is selected, then select Next.
-
On the Policy Scope page select Next.
-
On the Choose the type of retention policy to create page select Static then select Next.
-
On the Choose where to publish labels page select Let me choose specific locations and select:
- Exchange mailboxes
- SharePoint classic and communication sites
- OneDrive accounts
- Deselect all other locations
-
Select Next.
-
On the Name your policy enter:
- Name:
VAT Returns and Supporting Documents Retention Label - Description:
VAT Returns and supporting documents Retention label, retention period 3 years, Exchange email and SharePoint site locations.
- Name:
-
Select Next.
-
On the Finish page select Submit.
-
Once your retention label has been published, select Done on the Your retention label was published page.
You have successfully published the retention label for VAT Returns and supporting documents.
Task 3 – Publish auto-apply retention labels
In this task, you'll configure the credit card receipts retention label to be auto-applied, ensuring that any relevant documents are automatically labeled and retained for the required period.
-
You should still be logged into Client 1 VM (SC-400-CL1) as the SC-400-cl1\admin account, and you should be logged into Microsoft 365 as Joni Sherman.
-
You should still be on the File plan page in Records Management. If not, navigate to
https://purview.microsoft.com, and select Solutions from the left sidebar, then select Records Management. Select File plan from the Records Management page. -
Select the Credit Card Receipts label that was created previously.
-
Select the Auto-apply a label button (
 ) to start the configuration to publish this auto-apply retention label.
 -
On the Let's get started page, enter:
- Name:
Credit Card Receipts auto-applied - Description:
Credit Card Receipts auto-applied retention label, with a retention period of three years for all locations.
- Name:
-
Select Next.
-
On the Choose the type of content you want to apply this label to page select Apply label to content that contains sensitive info then select Next.
-
On the Content that contains sensitive info page, select Financial under Categories, then select U.K. Financial Data under Regulations
-
Select Next.
-
On the Define content that contains sensitive info page select Next.
-
On the Policy Scope page select Next.
-
On the Choose the type of retention policy to create page, select Static then select Next.
-
On the Choose locations to apply the policy page, select these locations:
- Exchange mailboxes
- SharePoint classic and communication sites
- OneDrive accounts
- Microsoft 365 Group mailboxes & sites
-
Select Next.
-
On the Choose a label to auto-apply page, ensure the Credit Card Receipts label is selected, then select Next.
-
On the Decide whether to test or run your policy, select Turn on policy then select Next.
-
On the Review and finish page, select Submit.
-
Once your auto-labeling policy has been created, select Done on the Your auto-labeling policy has been created. page.
-
Sign out of Joni's account by selecting her image in the top, right hand corner and selecting Sign out.
You have successfully configured the Credit Card Receipts retention label to be auto-applied, setting a three-year retention period for all identified documents.
Task 4 – Apply retention labels in Outlook
Megan Bowen, a financial analyst at Contoso Ltd., needs to ensure that specific emails and folders in Outlook comply with the company's data retention policies. In this task, you'll apply the appropriate retention labels to her Outlook items.
-
Log into Client 1 VM (SC-400-CL1) as the SC-400-cl1\admin account.
-
In Microsoft Edge, navigate to
https://outlook.office.com. and login as Megan BowenMeganB@WWLxZZZZZZ.onmicrosoft.com(where ZZZZZZ is your unique tenant ID provided by your lab hosting provider). Megan's password was set in a previous exercise. -
In Megan's inbox, select right click the any email then select Advanced actions > Assign policy > 5 year delete under the Retention labels section.
This retention label assigns a retention period of 5 years to the chosen email. After the 5 year period, the item is deleted.
-
Still in Outlook, expand Inbox from the left side bar, then right click the right click the Project Falcon folder.
-
From the menu that appeared when you right clicked, select Advanced actions > Assign policy > 5 year delete under the Retention labels section.
This retention label assigns a retention period of 5 years to the Project Falcon folder and all its contents. After the 5 year period, the items are deleted.
You have successfully applied retention labels to both an email and a folder in Outlook.
Task 5 – Apply retention labels in SharePoint
As a financial analyst, Megan Bowen manages sensitive documents in SharePoint. In this task, you will apply a retention label to a specific document in the SharePoint library, ensuring the document's retention aligns with company policy.
-
You should still be logged into Client 1 VM (SC-400-CL1) as the SC-400-cl1\admin account.
-
You should still be logged into Outlook as Megan Bowen. Select the meatball menu in the top left, then select SharePoint to navigate to SharePoint.
-
On the SharePoint landing page, search for
Communication sitethen select Communication site from the search results. -
In the top navigation bar, select the Documents tab.
-
Select the CAS folder.
-
Within the CAS folder, hover over the Blog Post preview.docx document and select the ellipses ... for Show more actions to open the menu to show more options.
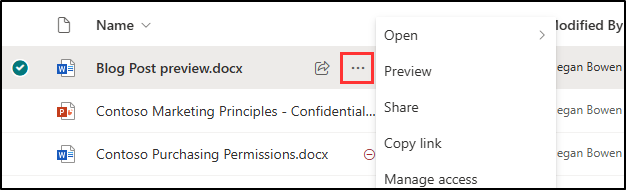
-
From the action menu, select More > Compliance details
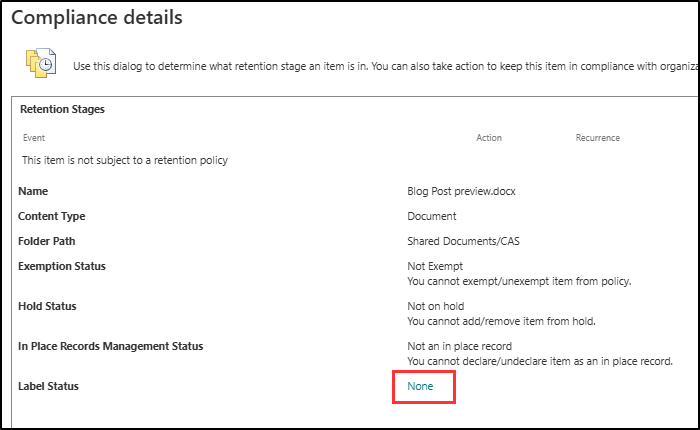
-
A new window displaying the Compliance details for the document opens. For Label Status select None to open the Apply Label window.
-
On the Apply Label page, select the dropdown for Apply label and change it from None to VAT Returns and supporting documents (Retain for 7 years). Select Save to the right of the screen.
Note: Retention labels might take 1-2 days to appear in SharePoint. If the VAT Returns and Supporting Documents label isn't available during this task, you can revisit and apply the label later.
You have successfully applied a retention label to a document in SharePoint.
Task 6 – Apply retention labels in OneDrive
Megan Bowen, while working remotely, stores critical financial documents in OneDrive. This task involves applying retention labels to ensure these documents are managed according to the company's retention policies.
-
You should still be logged into Client 1 VM (SC-400-CL1) as the SC-400-cl1\admin account.
-
You should still be logged into Outlook as Megan Bowen. Select the meatball menu in the top left, then select OneDrive to navigate to OneDrive.
-
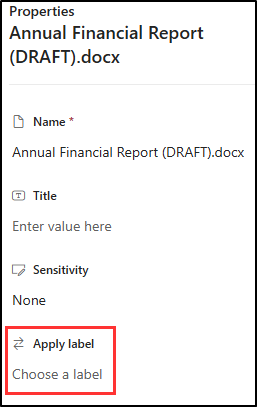
Select My files from the left sidebar. When the list of files appears, hover over Annual Financial Report and select the ellipses ... for More actions to open the menu to show more options.
-
From the action menu, select Details to open the detail panel on the right.
-
Under Properties scroll down to find the Apply label section. Select Choose a label, then select VAT Returns and Supporting Documents if available.
Note: Retention labels might take 1-2 days to appear in OneDrive. If the VAT Returns and Supporting Documents label isn't available during this task, you can revisit and apply the label later.
-
Select the x at the top of the details panel to close it. Changes made here are automatically applied.
-
Sign out of Megan's account by selecting her icon in the top right, then selecting Sign out.
You have successfully applied a retention label to a document in OneDrive.