Lab 1 - Exercise 3 - Manage Microsoft Purview Message Encryption
To ensure secure communication within Contoso Ltd., you need to configure and test Microsoft Purview Message Encryption. This includes modifying the default template and creating a new branding template for the finance department.
Tasks:
- Verify Azure RMS functionality
- Modify default branding template
- Test default branding template
- Create custom branding template
- Test the custom branding template
Task 1 – Verify Azure RMS functionality
In this task, you'll verify the correct Azure RMS functionality of your tenant.
-
You should still be logged into Client 1 VM (SC-400-CL1) as the SC-400-CL1\admin account.
-
Open an elevated PowerShell window by right clicking the Windows button in the task bar, then select Terminal (Admin).
-
Confirm the User Account Control window with Yes.
-
Run the Install-Module cmdlet in the terminal window to install the latest Exchange Online PowerShell module version:
Install-Module ExchangeOnlineManagement -
Confirm the NuGet provider security dialog with Y for Yes and press Enter. This process might take some time to complete.
-
Confirm the Untrusted repository security dialog with Y for Yes and press Enter. This process may take some time to complete.
-
Run the Set-ExecutionPolicy cmdlet to change your execution policy and press Enter
Set-ExecutionPolicy -ExecutionPolicy RemoteSigned -Scope CurrentUser -
Close the PowerShell window.
-
Open a regular PowerShell window, without elevation, right clicking the Windows button in the task bar, then select Terminal.
-
Run the Connect-ExchangeOnline cmdlet to use the Exchange Online PowerShell module and connect to your tenant:
Connect-ExchangeOnline -
When the Sign in window is displayed, sign in as
JoniS@WWLxZZZZZZ.onmicrosoft.com(where ZZZZZZ is your unique tenant ID provided by your lab hosting provider). You will use the password you reset Joni's to in a previous lab. -
Run the Get-IRMConfiguration cmdlet to verify Azure RMS and IRM is activated in your tenant:
Get-IRMConfiguration | fl AzureRMSLicensingEnabledThe AzureRMSLicensingEnabled result should be True.
-
Run the Test-IRMConfiguration cmdlet to test the Azure RMS templates used for Office 365 Message Encryption with user Megan Bowen:
Test-IRMConfiguration -Sender MeganB@contoso.com -Recipient MeganB@contoso.com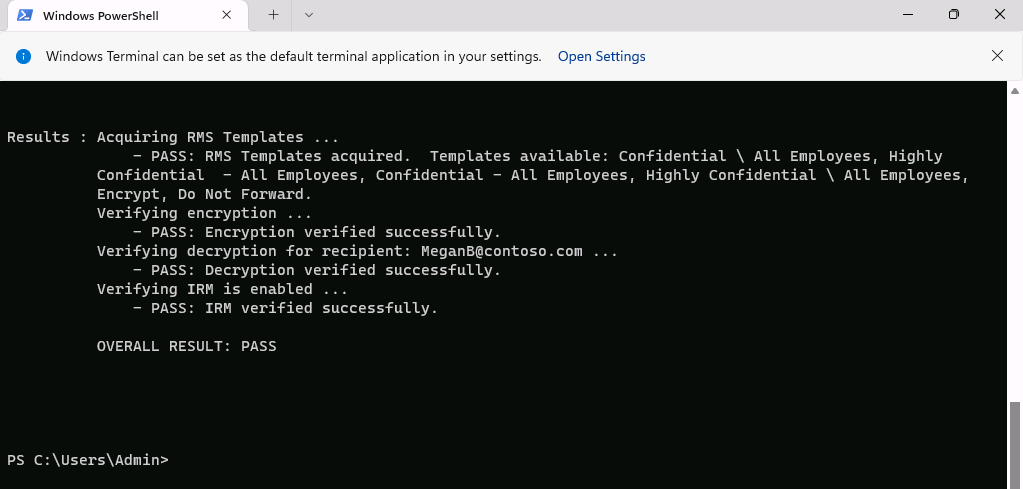
Verify all tests are in the status PASS and no errors are shown.
-
Leave the PowerShell window open.
You have successfully installed the Exchange Online PowerShell module, connected to your tenant, and verified the correct functionality of Azure RMS.
Task 2 – Modify default branding template
There is a requirement in your organization to restrict trust for foreign identity providers, such as Google or Facebook. Because these social IDs are activated by default for accessing messages protected with message encryption, you need to deactivate the use of social IDs for all users in your organization.
-
You should still be logged into your Client 1 VM (SC-400-CL1) as the SC-400-CL1\admin account and there should still be an open PowerShell window with Exchange Online connected.
-
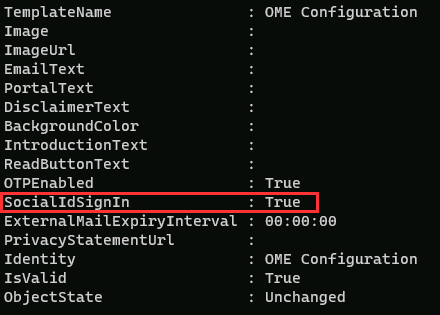
Run the Get-OMEConfiguration cmdlet to view the default configuration:
Get-OMEConfiguration -Identity "OME Configuration" | flReview the settings and confirm that the SocialIdSignIn is set to True.
-
Run the Set-OMEConfiguration cmdlet to restrict the use of social IDs for accessing messages from your tenant protected with OME:
Set-OMEConfiguration -Identity "OME Configuration" -SocialIdSignIn:$false -
Confirm the warning message for customizing the default template by entering Y for Yes then press Enter.
-
Run the Get-OMEConfiguration cmdlet to check the default configuration again and validate:
Get-OMEConfiguration -Identity "OME Configuration" | fl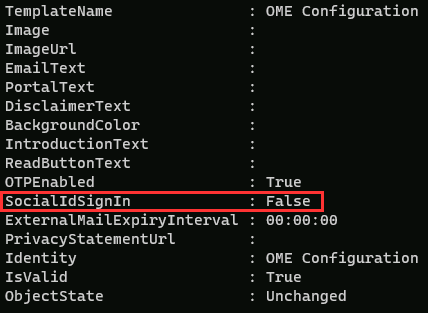
Notice the result should show the SocialIDSignIn is set to False. Leave the PowerShell window and client open.
You have successfully deactivated the usage of foreign identity providers, such as Google and Facebook in Office 365 Message Encryption.
Task 3 – Test default branding template
You must confirm that no social IDs dialog is displayed for external recipients when receiving a message protected with Office 365 Message Encryption from users of your tenant and they need to use the OTP at any time accessing the encrypted content.
-
You should still be logged into your Client 1 VM (SC-400-CL1) as the SC-400-CL1\admin.
-
Open Microsoft Edge in an InPrivate window by right clicking Microsoft Edge from the task bar and selecting New InPrivate window.
-
Navigate to
https://outlook.office.comand log into Outlook on the web asLynneR@WWLxZZZZZZ.onmicrosoft.com(where ZZZZZZ is your unique tenant ID provided by your lab hosting provider). Lynne's password was set in a previous exercise. -
On the Stay signed in? dialog box, select the checkbox for Don't show this again then select No.
-
In Outlook on the web, select New mail.
-
In the To line enter your personal or other third-party email address that isn't in the tenant domain. Enter
Secret Messagein the subject line andMy super-secret message.in the body of the email. -
From the top pane, select Options then Encrypt to encrypt the message. Once you've successfully encrypted the message, you should see a notice that says "Encrypt: This message is encrypted. Recipients can't remove encryption."

-
Select Send to send the message. Leave the Outlook window open.
-
Sign into your personal email account in a new window and open the message from Lynne Robbins. If you sent this email to a Microsoft account (like @outlook.com) the encryption might be processed automatically, and you'll see the message automatically. If you sent the email to another email service like (@gmail.com), you might have to perform the next steps to process the encryption and read the message.
Note: You might need to check your junk or spam folder for the message from Lynne Robbins.
-
Select Read the message.
-
Without having social IDs activated, there is no button to authenticate with your non-Microsoft account.
-
Select Sign in with a One-time passcode to receive a limited time passcode.
-
Go to your personal email portal and open the message with subject Your one-time passcode to view the message.
-
Copy the passcode, paste it into the OME portal and select Continue.
-
Review the encrypted message.
You have successfully tested the modified default OME template with deactivated social IDs.
Task 4 – Create custom branding template
Protected messages sent by your organizations finance department require special branding, including customized introduction and body texts and a Disclaimer link in the footer. The finance messages shall also expire after seven days. In this task, you will create a new custom OME configuration and create a transport rule to apply the OME configuration to all mail sent from the finance department.
-
You should still be logged into your Client 1 VM (SC-400-CL1) as the SC-400-CL1\admin, and there should still be an open PowerShell window with Exchange Online connected.
-
Run the New-OMEConfiguration cmdlet to create a new configuration:
New-OMEConfiguration -Identity "Finance Department" -ExternalMailExpiryInDays 7 -
Confirm the warning message for customizing the template with Y for Yes and press Enter.
-
Run the Set-OMEConfiguration cmdlet with the IntroductionText parameter to change the introduction text:
Set-OMEConfiguration -Identity "Finance Department" -IntroductionText " from Contoso Ltd. finance department has sent you a secure message." -
Confirm the warning message for customizing the template with Y for Yes and press Enter.
-
Run the Set-OMEConfiguration cmdlet with the EmailText parameter to change the body email text:
Set-OMEConfiguration -Identity "Finance Department" -EmailText "Encrypted message sent from Contoso Ltd. finance department. Handle the content responsibly." -
Confirm the warning message for customizing the template with Y for Yes and press Enter.
-
Run the Set-OMEConfiguration cmdlet with the PrivacyStatementURL parameter to change the disclaimer URL to point to Contoso's privacy statement site:
Set-OMEConfiguration -Identity "Finance Department" -PrivacyStatementURL "https://contoso.com/privacystatement.html" -
Confirm the warning message for customizing the template with Y for Yes and press Enter.
-
Run the TransportRule cmdlet to create a mail flow rule, which applies the custom OME template to all messages sent from the finance team. This process might take a few seconds to complete.
New-TransportRule -Name "Encrypt all mails from Finance team" -FromScope InOrganization -FromMemberOf "Finance Team" -ApplyRightsProtectionCustomizationTemplate "Finance Department" -ApplyRightsProtectionTemplate Encrypt -
Run the Get-OMEConfiguration cmdlet to verify changes.
Get-OMEConfiguration -Identity "Finance Department" | Format-List -
Close the PowerShell window after reviewing the results
You have successfully created a new transport rule that applies the custom branding template automatically, when a member of the finance department sends a message to external recipients.
Task 5 – Test the custom branding template
To validate the new custom configuration, you need to use the account of Lynne Robbins again, who is a member of the finance team.
-
Go back to Microsoft Edge with the InPrivate Outlook on the web window where you should still be logged in as Lynne Robbins.
-
Select New mail from the upper left side part of Outlook on the web.
-
In the To line enter your personal or other third-party email address that isn't in the tenant domain. Enter
Finance Reportin the subject line and enterSecret finance information.in the body of the email. -
Select Send to send the message, then close the InPrivate window where you're logged in as Lynne.
-
Sign into your personal email account and open the message from Lynne Robbins.
-
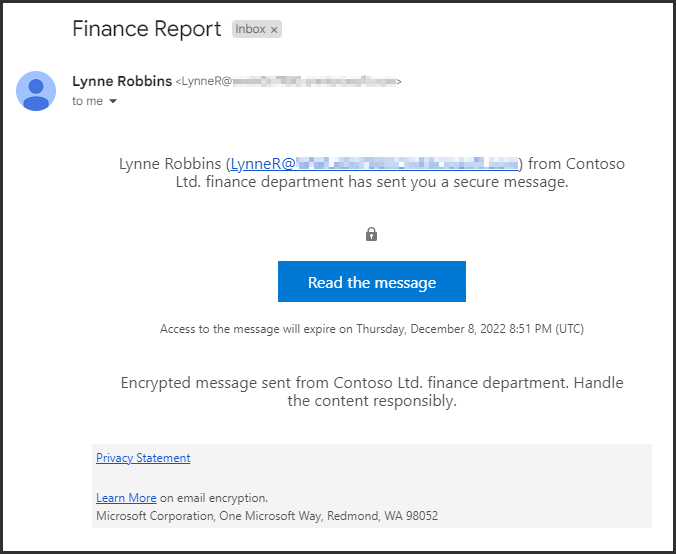
You should see a message from Lynne Robbins that looks like the image below. Select Read the message.
-
The customized configuration has social IDs activated, because both options are available. Select Sign in with a One-time passcode to receive a limited time passcode.
-
Go to your personal email portal and open the message with subject Your one-time passcode to view the message.
-
Copy the passcode, paste it into the portal and select Continue.
-
Review the encrypted message with custom branding. Close the window with your email account open.
You have successfully tested the new customized template.