Lab 09 - Configure and deploy self-service password reset
Login type: Microsoft 365 admin
Lab scenario
The company has decided to empower the employees and enable self-service password reset. You must configure this setting in your organization.
Estimated time: 15 minutes
Exercise 1 - Create a group with SSPR enabled and add users to it
Task 1 - Create a group to assign SSPR to
You want to roll out SSPR to a limited set of users first to make sure your SSPR configuration works as expected. Let’s create a security group for the limited rollout and add a user to the group.
-
Browse to Microsoft Entra admin center at
https://entra.microsoft.comusing a Global administrator account.Note: You may be prompted to complete Multi-Factor Authentication (MFA) during sign-in. Follow the prompts to configure or verify your authentication method before continuing.
-
On the Microsoft Entra admin center, in the left navigation, under Entra ID, select Groups.
-
Open All groups menu item, and select New Group on the right side window.
-
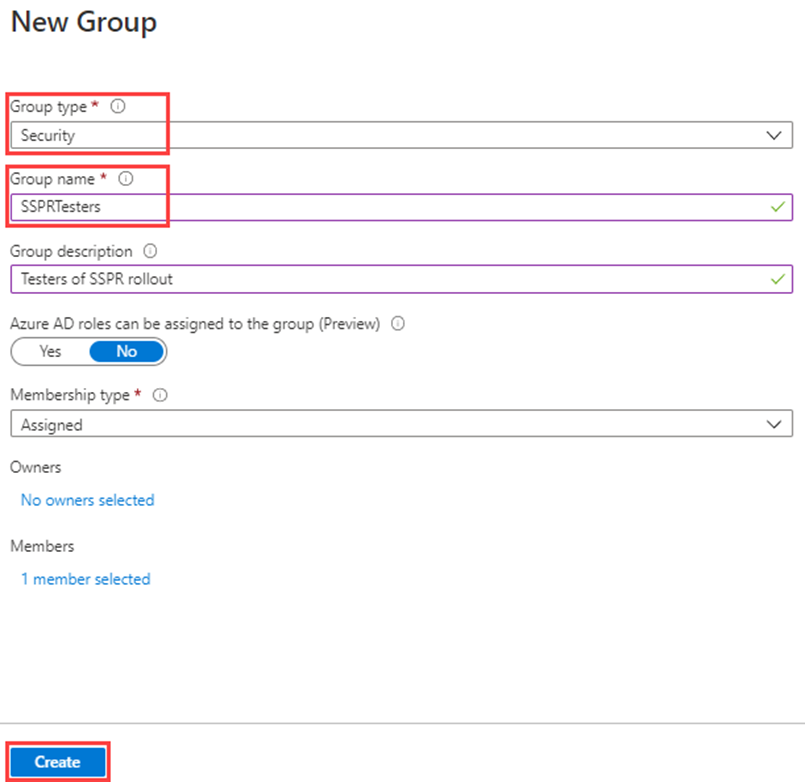
Create a new group using the following information:
Setting Value Group type Security Group name SSPRTestersGroup description Testers of SSPR rolloutMembership type Assigned Members Alex Wilber Allan Deyoung Bianca Pisani -
Select Create.
Task 2 - Enable SSPR for you test group
Enable SSPR for the group.
-
In the left navigation, under Entra ID, select Password reset.
-
On the **Password reset Properties** page, under Self service password reset enabled, select Selected. -
Under Select group, replace the existing SSPRSecurityGroupUsers with SSPRTesters you just created.
-
On the **Password reset Properties** page, select Save. 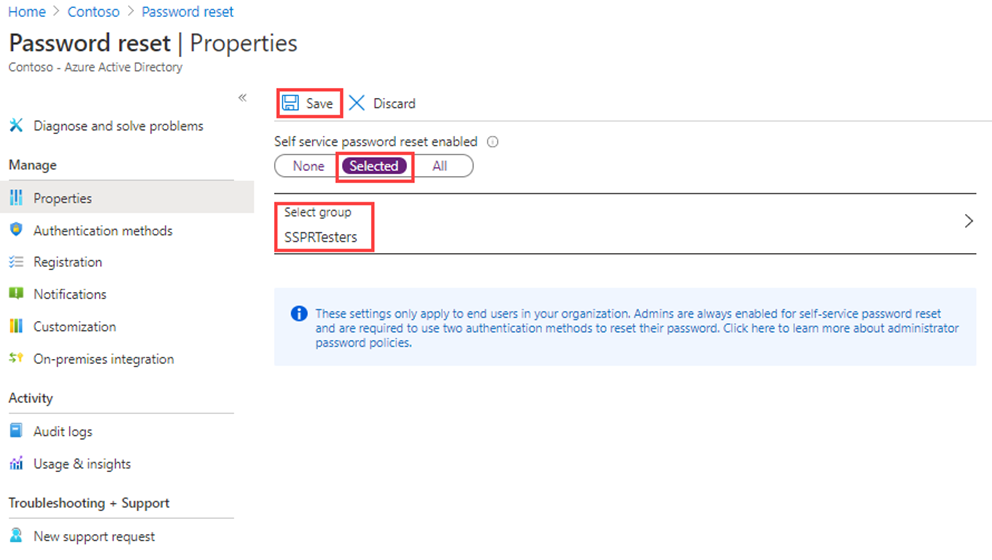
-
On the Password reset page, under Manage, select and review the default settings for Authentication methods, Registration, Notifications, and Customization.
Note: it is important to have phone selected as one of the authentication methods for the rest of this lab, but you can have other options as well.
Task 3 - Register for SSPR with Allan
Now that the SSPR configuration is complete, register a mobile phone number for the user you created.
-
Open a different browser or open an InPrivate or Incognito browser session and then browse to
https://aka.ms/ssprsetup.This is to ensure you are prompted for user authentication.
-
Sign in as
AllanD@<organization-domain-name>.onmicrosoft.comwith the password provided.Note: Replace the organization-domain-name with your domain name.
-
If prompted to update your password, enter a new password of your choice. Be sure to record the new password.
-
If prompted to stay signed in, choose Yes.
-
In the More information required dialog box, select Next.
-
On the Keep your account secure page, select Next to use the Authenticator app.
-
Follow the on screen instructions to set up your account in Authenticator by scanning the QR-code.
-
Complete the process by selecting Done when you successfully registered.
Note: at this point you have both registered for SSPR and MFA in a single step.
-
Close the browser. You do not need to complete the sign in process.
Task 4 - Test SSPR
Now let’s test whether the user can reset their password.
-
Open an InPrivate or Incognito browser session and then browse to the Microsoft Azure portal at
https://portal.azure.com.This is to ensure you well be prompted for user authentication.
-
Enter
AllanD@<organization-domain-name>.onmicrosoft.comand then select Next.Note: Replace the organization-domain-name with your domain name.
-
On the Enter password page, select Forgot my password.
-
On the Get back into your account page, complete the requested information and then select Next.
-
Follow the on-screen instructions to get the verification code from Microsoft Authenticator app.
-
Enter your verification code and then select Next.
-
In the choose a new password step, enter and then confirm your new password.
-
When complete, select Finish.
-
Sign in as AllanD with the new password you created.
-
Enter your verification code and then verify you can complete the sign in process.
-
When finished, close your browser.
Task 5 - What happens if you try a user not in SSPRTesters group?
- As a test, open a new InPrivate browser window and try to log into the Azure Portal as GradyA, and select Forgot my password option.
Exercise summary
In this exercise, you created a group, enabled self-service password reset for its members, and validated the reset flow. This exercise showed how SSPR reduces help-desk load while preserving security.