Lab 05: Add guest users to the directory
Login type = Microsoft 365 admin
Lab scenario
Your company works with many vendors and, on occasion, you need to add some vendor accounts to your directory as a guest.
Estimated time: 20 minutes
Exercise 1 - Add guest users to the directory
Task - Add the guest user
-
Sign in to Microsoft Entra admin center at
https://entra.microsoft.comas a user who is assigned a limited administrator directory role or the Guest Inviter role, or as Global Administrator. -
In the left navigation, under Entra ID, select Users, then select All users.
-
On the Users page, on the menu, select + New user.
-
On the New user menu, select Invite external user and then add your information as the guest user.
Note: Group email addresses are not supported; enter the email address for an individual. Also, some email providers allow users to add a plus symbol (+) and additional text to their email addresses to help with things like inbox filtering. However, Microsoft Entra ID does not currently support plus symbols in email addresses. To avoid delivery issues, omit the plus symbol and any characters following it up to the @ symbol.
-
Enter an email address, such as
sc300externaluser1@sc300email.com. -
Select the Properties tab.
-
On the Users page, verify your account is listed and, in the User type column, verify Guest is shown.
-
When complete, select Review + Invite, then select Invite.
After you send the invitation, the user account is automatically added to the directory as a guest.
Exercise summary
In this exercise, you invited a guest user to the directory through the Microsoft Entra admin center. This exercise showed how external users are onboarded into Microsoft Entra ID for B2B collaboration.
Exercise 2 - Invite guest users in bulk
Task 1 - Bulk user invite
A recent partnership has been established with another company. For now, employees of the partner company will be added as guests. You need to ensure you can import multiple guest users at one time.
-
Sign in to Microsoft Entra admin center at
https://entra.microsoft.comas your Global Administrator.Note: You may be prompted to complete Multi-Factor Authentication (MFA) during sign-in. Follow the prompts to configure or verify your authentication method before continuing.
-
In the left navigation, under Entra ID, select Users, then select All users.
-
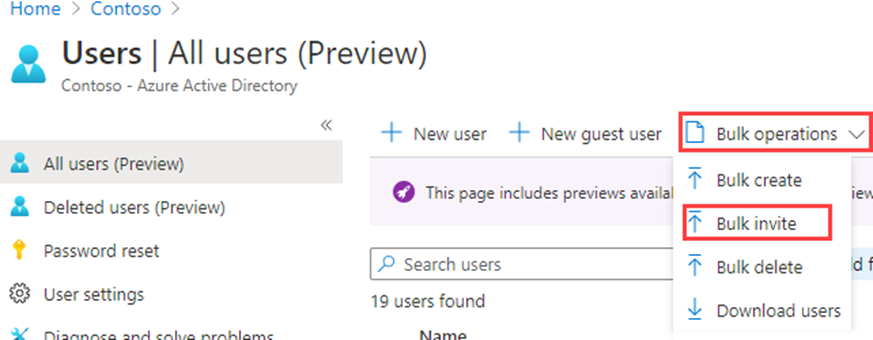
On the Users page, on the menu, select Bulk operations > Bulk invite.
-
In the Bulk invite users pane, select Download to a sample CSV template with invitation properties.
-
Using an editor to view the CSV file, review the template.
-
Open the .csv template and add a line for each guest user. Required values are:
- Email address to invite - the user who will receive an invitation
- Redirection url - the URL to which the invited user is forwarded after accepting the invitation.

Lab Tip - The users listed in the screenshot and the template files are examples, they don’t really exist. You will have to add a real users to fully test this feature.
-
Save the file.
-
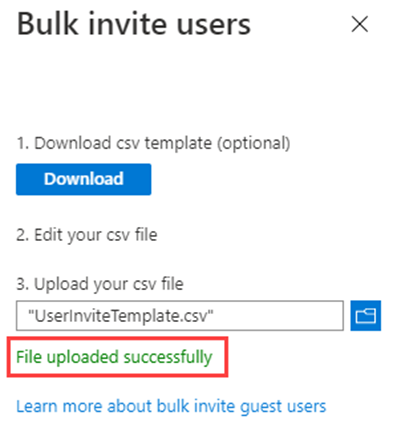
On the Bulk invite users page, under Upload your csv file, browse to the file.
Note: When you select the file, validation of the .csv file starts.
-
After the file contents are validated, you will see File uploaded successfully. If there are errors, you must fix them before you can submit the job.
-
When your file passes validation, select Submit to start the Azure bulk operation that adds the invitations.
-
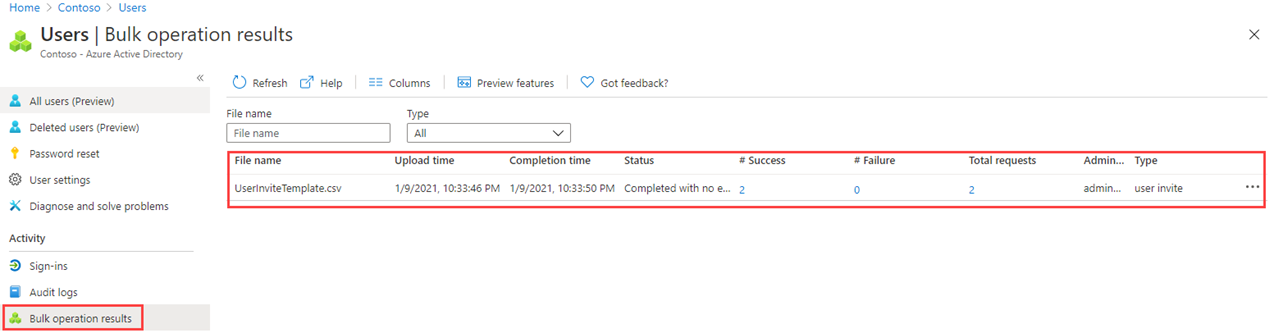
To view the job status, select Select here to view the status of each operation. Or, you can select Bulk operation results in the Activity section. For details about each line item within the bulk operation, select the values under the # Success, # Failure, or Total Requests columns. If failures occurred, the reasons for failure will be listed.
-
When the job completes, you will see a notification that the bulk operation succeeded.
Task 2 - Invite guest users with PowerShell
-
Open PowerShell. This can be done by searching for PowerShell in Windows.
Note: You need to have PowerShell version 7.2 or higher for this lab to function. When PowerShell opens you will get a version at the top of the screen, if you are running and older version, please update or this portion of the lab will fail.
Lab Tip - The TouchType feature in the lab environment has issues typing into PowerShell. If you launch Notepad in your lab, then use TouchType to load the PowerShell instructions into Notepad, you can use Cut & Paste to enter them into PowerShell without typing.
-
You will need to Install the Microsoft.Graph PowerShell module if you have not used it before. Run the following two commands and when prompted to confirm press Y:
Install-Module Microsoft.Graph -Scope CurrentUser -Verbose -
Confirm the Microsoft.Graph module is installed:
Get-InstalledModule Microsoft.Graph -
Next, you will need to login to Azure by running:
Connect-MgGraph -Scopes "User.ReadWrite.All"The Edge browser will open and you will be prompted to sign-in. Use the MOD Administrator account to connect. Mark the consent box, then accept the permissions request; then close the browser window.
-
Set the values for the email and redirect for the External user:
Import-Module Microsoft.Graph.Identity.SignIns $params = @{ invitedUserEmailAddress = "admin@fabrikam.com" inviteRedirectUrl = "https://myapp.contoso.com" } -
Sent the MgInvitation command to invite the External user:
New-MgInvitation -BodyParameter $params -
You can close PowerShell at this point.
You now know how to invite users within the Microsoft Entra admin center, Microsoft 365 Admin center, Bulk invitations with a csv file, and inviting users with PowerShell commands. You can go into the Microsoft Entra admin center, and check All Users to see that ADMIN has been added as an external user.
Exercise summary
In this exercise, you invited multiple guest users at once by uploading a CSV file and by running Microsoft Graph PowerShell. This exercise showed how to scale B2B onboarding beyond individual invitations.