Lab 02: Working with tenant properties
Login type = Microsoft 365 + E5 tenant log-in
Lab scenario
You need to identify and update the different properties associated with your tenant.
Estimated time: 15 minutes
Exercise 1 - Create a custom subdomains
Task 1 - Create a custom subdomain name
You would use Microsoft Entra ID to create a domain that you have purchased. If you want to create a subdomain to divide your existing .onmicrosoft.com domain, you have to use the Microsoft 365 admin center.
-
Browse to the Microsoft Entra admin center at
https://entra.microsoft.com, and sign in using a Global administrator account for the directory.Note: You may be prompted to complete Multi-Factor Authentication (MFA) during sign-in. Follow the prompts to configure or verify your authentication method before continuing.
-
In the left navigation, under Entra ID, select Domain names.
-
In the Custom domain name page, select + Add custom domain.
-
In the Custom domain name field, create a custom subdomain for the lab tenant by putting sales in front of the onmicrosoft.com domain name. The format will look similar to this:
Sales.labTenantName.onmicrosoft.comNote: After entering an .onmicrosoft.com domain, a restriction message appears indicating that managing onmicrosoft.com domains is restricted in Microsoft Entra ID. Select the Microsoft 365 Admin Center link shown in the message to complete this action.
-
On the Microsoft 365 Admin Center, in the Domains page, select Add domain to add the subdomain.
-
Enter the subdomain name
sales.tenantname.onmicrosoft.cominto the dialog. Remember to replace tenantname with the name of your tenant. -
Select the Use this domain button at the bottom of the screen.
-
Select the Close button when the next screen opens up. For the purpose of this lab we will not set up the DNS.
Exercise summary
In this exercise, you reviewed the steps to add a custom subdomain in Microsoft Entra ID. This exercise showed how organizations bind their public DNS namespace to their tenant.
Exercise 2 - Changing the tenant display name
Task 1 - Set the tenant name and technical contact
-
From within Microsoft Entra admin center, open the Identity menu.
-
In the left navigation, select Overview menu item, then select Properties.
-
Change the Tenant Properties for the Name and Technical contact in the dialog.
Setting Value Name Contoso Marketing Technical contact your Global admin account -
Select Save to update the tenant properties.
You will notice the name change immediately upon completion of the save.
Task 2 - Review the Country or region and other values associated with your tenant
-
In the left navigation, select Overview, then select Properties.
-
Under Tenant properties, locate Country or region and review the information.
IMPORTANT - When the tenant is created, the Country or region are specified at that time. This setting cannot be changed later.
-
In the Properties page, under Tenant properties, locate Location and review the information.

Task 3 - Finding the tenant ID
Azure subscriptions have a trust relationship with Microsoft Entra ID. Microsoft Entra ID is trusted to authenticate users, services, and devices for the subscription. Each subscription has a tenant ID associated with it, and there are a few ways you can find the tenant ID for your subscription.
-
Open the Microsoft Entra admin center at
https://entra.microsoft.com. -
In the left navigation, select Overview, then select Properties.
-
Under Tenant properties, locate Tenant ID. This is your unique tenant identifier.
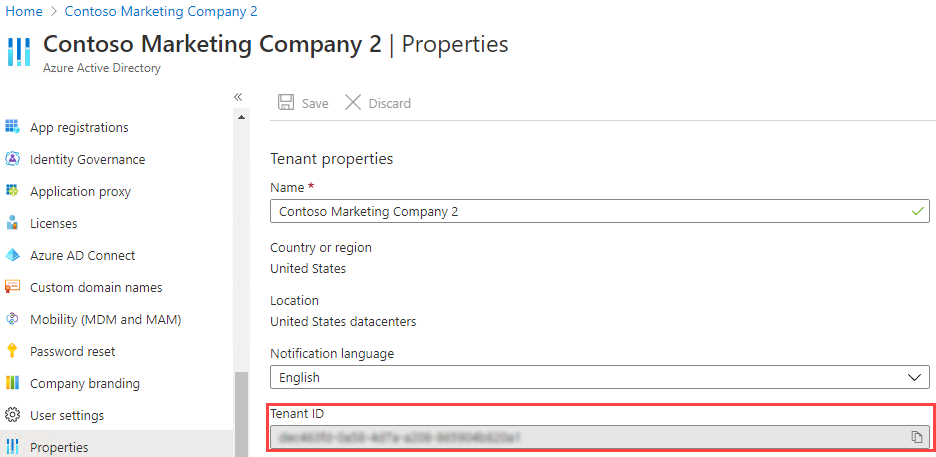
Note: It is helpful if you record your Tenant-Id in Notepad or other location for use in future labs.
Exercise summary
In this exercise, you updated the tenant display name and reviewed identifying tenant properties such as country, location, and Tenant ID. This exercise showed how branding and identifying information are managed at the tenant level.
Exercise 3 - Setting your privacy information
Task 1 - Adding your privacy info on Microsoft Entra ID, including Global privacy contact and Privacy statement URL
Microsoft strongly recommends you add both your global privacy contact and your organization’s privacy statement, so your internal employees and external guests can review your policies. Because privacy statements are uniquely created and tailored for each business, we strongly recommend you contact a lawyer for assistance.
Note: For information about viewing or deleting personal data, see https://docs.microsoft.com/microsoft-365/compliance/gdpr-dsr-azure. For more information about GDPR, see the https://servicetrust.microsoft.com/ViewPage/GDPRGetStarted.
You add your organization’s privacy information in the Properties area of Microsoft Entra ID. To access the Properties area and add your privacy information:
-
In the left navigation, select Overview, then select Properties.
-
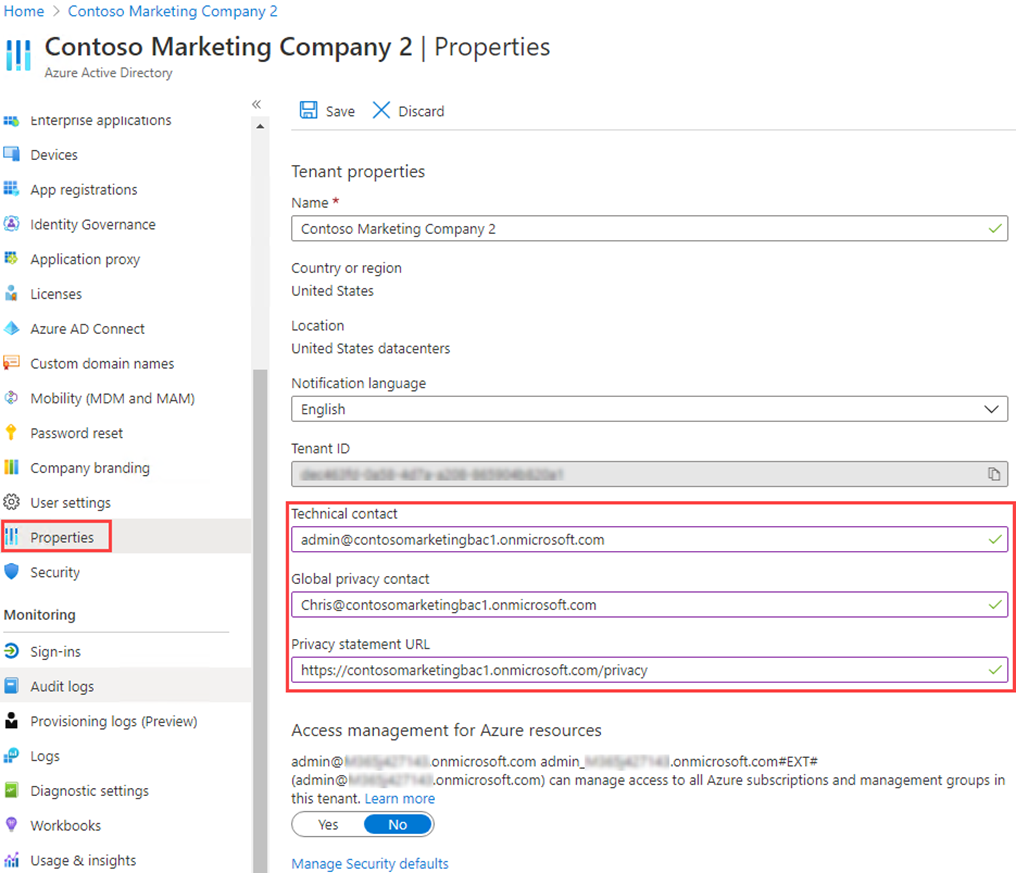
Add your privacy info for your employees:
- Global privacy contact -
AllanD@<your Azure lab domain>- Allan Deyoung is a built-in users in your Azure lab tenant who works as an IT Admin, we will use him as the Privacy contact.
- This person is also who Microsoft contacts if there’s a data breach. If there’s no person listed here, Microsoft contacts your global administrators.
-
Privacy statement URL - https://github.com/MicrosoftLearning/SC-300-Identity-and-Access-Administrator/blob/master/Allfiles/Labs/Lab2/SC-300-Lab_ContosoPrivacySample.pdf
- In sample Privacy PDF is provided in your labs directory. - Type the link to your organization’s document that describes how your organization handles both internal and external guest’s data privacy.
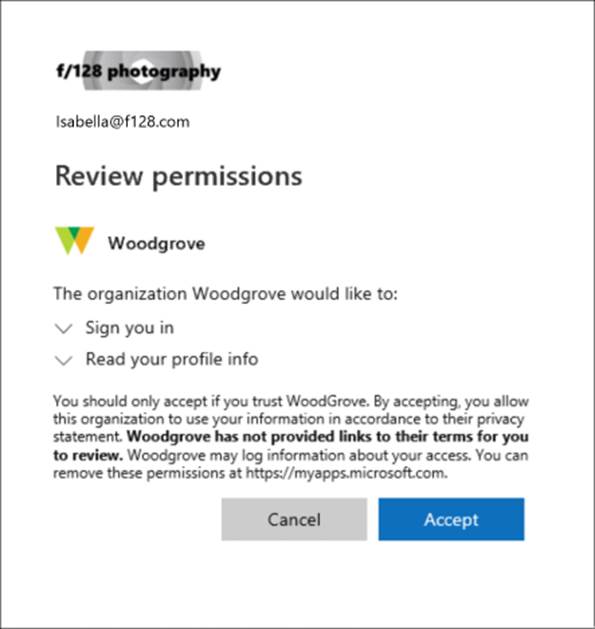
IMPORTANT: If you don’t include either your own privacy statement or your privacy contact, your external guests will see text in the Review Permissions box that says, <your org name> has not provided links to their terms for you to review. For example, a guest user will see this message when they receive an invitation to access an organization through B2B collaboration.
- Global privacy contact -
-
Select Save.
Task 2 - Check your Privacy Statement
-
Return to the Microsoft Entra admin center Dashboard.
-
In the upper-right corner of the UI, Select on your username.
-
Choose View account from the dropdown menu.
A new browser tab will open automatically.
-
Select the Settings & Privacy on the left menu.
-
Select Privacy.
-
Under Organization’s notice select the View item next to Contoso Marketing organizational privacy statement.
A new browser tab will open with the Privacy PDF file you linked to displayed.
-
Review the sample Privacy statement.
-
Close the browser tab with the PDF in it.
-
Close the browser tab displaying the My Account items.
Exercise summary
In this exercise, you configured the tenant privacy contact and privacy statement URL, and verified the link from a user account. This exercise showed how to surface required organizational notices to internal and external users.