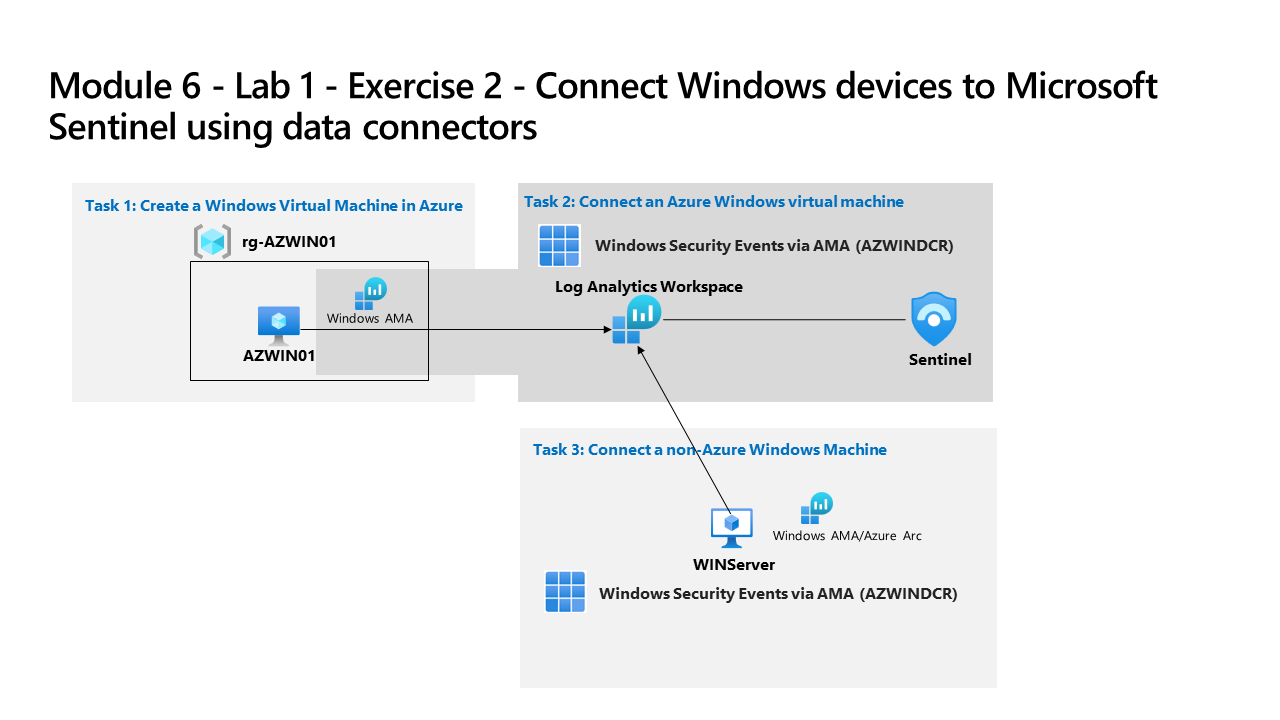
Learning Path 8 - Lab 1 - Exercise 2 - Connect Windows devices to Microsoft Sentinel using data connectors
Lab scenario
You’re a Security Operations Analyst working at a company that implemented Microsoft Sentinel. You must learn how to connect log data from the many data sources in your organization. The next source of data is Windows virtual machines inside and outside of Azure, like on-premises environments or other Public Clouds.
Important: The lab exercises for Learning Path #8 are in a standalone environment. If you exit the lab before completing it, you will be required to re-run the configurations again.
Estimated time to complete this lab: 30 minutes
Task 1: Create a Windows Virtual Machine in Azure
In this task, you create a Windows virtual machine in Azure.
-
Login to WIN1 virtual machine as Admin with the password: Pa55w.rd.
-
In the Microsoft Edge browser, navigate to the Azure portal at https://portal.azure.com.
-
In the Sign in dialog box, copy, and paste in the Tenant Email account provided by your lab hosting provider and then select Next.
-
In the Enter password dialog box, copy, and paste in the Tenant Password provided by your lab hosting provider and then select Sign in.
-
Select + Create a Resource. Hint: If you were already in the Azure portal, you might need to select Microsoft Azure from the top bar to go Home.
-
In the Search services and marketplace box, enter Windows 11 and select Windows 11 from the drop-down list.
-
Select the box for Windows 11.
-
Open the Plan drop-down list and select Windows 11 Enterprise, version 23H2.
-
Select Start with a pre-set configuration to continue.
-
Select Dev/Test and then select Continue to create a VM.
-
Select Create new for Resource group, enter RG-AZWIN01 as Name and, select OK.
Note: This will be a new resource group for tracking purposes.
-
In Virtual machine name, enter AZWIN01.
-
Leave (US) East US as the default value for Region.
-
Scroll down and review the Image for the virtual machine. If it appears empty, select Windows 11 Enterprise, version 23H2.
-
Review the Size for the virtual machine. If it appears empty, select See all sizes, choose the first (D-series) VM size listed and select Select.
Note: If you see the message: This image is not supported for Azure Automanage. To disable this feature,navigate to the Management tab. Otherwise, select a supported image. Go to the Management tab and disable “Automanage”. The creation process will succeed afterwards.
-
Scroll down and enter a Username of your choosing. Hint: Avoid reserved words like admin or root.
-
Enter a Password of your choosing. Hint: It might be easier to reuse your LabUser password. It can be found in the resources tab. You may need to enter it twice.
-
Scroll down to the bottom of the page and select the checkbox below Licensing to confirm you have the eligible license.
-
Select Review + create and wait until the validation is passed.
Note: If there is a Networking validation failure, select that tab, review its contents and then select Review + create again.
-
Select Create. Wait for the Resource to be created, this may take a few minutes.
Task 2: Connect an on-premises Server to Azure
In this task, you connect an on-premises server to your Azure subscription. Azure Arc was preinstalled on this server. The server will be used in next exercises to run simulated attacks that you’ll later detect and investigate in Microsoft Sentinel.
Important: The next steps are done on a different machine than the one you were previously working.
-
Log in to WINServer virtual machine as Administrator with the password: Passw0rd! if necessary.
Note: As described above, Azure Arc has been pre-installed on the WINServer machine. You will now connect this machine to your Azure subscription.
-
On the WINServer machine, select the search icon and type cmd.
-
In search results right click Command Prompt and select Run as administrator.
-
In the Command Prompt window, type the following command. Do not press enter:
azcmagent connect -g "defender-RG" -l "EastUS" -s "Subscription ID string" -
Replace the Subscription ID string with the Subscription ID provided by your lab hoster (*Resources tab). Make sure to keep the quotes.
-
Type Enter to run the command (this may take a couple minutes).
Note: If you see the How do you want to open this? browser selection window, select Microsoft Edge.
-
In the Sign in dialog box, enter your Tenant Email and Tenant Password provided by your lab hosting provider and select Sign in. Wait for the Authentication complete message, close the browser tab and return to the Command Prompt window.
-
When the commands complete running, leave the Command Prompt window open and type the following command to confirm that the connection was successful:
azcmagent show -
In the command output, verify that Agent status is Connected.
Task 3: Connect an Azure Windows virtual machine
In this task, you connect an Azure Windows virtual machine to Microsoft Sentinel.
Note: Microsoft Sentinel has been predeployed in your Azure subscription with the name defenderWorkspace, and the required Content Hub solutions have been installed.
-
Login to WIN1 virtual machine as Admin with the password: Pa55w.rd.
-
If necessary, open the Microsoft Edge browser, navigate to the Azure portal at https://portal.azure.com, and sign in with the provided credentials.
-
In the Search bar of the Azure portal, type Sentinel, then select Microsoft Sentinel.
-
Select the Microsoft Sentinel defenderWorkspace.
-
In the Microsoft Sentinel left navigation menu, scroll down to the Content management section and select Content Hub.
-
In the Content hub, search for the Windows Security Events solution and select it from the list.
-
On the Windows Security Events solution page select Manage.
Note: The Windows Security Events solution installs both the Windows Security Events via AMA and the Security Events via Legacy Agent Data connectors. Plus 2 Workbooks, 20 Analytic Rules, and 43 Hunting Queries.
-
Select the Windows Security Events via AMA Data connector, and select Open connector page on the connector information blade.
-
In the Configuration section, select the +Create data collection rule button.
-
Enter AZWINDCR for Rule Name, then select Next: Resources.
-
Expand your MOC Subscription under Scope on the Resources tab.
Hint: You can expand the whole Scope hierarchy by selecting the “>” before the Scope column.
-
Expand RG-AZWIN01, then select AZWIN01.
-
Select Next: Collect.
-
Review the different Security Event collection option. Keep All Security Events and then select Next: Review + create.
-
Select Create to save the Data Collection Rule.
-
Wait a minute and then select Refresh to see the new data collection rule listed.
Task 4: Connect a non-Azure Windows Machine
In this task, you’ll add an Azure Arc connected, non-Azure Windows virtual machine to Microsoft Sentinel.
Note: The Windows Security Events via AMA data connector requires Azure Arc for non-Azure devices.
-
Make sure you are in the Windows Security Events via AMA data connector configuration in your Microsoft Sentinel workspace.
-
In the Configuration section, edit the AZWINDCR data collection rule by selecting the pencil icon.
-
Select Next: Resources, and expand your MOC Subscription under Scope on the Resources tab.
Hint: You can expand the whole Scope hierarchy by selecting the “>” before the Scope column.
-
Expand defender-RG (or the Resource Group your created), then select WINServer.
Important: If you do not see WINServer, please refer to the Learning Path 3, Exercise 1, Task 4 where you installed Azure Arc in this server.
-
Select Next: Collect, then Next: Review + create.
-
Select Create after Validation passed is displayed.