Learning Path 7 - Lab 1 - Exercise 3 - Connect Linux hosts to Microsoft Sentinel using data connectors
Lab scenario
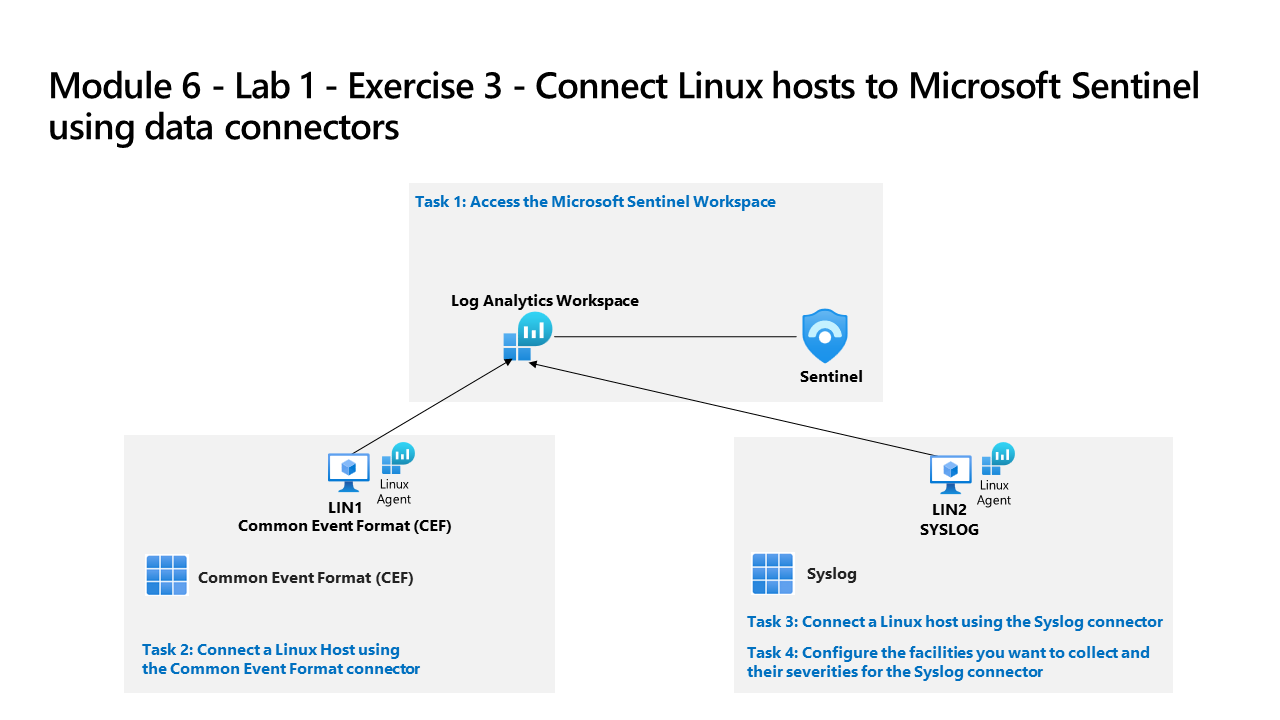
You are a Security Operations Analyst working at a company that implemented Microsoft Sentinel. You must learn how to connect log data from the many data sources in your organization. This includes data sources from Linux virtual machines using the Common Event Format (CEF) via AMA and Syslog via Legacy Agent data connectors.
Important: The lab exercises for Learning Path #7 are in a standalone environment. If you exit the lab before completing it, you will be required to re-run the configurations again.
Estimated time to complete this lab: 30 minutes
Important: There are steps within the next Tasks that are done in different virtual machines. Look for the Virtual Machine name references.
Task 1: Access the Microsoft Sentinel Workspace
In this task, you’ll access your Microsoft Sentinel workspace.
Note: Microsoft Sentinel has been predeployed in your Azure subscription with the name sentinelworkspace-01, and the required Content Hub solutions have been installed.
-
Log in to WIN1 virtual machine as Admin with the password: Pa55w.rd.
-
Open the Microsoft Edge browser.
-
In the Edge browser, navigate to Defender XDR at
https://security.microsoft.com. -
In the Sign in dialog box, copy, and paste in the Tenant Email account provided by your lab hosting provider and then select Next.
-
In the Enter password dialog box, copy, and paste in the Tenant Password provided by your lab hosting provider and then select Sign in.
Note: You may be prompted to enter the Temporary Access Pass (TAP) instead of a password. This is also provided in the resources tab. If prompted, copy and paste the TAP value and select Sign in.
Task 2: Connect a Linux Host using the Common Event Format connector
In this task, you will connect a Linux host to Microsoft Sentinel with the Common Event Format (CEF) via AMA data connector. You will also create a Data Collection Rule (DCR) to collect the events. Azure Arc was pre-installed on this Linux host as required for creating a DCR.
-
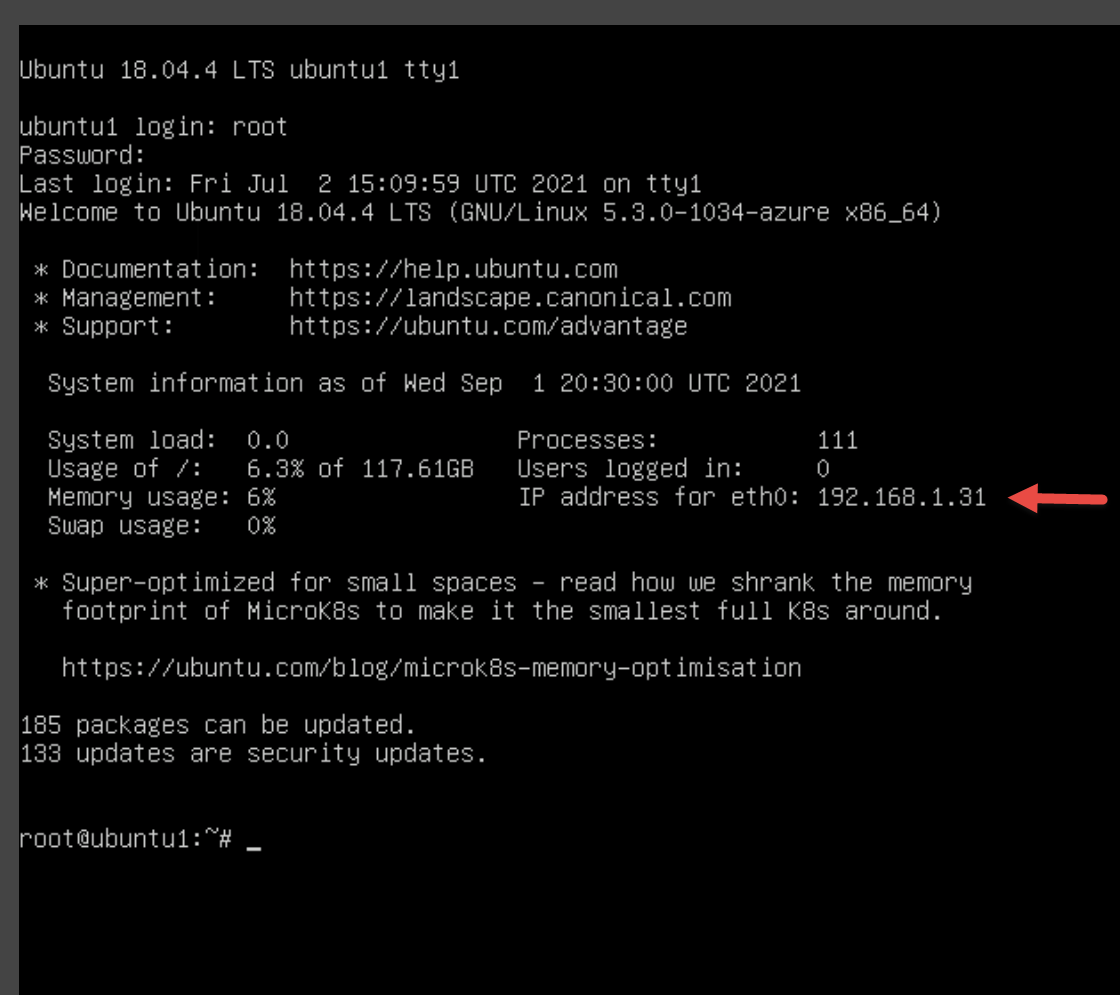
Launch your LIN1 virtual machine. Login with the username and password provided by your lab hoster. Hint: You might need to press the Enter key to see the login prompt, and it is a good idea to write down the Username and Password.
-
Note the IP address for your LIN1 server. See the screenshot below as an example:
-
Go back to the WIN1 virtual machine. Start the Microsoft Edge browser.
-
Launch Windows PowerShell by typing Windows PowerShell in the Search form in the Taskbar, and then select Windows PowerShell.
-
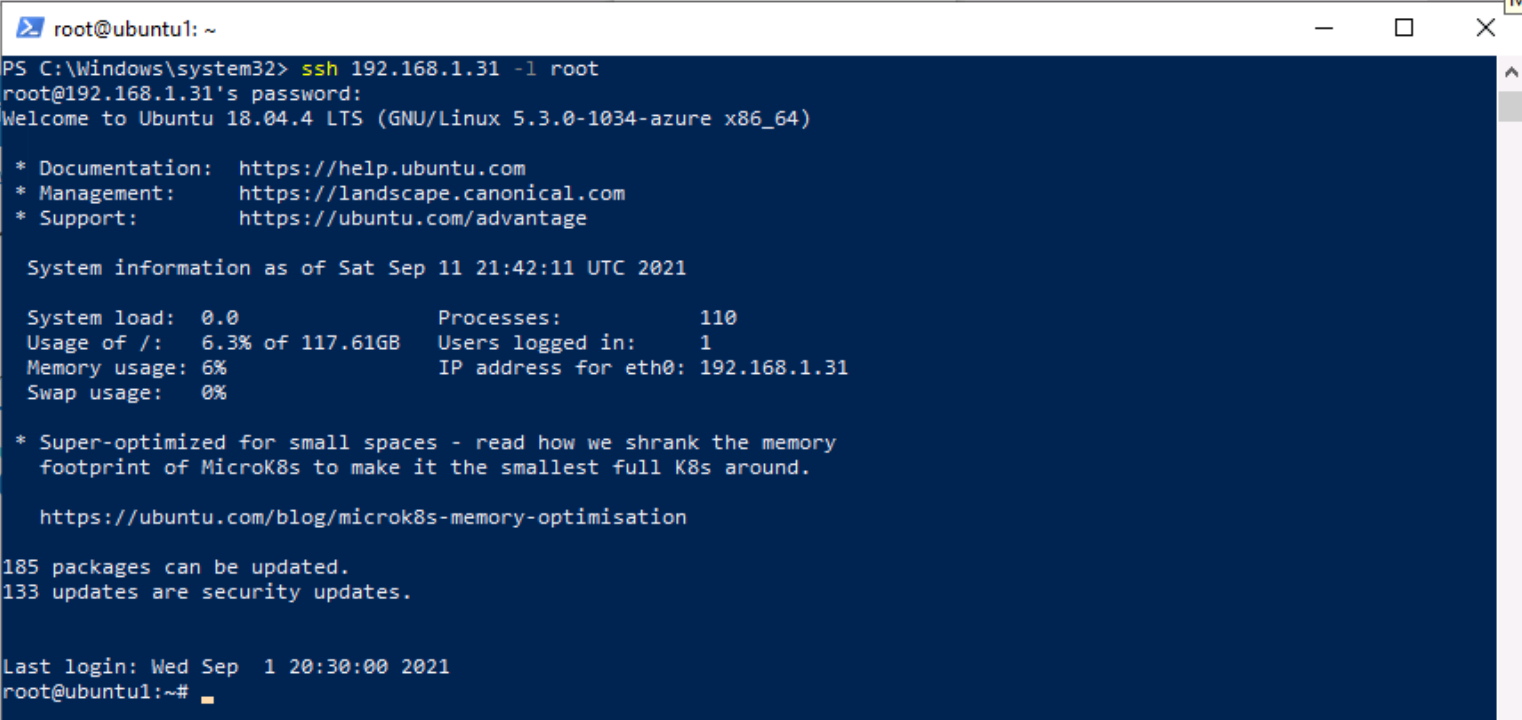
Enter the following PowerShell command, adjusting for your specific Linux server information, and press enter:
ssh insert-your-linux-IP-address-here -l insert-linux-user-name-here -
Enter yes to confirm the connection and then type the user’s password and press enter. Your screen should look something like this:
-
In the SSH session, at the linux prompt, type the following command. Do not press enter:
azcmagent connect -g "SentinelStatic" -l "CentralUS" -s "Subscription ID string" -
Replace the Subscription ID string with the Subscription ID provided by your lab hoster (*Resources tab). Make sure to keep the quotes.
-
Type Enter to run the command (this may take a couple minutes).
-
In the To sign in, use a web browser to open the page https://microsoft.com/devicelogin and enter the code message, Ctrl+Click the link to open the device login page. Copy the code provided and paste it into the Enter code to allow access box and select Next.

-
In the Pick an account dialog box, select your Tenant Email provided by your lab hosting provider. Wait for the Authentication complete message, close the browser tab and return to the Command Prompt window. Or, if you see the Sign in dialog box, enter your Tenant Email and Tenant Password provided by your lab hosting provider and select Sign in. Wait for the Authentication complete message, close the browser tab and return to the Command Prompt window.
-
When the commands complete running, leave the Command Prompt window open and type the following command to confirm that the connection was successful:
azcmagent show -
In the command output, verify that Agent status is Connected. Do not close the PowerShell Command Prompt window yet.
-
Start the Microsoft Edge browser.
-
In the Edge browser, navigate to Defender XDR at
https://security.microsoft.com. -
In the Sign in dialog box, copy, and paste in the Tenant Email account provided by your lab hosting provider and then select Next.
-
In the Enter password dialog box, copy, and paste in the Tenant Password provided by your lab hosting provider and then select Sign in.
Note: You may be prompted to enter the Temporary Access Pass (TAP) instead of a password.
-
In the Microsoft Defender navigation menu, scroll down and expand the Microsoft Sentinel section.
-
Expand the Content management section and select Content Hub.
-
In the Content hub, search for the Common Event Format solution and select it from the list.
-
On the Common Event Format solution page select Manage.
Note: The Common Event Format solution installs both the Common Events Format (CEF) via AMA and the Common Events Format (CEF) via Legacy Agent Data connectors.
-
Select the Common Events Format (CEF) via AMA Data connector, and select Open connector page on the connector information blade.
-
In the Configuration section, select the +Create data collection rule button.
Important: You need to enter a unique name for the Rule Name, consider using your Student username number, for example, AZLINxxxxxxxxDCR.
-
On the Create data collection rule page, Basic tab, enter AZLINxxxxxxxxDCR for Rule Name, then select Next: Resources.
-
On the Resources tab, expand your MOC Subscription under Scope.
Hint: You can expand the whole Scope hierarchy by selecting the “>” before the Scope column.
-
Expand SentinelStatic, then select LIN1.
Note: You’re LIN1 virtual machine may appear with a different name, like ubuntuxxx.
-
Select Next: Collect. In the Collect tab, select the LOG_ALERT drop-down menu, and select LOG_WARNING.
-
Select Next: Review + create, and select Create. Wait for the deployment to finish.
Note: You may need to refresh the page.
-
The Common Event Format (CEF) via AMA Data connector should now show Connected.
-
The data collection rule installs the Azure Monitor Agent (AMA), and the The CEF collector install commands were pre-deployed on the LIN1 machine to install the CEF collector.
-
Return to the PowerShell Command Prompt window. You should still be connected to the LIN1 virtual machine.
-
At the linux prompt, type the following command, and press enter:
netstat -lnptv -
You should see the rsyslog (or syslog-ng) daemon listening on port 514.
Note: You can query the CommonSecurityLog table for CEF events.
-
Type exit to close the remote shell connection to LIN1.
Task 3: Connect a Linux host using the Syslog connector
In this task, you will connect a Linux host to Microsoft Sentinel with the Syslog connector.
-
Launch your LIN2 virtual machine. Login with the username and password provided by your lab hoster. Hint: You might need to press the Enter key to see the login prompt, and it is a good idea to write down the Username and Password.
-
Note the IP address for your LIN2 server. See the screenshot below as an example:
-
Go back to the WIN1 virtual machine. Start the Microsoft Edge browser.
-
Launch Windows PowerShell by typing Windows PowerShell in the Search form in the Taskbar, and then select Windows PowerShell.
-
Enter the following PowerShell command, adjusting for your specific Linux server information, and press enter:
ssh insert-your-linux-IP-address-here -l insert-linux-user-name-here -
Enter yes to confirm the connection and then type the user’s password and press enter. Your screen should look something like this:
-
In the SSH session, at the linux prompt, type the following command. Do not press enter:
azcmagent connect -g "SentinelStatic" -l "CentralUS" -s "Subscription ID string" -
Replace the Subscription ID string with the Subscription ID provided by your lab hoster (*Resources tab). Make sure to keep the quotes.
-
Type Enter to run the command (this may take a couple minutes).
-
In the To sign in, use a web browser to open the page https://microsoft.com/devicelogin and enter the code message, Ctrl+Click the link to open the device login page. Copy the code provided and paste it into the Enter code to allow access box and select Next.
-
In the Pick an account dialog box, select your Tenant Email provided by your lab hosting provider. Wait for the Authentication complete message, close the browser tab and return to the Command Prompt window. Or, if you see the Sign in dialog box, enter your Tenant Email and Tenant Password provided by your lab hosting provider and select Sign in. Wait for the Authentication complete message, close the browser tab and return to the Command Prompt window.
Note: You may be prompted to enter the Temporary Access Pass (TAP) instead of a password.
-
When the commands complete running, leave the Command Prompt window open and type the following command to confirm that the connection was successful:
azcmagent show -
In the command output, verify that Agent status is Connected. Do not close the PowerShell Command Prompt window yet.
-
Leave the SSH session open, and go back to the WIN1 virtual machine.
-
Start the Microsoft Edge browser.
-
In the Microsoft Edge browser, navigate to the Microsoft Defender portal.
-
In the Sign in dialog box, copy, and paste in the Tenant Email account provided by your lab hosting provider and then select Next.
-
In the Enter password dialog box, copy, and paste in the Tenant Password provided by your lab hosting provider and then select Sign in.
Note: You may be prompted to enter the Temporary Access Pass (TAP) instead of a password.
-
In the Microsoft Defender navigation menu, scroll down and expand Microsoft Sentinel
-
In the Microsoft Sentinel navigation menus, scroll down to the Content management section and select Content Hub.
-
In the Content hub, search for the Syslog solution and select it from the list.
-
On the Syslog solution page select Manage.
Note: The Syslog solution installs two Syslog Data connector, 7 Analytics rules, 9 Hunting queries, 2 Parsers and 21 Workbooks.
-
Select the Syslog via AMA Data connector, and select Open connector page on the connector information blade
-
In the Configuration section, select +Create data collection rule.
Important: You need to enter a unique name for the Rule Name, consider using your Student username number, for example, AZLINxxxxxxxxDCR2.
-
On the Create data collection rule page, Basic tab, enter AZLINxxxxxxxxDCR2 for Rule Name, then select Next: Resources.
-
On the Resources tab, expand your MOC Subscription under Scope.
Hint: You can expand the whole Scope hierarchy by selecting the “>” before the Scope column.
-
Expand SentinelStatic, then select LIN2.
Note: You’re LIN2 virtual machine may appear with a different name, like ubuntuxxx.
-
Select Next: Collect. In the Collect tab, select the LOG_ALERT drop-down menu, and select LOG_WARNING.
-
Select Next: Review + create, and select Create. Wait for the deployment to finish.
-
The Syslog via AMA Data connector should now show Connected.
Note: You may need to refresh the page.
-
The data collection rule installs the Azure Monitor Agent (AMA), and the The AMA Forwarder install commands were pre-deployed on the LIN2 machine to install the AMA Forwarder.
-
Return to the PowerShell Command Prompt window. You should still be connected to the LIN2 virtual machine.
-
At the linux prompt, type the following command, and press enter:
netstat -lnptv -
You should see the rsyslog (or syslog-ng) daemon listening on port 514.
Note: You can query the Syslog table for Syslog events.
-
Type exit to close the remote shell connection to LIN2.