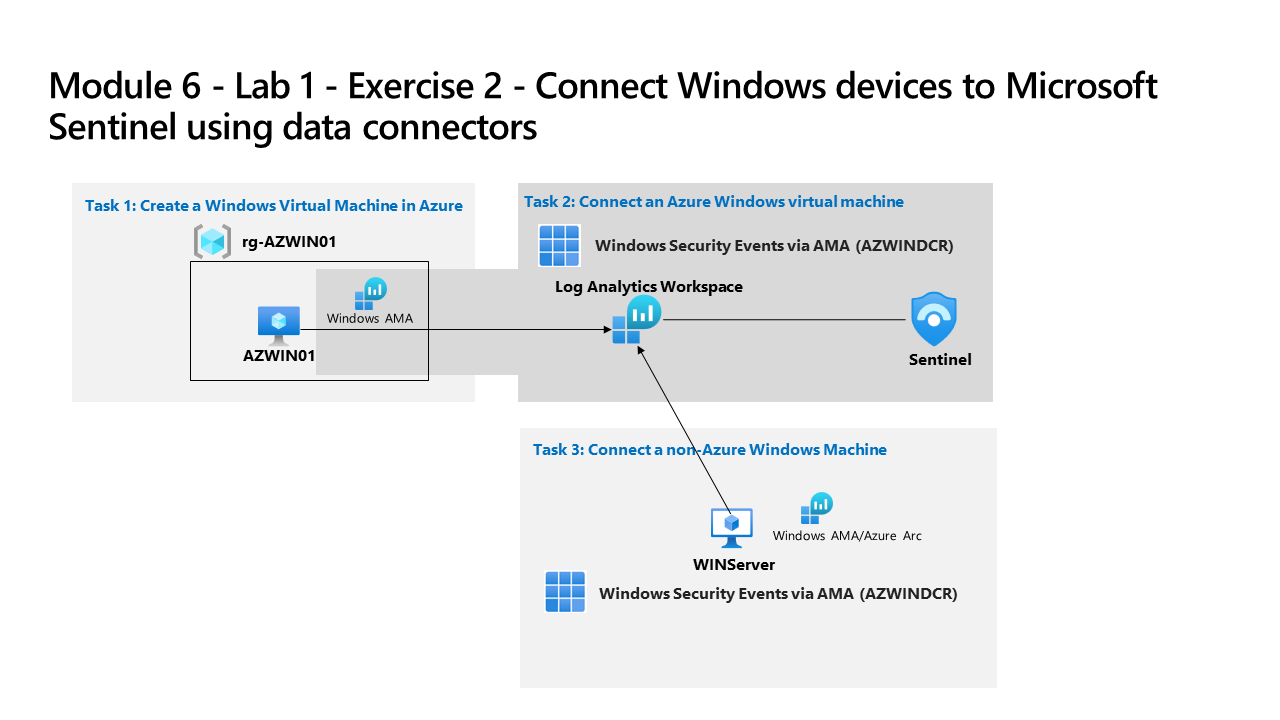
Learning Path 6 - Lab 1 - Exercise 2 - Connect Windows devices to Microsoft Sentinel using data connectors
Lab scenario
You’re a Security Operations Analyst working at a company that implemented Microsoft Sentinel. You must learn how to connect log data from the many data sources in your organization. The next source of data is Windows virtual machines inside and outside of Azure, like On-Premises environments or other Public Clouds.
Note: An interactive lab simulation is available that allows you to click through this lab at your own pace. You may find slight differences between the interactive simulation and the hosted lab, but the core concepts and ideas being demonstrated are the same.
Task 1: Create a Windows Virtual Machine in Azure
In this task, you’ll create a Windows virtual machine in Azure.
-
Login to WIN1 virtual machine as Admin with the password: Pa55w.rd.
-
In the Microsoft Edge browser, navigate to the Azure portal at https://portal.azure.com.
-
In the Sign in dialog box, copy, and paste in the Tenant Email account provided by your lab hosting provider and then select Next.
-
In the Enter password dialog box, copy, and paste in the Tenant Password provided by your lab hosting provider and then select Sign in.
-
Select + Create a Resource. Hint: If you were already in the Azure Portal, you might need to select Microsoft Azure from the top bar to go Home.
-
In the Search services and marketplace box, enter Windows 10 and select Microsoft Window 10 from the drop-down list.
-
Select the box for Microsoft Window 10.
-
Open the Plan drop-down list and select Windows 10 Enterprise, version 22H2.
-
Select Start with a pre-set configuration to continue.
-
Select Dev/Test and then select Continue to create a VM.
-
Select Create new for Resource group, enter RG-AZWIN01 as Name and select OK.
Note: This will be a new resource group for tracking purposes.
-
In Virtual machine name, enter AZWIN01.
-
Leave (US) East US as the default value for Region.
-
Scroll down and review the Image for the virtual machine. If it appears empty, select Windows 10 Enterprise, version 22H2.
-
Review the Size for the virtual machine. If it appears empty, select See all sizes, choose the first VM size under Most used by Azure users and select Select.
Note: If you see the message: This image is not supported for Azure Automanage. To disable this feature,navigate to the Management tab. Otherwise, select a supported image. Go to the Management tab and disable “Automanage”. The creation process will succeed afterwards.
-
Scroll down and enter a Username of your choosing. Hint: Avoid reserved words like admin or root.
-
Enter a Password of your choosing. Hint: It might be easier to re-use your tenant password. It can be found in the resources tab.
-
Scroll down to the bottom of the page and select the checkbox below Licensing to confirm you have the eligible license.
-
Select Review + create and wait until the validation is passed.
Note: If there is a Networking validation failure, select that tab, review its contents and then select Review + create again.
-
Select Create. Wait for the Resource to be created, this may take a few minutes.
Task 2: Connect an Azure Windows virtual machine
In this task, you’ll connect an Azure Windows virtual machine to Microsoft Sentinel.
-
In the Search bar of the Azure portal, type Sentinel, then select Microsoft Sentinel.
-
Select your Microsoft Sentinel Workspace you created earlier.
-
- In the Microsoft Sentinel left menus, scroll down to the Content management section and select Content Hub.
-
In the Content hub, search for the Windows Security Events solution and select it from the list.
-
On the Windows Security Events solution page select Install.
-
When the installation completes select Manage
Note: The Windows Security Events solution installs both the Windows Security Events via AMA and the Security Events via Legacy Agent Data connectors. Plus 2 Workbooks, 20 Analytic Rules, and 43 Hunting Queries.
-
Select the Windows Security Events via AMA Data connector, and select Open connector page on the connector information blade.
-
In the Configuration section, under the Instructions tab, select the Create data collection rule.
-
Enter AZWINDCR for Rule Name, then select Next: Resources.
-
Select +Add resource(s) to select the Virtual Machine we created.
-
Expand RG-AZWIN01, then select AZWIN01.
-
Select Apply and then select Next: Collect.
-
Review the different Security Event collection option. Keep All Security Events and then select Next: Review + create.
-
Select Create to save the Data Collection Rule.
- Wait a minute and then select Refresh to see the new data collection rule listed.
Task 3: Connect a non-Azure Windows Machine
In this task, you’ll add an Azure Arc connected, non-Azure Windows virtual machine to Microsoft Sentinel.
Note: The Windows Security Events via AMA data connector requires Azure Arc for non-Azure devices.
-
Make sure you are in the Windows Security Events via AMA data connector configuration in your Microsoft Sentinel workspace.
-
In the Instructions tab, under the Configuration section, edit the AZWINDCR data collection rule by selecting the pencil icon.
-
Select Next: Resources, and expand your Subscription under Scope on the Resources tab.
Hint: You can expand the whole Scope hierarchy by selecting the “>” before the Scope column.
-
Expand RG-Defender (or the Resource Group your created), then select WINServer.
Important: If you do not see WINServer, please refer to the Learning Path 3, Exercise 1, Task 4 where you installed Azure Arc in this server.
-
Select Apply.
-
Select Next: Collect, then Next: Review + create.
-
Select Create after Validation passed is displayed.